ServiceNow (Table API)
Integrate with and federate search to any ServiceNow Table using the Query Security Data Mesh Connector for ServiceNow
TL;DRTo integrate ServiceNow with Query:
- Create or identify an existing Integration (Machine) User.
- Create a new Role.
- Create new
READACLs for the Role - the minimum necessary required ACLs include:sys_db_object,sys_db_object.*,sys_dictionary,sys_dictionary.*,sys_glide_object, andsys_glide_object.*. Plus any other table (and relationship table) you wish to onboard.- Associate the Role with the Integration (Machine) user.
- Create a new
OAuth - Client credentials grantinbound integration (Application Registry) and set the Integration (Machine) User as its OAuth Application User. No user password is required.- Provide your ServiceNow URL, Client ID, Client Secret, (optional) Scope, and table name and use the Configure Schema no-code Wizard to map your SN table data into the Query Data Model/OCSF.
- Use Query Search to parallelize searches and surface details about CI classes, internal logs, or other table data for incident response (IR), threat hunting, investigations, and other security and observability use cases.
Overview
The ServiceNow Connector for the Query Security Data Mesh enables secure, federated access to your ServiceNow instance without centralizing or duplicating any data. It allows analysts to search, correlate, and analyze ServiceNow records (e.g., incidents, change requests, and assets) alongside telemetry and events from any other connected source, directly through the Query Security Data Mesh.
This Connector exposes ServiceNow’s structured tables (e.g., Incident, Task, Asset, and CMDB) as queryable datasets. Analysts can perform cross-domain investigations, enrich findings with contextual ticket or asset data, and build detections or dashboards that span identity, configuration, and operations data. All of this is possible while preserving ServiceNow’s native access controls and governance.
The Query Security Data Mesh data model is built around the Open Cybersecurity Schema Framework (OCSF) - named the Query Data Model (QDM) - which expresses all search intents with OCSF/QDM concepts such as Entities/Observables used to represent facts and indicators whereas Event Classes represent things that have happened and are normalized against network, application, file system, identity, and 1st party security findings. You will use Configure Schema (or our AI Assistant, Query CoPilot for Configure Schema) to map the source data into these constructs to facilitate federated search, detections, analytics, or otherwise.
Through this integration, Query automatically handles schema discovery, ACL-aware filtering, and parallelized query translation and search against ServiceNow’s Table API. Depending on how you mapped your Tables, this connector ensures that users can issue QDM-style searches, like...
- "Show me all Incidents that barbarasalazar is assigned to" →
QUERY incident_finding.** WITH incident_finding.assignee.name == 'barbarasalazar' - "Show me all business applications that were created by jonsmith or an admin" →
QUERY cloud_application_inventory_info.resources.** WITH cloud_application_inventory_info.actor.user.name == 'jonsmith' OR cloud_application_inventory_info.actor.user.name ICONTAINS 'admin' - "Show me all asset CIs that are running MacOS that aren't use Apple silicon" →
QUERY inventory_info.device.** WITH inventory_info.device.os.type_id = MACOS AND inventory_info.device.hw_info.cpu_architecture_id NOT = ARM
...that transparently resolve to the correct ServiceNow tables and fields without manual query building. Once configured, the Query Security Data Mesh treats ServiceNow as a first-class, federated source. This allows teams to investigate indicators of compromise, correlate vulnerabilities to CMDB assets, pivot from incidents to identity or endpoint data, and visualize relationships between ITSM and security datasets without exporting or ingesting records into another platform.
Authentication: OAuth 2.0 Client Credentials GrantThis Connector authenticates using the OAuth 2.0 Client Credentials Grant, ServiceNow's recommended standard for automated, system-to-system (machine-to-machine) integrations that operate independently of any user context. Query does not use Basic Authentication and does not store or transmit an integration user's password.
Because the integration runs as a non-human, machine identity, your service account will pass cleanly through ServiceNow's Machine Identity Console reviews rather than being flagged for legacy Basic Authentication - removing a common friction point during enterprise security reviews and aligning with modern zero-trust architectures.
Some details on searchesQuery authenticates directly against ServiceNow's OAuth token endpoint using the OAuth 2.0 Client Credentials Grant - ServiceNow's recommended standard for machine-to-machine integrations. To obtain an access token, Query executes an HTTP
POSTto your instance's/oauth_token.doendpoint with the following parameters:
Parameter Required Description grant_typeYes The OAuth 2.0 grant type. Always client_credentials.client_idYes Unique identifier for the client application (from your OAuth Application Registry). client_secretYes Secret associated with the Client ID (from your OAuth Application Registry). scopeOptional Requested permissions for the access token, e.g. incident_read incident_write.ServiceNow returns a bearer access token that Query attaches to every subsequent Table API request. No integration user password is ever exchanged, stored, or transmitted - the machine identity is resolved server-side via the OAuth Application User you associate with the Application Registry.
Token lifespan (TTL): The issued access token persists for the duration of your queries. ServiceNow's default access token lifespan is 1800 seconds (30 minutes), which is sufficient for the vast majority of queries. Query requests a fresh token as needed, so you never have to manage token rotation yourself.
To facilitate listing table schemas and filtering on columns, you must have
READACLs tosys_db_object,sys_db_object.*,sys_dictionary,sys_dictionary.*,sys_glide_object, andsys_glide_object.*at the very least. These ACLs provide metadata context (they do not expose business or personal data) and are required for accurate table introspection, type mapping, and federated query translation within Query.
Each ACL should be scoped to your dedicated integration role and limited to read operations only, in line with the principle of least privilege.Each Connector is mapped to EXACTLY ONE ServiceNow table and EXACTLY ONE QDM/OCSF Event Class. However, Entities are shared across them allow you to traverse tables irrespective of Event Class mappings by common Entities (e.g.,
User Name,Resource Name,IP Address) all without memorizing what field name and what table name, all in parallel.Federated Search Flow
- Schema Resolution: Fetch configured table’s schema from sys_dictionary including parent tables via recursive traversal of sys_db_object, plus retrieve sample data for field type inference
- Configure Schema: Map OCSF entity attributes to ServiceNow table columns using the schema information and sample data (performed by the user in go.query UI)
- Search Translation: Convert OCSF search predicates to ServiceNow encoded query format using discovered schema and field mappings
- Query Execution: Execute queries against the ServiceNow Table API using an OAuth 2.0 Client Credentials access token (bearer)
- Response Normalization: Transform ServiceNow results back to OCSF format using the same schema mappings
Details on Minimum Necessary ACLs
The required ACLs grant visibility into system metadata only and do not expose customer or PII data.
We recommend creating a dedicated integration role and assigning these ACLs to that role exclusively. This ensures the Query connector can resolve schemas safely while maintaining strict separation of duties and auditability. These are the same tables used internally by ServiceNow Studio, Schema Maps, and the REST Table API documentation generator. The permissions mirror what ServiceNow tooling itself requires for schema introspection.
| Table / Field | Purpose | Why It’s Needed |
|---|---|---|
| sys_db_object | Defines every table and its inheritance relationships. | Allows the connector to enumerate tables, determine parent/child structures, and understand how ServiceNow extends base tables (e.g., task → incident, cmdb_ci → cmdb_ci_computer). |
| sys_dictionary | Defines every field on every table. | Enables schema discovery — the connector can identify field names, labels, references, lengths, mandatory flags, and data types. |
| sys_glide_object | Contains the canonical definitions of all Glide field types used in ServiceNow. | sys_dictionary.type references this table. Without it, type values resolve to sys_id instead of friendly type names. |
| sys_glide_object.* | Field-level read access. | Allows retrieving the name and label of the Glide type reference (e.g., “glide_date_time”, “integer”, “string”). |
These ACLs expose structural metadata (table names, field definitions, data types) but not record data such as incidents, users, or configuration items. The integration only requires the read operation on these tables; it does not need create, update, or delete access which eliminates the risk of data modification. Additionally, standard ACL evaluation still applies; if a table or field has its own restrictions, those remain enforced.
The integration operates under the same audit and logging framework (syslog_transaction, sys_user_session), so all API activity is visible to administrators.
Prerequisites
Admin Permissions RequiredTo facilitate the creation of new Users, Roles, ACLs, and Inbound Integrations the following must be true
- You have access to an Administrator account.
- You can ELEVATE permissions to the
security_adminRole.- You have your scope set as GLOBAL.
- Your ServiceNow instance supports the inbound OAuth Client Credentials grant (System OAuth → Application Registry).
To connect your ServiceNow instance with Query Federated Search for the purpose of conducting searches across your tables you'll need to execute the following steps.
-
Login to your ServiceNow instance as an Administrator. Select your portrait on the upper-righthand corner of the screen, select Elevate role. From the pop-up, select
security_admin, and finally select Update to elevate your role to Security Admin, as shown below (FIG. 1).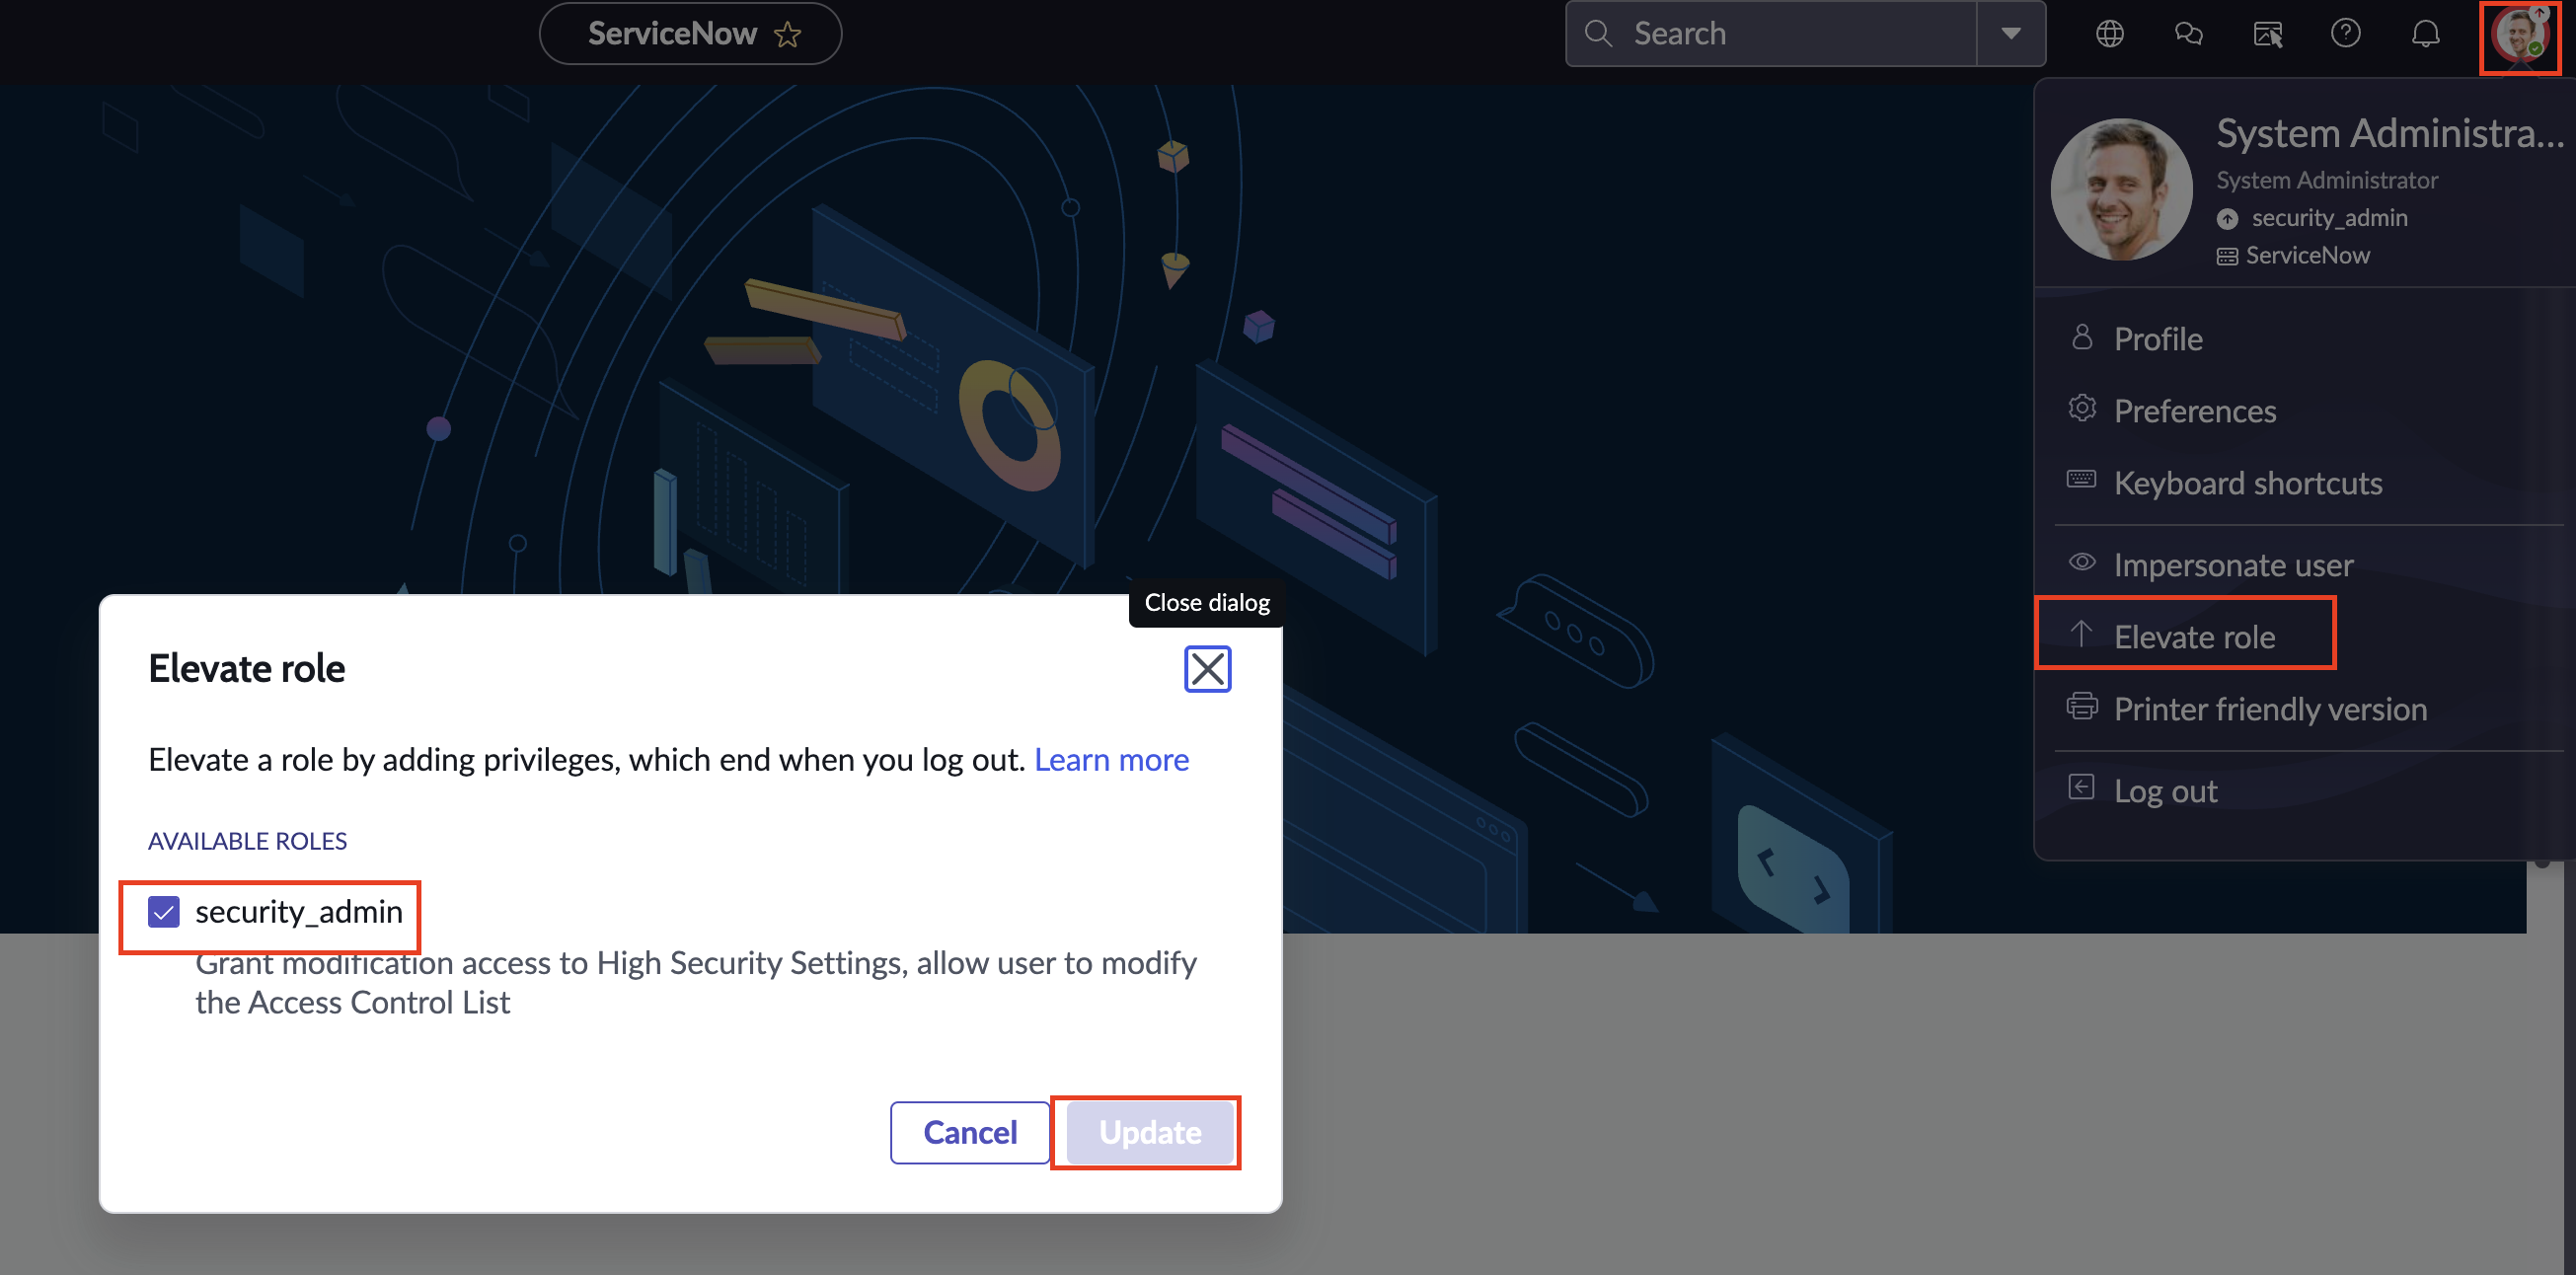
FIG. 1 - Elevating your role to Security Admin in the ServiceNow console
-
Again on the upper-righthand corner of your screen select the Application scope selector (pictured as a 2D globe of the Earth) and ensure that your Application scope is set to
Globalas shown below (FIG. 2).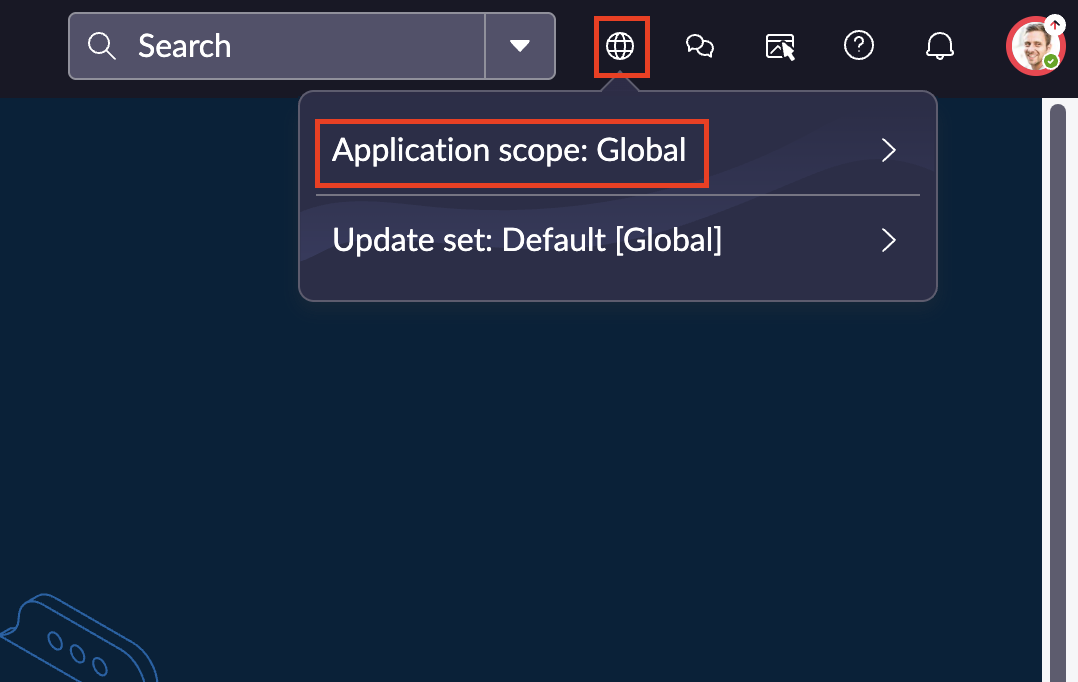
FIG. 2 - Ensuring Application scope is set to
Globalin the ServiceNow console -
Using the navigation menu, navigate to System Security → Users and Groups → Users. On the top-righthand corner of the screen select New and configure the following details, leaving all others the default value, as shown below (FIG. 3). Once you are done adding other organization-mandated details (given name, email, time zone, etc.) select Submit. This user is the machine identity the Client Credentials integration runs as — its roles and ACLs (configured in the next steps) define exactly what the connector can read. The Client Credentials grant never logs this user in, so you do not set or reset a password for it; it exists purely as the authorization principal for the OAuth token.
User ID: Use an easy to recognize pattern here, such asint_query_fs_userorintegration_query_connector.Active: Ensure this toggle is checked.Internal Integration User: Set this to CHECKED so the account is tracked as a non-human integration identity.Identity Type: Set this to Machine. This ensures the account is recognized as a machine identity in ServiceNow's Machine Identity Console.
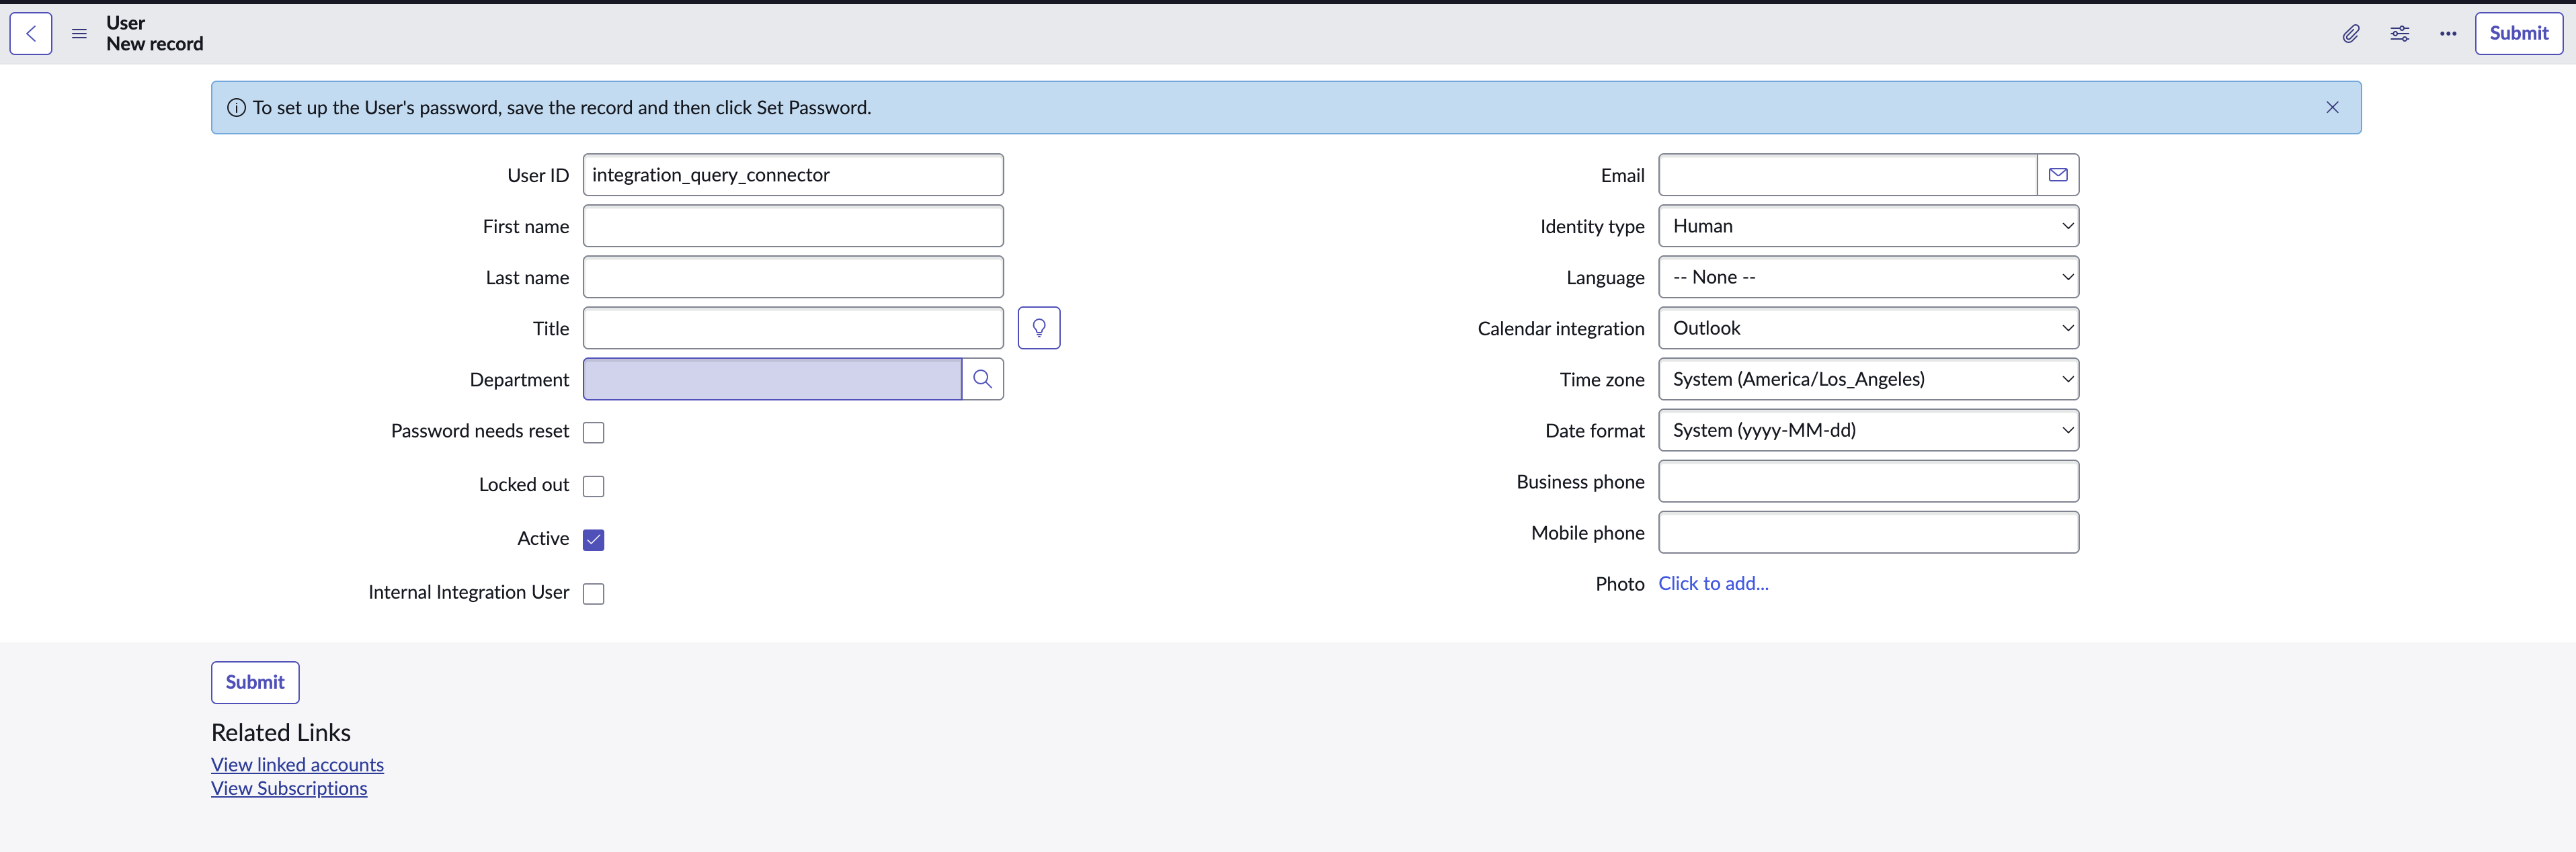
FIG. 3 - Configuring a new Integration User in the ServiceNow console.
-
Select the user your just created, and select Set Password → Generate → Save Password (be sure to vault this generated password, you'll need it later!). Once complete, toggle the
Password needs resetoption and select Update. Later on when you manually reset the password, this will allow you to override the nonlatin-1codec characters in the ServiceNow-generated password. -
Using the navigation menu, navigate to User Administration → Roles and select New on the upper-righthand of your screen. Provide a Name such as
x_queryfs_roleand select Submit on the upper-righthand corner as shown below (FIG. 4).
FIG. 4 - Creating a new Role in the ServiceNow console.
-
IMPORTANT NOTE: You will need to repeat this step multiple times for each table/meta table you need access to, in addition to the baseline requirements!! Using the navigation menu, navigate to System Security → Access Control (ACL). At the top-righthand corner select New to create a new ACL for the following meta tables:
sys_db_object,sys_db_object.*,sys_dictionary,sys_dictionary.*,sys_glide_object, andsys_glide_object.*. You will also need to addyour_tableandyour_table.*for other tables you'll need to federate with such asincident/incident.*orcmdb_ci_business_app/cmdb_ci_business_app.*.Type:recordOperation:readName: Your table name, such assys_dictionaryFields: This dropdown is not labeled, it's to the immediate right of theNamedropdown as show below (FIG. 5). Leave this blank for your first table, but you'll need to change the value to*for each table as an additional ACL!Description: Not required, but you can use the following convention, if needed:Grants x_queryfs_dynamic sys_dictionary READRequires role: In the Conditions subsection, enter the Role you created in Step 5.- Once complete, select Submit and then begin the flow again. Ensure you communicate with your ServiceNow CMDB Administrators for information on table flows and meta tables.
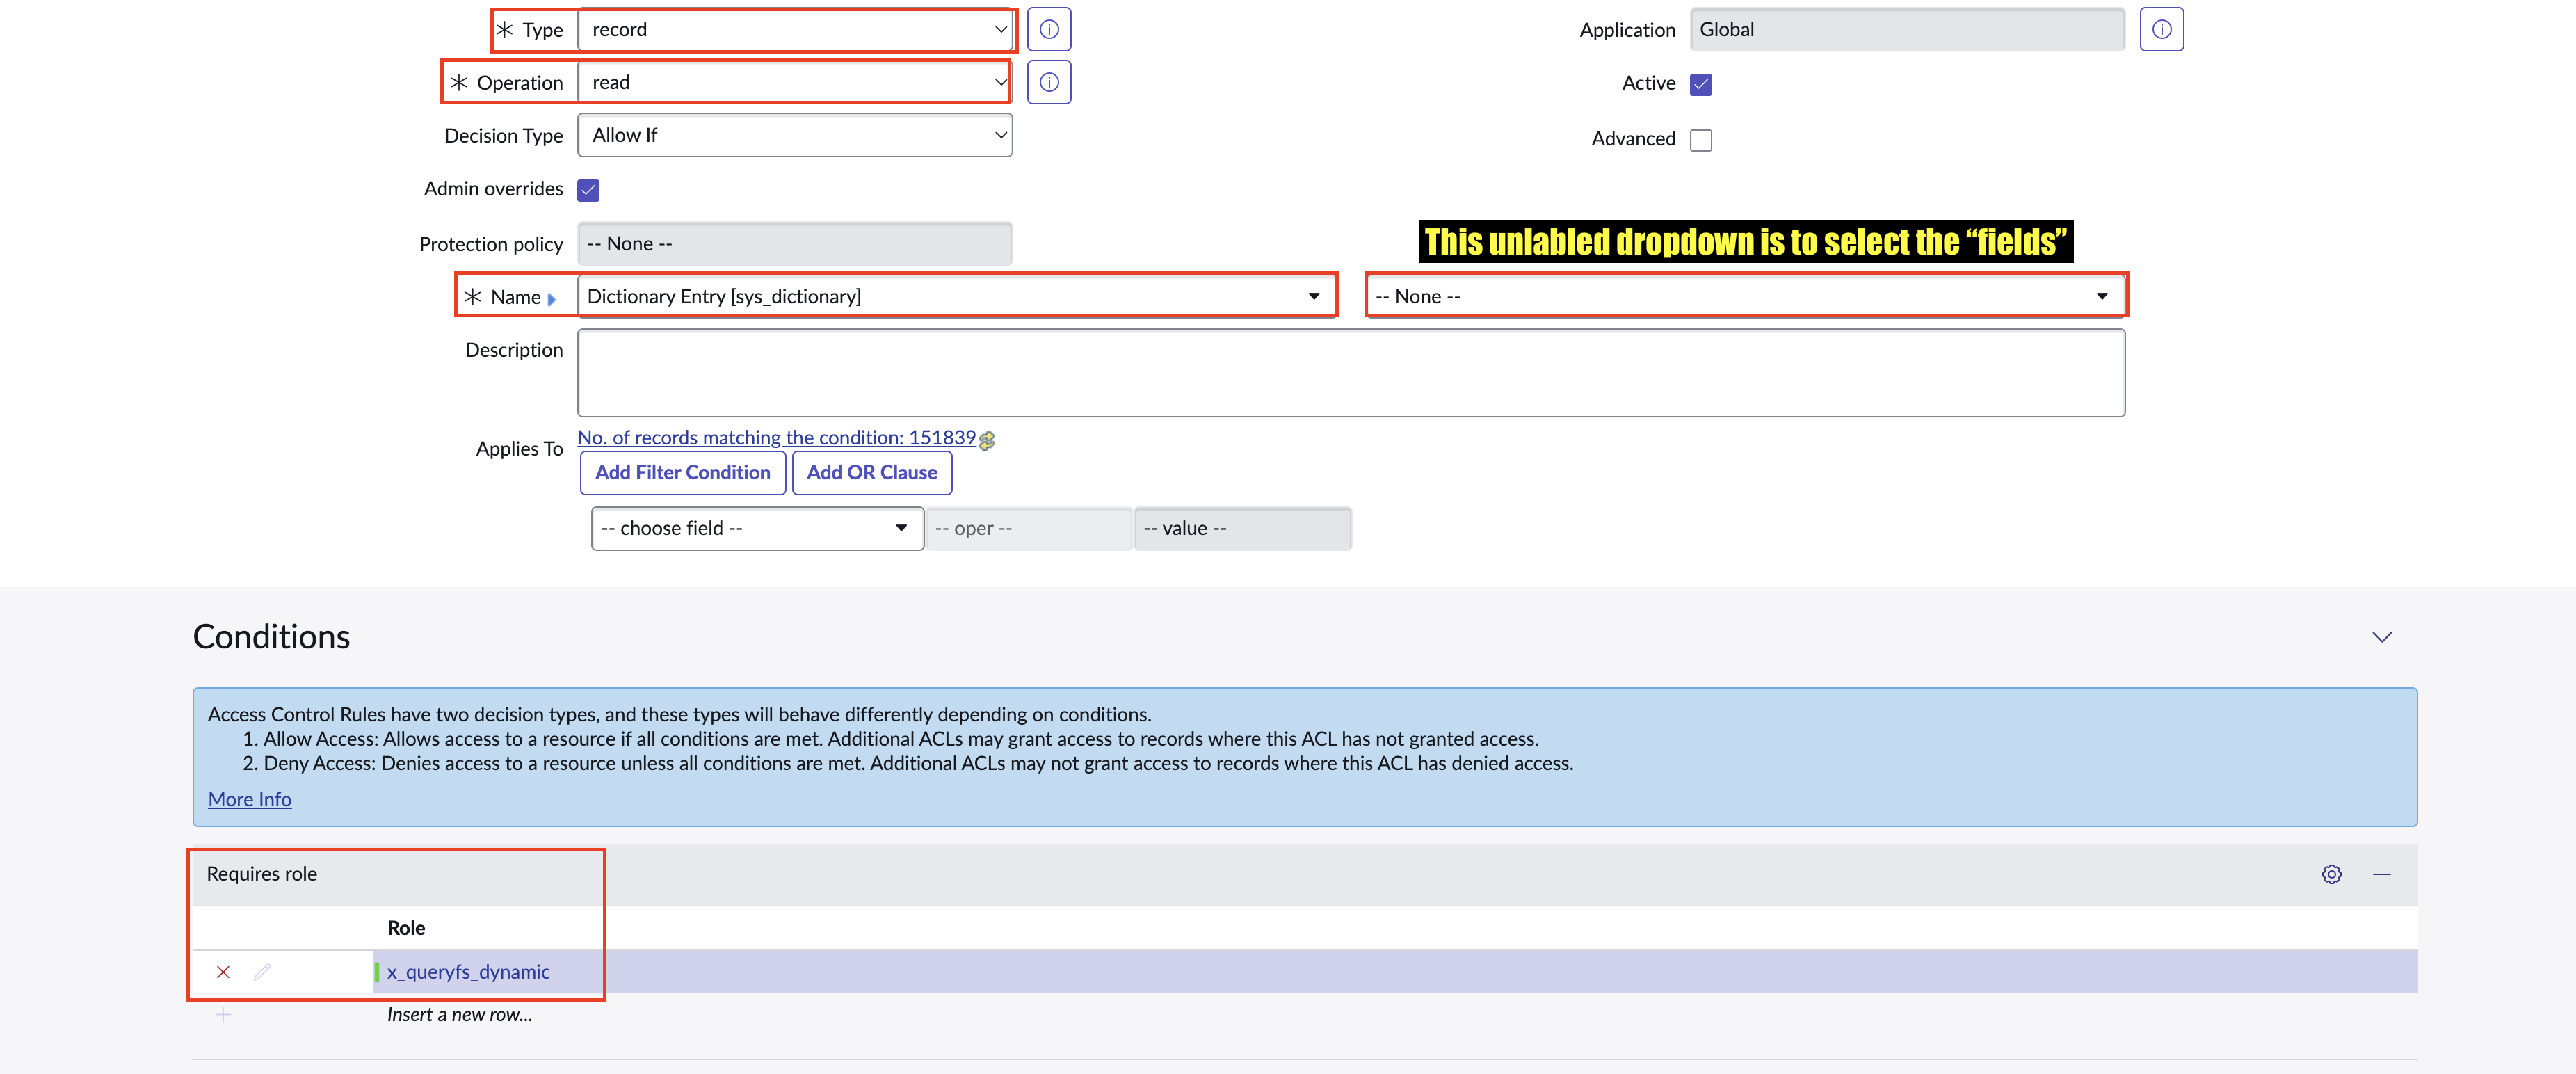
FIG. 5 - Creating and modifying table ACLs in the ServiceNow console.
Scenarios: ACLs and Tables
- In the case that you do not want to continue to manually create ACLs, consider adding a pre-built Role such as
itil,asset, orcmdb_readto your integration user.- For supporting CMDB tables that have multiple relationships, you will need to add
cmdb_rel_ci,cmdb_rel_ci.*,cmdb_model, andcmdb_model.*that give access to shared relationship and model data.- Business Applications require
cmdb_ci_business_appsandcmdb_ci_business_apps.*.- For Incidents (
incident), Change Management (change_request), Problem management (problem), and Service Catalog (sc_request&sc_req_tiem) you will need to also grant access totaskwhich is the parent for all work records and gives access to shared/common fields.- Device CIs:
cmdb_ci_computer.- Physical devices:
cmdb_ci_hardware.Be sure to communicate with your internal ServiceNow CMDB Administrators to determine the best layout of ACLs or blend of pre-built roles to use.
-
Navigate back to System Security → Users and Groups → Users and select the integration user created in Step 3. Scroll down to the Related Links section, select the Roles tab, and select Edit... on the righthand side of the panel to add a new Role, as shown below (FIG. 6).
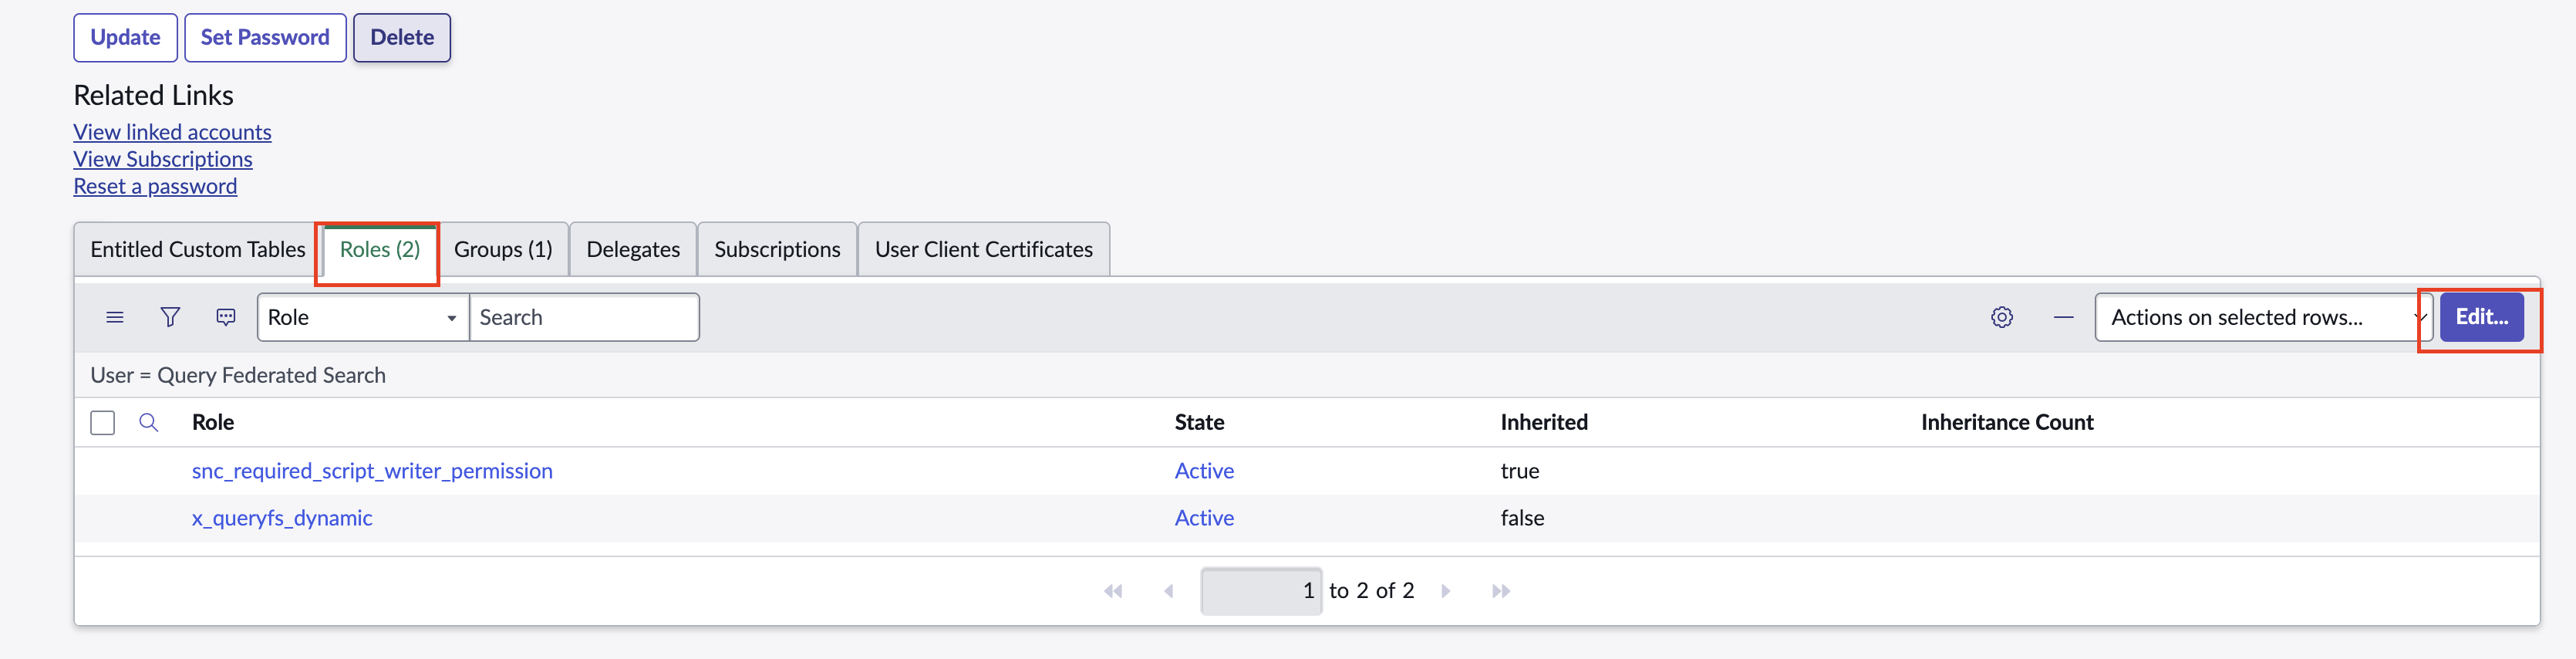
FIG. 6 - Navigating to the Role assignment panel for a User in the ServiceNow console.
-
Enter the name of your Role on the left-hand panel on this screen, select the role, and then select the
>button. You can add additional built-in Roles, and select Save when you are satisfied as shown below (FIG. 7).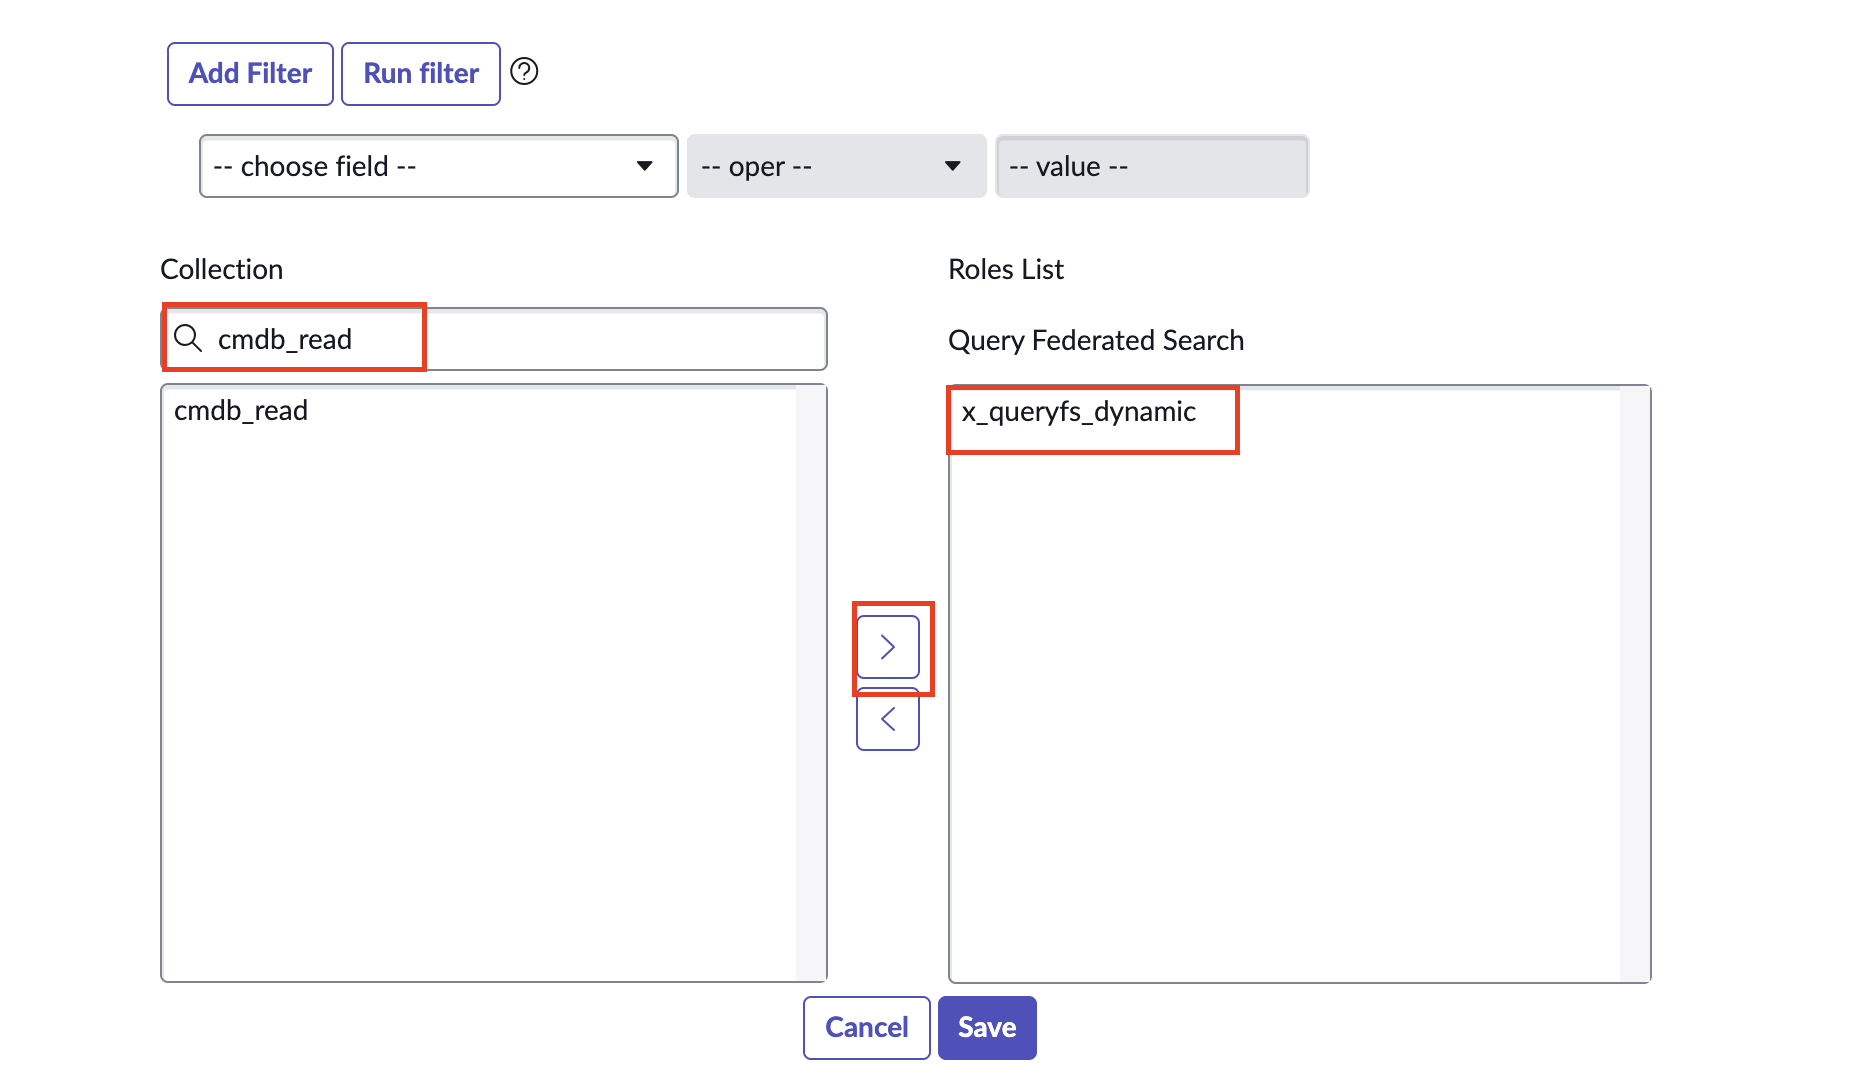
FIG. 7 - Using the Role selector widget to assign new Roles to a user in the ServiceNow console.
-
Using the navigation pane, navigate to System OAuth → Application Registry. On the top-righthand side of the screen select New, then select OAuth - Client credentials grant as shown below (FIG. 8).
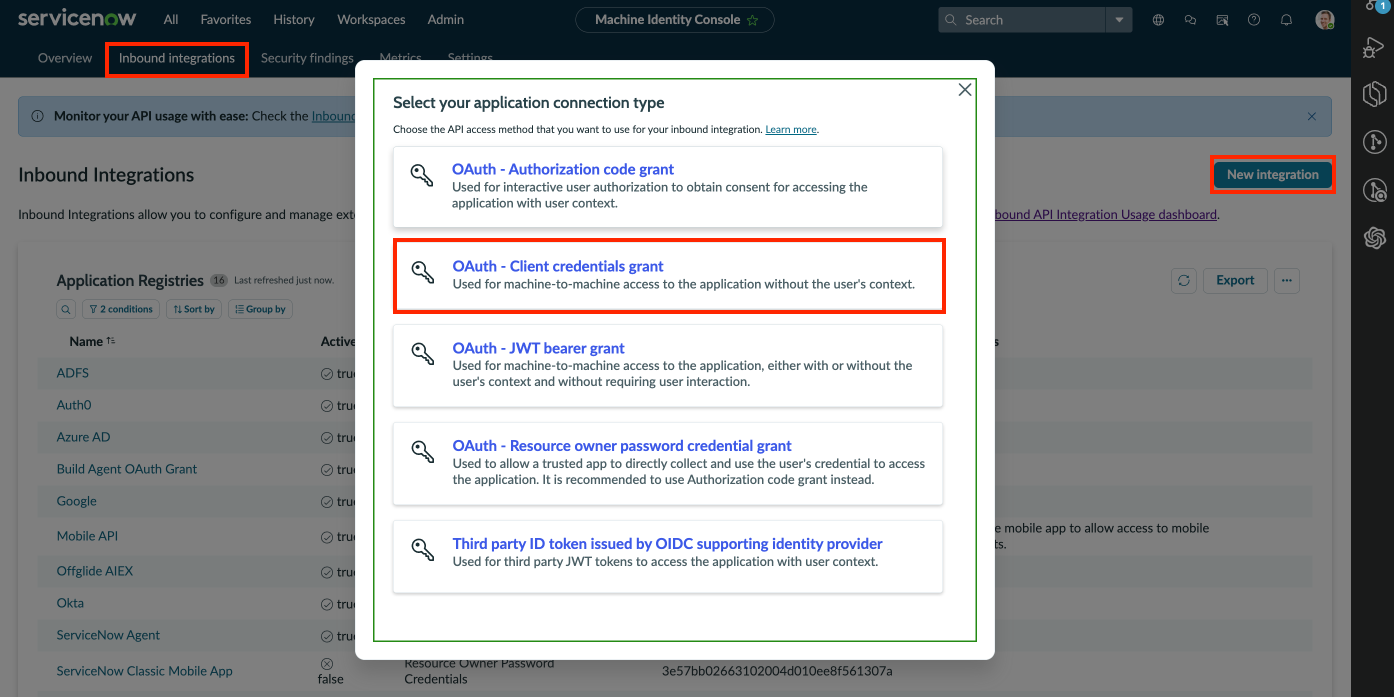
FIG. 8 - Creating a new OAuth integration client in the ServiceNow console.
-
Configure the OAuth client as follows, then select Submit/Save (FIG. 9):
-
Name: An easy-to-recognize name, such asQuery Federated Search. -
Grant type: Select Client Credentials. -
Client ID/Client Secret: Leave these blank - ServiceNow auto-generates both on save. After saving, open the record and copy and vault both values; you will need them for the Connector configuration. -
Public Client: Leave this UNCHECKED. The Client Credentials grant requires a confidential client. -
Refresh Token Lifespan/Access Token Lifespan: The Access Token Lifespan defaults to 1800 seconds (30 minutes), which persists for the duration of your queries and is sufficient for most workloads. You may increase it if you run unusually long queries, but the default is recommended. -
OAuth Application User: Set this to the Integration (Machine) User you created in Step 3. This is the identity the integration runs as - no user password is exchanged; ServiceNow resolves the machine identity server-side. (If this field is not visible on the form, use the record's context menu → Configure → Form Layout to add the OAuth Application User field.) -
Auth Scopes(optional): If you use scoped tokens, associate the REST API Auth Scopes your queries require (e.g.incident_read). This is optional; if omitted, the token receives the scopes available to the Application Registry.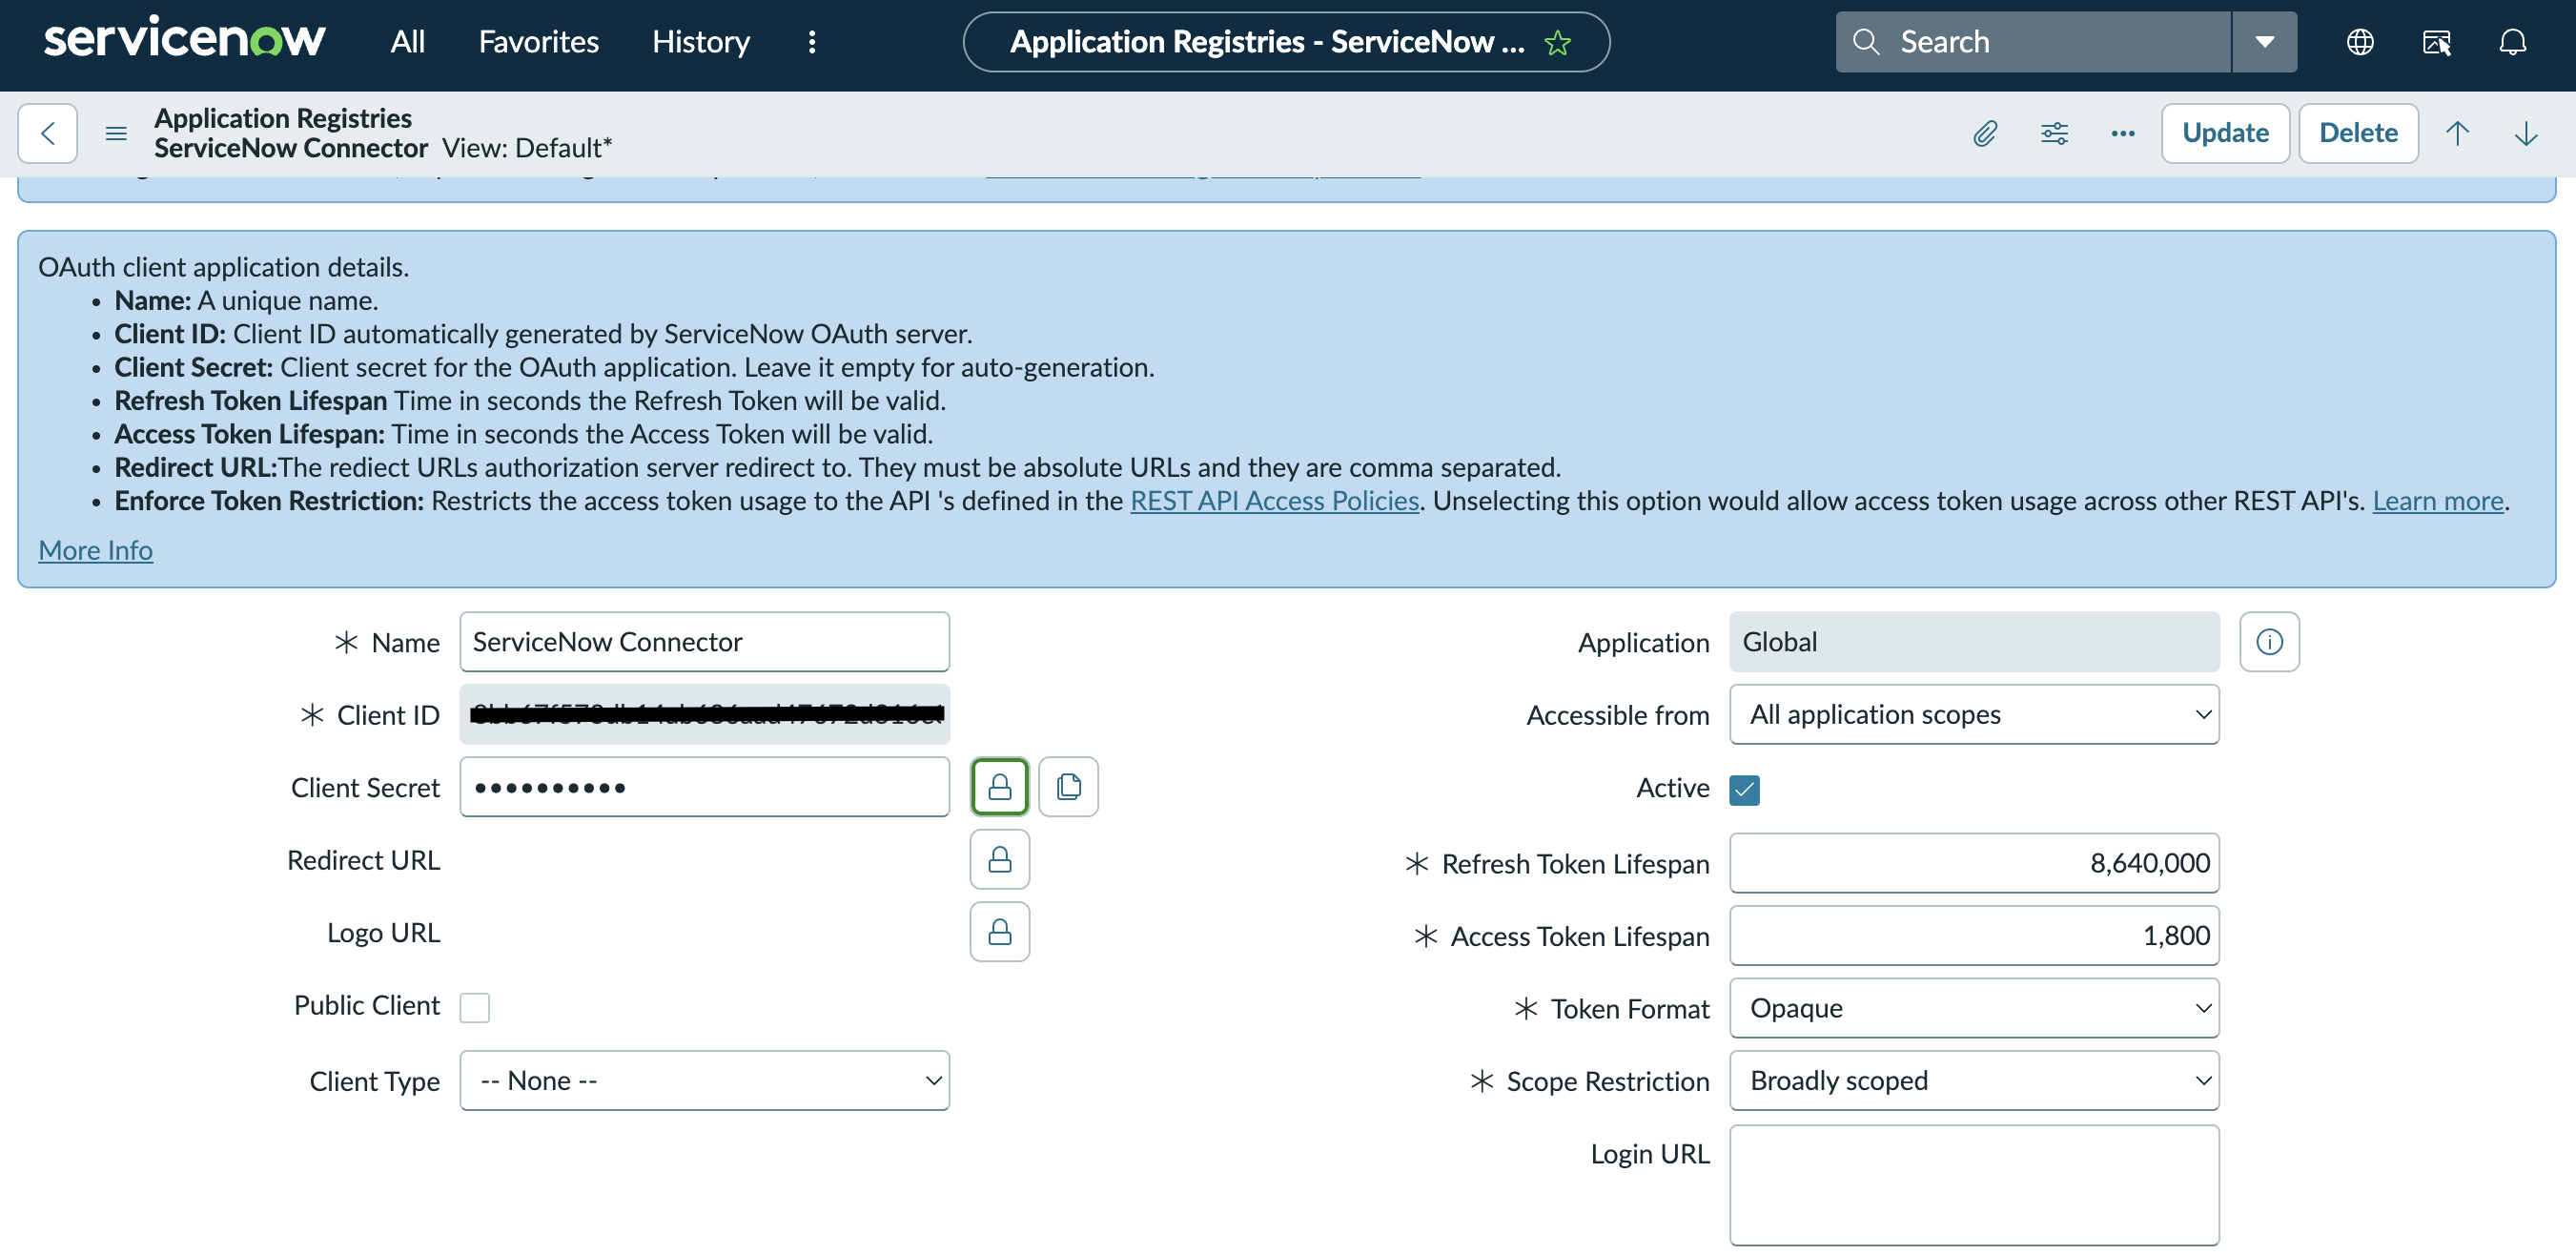
FIG. 9 - Final configuration of the OAuth Client in the ServiceNow console.
-
To learn how to configure a ServiceNow Connector, proceed to the next section. Ensure you have vaulted your ServiceNow URL, Client ID, and Client Secret (and any Scope) for usage in the Connector configuration.
On NHI securityNHI - or, Non-Human Identities - such as your OAuth Client Secret are extremely sensitive, especially with the
READACLs granted to the associated machine identity. Because the Client Credentials grant uses no user password, the Client Secret is the single credential you must protect. Query securely stores the Client Secret in a dedicated AWS Secrets Manager Secret per Connector per Tenant.Every copy is stored as securely as each other with minimum necessary permissions that only allows the specific piece of serverless infrastructure to retrieve the secret, it is never cached or persisted outside of the Secret. This does require you to continue to provide the credentials to each Connector, but they're all secured the same, and isolated from one another.
Setting up the ServiceNow Connector
Use the following steps to create a new Query Federated Search Connector for ServiceNow.
-
Navigate to the Connectors page, select Add Connector, and selectServiceNow from the
IT Service Managementcategory as shown below (FIG. 10). You can also search for ServiceNow using the search bar in the Add Connector page.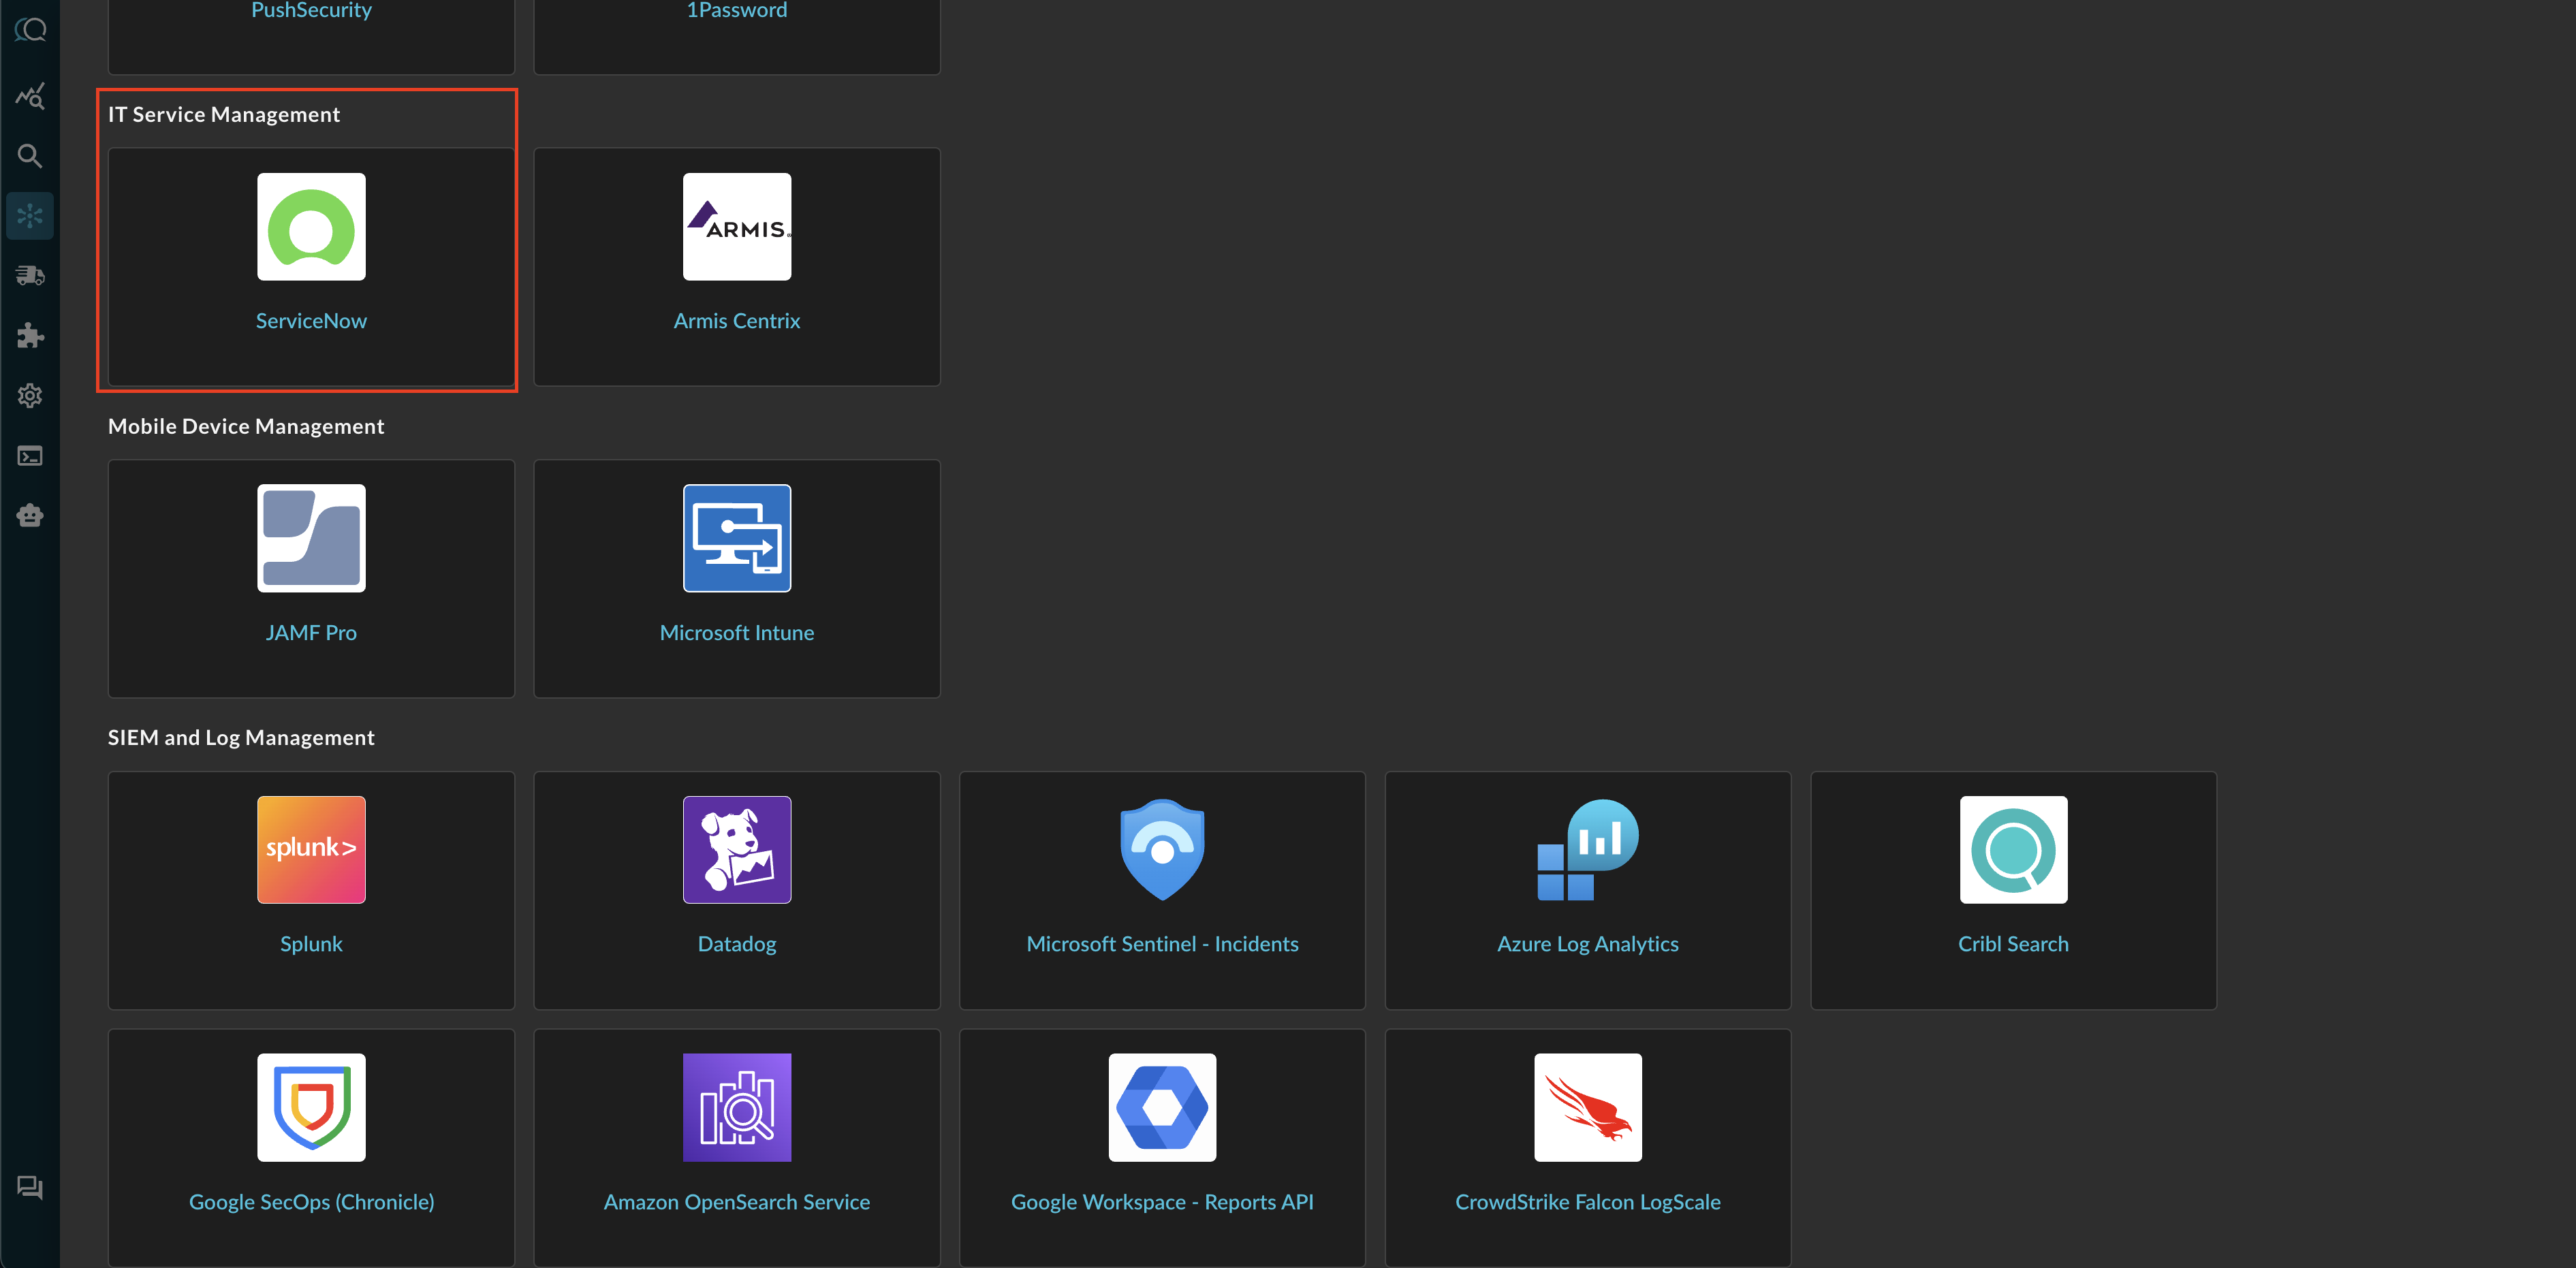
FIG. 10 - Locating the ServiceNow Connector in the Query Security Data Mesh console.
-
In the Configure Connector tab, add the following detail as shown below (FIG. 11):
- Connector Alias Name: The human-readable name you want to give to this connector, typically this should denote the source table name and any other information you wish to convey.
- ServiceNow URL: The base URL of your ServiceNow instance, such as
https://dev111222.service-now.com. Query issues the token request against this instance's/oauth_token.doendpoint. - Client ID: The Client ID for your OAuth Client, created in Step 10 of the Prerequisites section.
- OAuth Scope (optional): The scope(s) to request for the access token, such as
incident_read incident_write. Leave blank to use the scopes available to your Application Registry. - Table Name: The name of your ServiceNow table you want to search against, such as
incidents,internal_users, orcmdb_ci_business_apps.
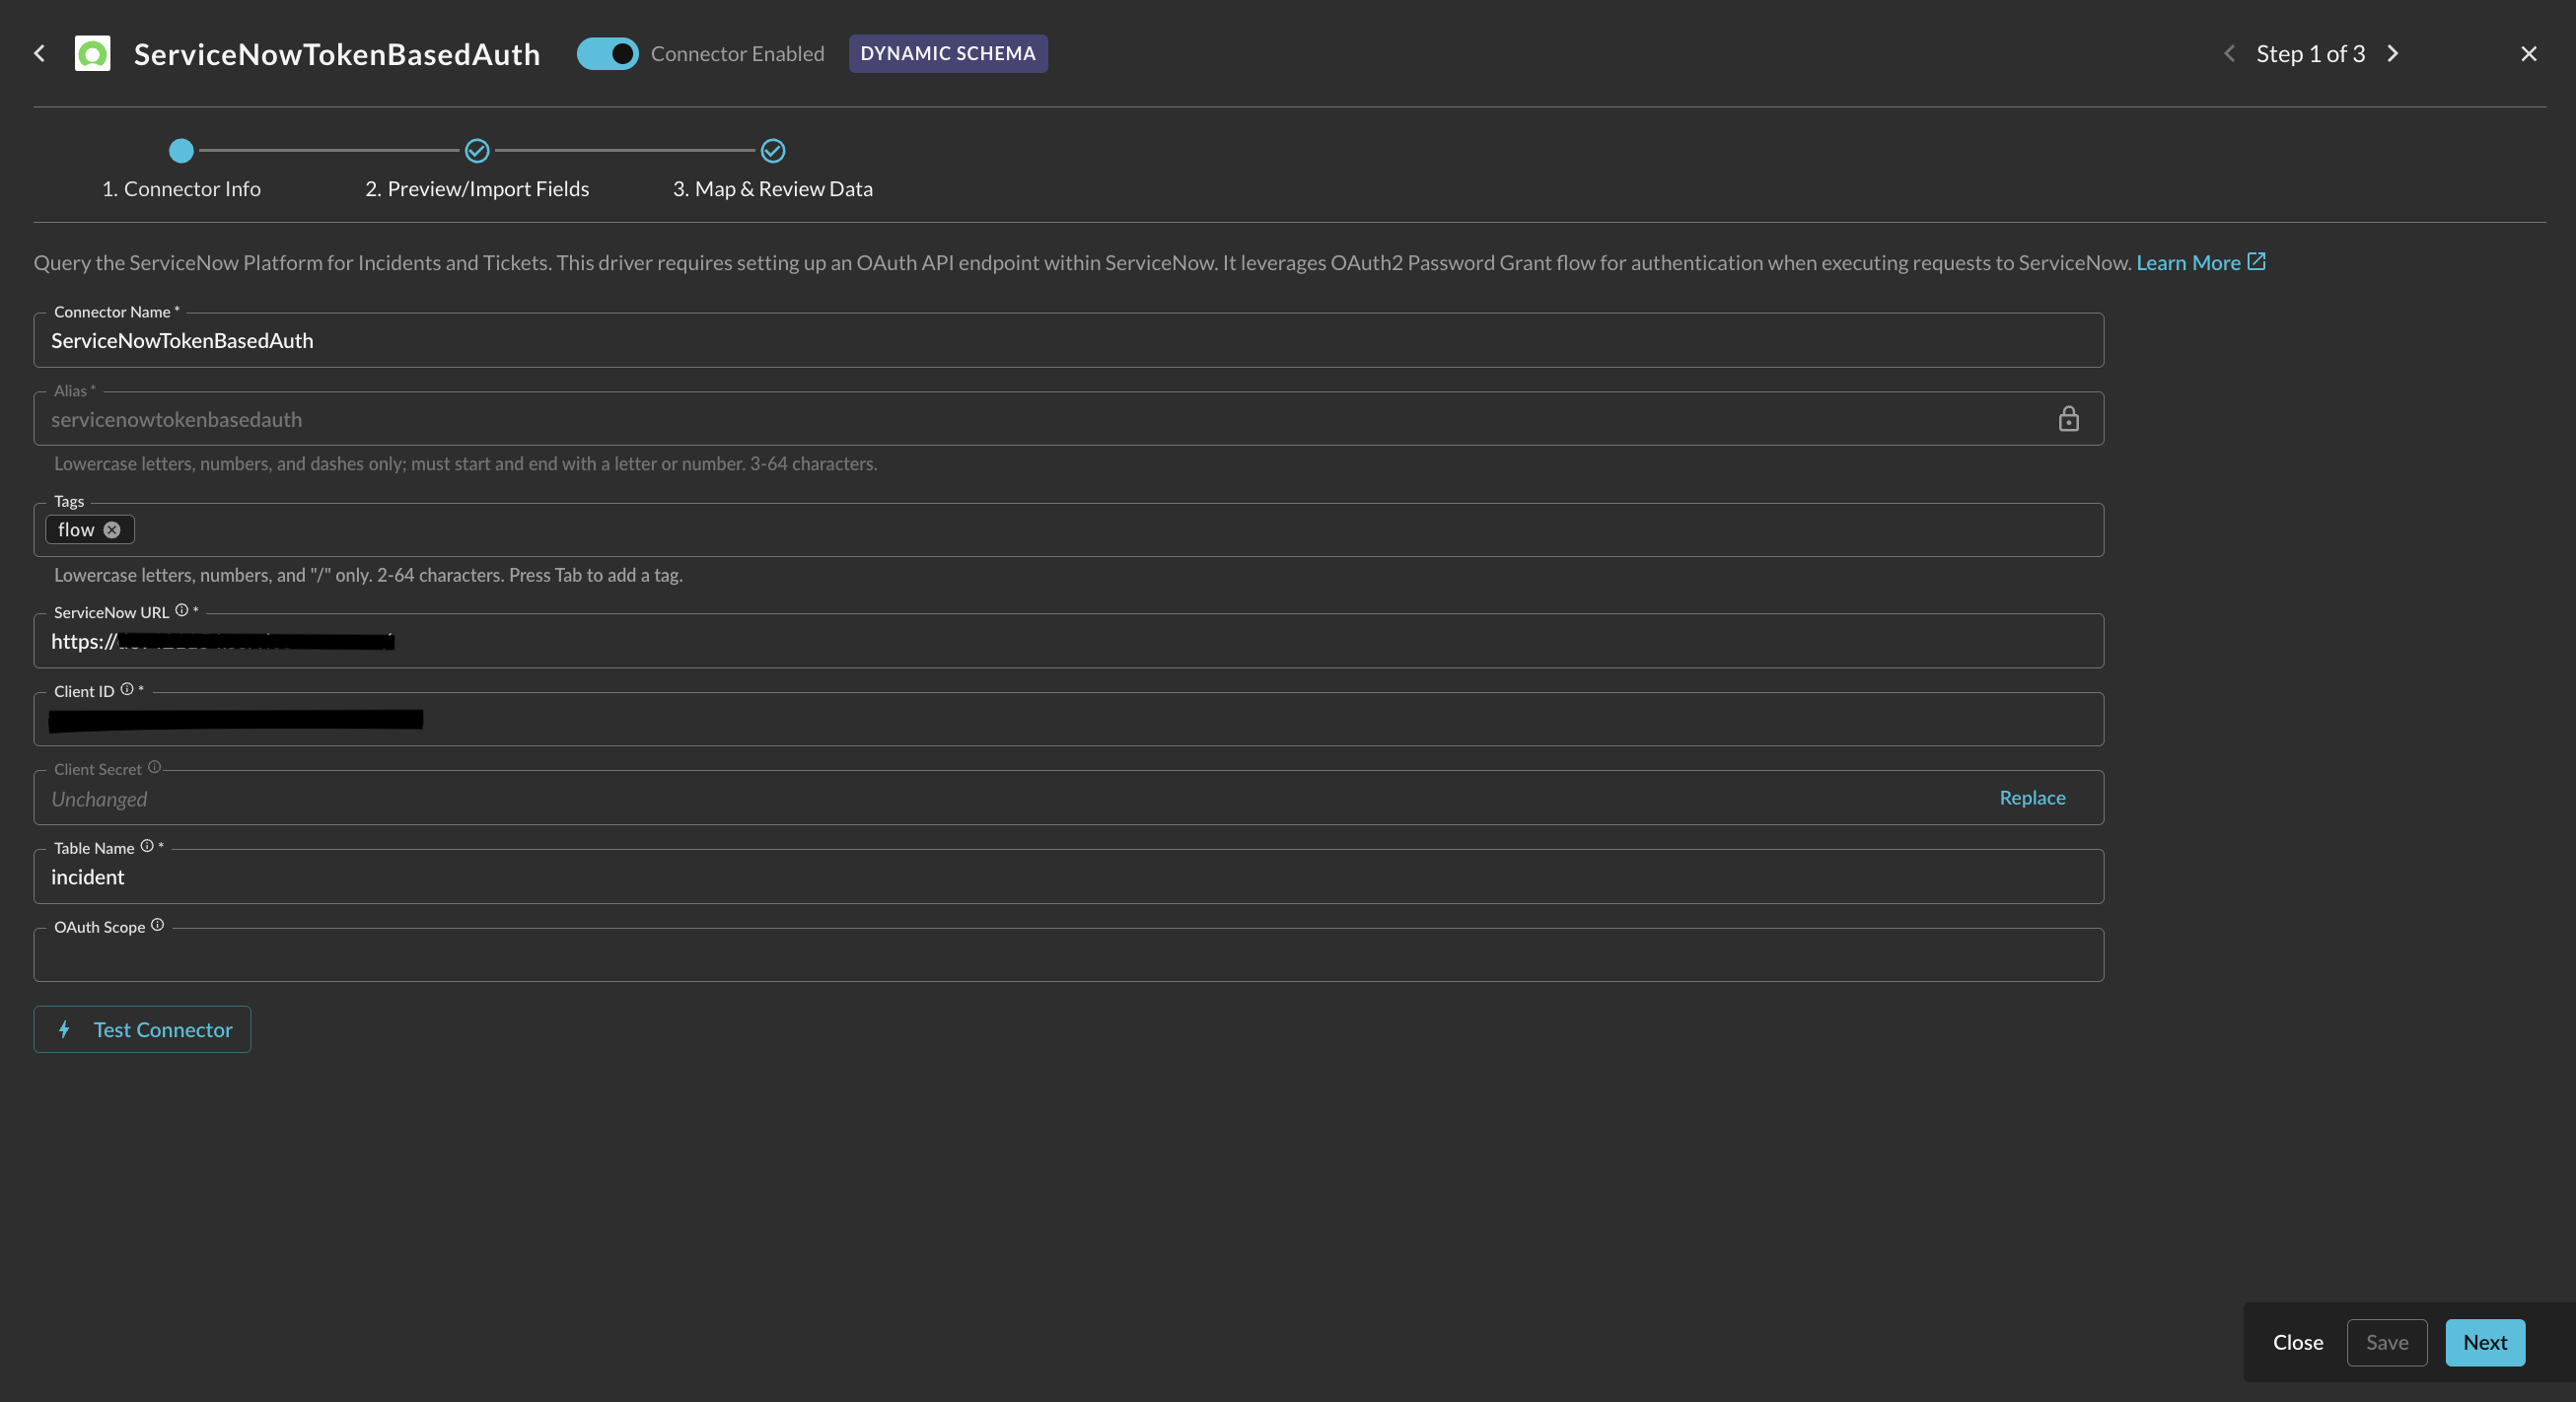
FIG. 11 - Configuring the parameters for the ServiceNow Connector in the Query Security Data Mesh console.
-
Select Save to save and activate the Connector.
-
Select Test Connection from the bottom-right of the connection pane to ensure the following conditions
- Your OAuth Client is properly configured for the Client Credentials grant, and a token can be minted from
/oauth_token.do. - Your OAuth Application User (machine identity) is associated and active.
- Your OAuth Client has the proper scopes.
- The table you provided exists.
- You have the correct ACLs within your Role for the table you provided.
- A sample of data and the metadata/structure for the table can be retrieved.
- Your OAuth Client is properly configured for the Client Credentials grant, and a token can be minted from
-
Finally, proceed to the Preview/Import Fields section to begin the Configure Schema process.
You will now see ServiceNow added as an available Connector within the Query Search and Query Summary Insights UI.
Querying ServiceNow Connectors
Within the Query Search UI, all Connectors are enabled by default. To check that your specified Connector(s) for INTEGRATION are enabled, navigate to the IT Service Management section of the Selected Connectors dropdown and ensure that your specified ServiceNow Connector(s) are are selected (denoted by a checkbox) before running your searches as shown below (FIG. 12).
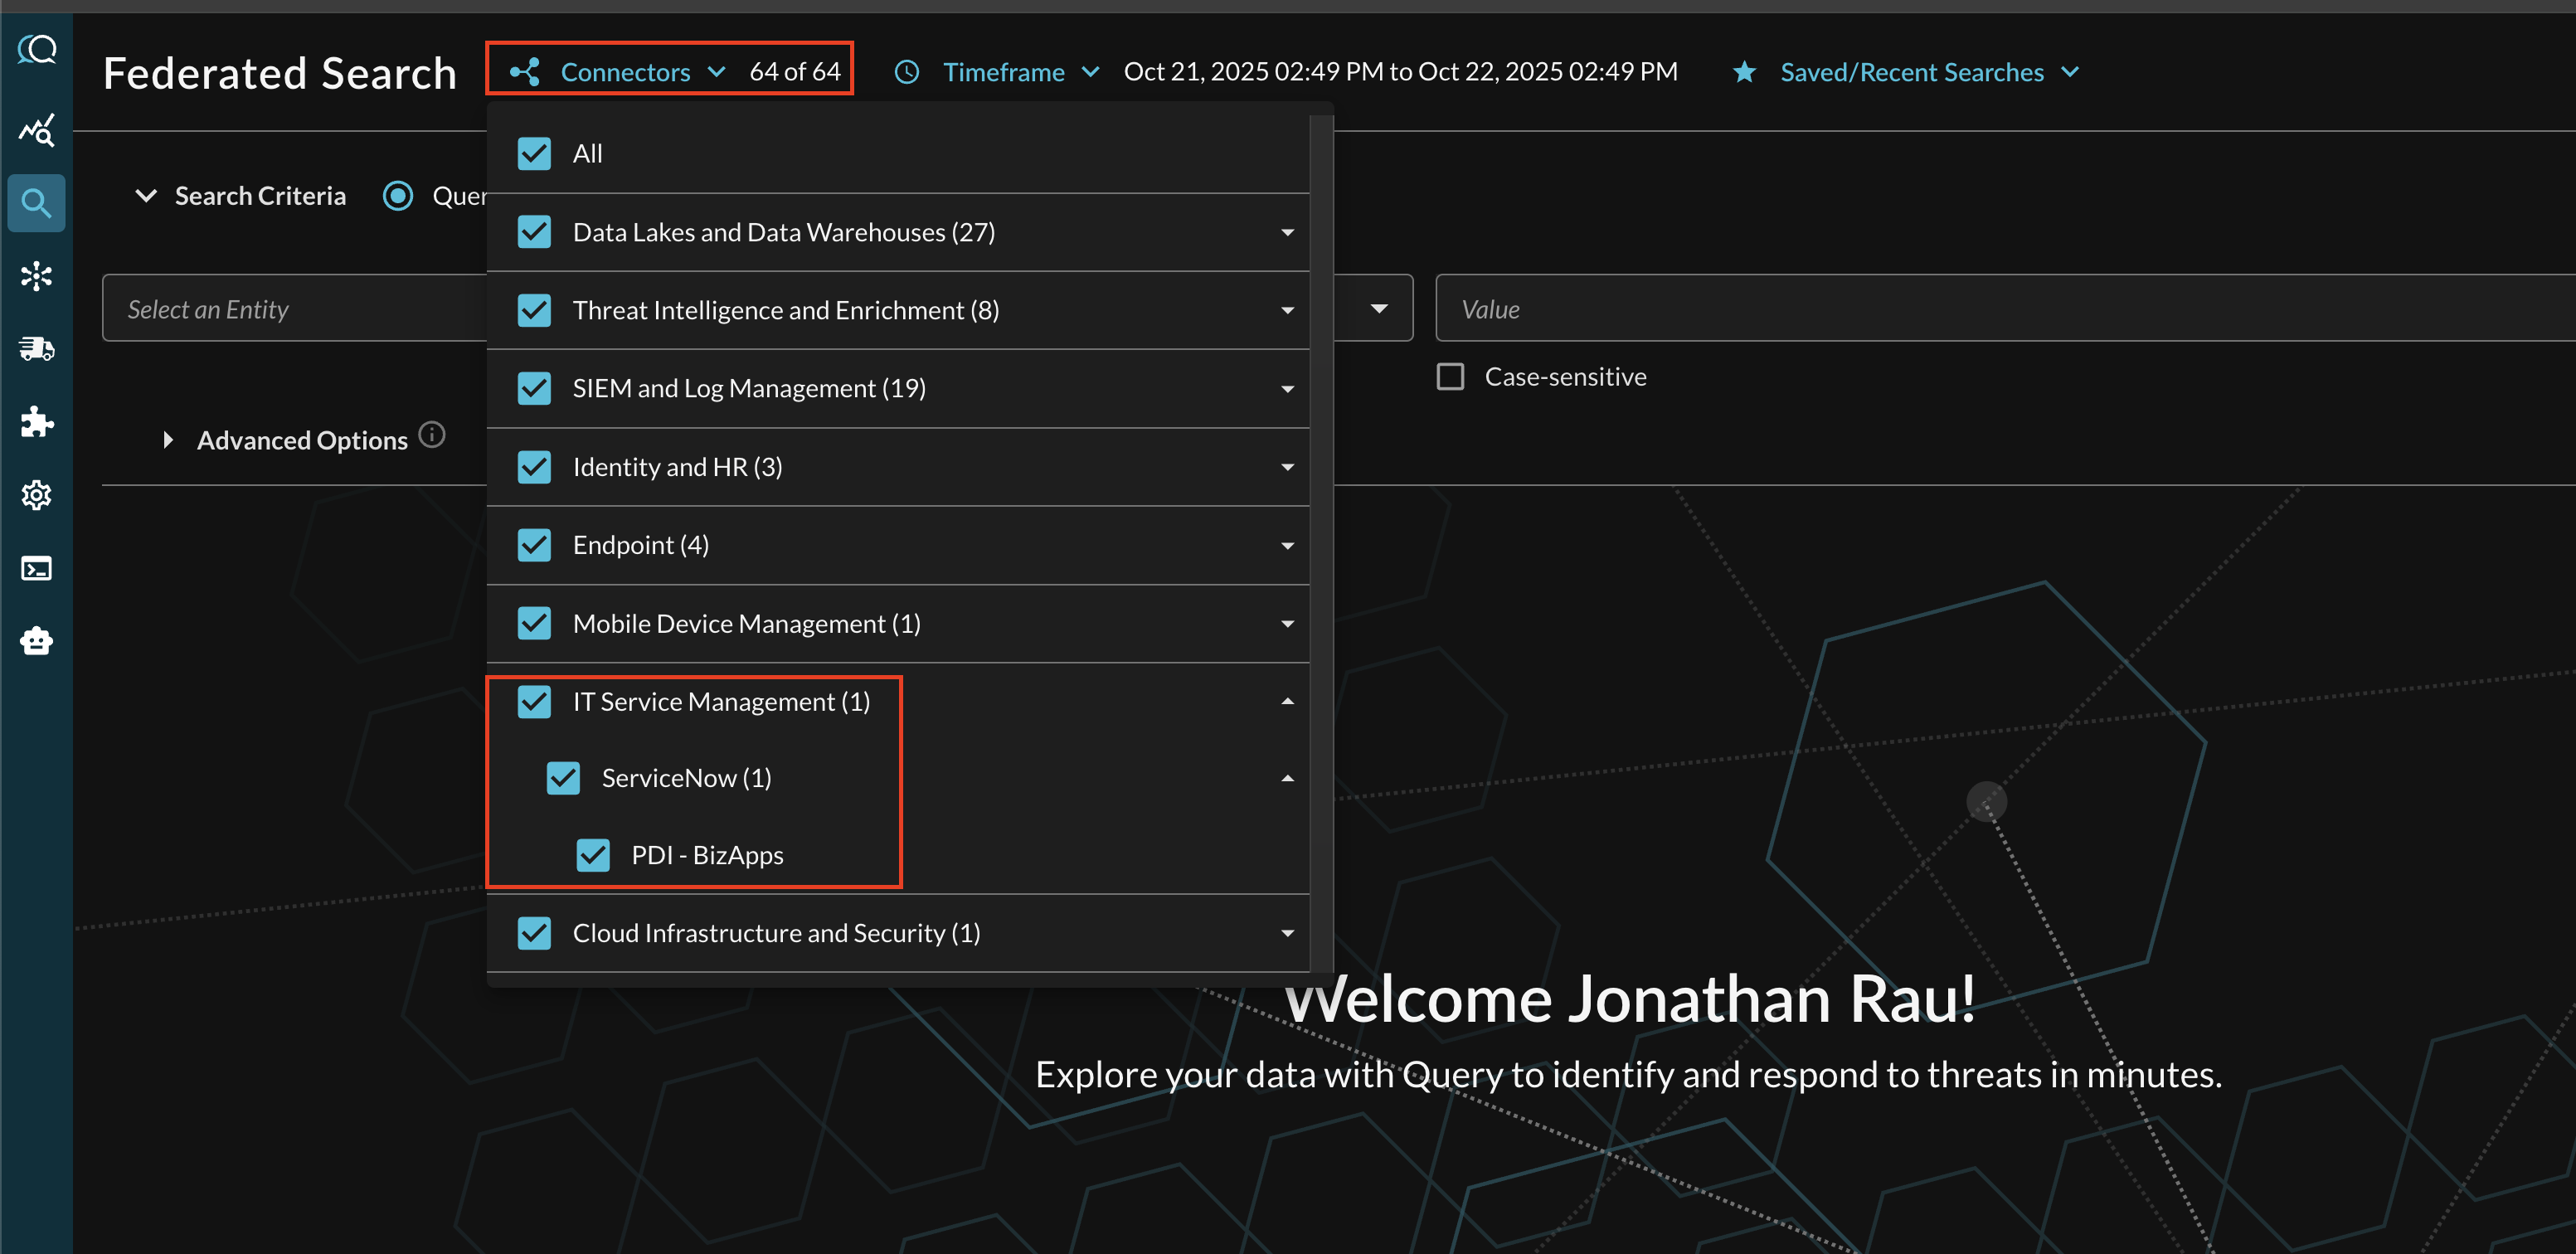
FIG. 12 - Connector picker for ServiceNow in the Query Security Data Mesh console.
The Entities (Observables) and Events you will be able to search determine on how you mapped your data in Configure Schema against a given ServiceNow table. For more information about the QDM/OCSF schema itself refer to the About the Query Data Model section of the Query docs, you can also view the Categories, Events, and Objects themselves.
Resources
- Table API
- OAuth Inbound
- OAuth 2.0 credentials (Client Credentials grant)
- Create an ACL
- Create a user
Troubleshooting Steps
- Ensure your ServiceNow instance supports the inbound OAuth Client Credentials grant (available under System OAuth → Application Registry); older instances may not offer this grant type.
- Ensure that your Integration (Machine) User is ACTIVE in ServiceNow, and not locked out or deactivated.
- Ensure that the Integration (Machine) User is set as the OAuth Application User on the Application Registry record.
- Ensure your Integration User is associated with a custom Role with ACL grants, or with built-in ServiceNow roles.
- Ensure any Custom role has two pairs of
recordACLs that giveREADpermissions per table name, e.g.,cmdb_ci_business_appandcmdb_ci_business_app.*. - Ensure that you created a Client Credentials grant OAuth Client, and that Public Client is unchecked.
- Ensure that your OAuth Client Secret is correct and has not expired, and that the Client ID matches the same Application Registry record.
- If you supplied a Scope, ensure the corresponding REST API Auth Scopes exist and are associated with your OAuth Client.
- Ensure that you have all ACLs for meta tables and relationships with tables you wish to query, especially for custom CIs.
- Ensure that you provided a valid table.
- Ensure that there not any superseded ACLs or other security controls prevented table/field level access.
If you have exhausted the above Troubleshooting list, please contact your designated Query Sales Engineer or Customer Success Manager. If you are using a free tenant, please contact Query Customer Success via the Support email in the Help section, or via Intercom within your tenant.
Updated 10 days ago