ClickHouse Cloud
Integrate Query with any table or view in ClickHouse Cloud
TL;DRTo integrate ClickHouse Cloud with Query:
- Retrieve your hostname, database name, and table/view name(s).
- Create or retrieve a username and password to connect to your ClickHouse Cloud tenant.
- Optionally, add the Query IP Range to your IP Allowlist in ClickHouse Cloud.
- Use Query Search to parallelize searches and surface details about any security-relevant data loaded into ClickHouse Cloud for incident response (IR), threat hunting, investigations, and other security and observability use cases.
Overview
ClickHouse® is a high-performance, column-oriented SQL database management system (DBMS) for online analytical processing (OLAP). It is available as both an open-source software and a cloud offering. Analytics, also known as OLAP (Online Analytical Processing), refers to SQL queries with complex calculations (e.g., aggregations, string processing, arithmetics) over massive datasets. Unlike transactional queries (or OLTP, Online Transaction Processing) that read and write just a few rows per query and, therefore, complete in milliseconds, analytics queries routinely process billions and trillions of rows.
In ClickHouse, each table consists of multiple "table parts". A part is created whenever a user inserts data into the table (INSERT statement). A query is always executed against all table parts that exist at the time the query starts. To avoid that too many parts accumulate, ClickHouse runs a merge operation in the background which continuously combines multiple (small) parts into a single bigger part. This approach has several advantages: On the one hand, individual inserts are "local" in the sense that they do not need to update global, i.e. per-table data structures. As a result, multiple simultaneous inserts need no mutual synchronization or synchronization with existing table data, and thus inserts can be performed almost at the speed of disk I/O.
Query facilitates connectivity, schema interpolation, schema mapping, and transpilation of search primitives from the Query Federated Search platform into ANSI SQL and transpiles that normalized SQL into the ClickHouse SQL syntax. This allows any user - regardless if they know SQL or not - to be able to securely connect to ClickHouse, map the data stored in any table or view, and begin extracting immediate value from the integration by retrieving data stored in the tenant.
Query's entire data model is built around the Open Cybersecurity Schema Framework (OCSF) - named the Query Data Model (QDM) - which expresses all search intents with OCSF/QDM concepts such as Entities/Observables used to represent facts and indicators whereas Event Classes represent things that have happened and are normalized against network, application, file system, identity, and 1st party security findings.
Security teams use ClickHouse Cloud due to its extremely fast speeds, affordable storage, and easy of data integrations versus other warehousing or legacy SIEM offerings. For instance, several security-specific detection and analytics platforms underpin ClickHouse into their tech stack and several other organizations use it. Security teams can store 10s of millions or billions of records from high volume application, observability, and security logging sources such as audit logs, login logs, or flow logs. Using Query, these same teams can search across any number of datasets in ClickHouse Cloud across any number of Services and Tenants alongside other data onboarded into Query Federated Search.
Some details on searchesAs of 6 JAN 2025, Query Federated Search supports all scalar-types within ClickHouse as well as the
MAPsemi-structured data types. Thenestedandjsondata formats are currently in preview are are not supported.Query cannot currently support mappings of unstructured or schemaless
arraydata types.
Prerequisites
To connect ClickHouse Cloud with Query Federated Search you'll need to complete the following steps to retrieve the required connection parameters.
-
To retrieve your connectivity information login to ClickHouse Cloud and select your Service. Once the Service is started, select the Connect option on the left-hand navigation pane as shown below (FIG. 1).

FIG. 1 - Locating the Connection parameters for a ClickHouse Cloud Service
-
Copy the values for your username, password, and with the
HTTPSoption selected, only copy the hostname such as<random_id>.<region>.<cloud>.clickhouse.cloudas well as the port number (defaults to 8443) as shown below (FIG. 2).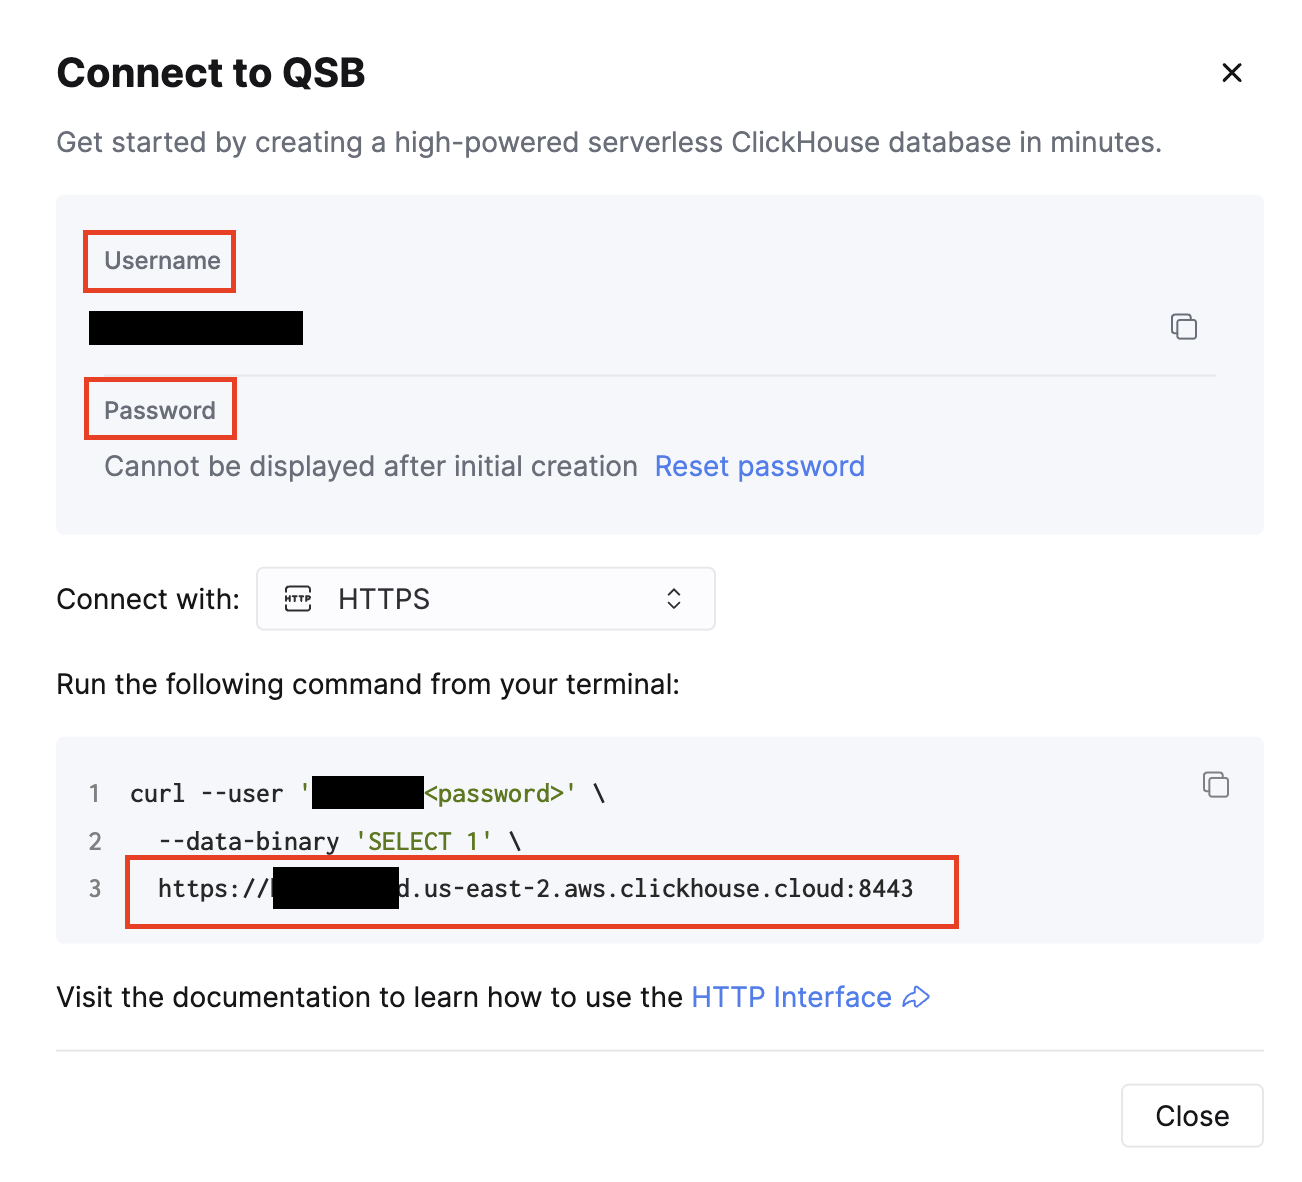
FIG. 2 - Retrieve connection parameters for ClickHouse Cloud
Important Note on Reseting ClickHouse Cloud passwordsYou may need to reset your password if you not have noted it in a vaulting solution - this will cause all other Connectors to become invalid and require recreation.
-
OPTIONAL STEP. If you require more stringent network security controls consider adding an IP access list. From your service select Settings from the navigation pane and scroll down to the Security Section and select Add IPs as shown below (FIG. 3). Contact your Query Customer Success Manager or Technical Account Manager to retrieve our IP range(s).
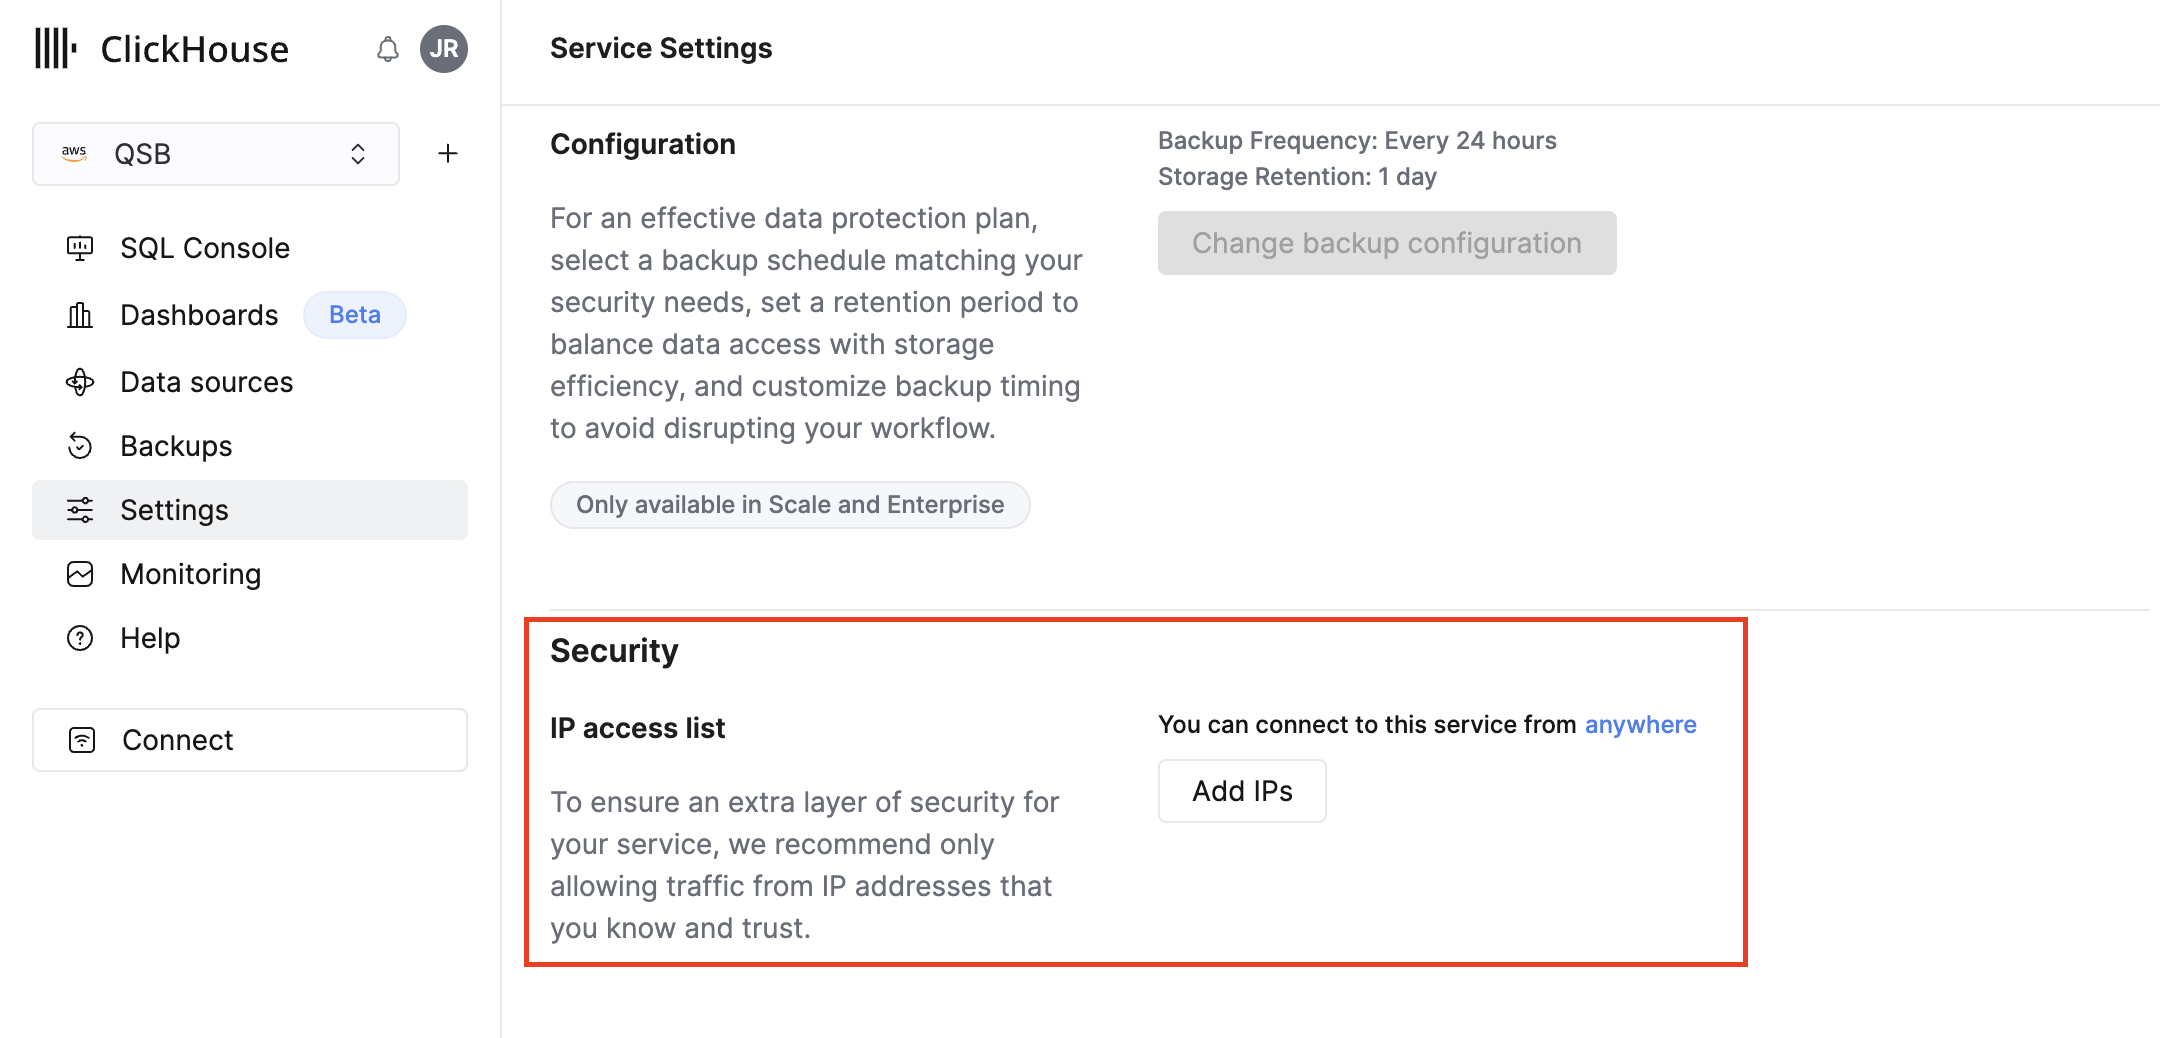
FIG. 3 - Adding an IP access list in ClickHouse Cloud
To learn how to configure a ClickHouse Cloud Connector, proceed to the next section.
On NHI securityNHI - or, Non-Human Identities - such as your ClickHouse Cloud username and password are extremely sensitive. Query securely stores the username and password in a dedicated AWS Secrets Manager Secret per Connector per Tenant.
While this requires you to configure Connectors per ClickHouse Cloud and continue to enter in your credentials, every copy is stored as securely as each other with minimum necessary permissions that only allows the specific piece of serverless infrastructure to retrieve the secret, it is never cached or persisted outside of the Secret.
Setting up the ClickHouse Cloud Connector
Use the following steps to create a new Query Federated Search Connector for ClickHouse Cloud.
-
Navigate to the Connectors page, select Add Connector, and selectClickHouse Cloud from the
Data Lakes and Data Warehousescategory as shown below (FIG. 4). You can also search for ClickHouse Cloud using the search bar in the Add Connector page.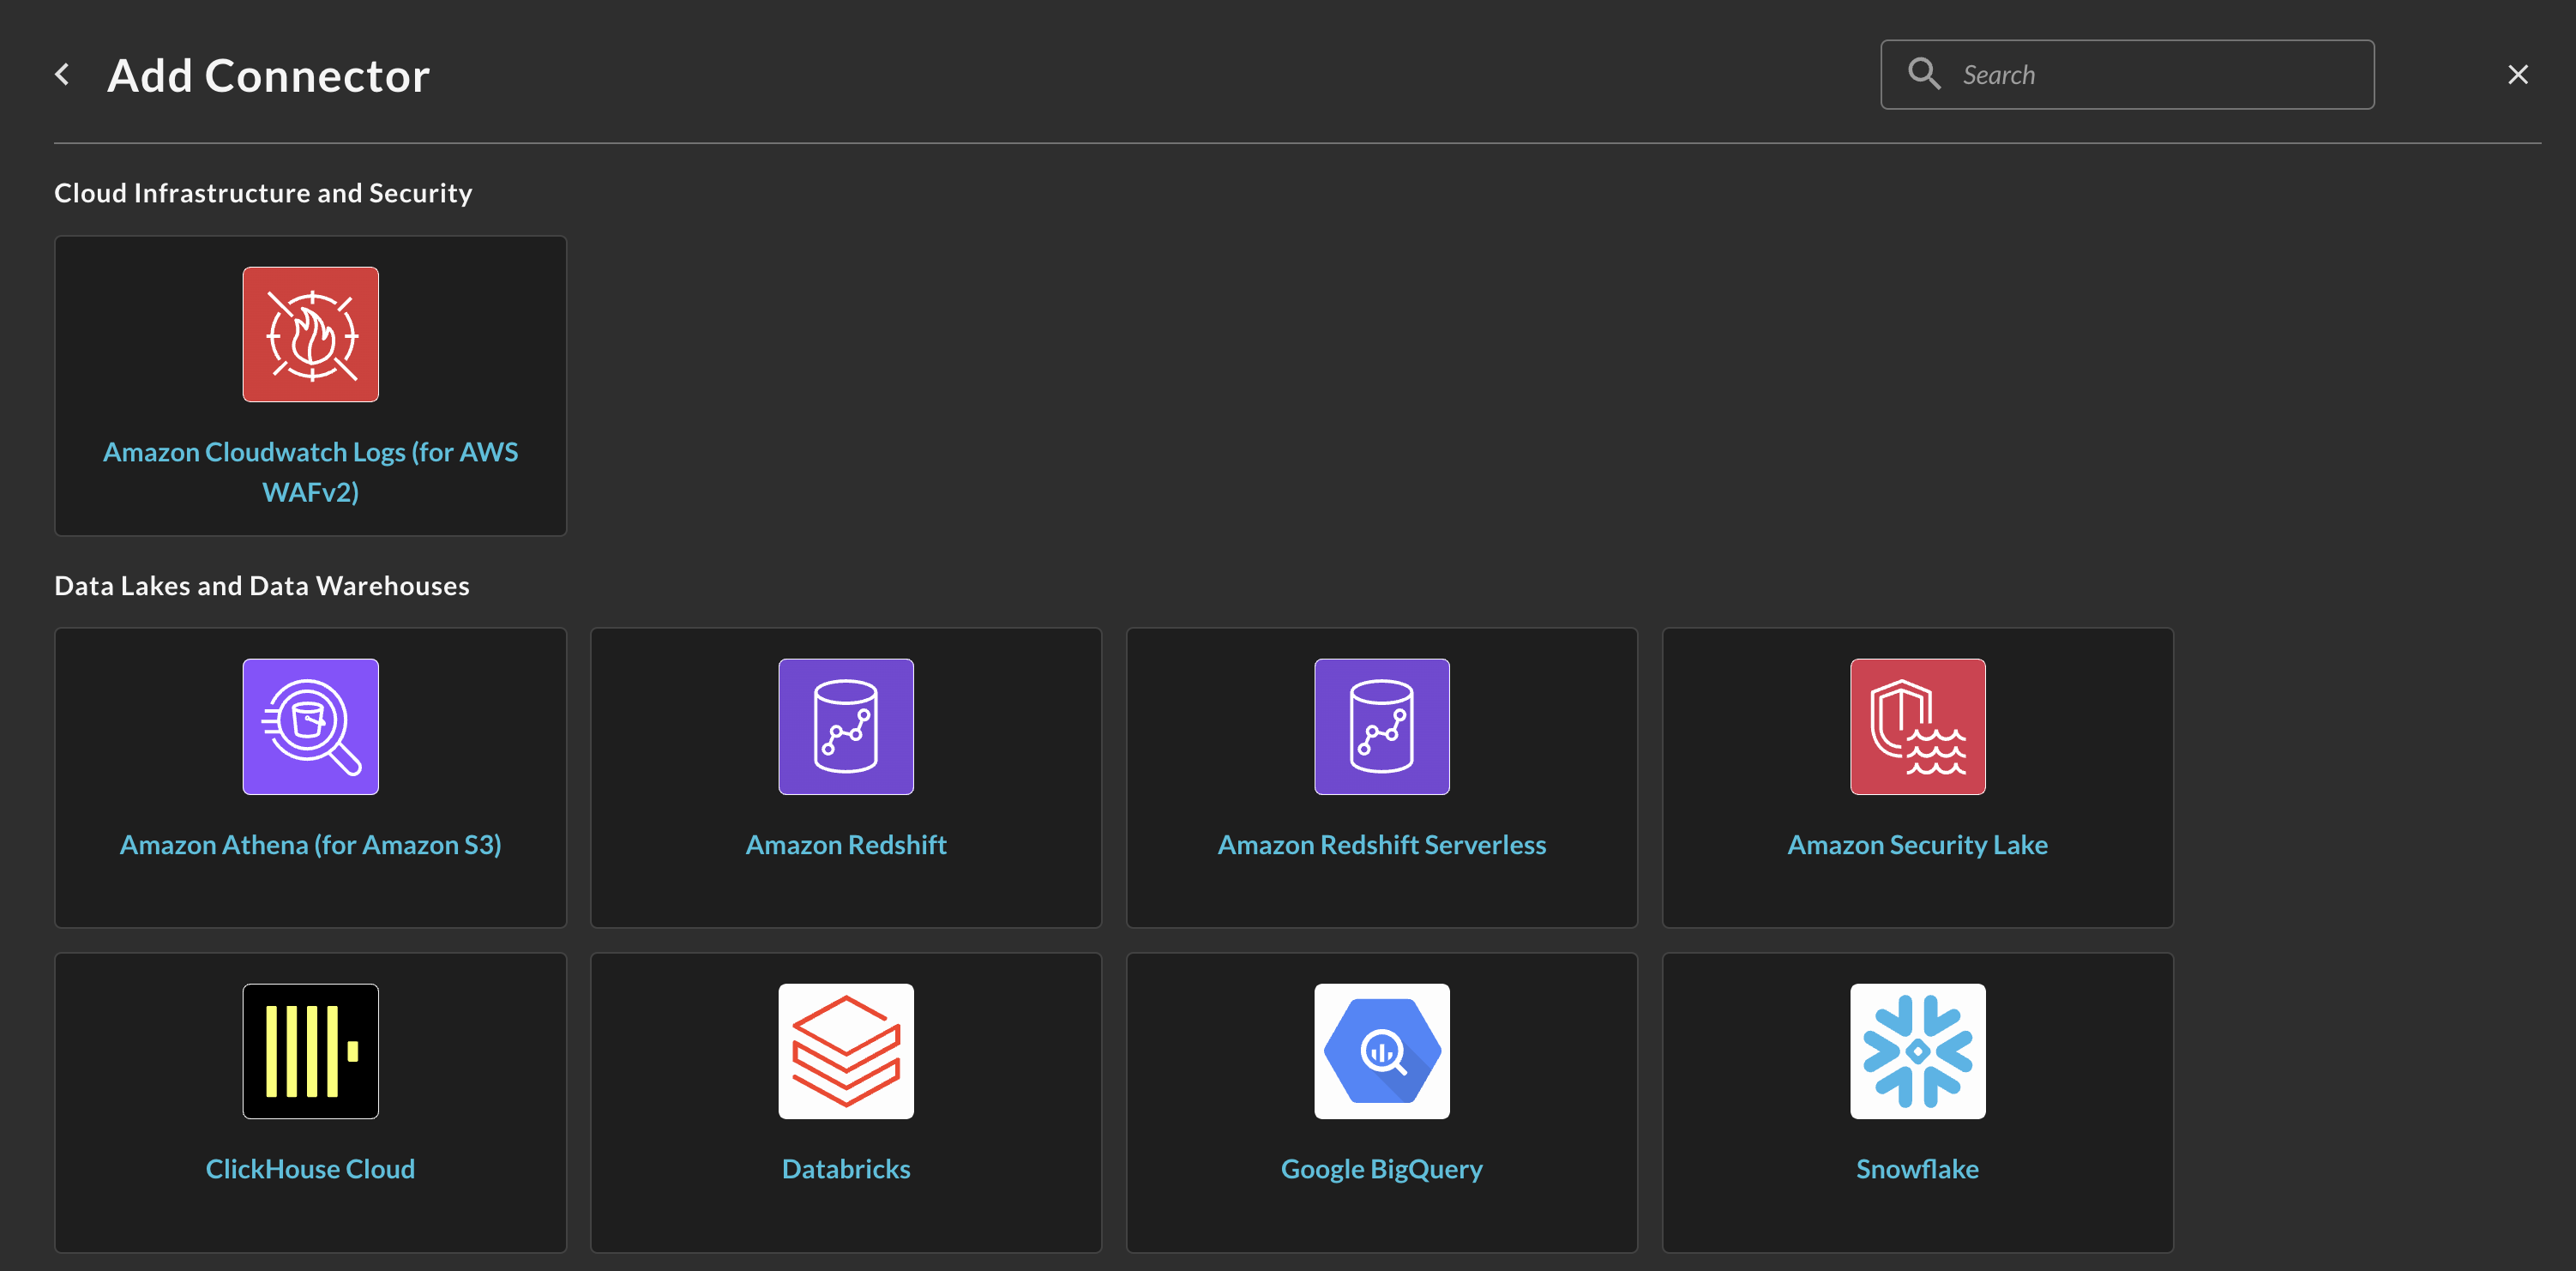
FIG. 4 - Locating the ClickHouse Cloud Connector
-
In the Configure Connector tab, add the following detail as shown below (FIG. 5):
-
Connector Alias Name: The human-readable name you want to give to this connector, such as the table or view name, or some combination that includes the Service or Organization Name.
-
Default Login: Leave the default value:
Default Login. -
Username: Your ClickHouse Cloud username, copied in Step 2 of the Prerequisites section.
-
Password: Your ClickHouse Cloud user password, copied in Step 2 of the Prerequisites section.
-
Database Name: The database name your have your table or view in. This is typically
default. -
Table Name: The name of any table or view your wish to connect that corresponds to your specified database.
-
Host: The hostname of your ClickHouse Cloud Service DO NOT ENTER IN THE FULL URL. Copied in Step 2 of the Prerequisites section.
-
Port: The port number, defaults to
8443, copied in step 2 of the Prerequisites section.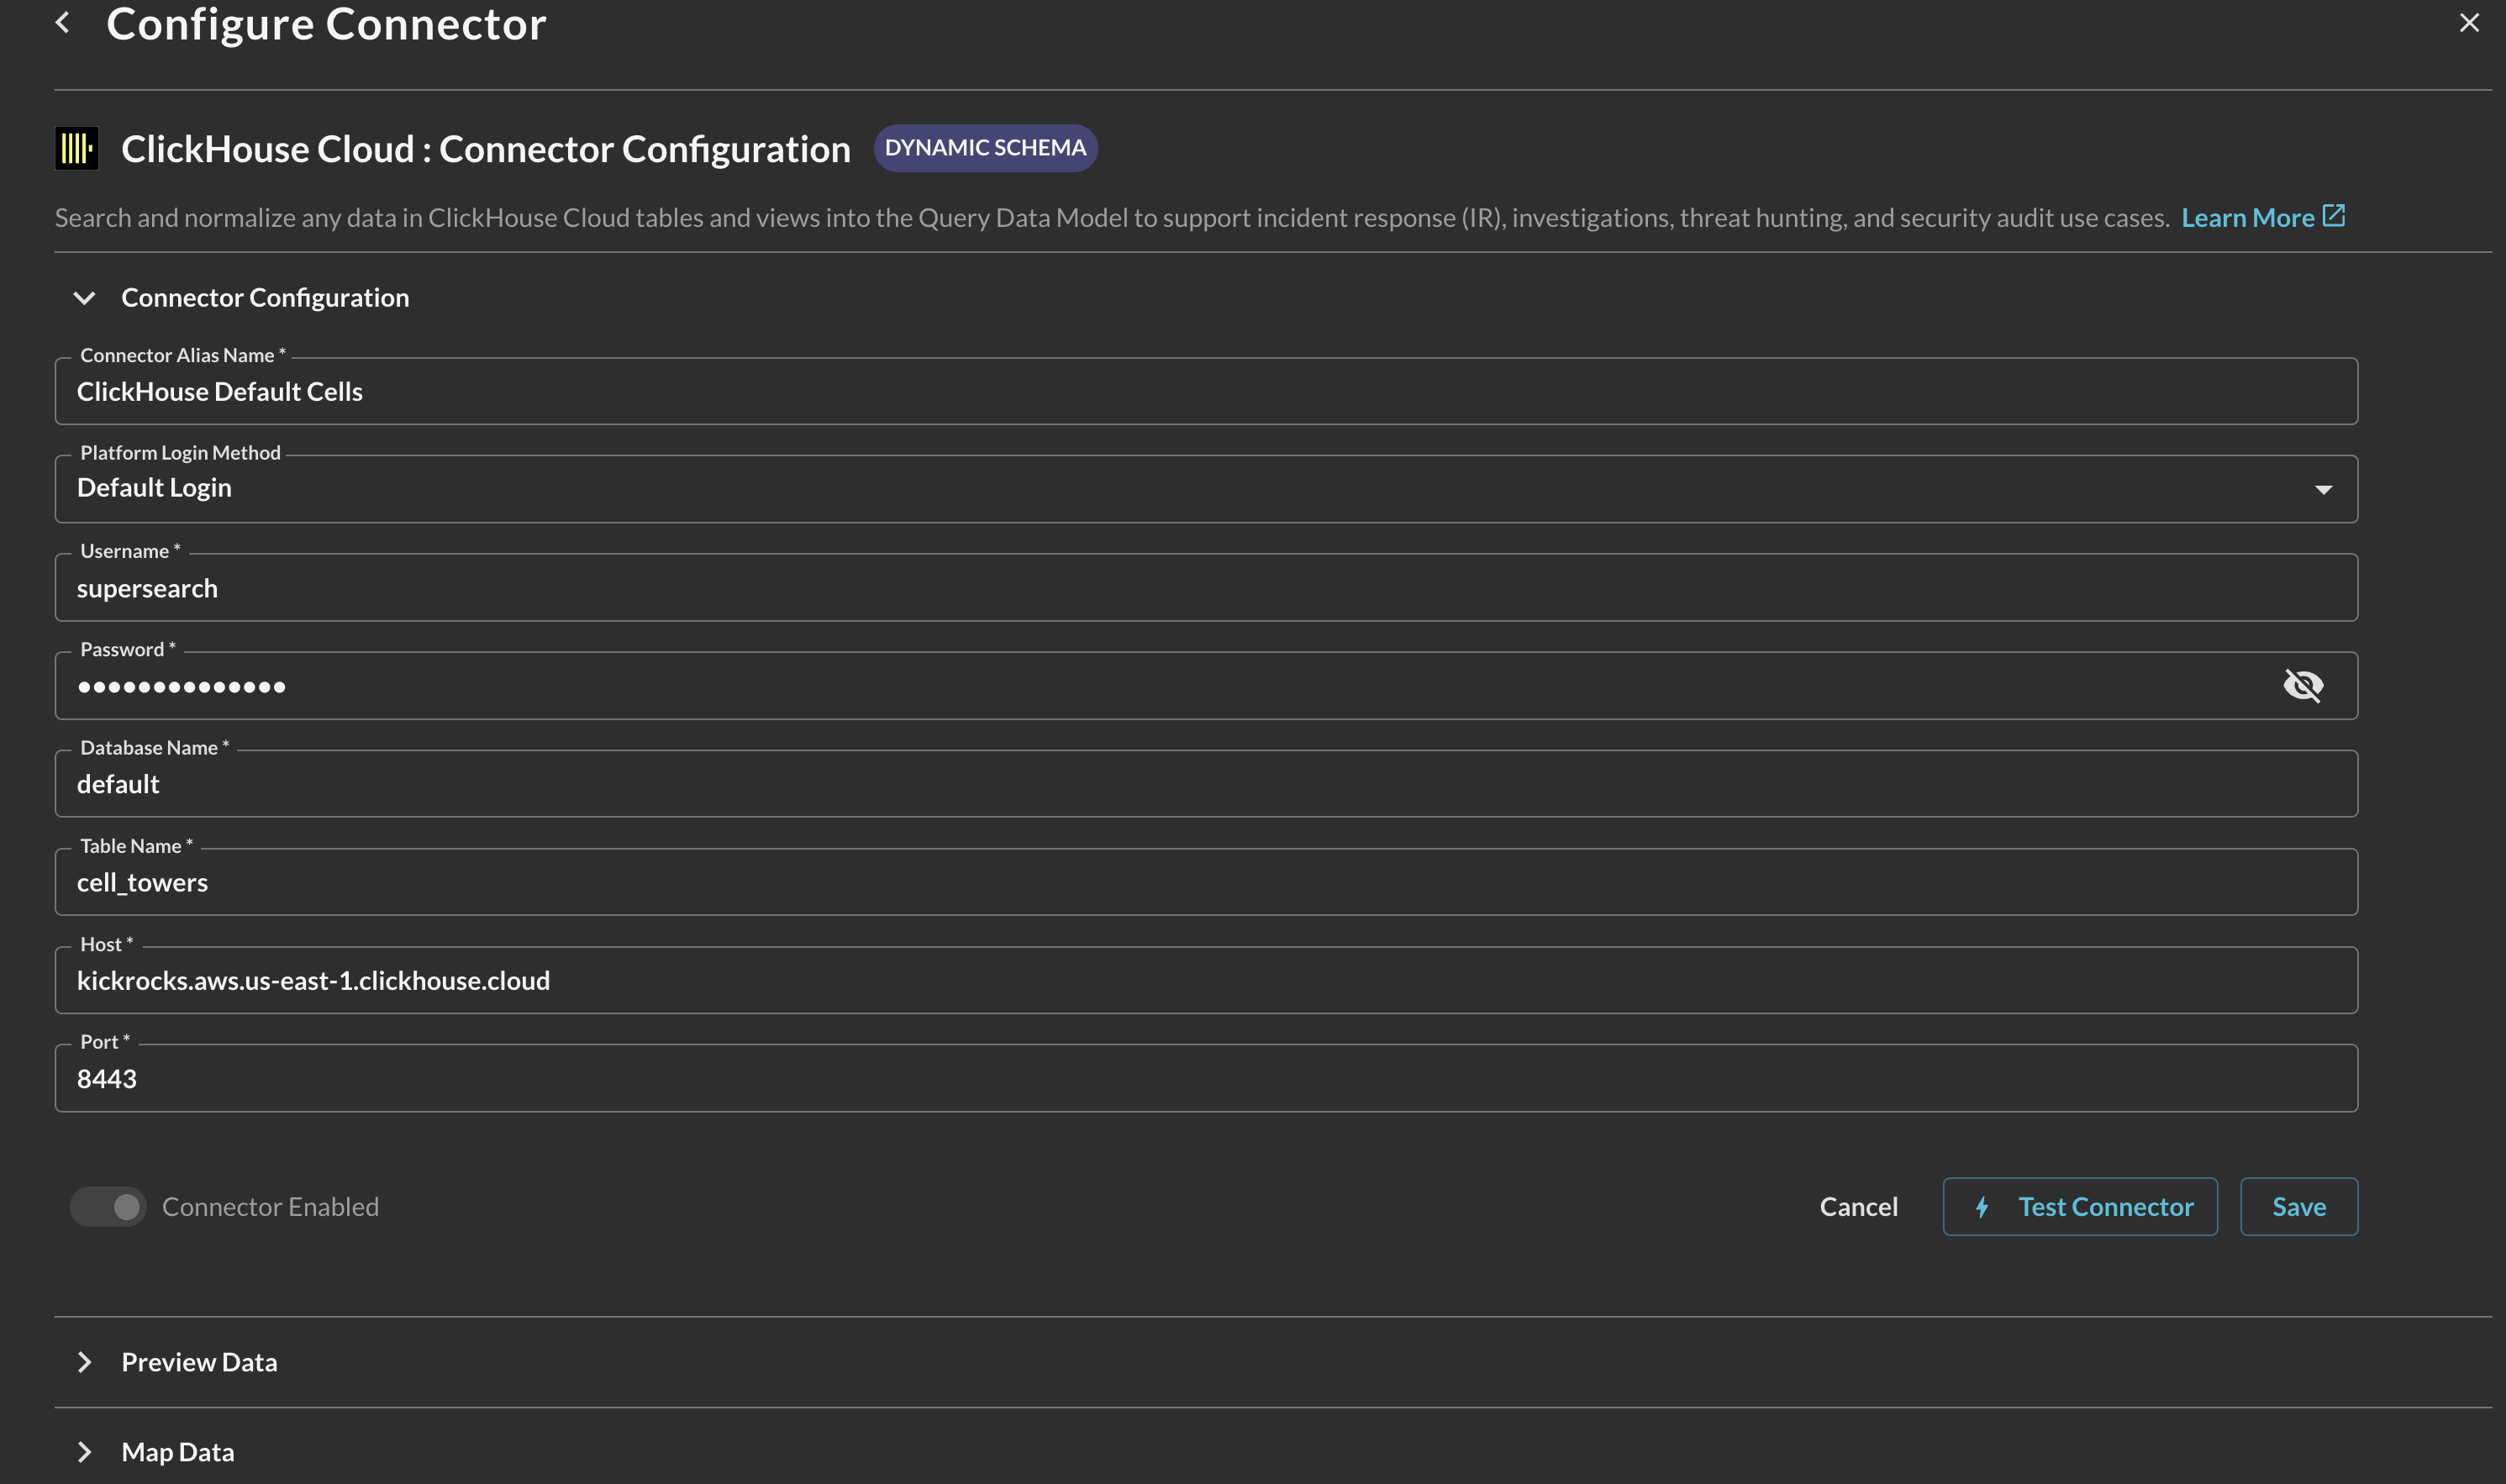
FIG. 5 - Entering the parameters for the ClickHouse Cloud Connector
-
-
Select Save to save and activate the Connector.
-
Select Test Connection from the bottom-right of the connection pane to ensure that your credentials are correct, your database and table/view combination is valid, and that there is connectivity to your Service.
-
Finally, proceed to the Preview Data section to begin the Configure Schema process. Refer to the hyperlink to learn how to use the Configure Schema no-code workflow, it is HIGHLY recommended for first time users.
You will now see ClickHouse Cloud added as an available Connector within the Query Search and Query Summary Insights UI.
Querying ClickHouse Cloud Connectors
Within the Query Search UI, all Connectors are enabled by default. To check that your specified Connector(s) for ClickHouse Cloud are enabled, navigate to the Data Lakes and Data Warehouses section of the Selected Connectors dropdown and ensure that your specified ClickHouse Cloud Connector(s) are are selected (denoted by a checkbox) before running your searches as shown below (FIG. 6).
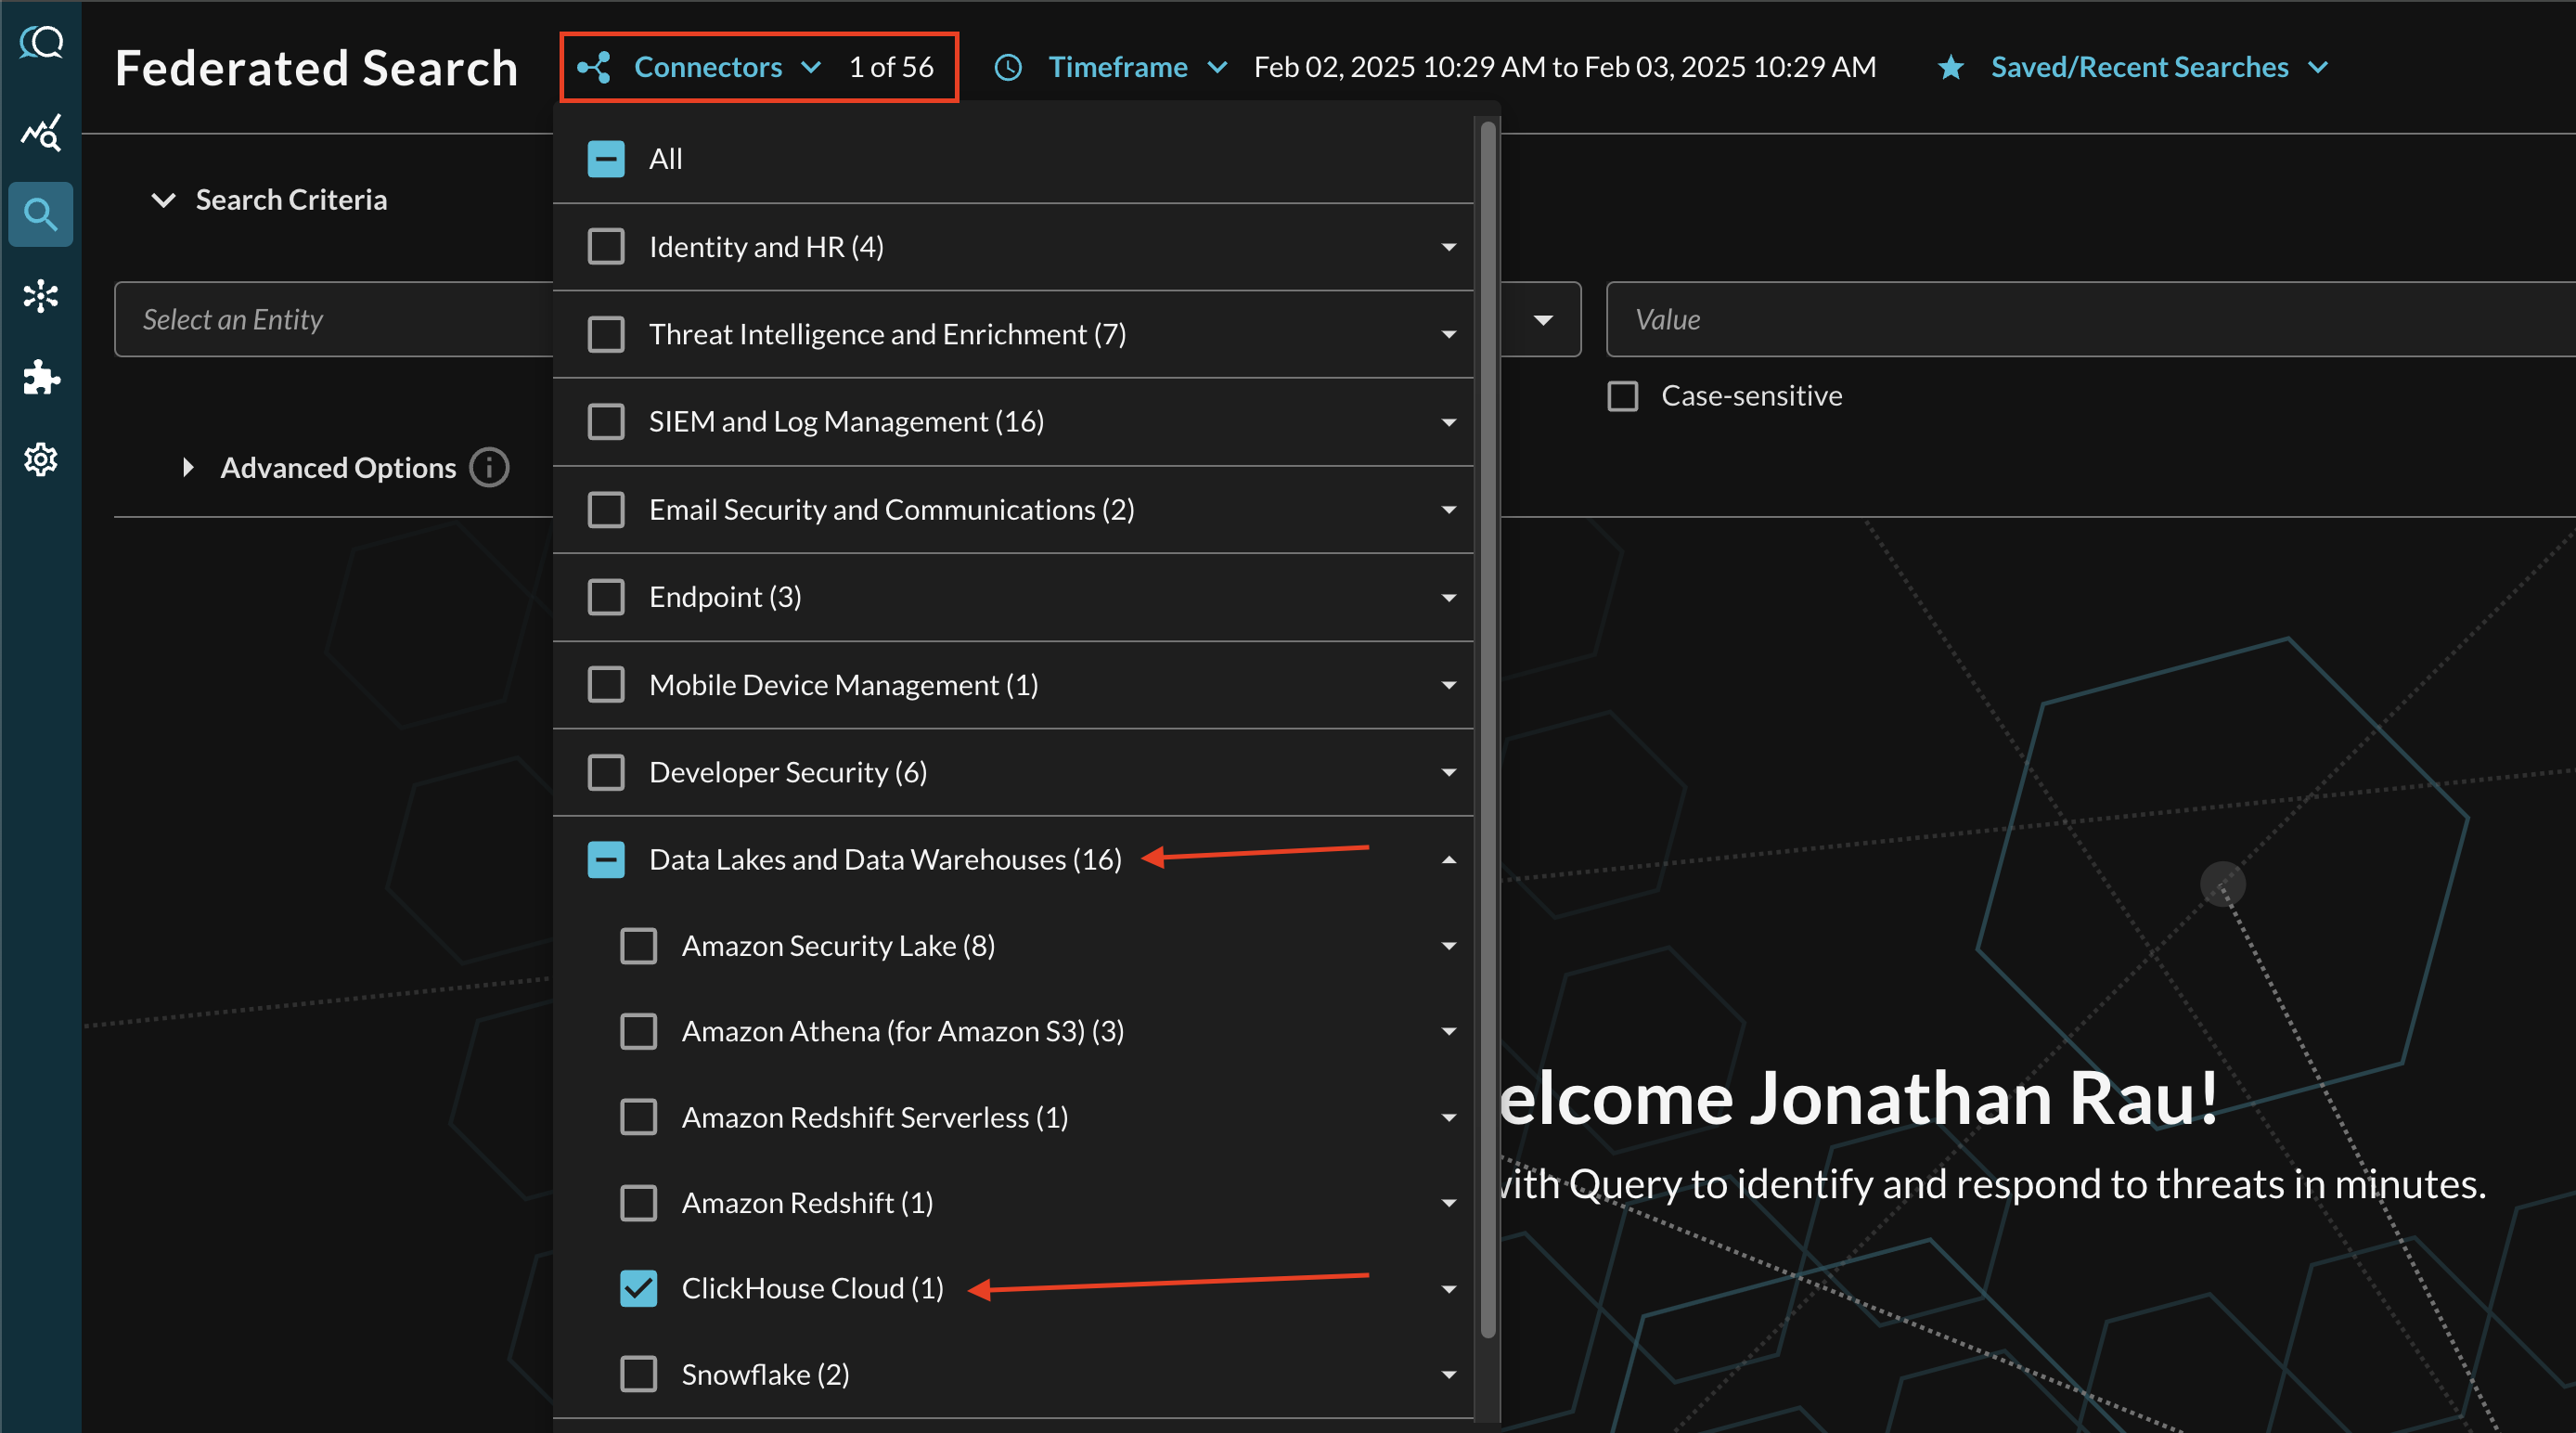
FIG. 6 - Selecting ClickHouse Cloud Connectors
The Entities (Observables) and Events you will be able to search determine on how you mapped your data in Configure Schema against a given ClickHouse Cloud table/view. For more information about the QDM/OCSF schema itself refer to the About the Query Data Model section of the Query docs, you can also view the Categories, Events, and Objects themselves.
Entity-based Search
To conduct an Entity-based search, ensure that all of the data points you will be searching for are mapped within the Configure Schema wizard as demonstrated in the previous section.
In the Federated Search console, select the search dropdown, ensure the Entities radio button is selected and search for your desired Entity as shown below (FIG. 7). For instance, you can search for IP addresses or resource IDs within a view in ClickHouse that correlates asset data with security detections from external, these can be further correlated against other different Query Connectors such as for Crowdstrike Falcon or Microsoft Defender for Endpoint (MDE).
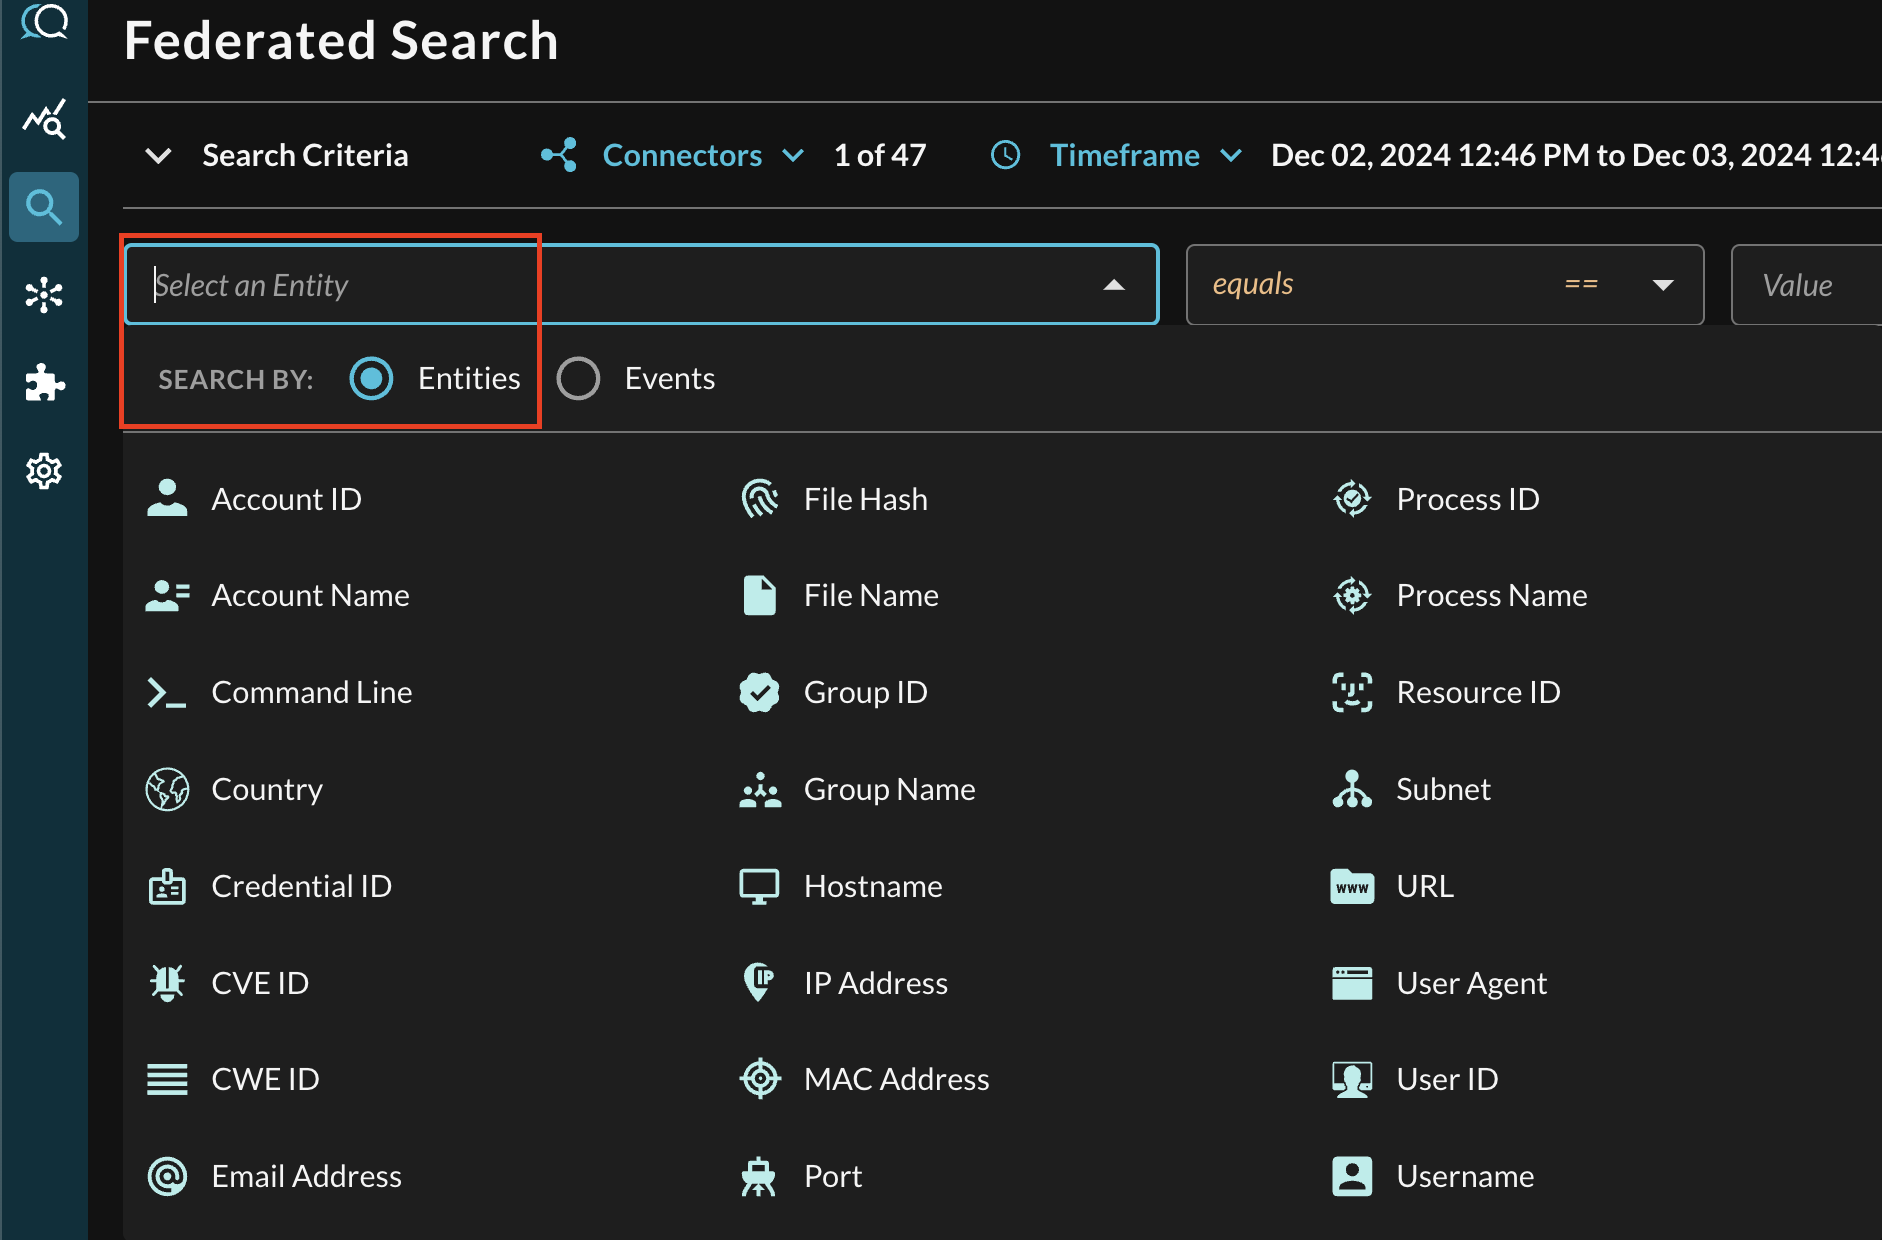
FIG. 7 - Entity-based searching with Query Federated Search
After selecting an Entity, most allow you to specify an Operator. This allows you to perform simple equality searches or to perform more generalized searches using Contains, Starts With, or Ends With Operators. These are mapped against appropriate CONNECTOR operators.
When you search for multiple values that may be present across different Connectors, the Query Federated Search query planner inspects the Configure Schema metadata to ensure searches are sent to the appropriate Connectors, this operates more as a collated window function within Query and not as an expensive SQL join.
Additionally, you can specify case-sensitivity for the entire search criteria. An example of a multi-value CVE search that uses the equals operator and toggled case-sensitivity is shown below (FIG. 8).

FIG. 8 - Orientation for Entity-based search in Query Federated Search
Event-based Search
To conduct an Event-based search, ensure that all of the data points you will be searching for are mapped within the Configure Schema wizard as demonstrated in the mapping section. Within the Federated Search console, only mapped Events per the Select Connectors are populated, unlike Entities which has every potential value shown in the list.
In the Federated Search console, select the search dropdown, ensure the Events radio button is selected and search for your desired Event as shown below (FIG. 9). For instance, you can search for all API Activity events which can be normalized from a ClickHouse dataset that contains audit log information, in addition you can also search across all Connectors normalized to API Activity such as AWS CloudTrail Management Events stored in AWS Security Lake, System Event logs in Okta, and Audit Events in Microsoft Intune.

FIG. 9 - Searching for API Activity events with Query Federated Search
Searching from the Event will pull a sample (up to 1000) of all matching events per Connectors that are mapped to it. For more specific filtering within an Event, you can choose one or more conditions to refine a search. Selecting the plus-sign (+) dropdown next to the Event menu allows you to choose from any specific OCSF/QDM attribute in the event.
For instance, when searching for API Activity events, you can specify a specific Username by filtering for Actor --> User --> Name (which is mapped in Configure Schema as actor.user.name) as shown below (FIG. 10). In this case, the actor Object contains information about the process and user who is acting on something, such as a user authenticating to a service or an admin user making a change to a setting or configuration.
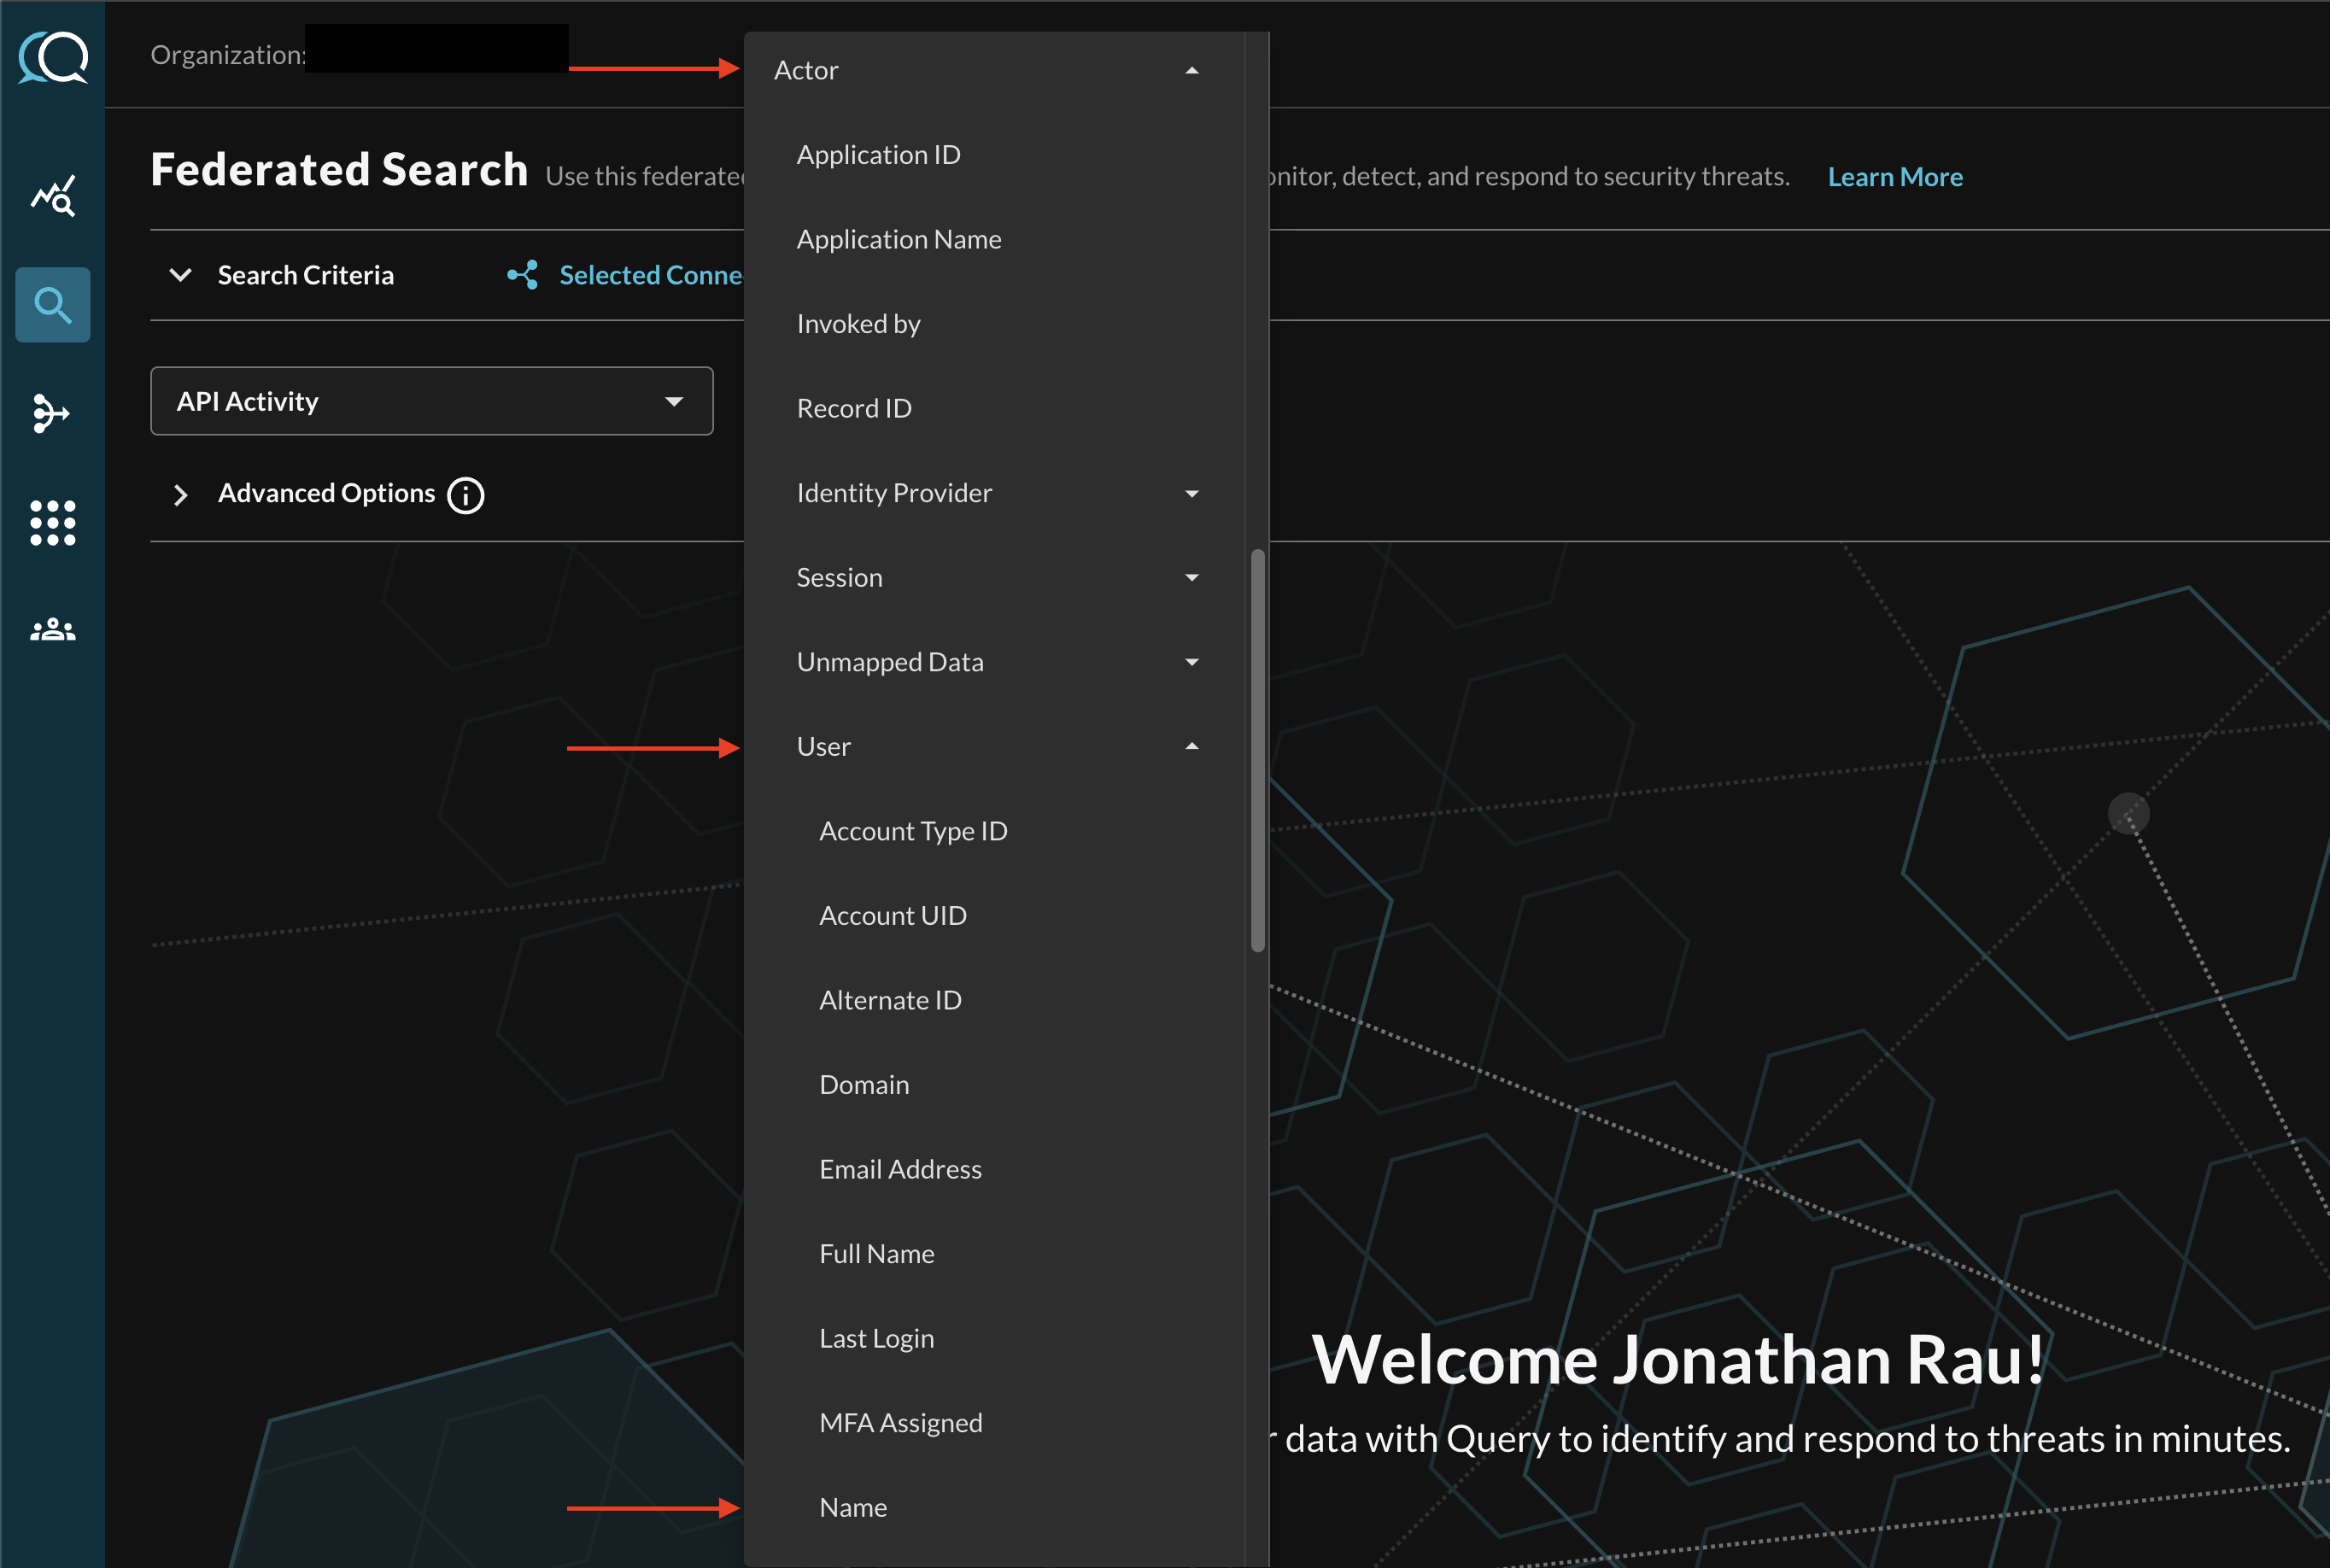
FIG. 10 - Filtering for specific Attributes within an Event Class Search
When adding two or more Conditions, you can further change the behavior by specifying ANY or ALL quantifiers over the filters for greater levels of specificity or more narrow-but-generalized searches, respectively, as shown below (FIG. 11).

FIG. 11 - Selecting multiple conditional filters
Resources
Troubleshooting Steps
- Ensure that you are ClickHouse Cloud Service has started and that there is data loaded into a table or view within it.
- Ensure that your username and password is correct, and that your password has not be rotated.
- If you have IP Ranges specified for allowlisting, ensure that you work with your Query Sales Engineer or Customer Success Manager to receive our up-to-date IP ranges and add them.
- Ensure that your Database matches the Table/View that you specific in the Connector.
- Ensure that you did not change the Port number, it defaults to
8443and shouldn't be changed, though some exceptions may exist. - Ensure that your hostname is correct and that you did not provide the FQDN or URL of your ClickHouse Cloud tenant.
If you have exhausted the above Troubleshooting list, please contact your designated Query Sales Engineer or Customer Success Manager. If you are using a free tenant, please contact Query Customer Success via the Support email in the Help section, or via Intercom within your tenant.
Updated 3 months ago