Microsoft Entra ID (Azure AD)
Use Query Federated Search to surface details on Analyzed Emails, Audit Logs, Authentication (Logins), Devices, and Users.
TL;DRTo integrate Microsoft Azure Active Directory with Query:
- Setup the required connection parameters in Microsoft Graph API mentioned in the 'Prerequisites' section of this document.
- Add a Microsoft Azure Active Directory connection source in Query with the connection parameters
- Test the integration with Test connection link.
- Perform searches for users, devices and authentication events.
Overview
Microsoft Entra ID (formerly known as Azure Active Directory, or AAD) is a cloud-based identity and access management service provided by Microsoft, offering secure authentication and authorization capabilities for applications and resources in the Azure and M365 ecosystems. Underpinning the Entra ID service is the Microsoft Graph API which provides access to a variety of endpoints that are available to Entra Premium Plan and Microsoft Defender for Office 365 (MDO) Plan 2 licensees. For instance, deep details and metadata and users and their devices, all authentication and audit events, as well as all emails analyzed by MDO.
All federated searches have their searches and results expressed in the terms of the Query Data Model (QDM), which is based on the Open Cybersecurity Schema Framework (OCSF). Each API source is normalized into a specific QDM/OCSF Event Class to standardize and normalize the data for increased situational awareness, ease of aggregation of filtering, and easy pivoting.
| API Endpoint | QDM/OCSF Event Class | Entities/Observables |
|---|---|---|
| List analyzedEmails | Email Activity | Email Address |
| List signIns | Authentication | Email Address IP Address Username User UID User Agent |
| List directoryAudits | Web Resources Activity | Email Address IP Address Username User UID |
| List devices | Device Inventory Info | IP Address Hostname Resource UID |
| List users | User Inventory Info | Email Address User UID Username |
Using the Entra ID Graph API, users can easily surface details relevant to several Security Operations jobs as well as IT Ops, Audit, and GRC tasks. For example, you can retrieve all Users from your directory and see their login details, licenses, business-specific information, and more. Likewise, you can retrieve all sign-in logs and audit logs in your environment and search for specific users by email, user principal name, or ID to review their log in activity and any changes you enact in the environment. Finally, for MDO P2 licensees, you can search across all Analyzed Emails sent to and from your email domain and conduct anti-spam or anti-malware investigations from there.
Prerequisites
To use all capabilities of this Connector, you must have both a Microsoft Defender for Office 365 (MDO) Plan 2 license. These are made available via a variety of plan tiers such as M365 A/E/F/G5 and F3, and others.
| API Endpoint | App Permission Required | Minimum Plan Required |
|---|---|---|
| List analyzedEmails | SecurityAnalyzedMessage.Read.All | Defender for Office 365 Plan 2 |
| List signIns | AuditLog.Read.All Directory.Read.All | Entra ID Free |
| List directoryAudits | AuditLog.Read.All Directory.Read.All | Entra ID Free |
| List devices | Device.Read.All | Entra ID Free |
| List users | AuditLog.Read.All Directory.Read.All User.Read.All | Entra ID Free |
Ensure that the Administrator who creates the Application Registration for this Connector has the plan active. The permissions listed are also the minimum necessary to retrieve all data available to the Query Connector for Microsoft Entra ID. While you can use all of the other capabilities without a specific license, having Entra P1 or Entra P2 license tiers increases the search range and retention up to 30-90 days depending on the log resource (for Audit and Sign Ins).
To connect a Microsoft Entra ID with Query Federated Search you'll need to execute the following steps.
-
Login to your Microsoft Azure subscription where your Tenant is hosted and navigate to Microsoft Entra ID. On the left-hand navigation pane, select App registrations as shown below (FIG. 1).
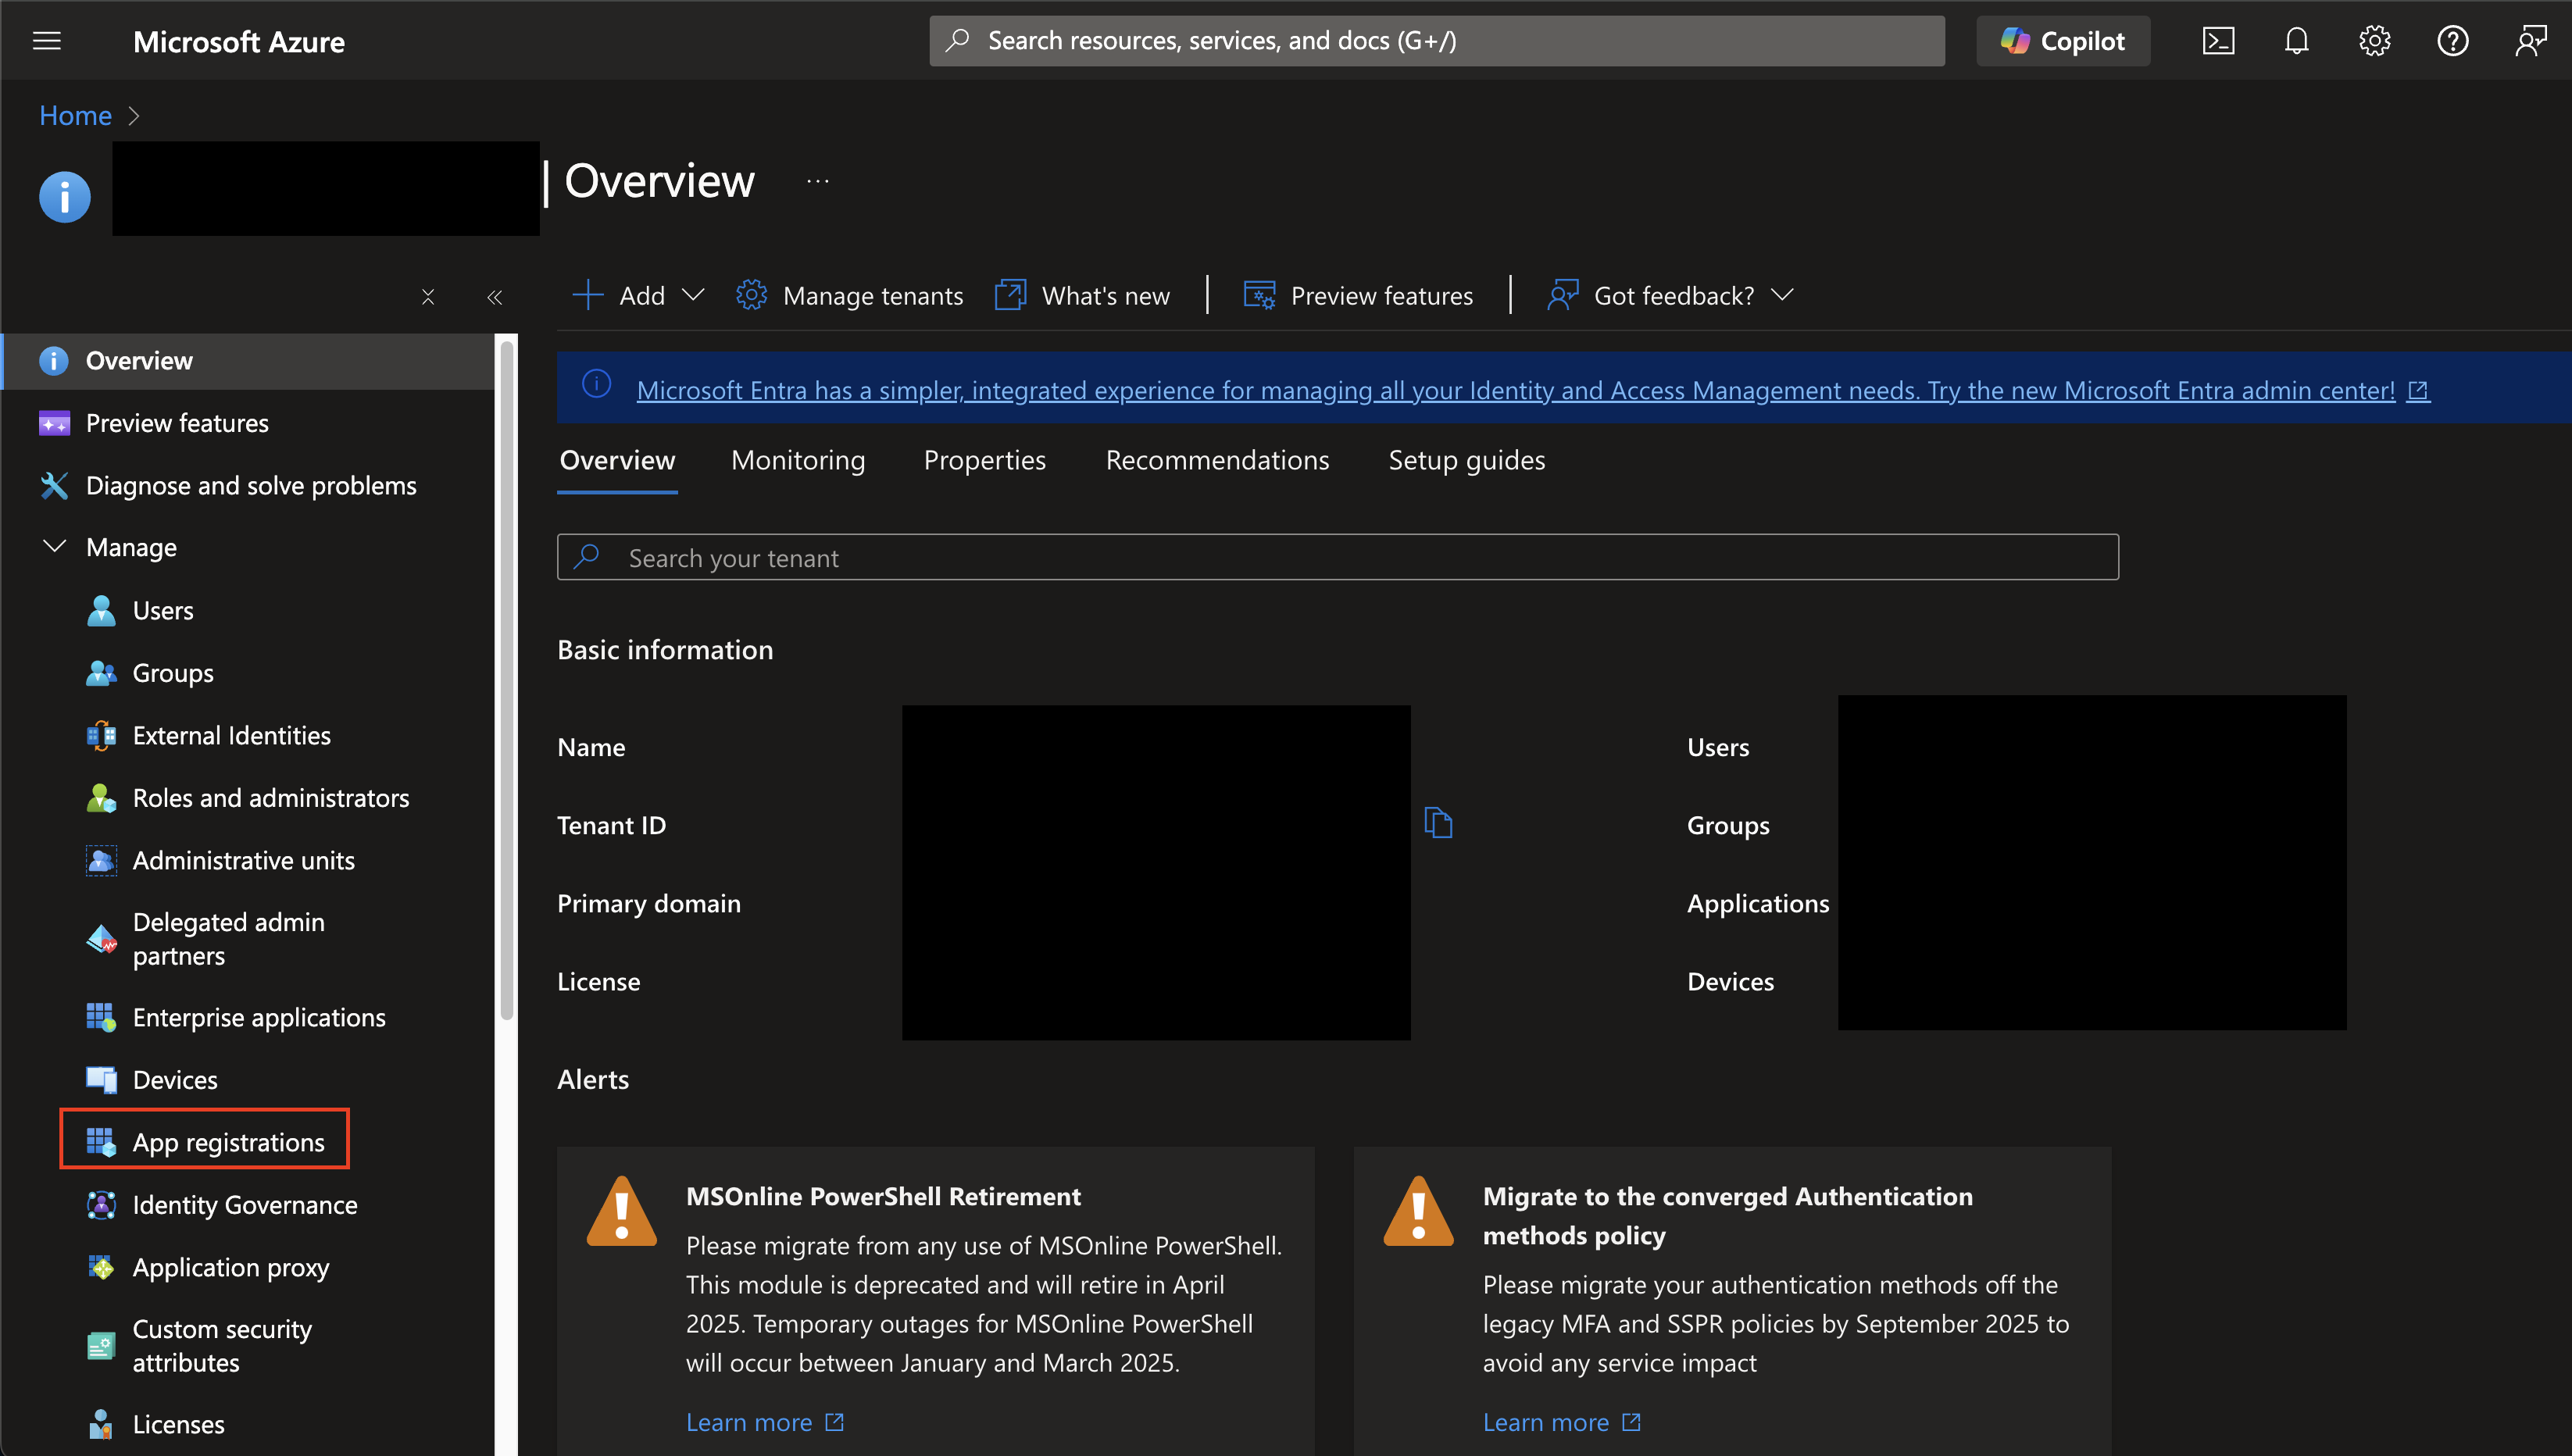
FIG. 1 - Navigating to App registrations in Entra ID
-
At the navigation tab on the top of the page select + New registration. Enter a Name (such as
QueryFederatedSearchForMicrosoftGraphSecurity) and select the appropriate Supported account types for your tenancy and select Register at the bottom-left as shown below.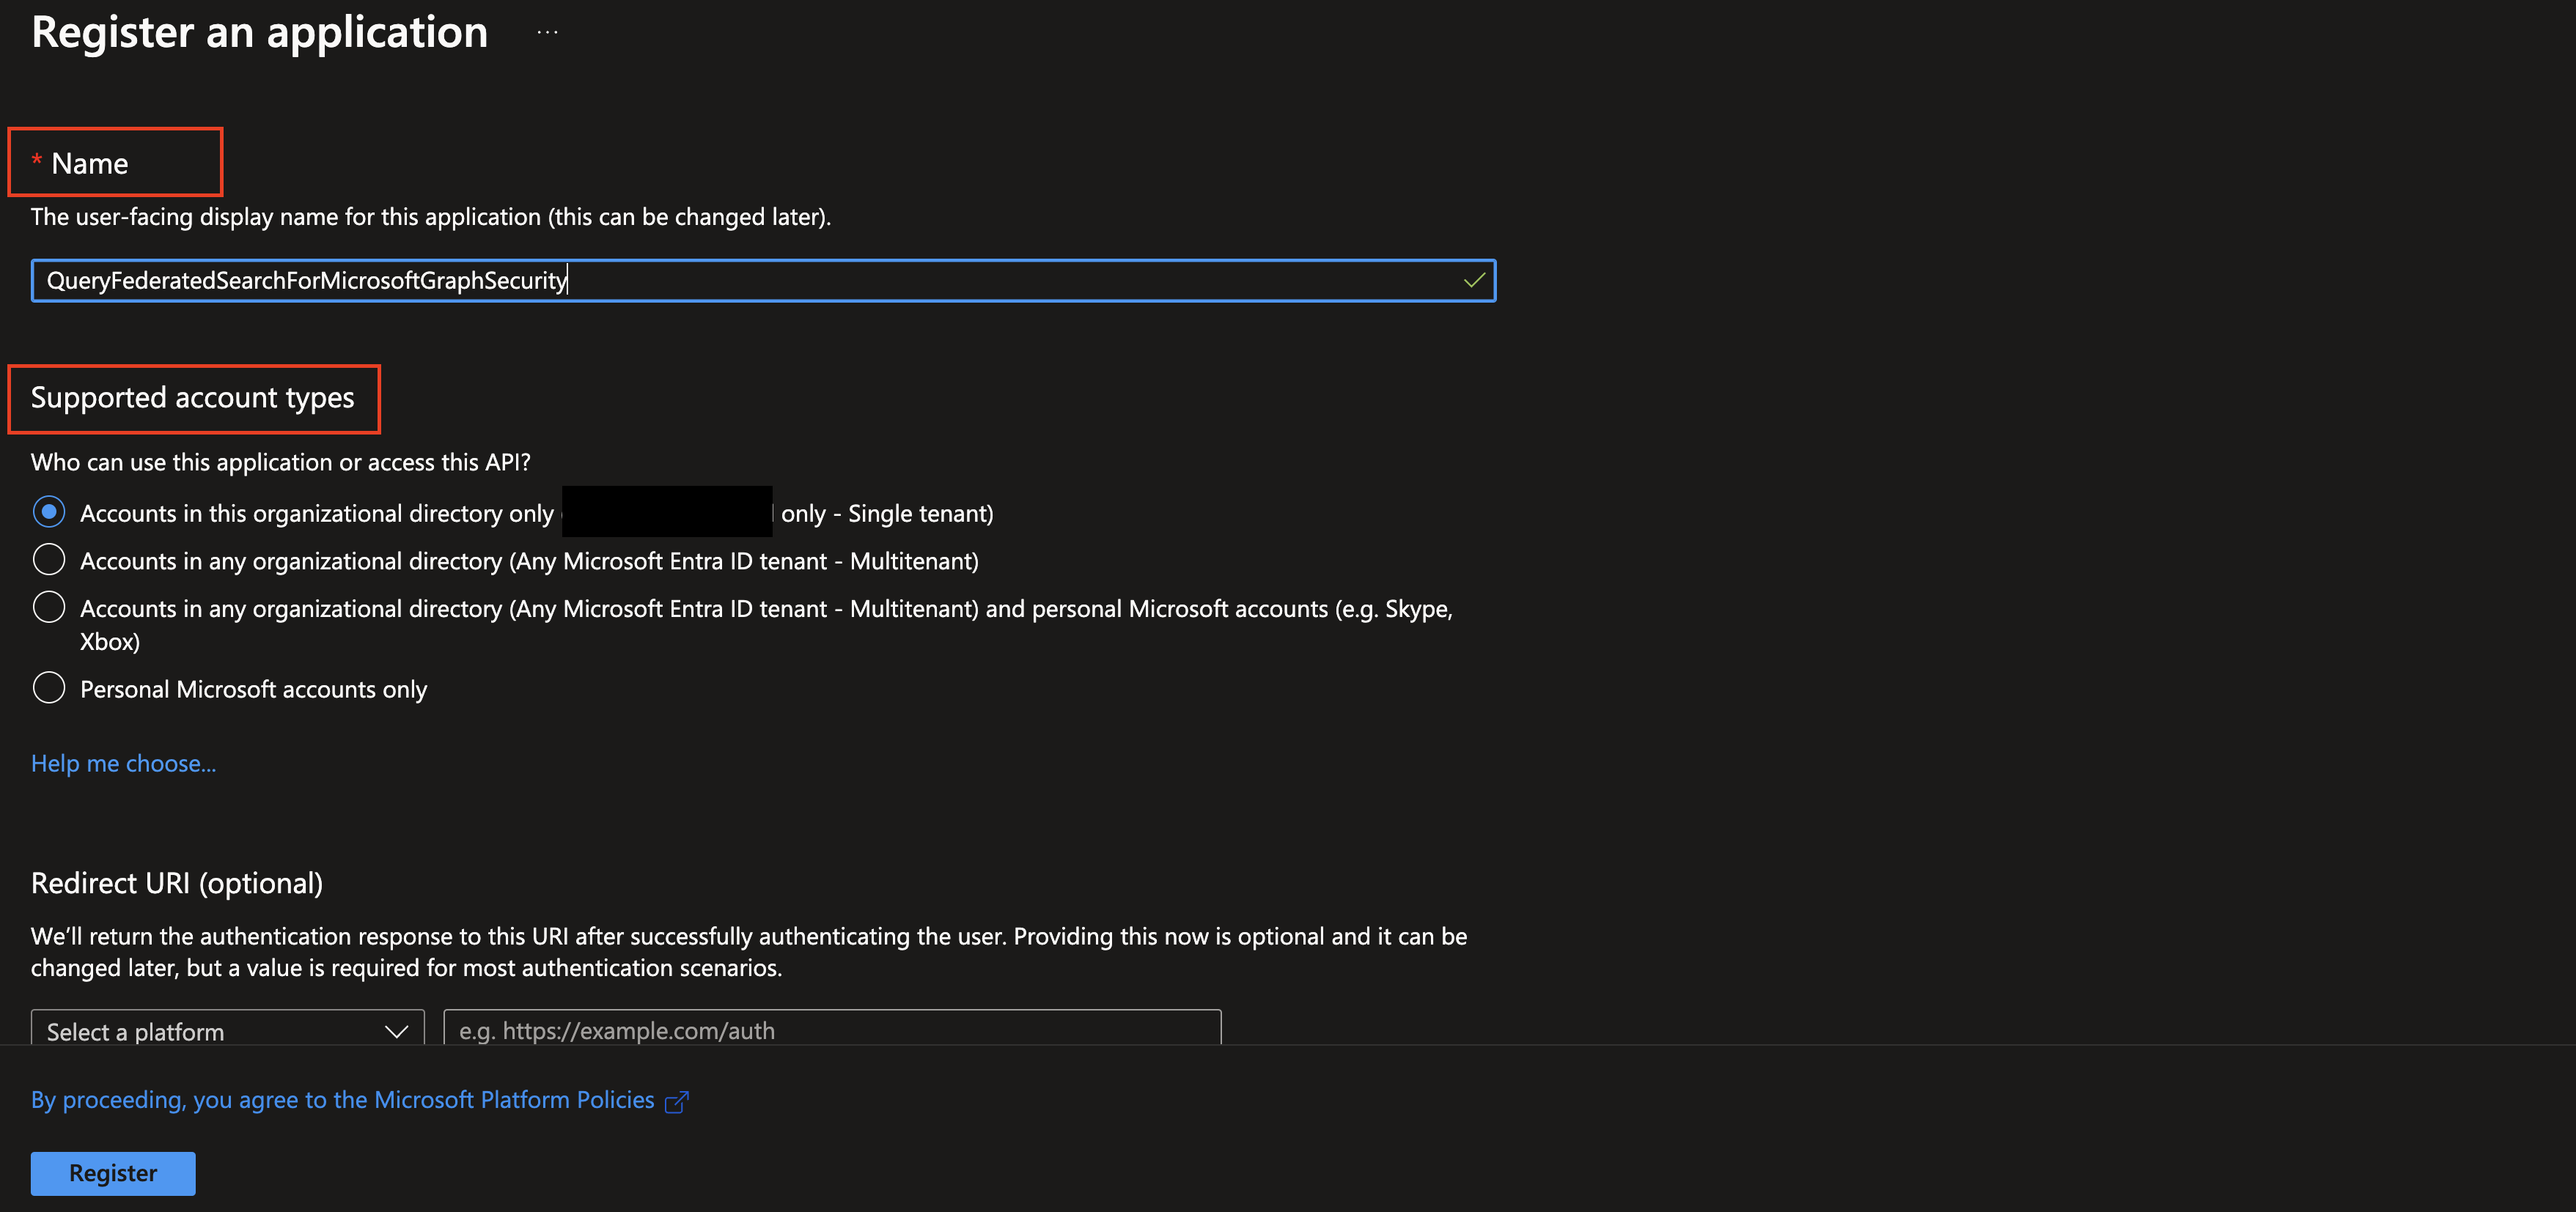
FIG. 2 - Naming and selecting the supported account types for an App registration
-
You will (should) be automatically redirected to the App registration's overview screen. Copy the value for Application (client) ID and Directory (tenant) ID as you will require them to create your Connector, as shown below (FIG. 3).
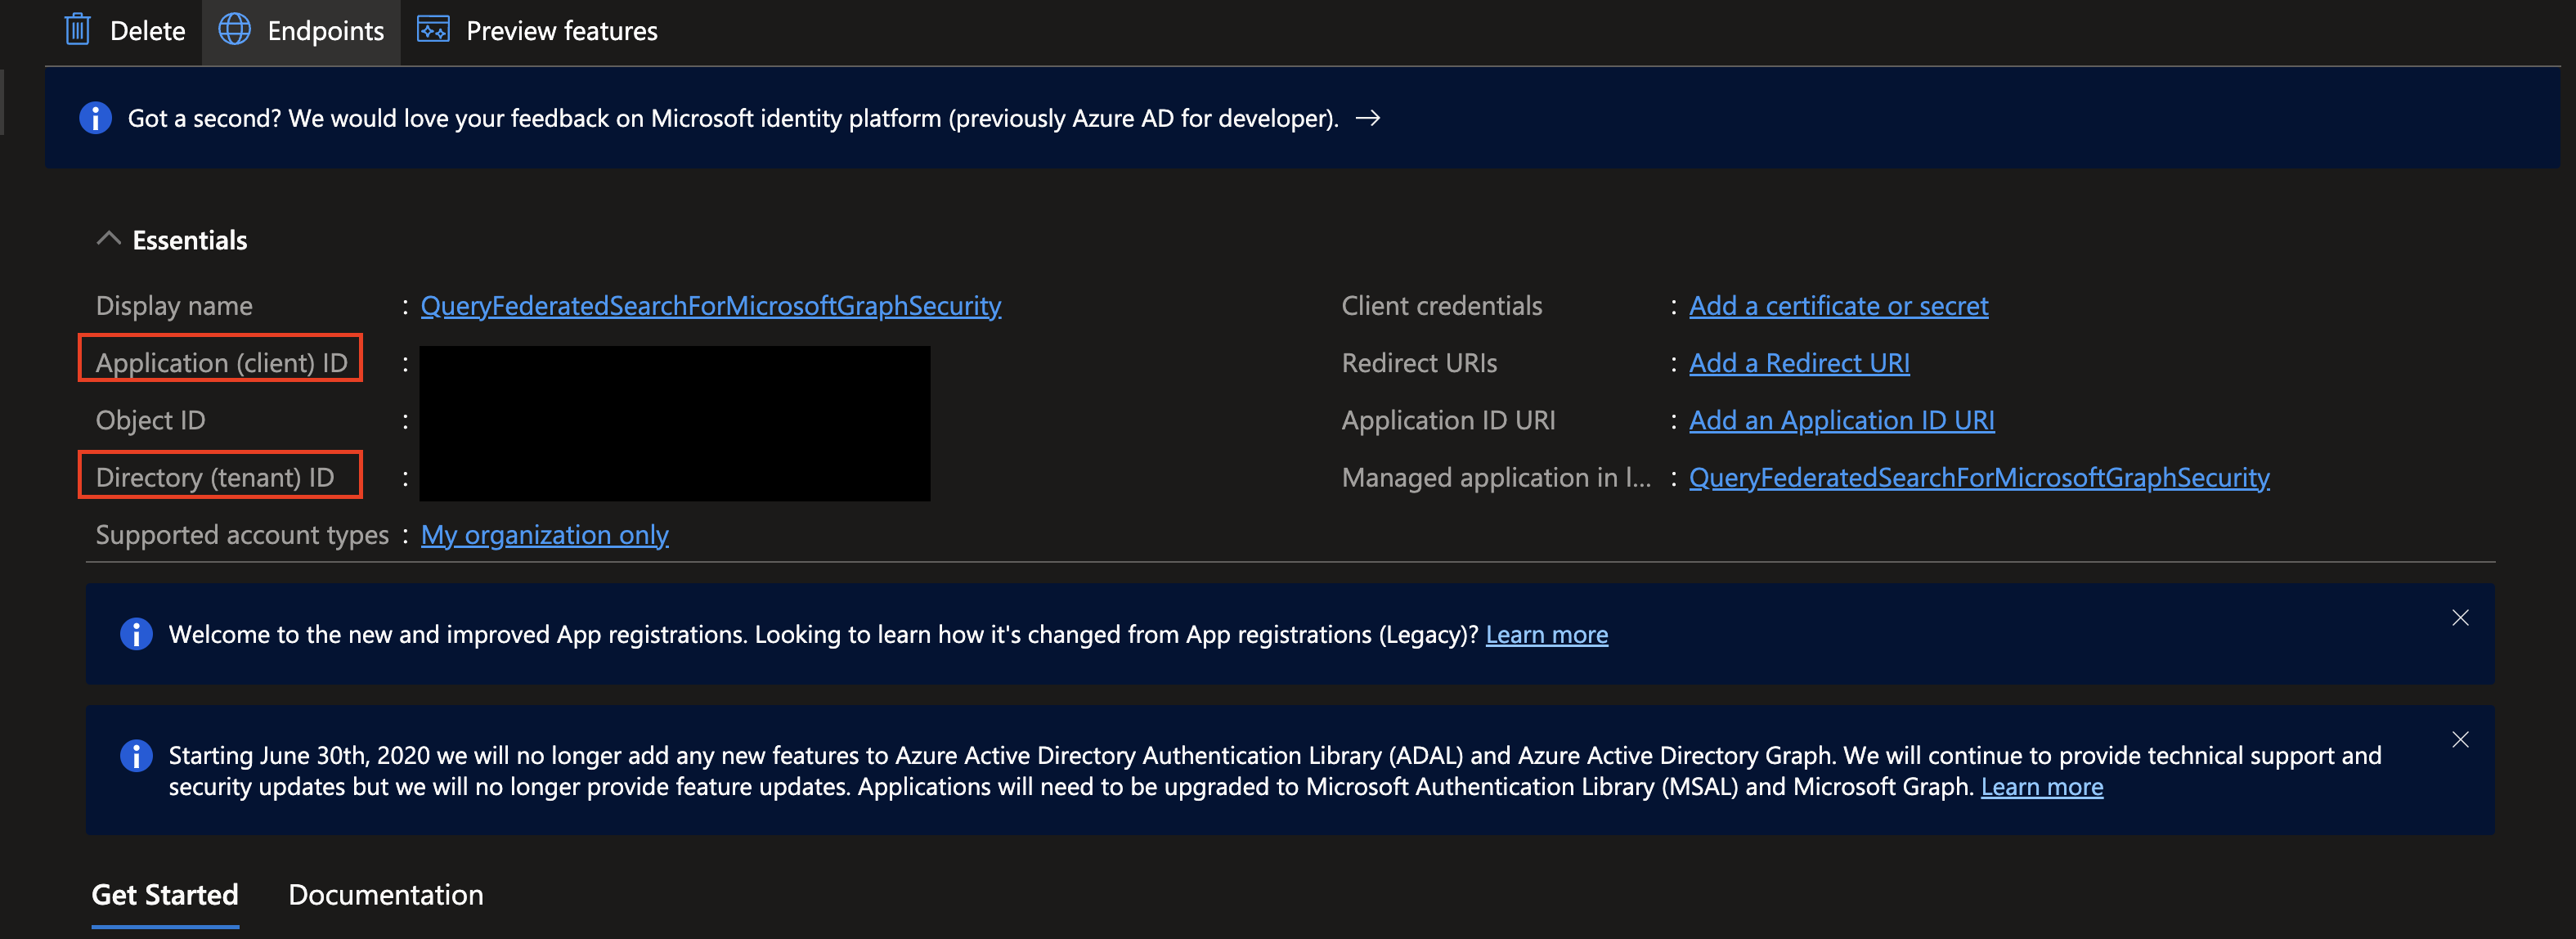
FIG. 3 - Copying the client ID and tenant ID from the App registration
-
In the left-hand navigation pane, select API permissions. Once at the API permissions screen, select + Add a permission under the
Configure permissionsheader at the center of the screen, as shown below (FIG. 4).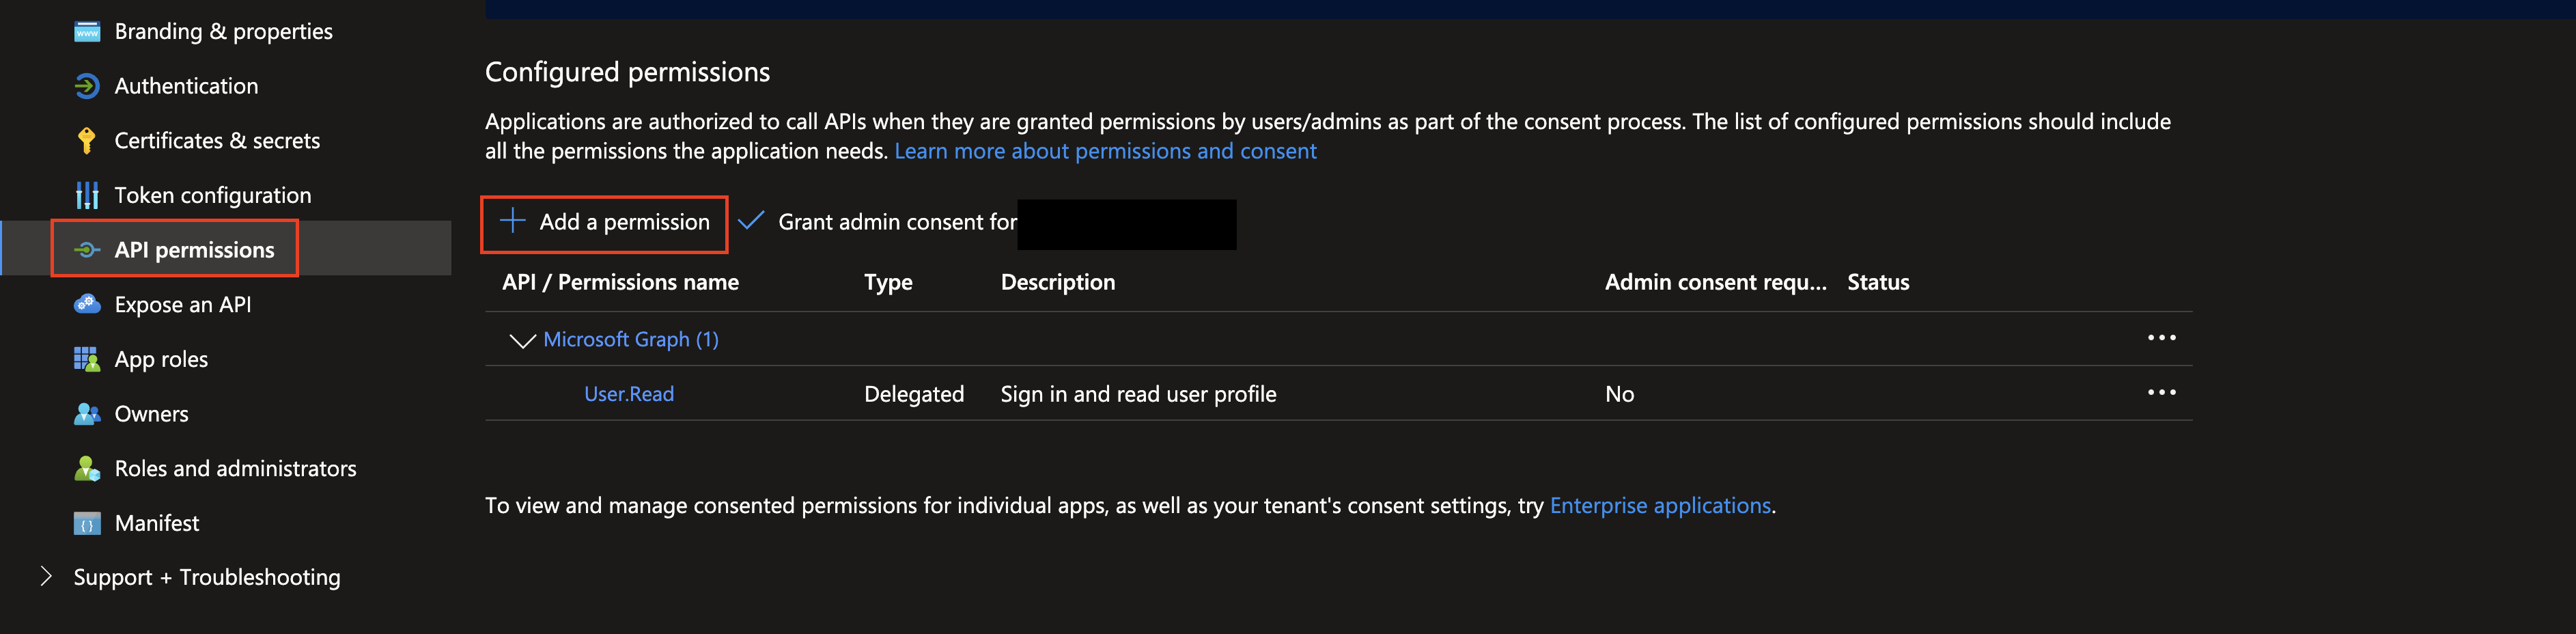
FIG. 4 - Adding permissions to an App registration
-
Select Microsoft Graph from the APIs, choose Application permissions, enter all of the required permissions in the table above, in search bar, toggle the checkbox next to the permission to select it, and select Add permissions at the bottom of the pane as shown below (FIG. 5). Ignore the screenshot showing
SecurityAlert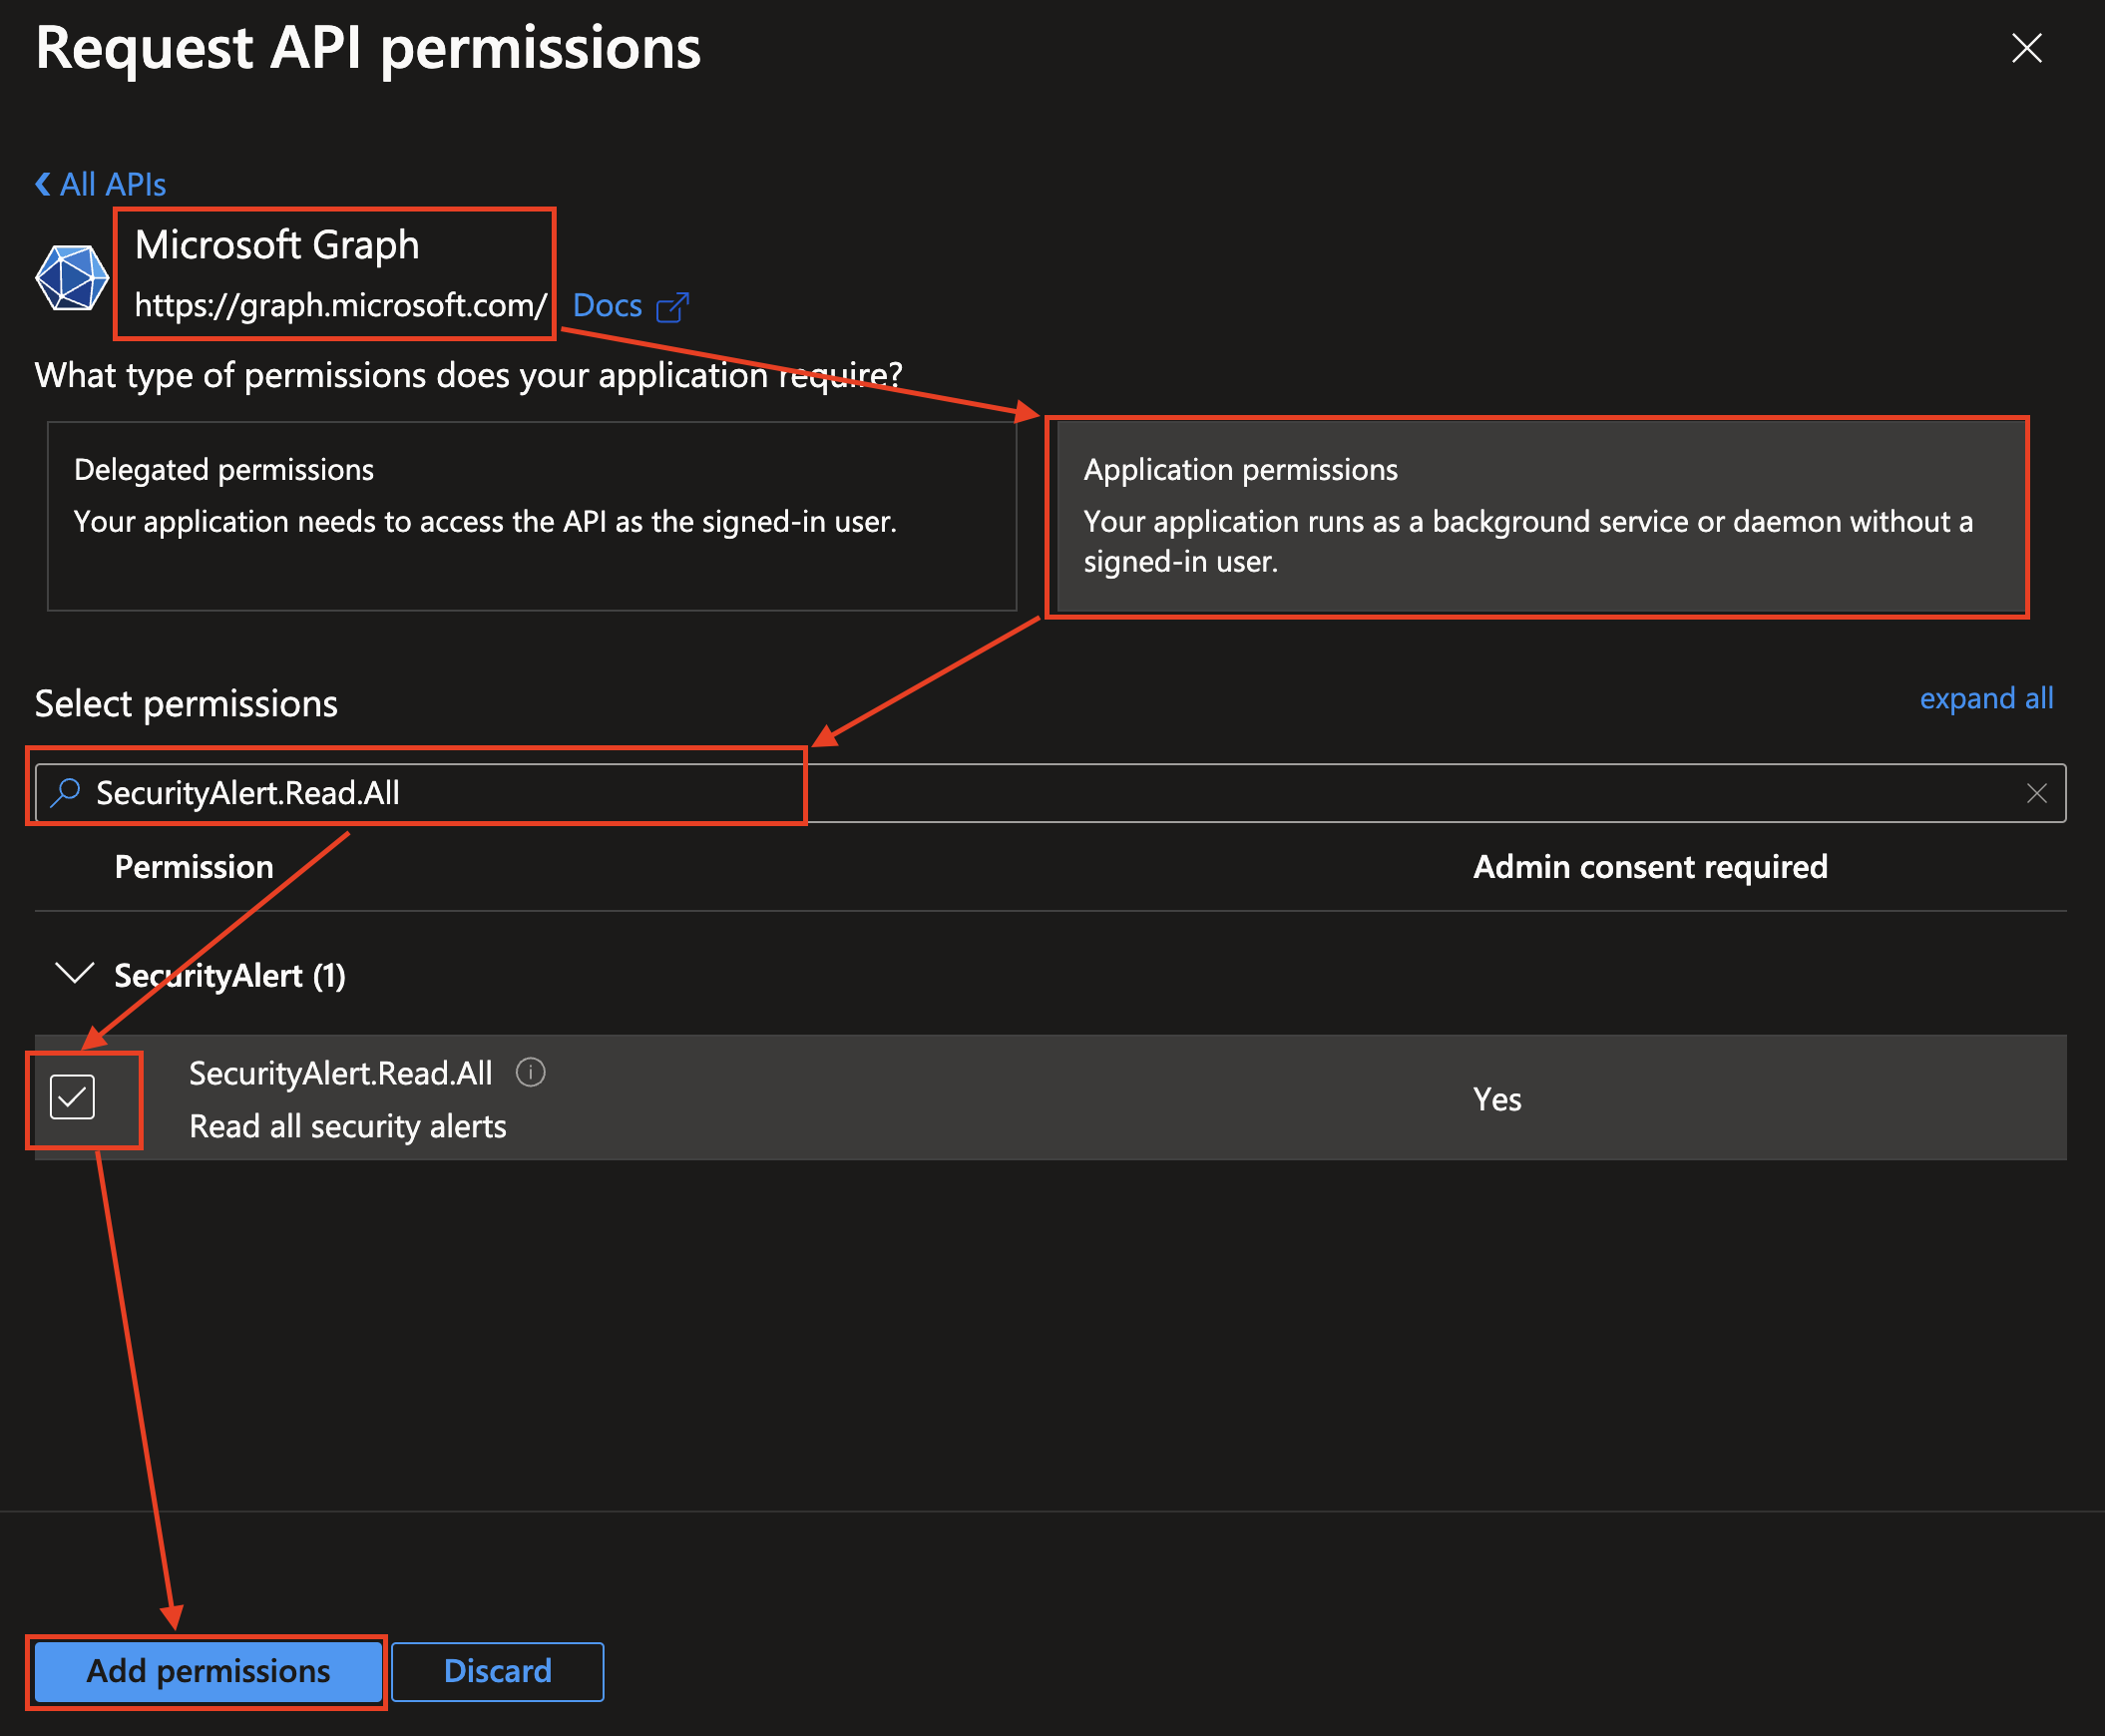
FIG. 5 - Adding the
SecurityAlert.Read.Allpermission to your App Registration -
Select Grant admin consent for {your_tenant_name} and from the
Grant admin consent confirmationpop-up select Yes as shown below (FIG. 6) to add domain-wide consent for your Application Permissions.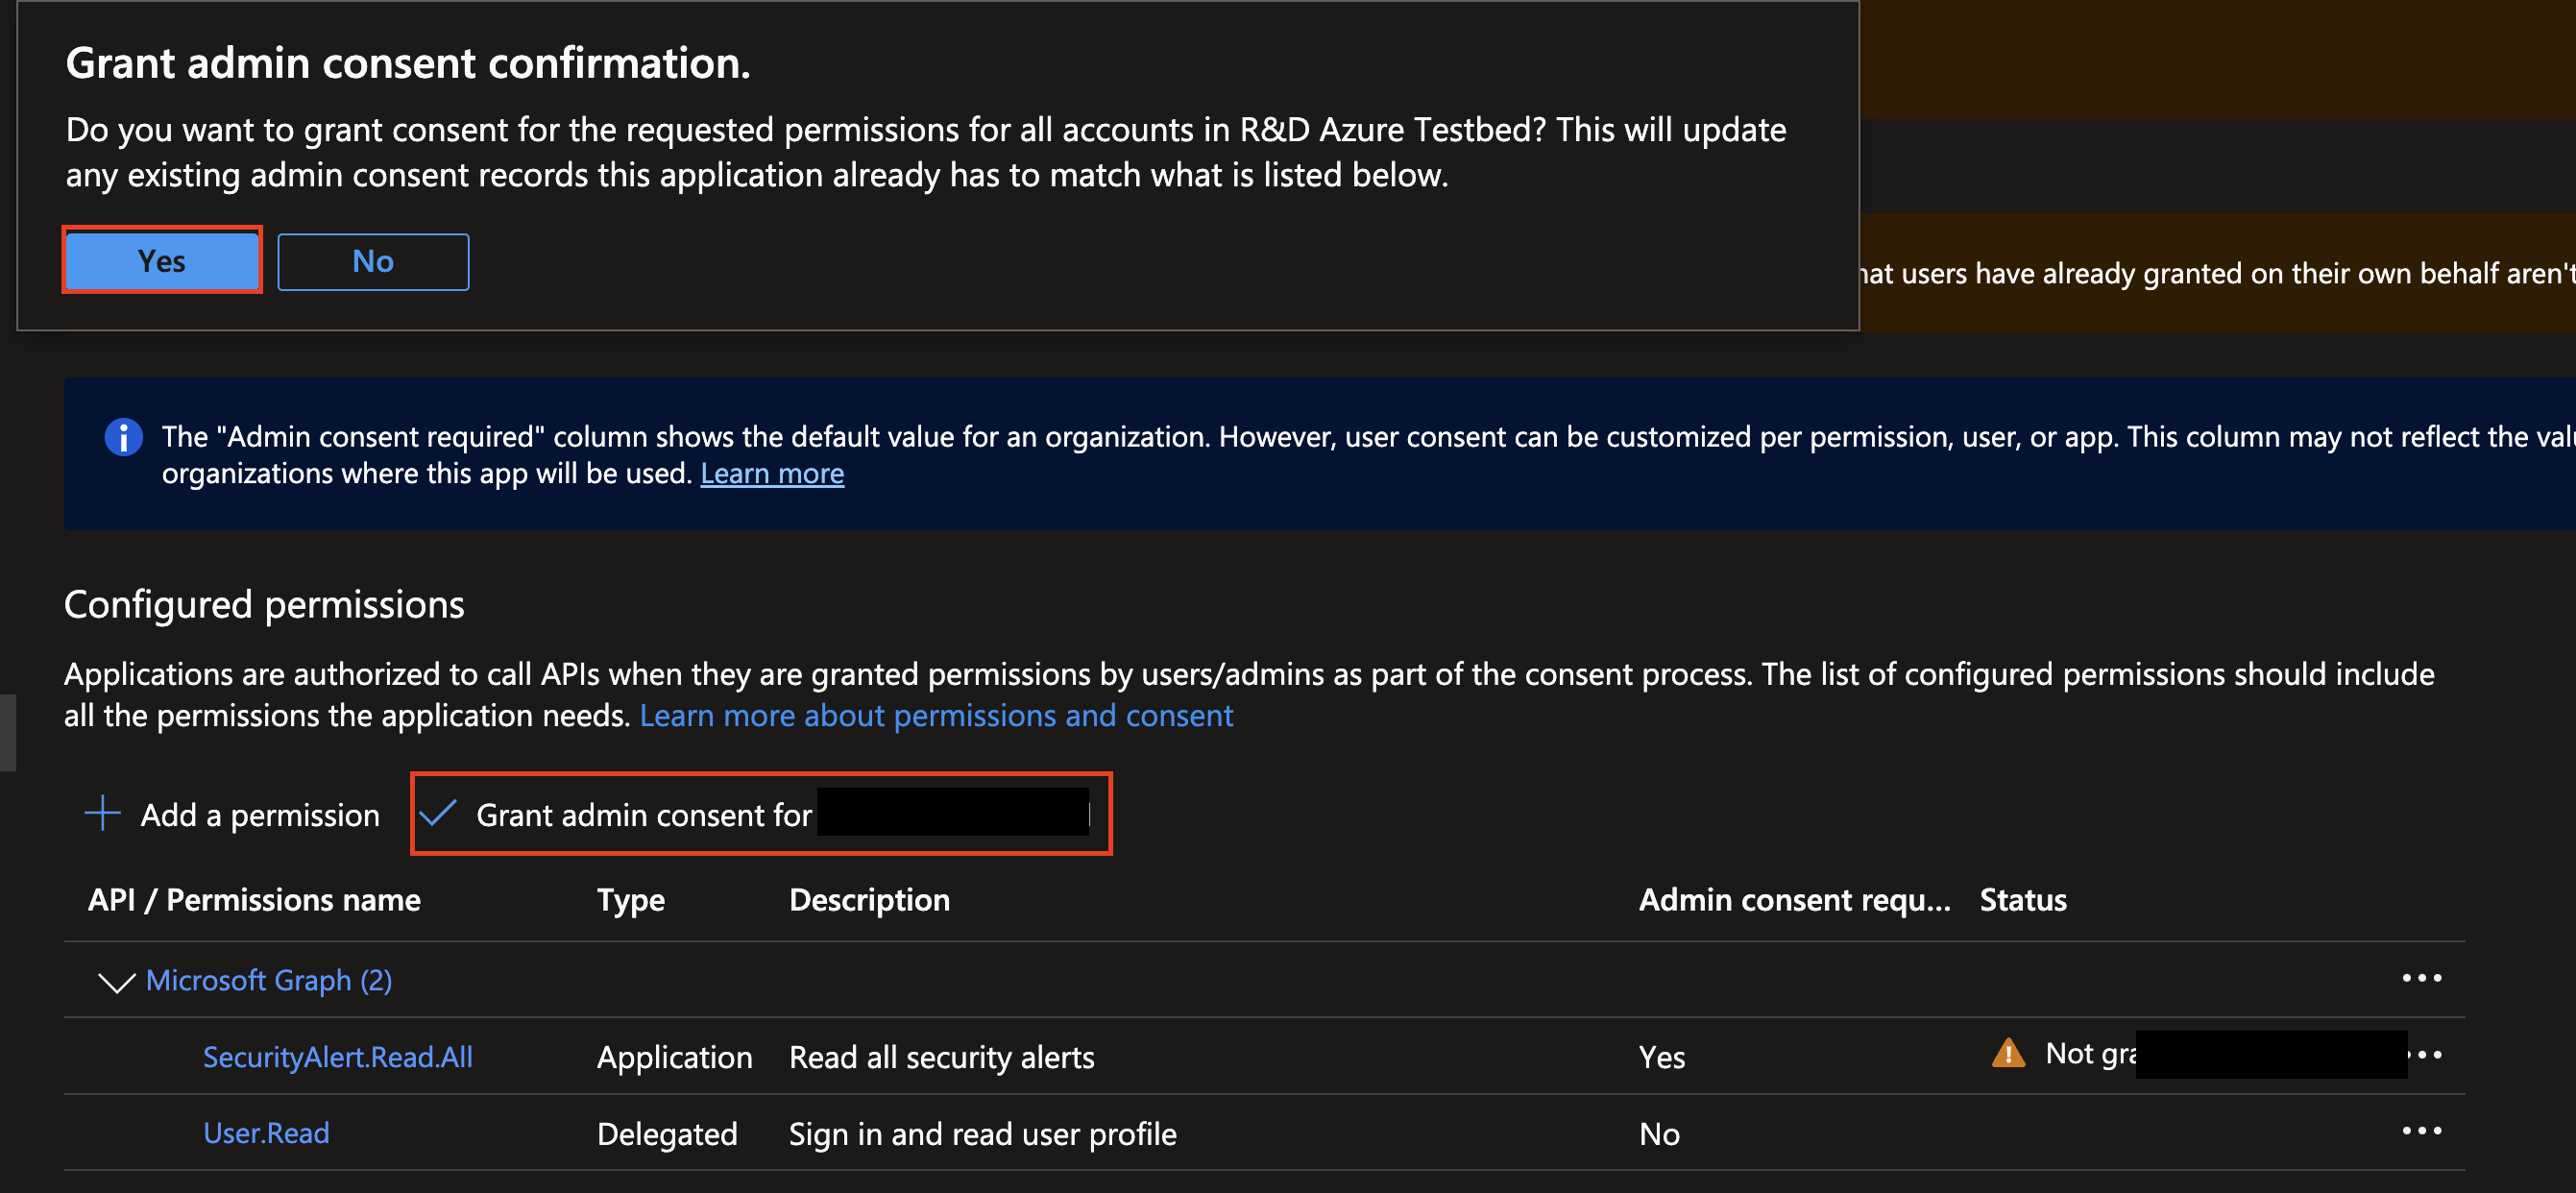
FIG. 6 - Granting admin consent for your App registration
-
In the left-hand navigation pane select Certificates & secrets, choose the Client secrets tab, and select + New client secret as shown below (FIG. 7).
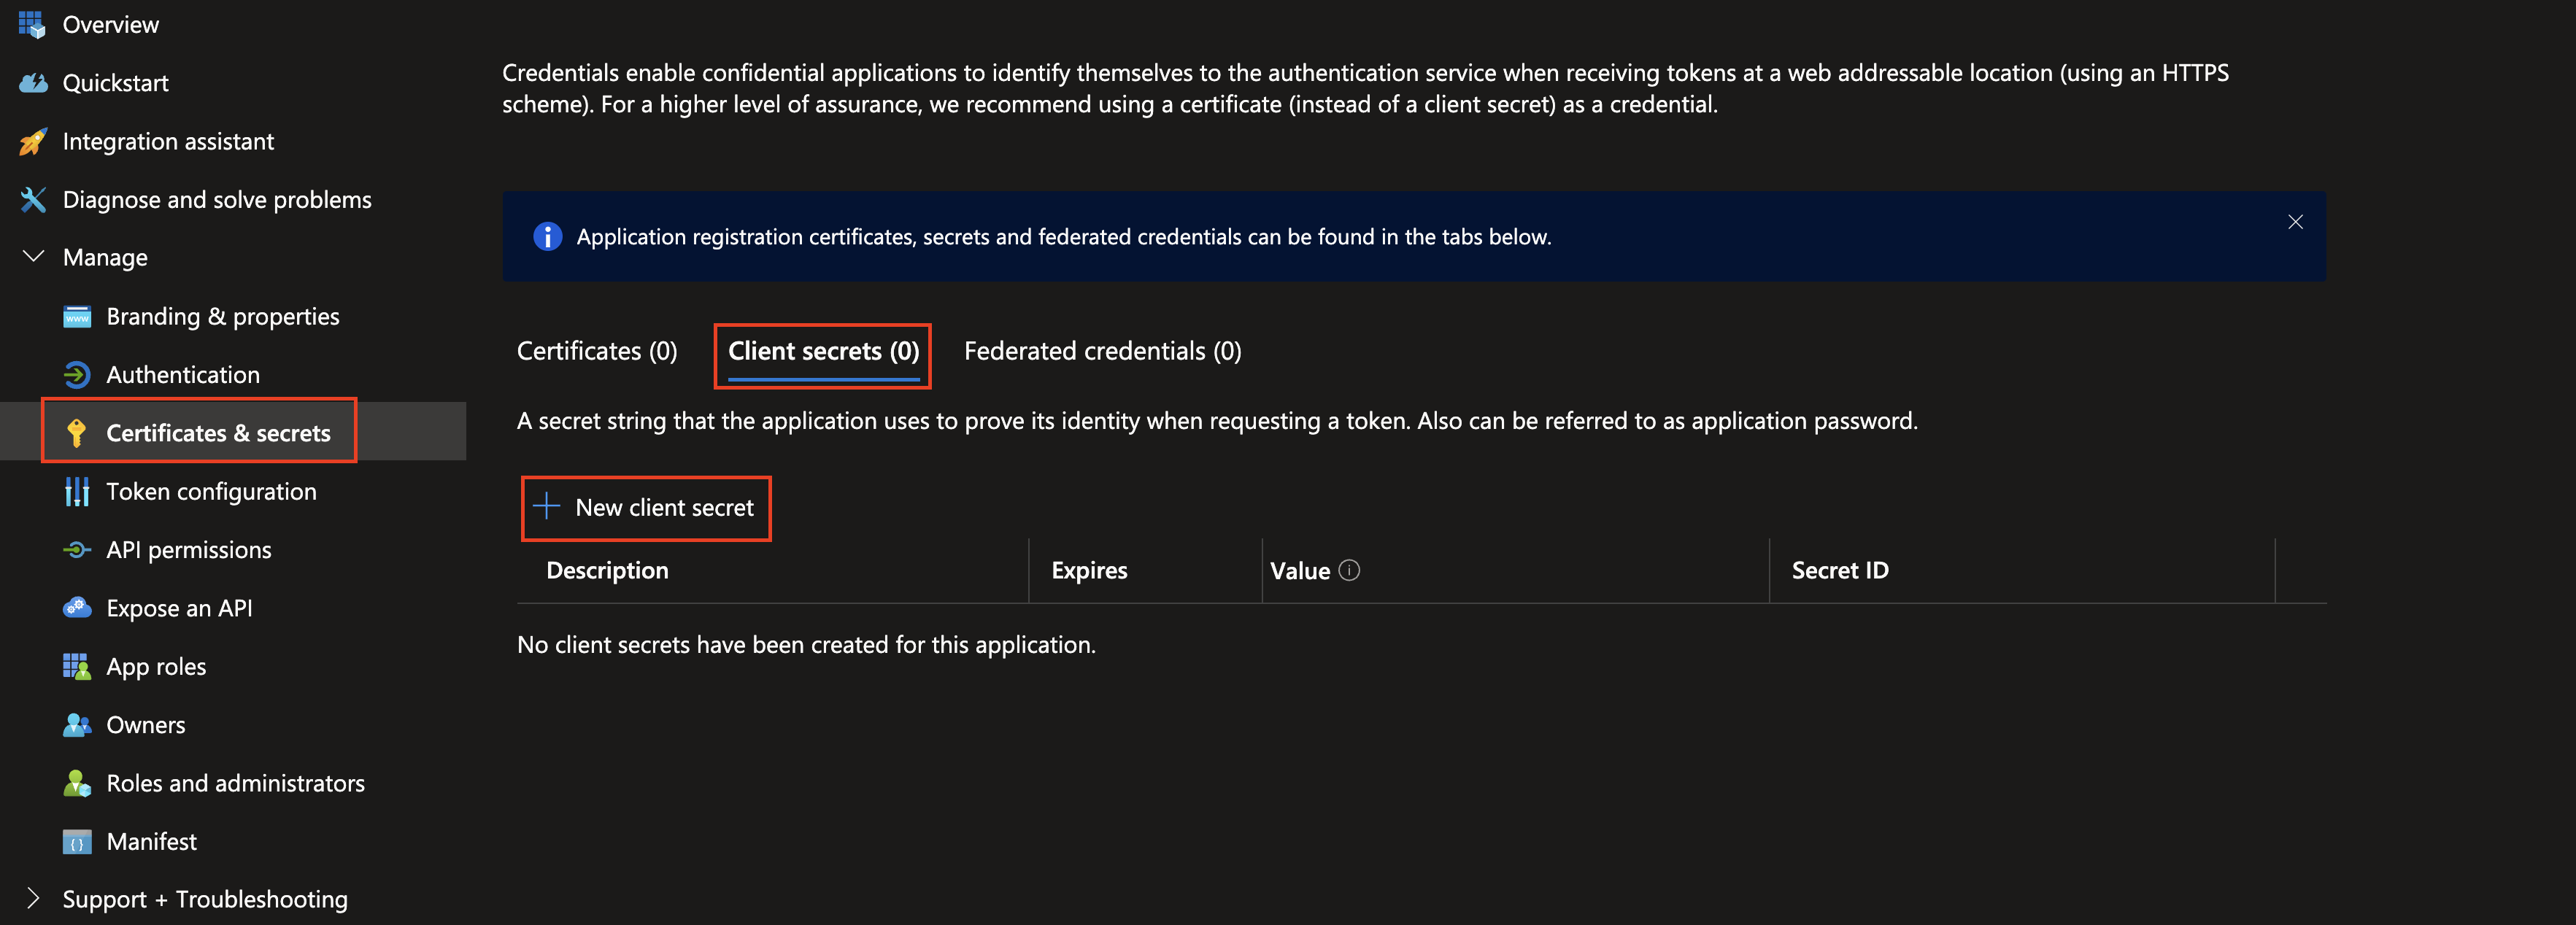
FIG. 7 - Creating a new client secret for your App registration
-
Provide a Description and select an appropriate Expires data (up to 2 year) and select Add from the
Add a client secretpane as shown below (FIG. 8).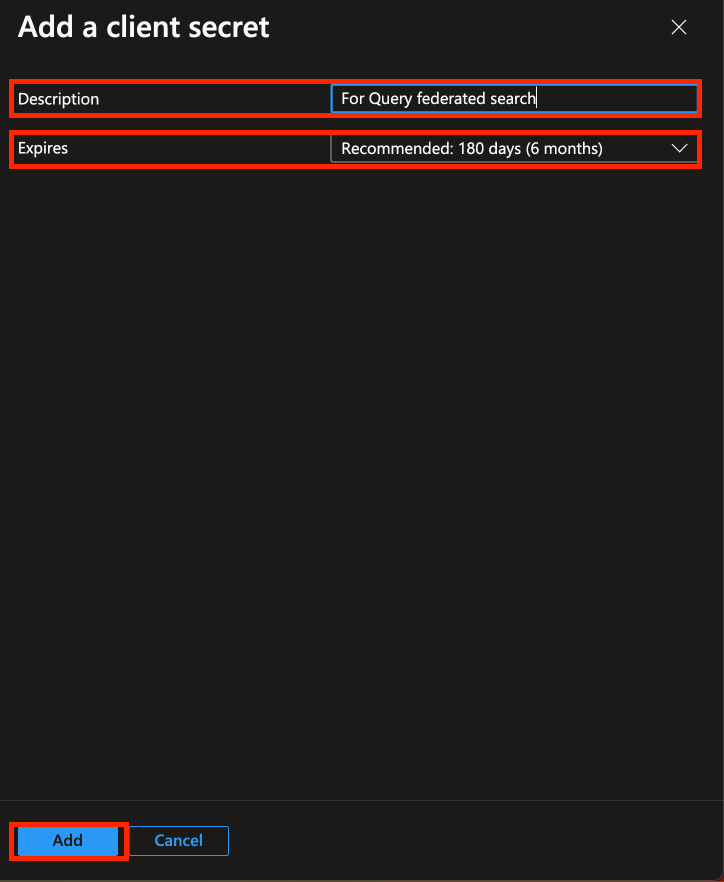
FIG. 8 - Adding a description and expiration date to your client secret
-
After creating your Secret, copy the value underneath the Value column, do not copy the value for Secret ID as shown below (FIG. 9). Immediately vault these credentials and save them for configuring your Connector in the next section.

FIG. 9 - Copy your SECRET VALUE and store it securely
To learn how to configure a Microsoft Entra ID Connector, proceed to the next section.
On NHI securityNHI - or, Non-Human Identities - such as your Enterprise Application (App Registration) client secrets are extremely sensitive. Query securely stores the Client Secret in a dedicated AWS Secrets Manager Secret per Connector per Tenant.
While this requires you to configure Connectors per Microsoft Entra ID Connector and continue to enter in your credentials, every copy is stored as securely as each other with minimum necessary permissions that only allows the specific piece of serverless infrastructure to retrieve the secret, it is never cached or persisted outside of the Secret.
Configure a Microsoft Entra ID Connector
-
Navigate to the Connections page, select Add Connections, and select Microsoft Entra ID (Azure AD) from the Identity and HR category, optionally type "Entra ID" in the search bar as shown below (FIG. 10).
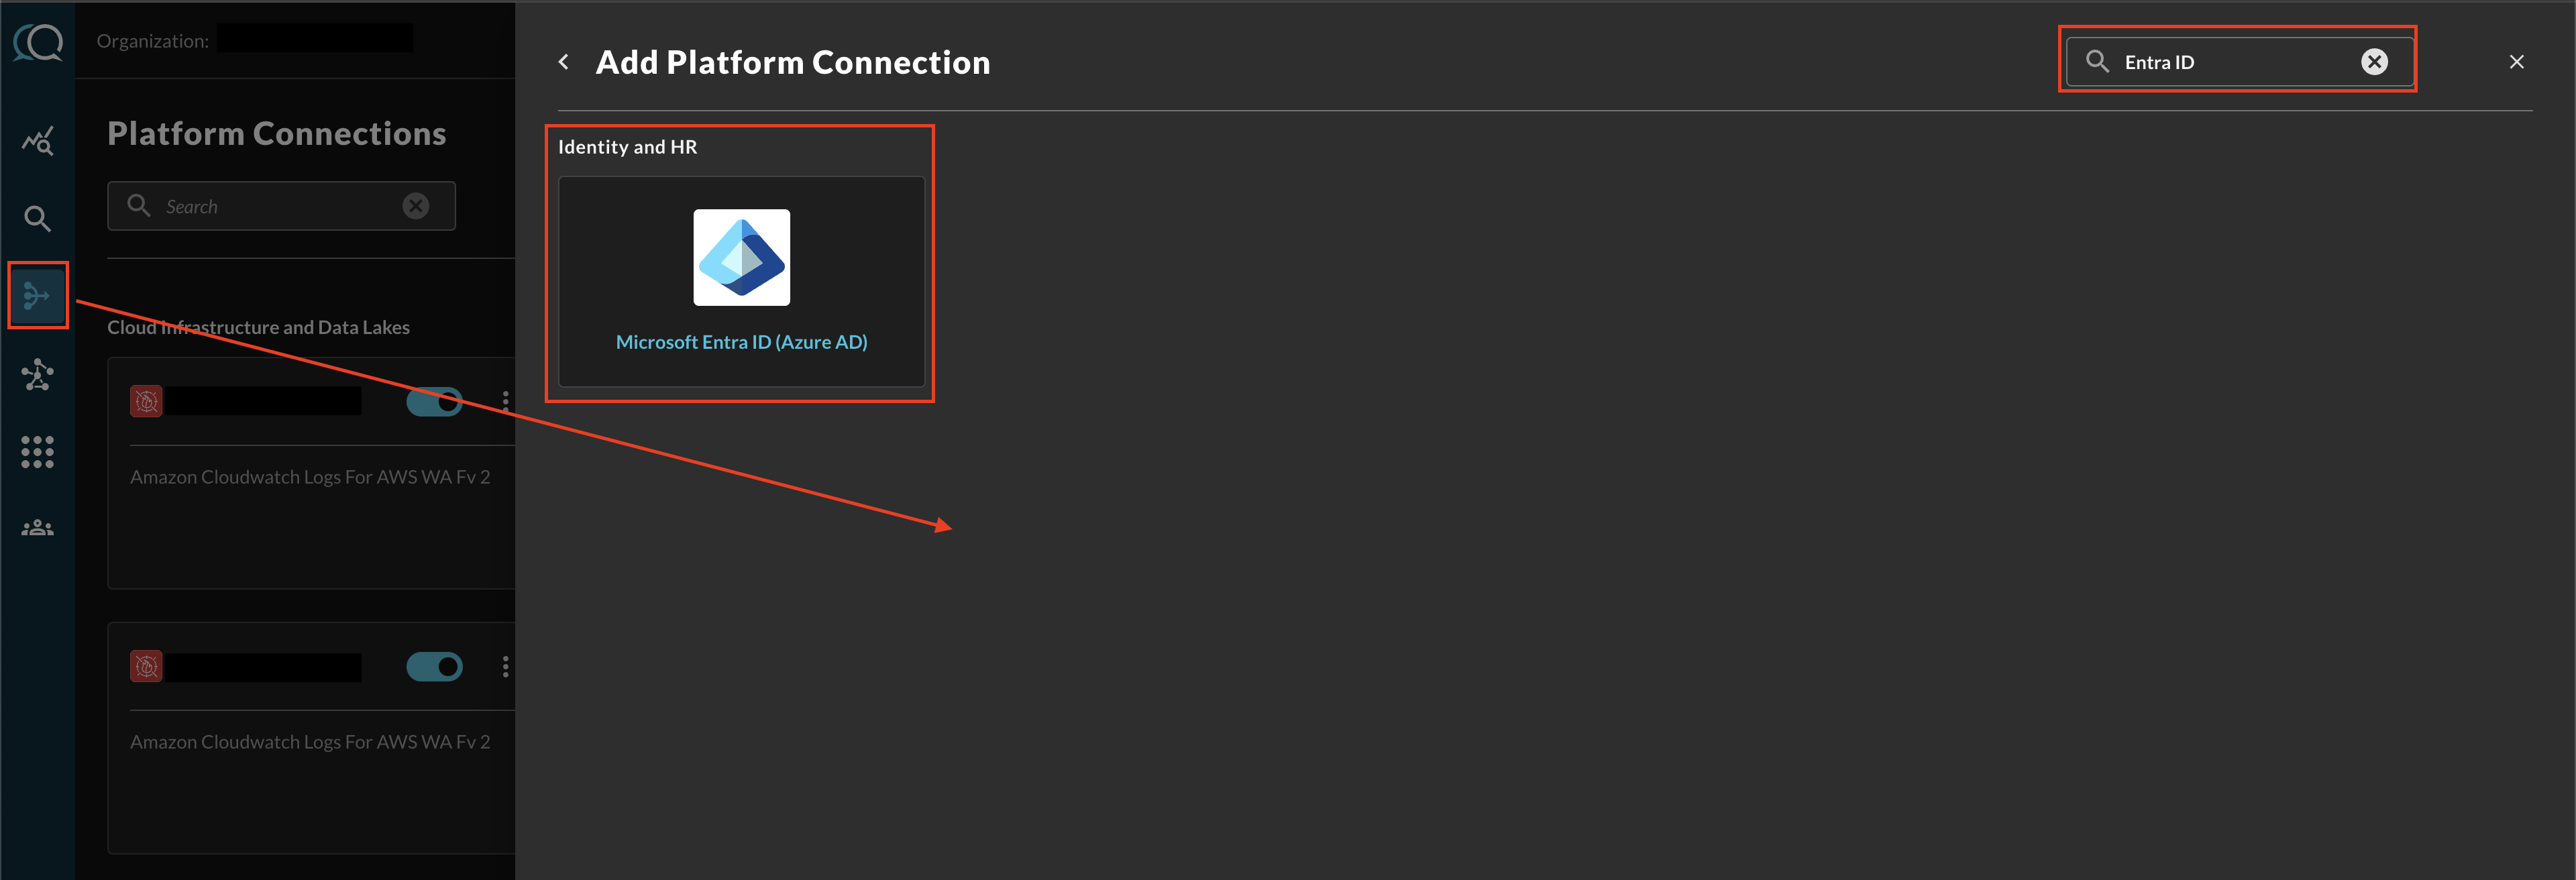
FIG. 10 - Locating the Microsoft Entra ID (Azure AD) Platform Connector
-
In the Connection Info section of the platform connector, provide the following details, select Save, and then Test Connection as shown below (FIG. 11).
-
Connection Alias Name: A contextual name for the Connector, this is used to disambiguate multiple of the same connector.
-
Microsoft Entra ID Tenant ID: The Tenant (Directory) Identifier of your Entra ID tenant.
-
Microsoft Entra ID Client ID: The Client (Application) Identifier of the Enterprise Application you created.
-
Microsoft Entra ID Client Secret: The Value of the Client Secret you generated for the Enterprise Application you created.
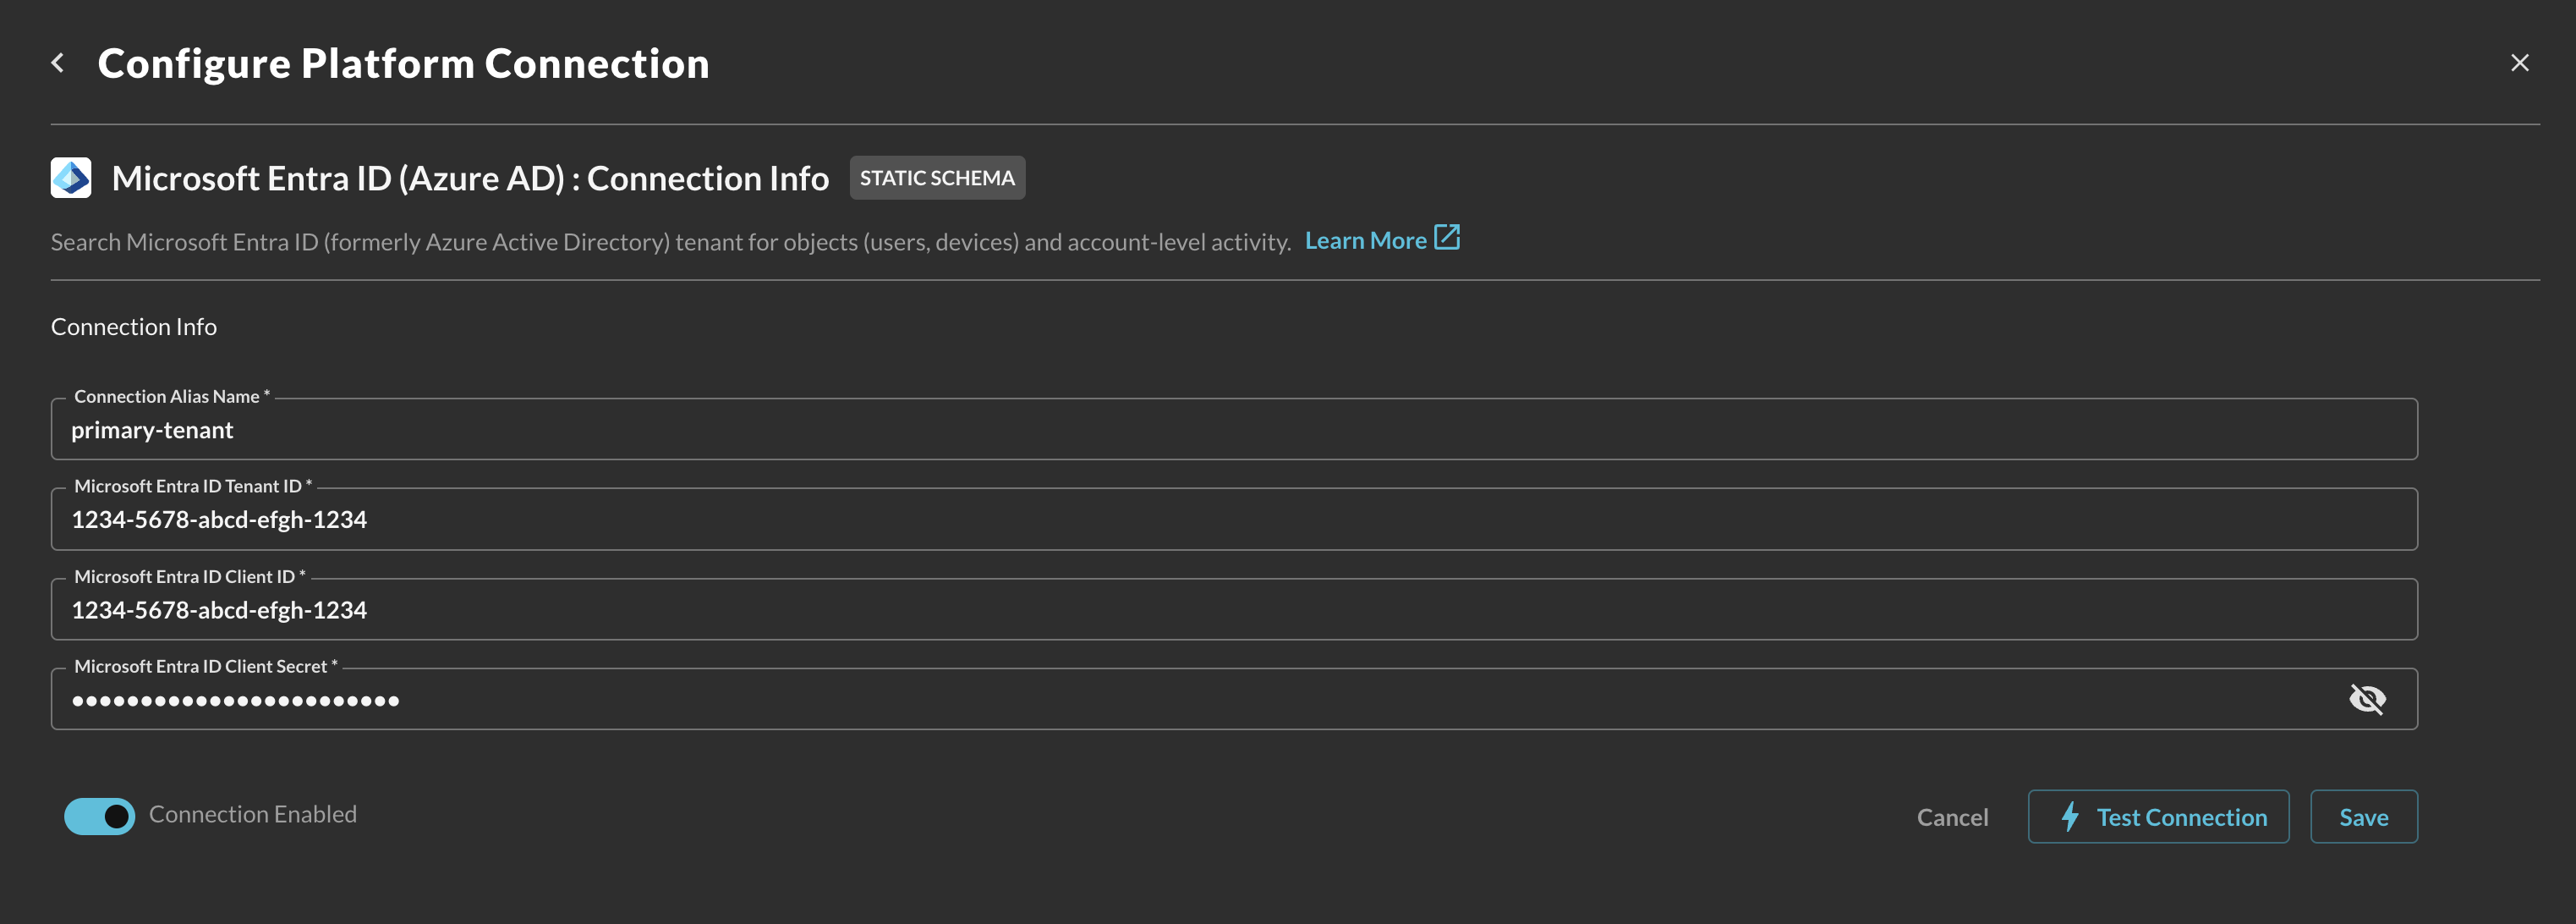
FIG. 11 - Configuring the Connector
-
-
Select Test Connection from the bottom-right of the connection pane to ensure that you have an active Entra ID P2 license, that you have the right scope(s) added to your App Registration, and that Admin Consent was granted. After that, we attempt to hit each endpoint and filter 1 object to ensure that the end-to-end search federation is operating correctly.
After you have verified you can successfully test the connection, you are ready to perform Federated searches against your Microsoft Entra ID tenant!
Querying the Microsoft Entra ID (Azure AD) Connector
Within the Query Search UI, all Platforms (A.K.A Connectors) are enabled by default, to check that Microsoft Entra ID (Azure AD) is enabled, navigate to the Identity & HR section of the Platforms dropdown and ensure that Microsoft Entra ID (Azure AD) is selected (denoted by a checkbox) before running your searches as shown below (FIG. 12).
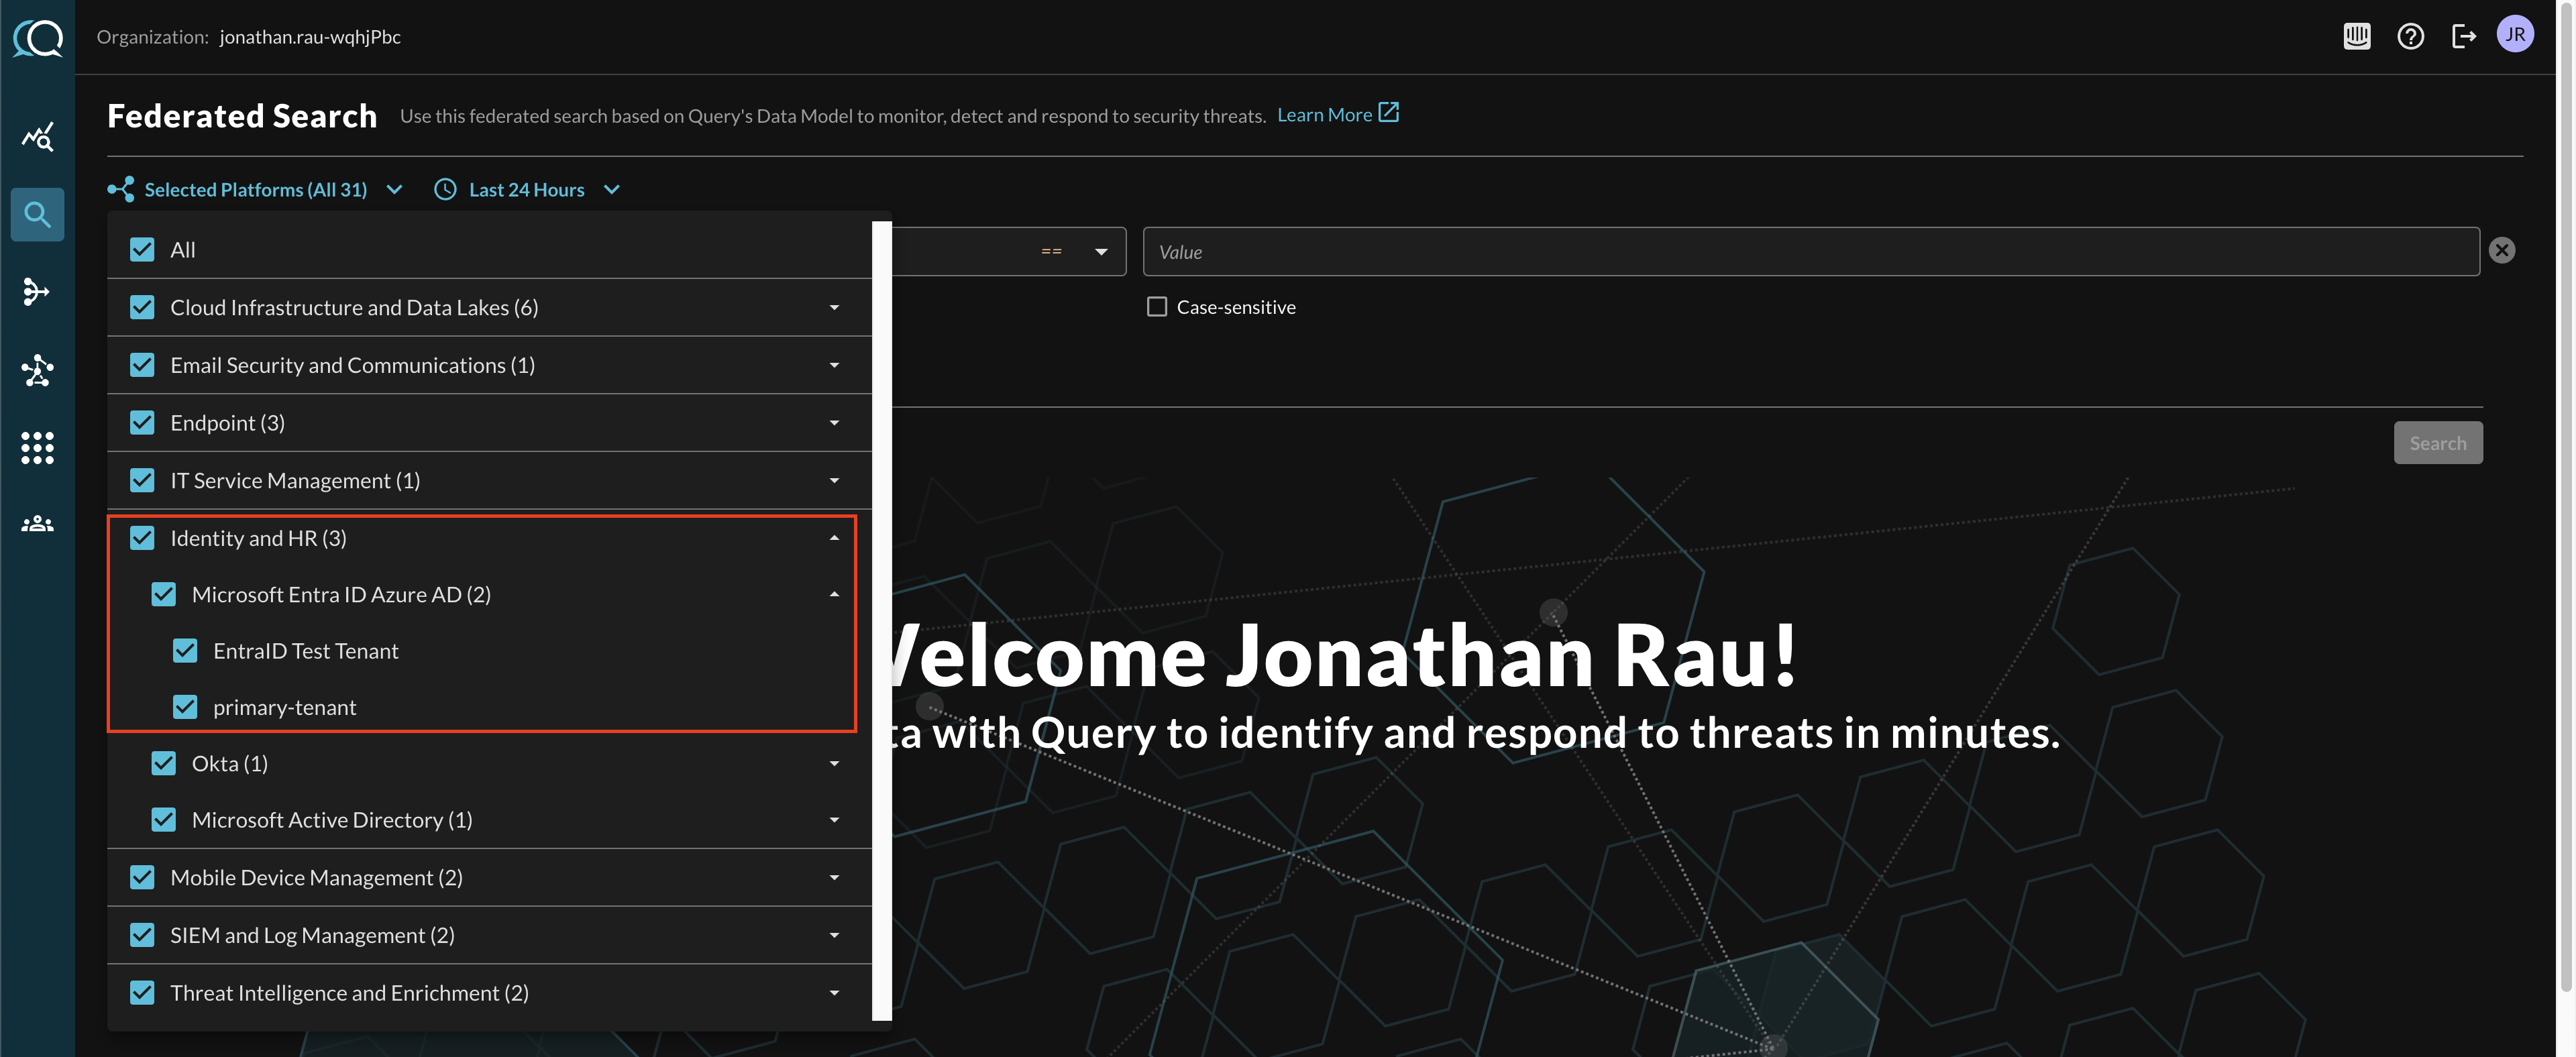
FIG. 12 - Ensure Platform Connectors are selected for search
If you configured multiple Connectors their actual Platform Connection Name will appear in another sub-section.
The following Entities, Events and Objects are supported by Query for those data points. For more information about this terminology, refer to the Normalization and the Query Data Model (QDM) section of the docs or check out our QDM Schema website.
Entities
- IP Address - maps to Email
SenderIPv4,SenderIPv6, and Originated From - Email Address - for the Users as well as email and authentication logs
- User Name - the UPN of Users as well as within email and authentication logs
- Resource ID - for assigned devices (
id)
Events
- Email Delivery Activity (legacy)
- Email Activity
- Authentication
Objects
emailosurlusergroupdevicehardware_info
Resources
- Working with Azure Active Directory resources in Graph API
Troubleshooting Steps
- Ensure that you have granted the correct Microsoft Graph permission with admin consent.
- Ensure that the Tenant ID, Client ID, and Client Secret Value match.
- Ensure that you copied the Client Secret Value and NOT the client secret ID.
- Ensure that your client credentials are not expired.
- If you are in a Government or Secret region, please contact Query Support.
Updated 8 months ago