Amazon Redshift Serverless
Integrate Query with the Amazon Redshift Serverless data warehouse without writing any SQL!
TL;DRTo integrate Amazon Redshift Serverless with Query:
- Gather basic connection parameters: Hostname, Port, Workgroup Name, Database Name, and Table Name(s).
- Retrieve or create a username and password and grant it SELECT permissions in your Schema and for your Tables, OR, setup an AWS IAM Role and grant permissions to the temporary user.
- Use the Configure Schema workflow to introspect and map your data into the Query Data Model.
- Use Query Federated Search to surface any number of indicators, assets, findings, alerts, and anything else stored in your Redshift Serverless workgroups to support Incident Response (IR), Investigations, Threat Hunting, or Security Audit workflows.
Overview
Amazon Redshift Serverless makes it convenient for you to run and scale analytics without having to provision and manage an on-premises data warehouse. With Amazon Redshift Serverless, data analysts, developers, and data scientists can now use Amazon Redshift to get insights from data in seconds by loading data into and querying records from the data warehouse in the cloud. Amazon Redshift automatically provisions and scales data warehouse capacity to deliver fast performance for demanding and unpredictable workloads. You pay only for the capacity that you use. You can benefit from this simplicity without changing your existing analytics and business intelligence applications.
The following are some key Amazon Redshift Serverless concepts.
- Namespace – A collection of database objects and users. Namespaces group together all of the resources you use in Amazon Redshift Serverless, such as schemas, tables, users, datashares, and snapshots.
- Workgroup – A collection of compute resources. Workgroups house compute resources that Amazon Redshift Serverless use to run computational tasks. Some examples of such resources include Redshift Processing Units (RPUs), security groups, usage limits. Workgroups have network and security settings that you can configure using the Amazon Redshift Serverless console, the AWS Command Line Interface, or the Amazon Redshift Serverless APIs.
NOTE: While functionally similar, Amazon Redshift ("Classic") is a separate Connector due to slight variation of metadata required to connect. Refer to that Connector here.
Security teams make use of Redshift Serverless for security analytics and aggregated use cases within a warehouse. For instance, they can combine data feeds from several downstream databases, SIEMs, XDRs, and flat files to create complex analytics datasets. From there, these can be fed into Business Intelligence tools or other bespoke reporting. However, some teams process such high volumes of data that they also benefit from the columnar-wise orientation and speed on a data warehouse. Regardless, Query Federated Search supports integrations with any table, view, materialized view, or even external dataset with Amazon Redshift Spectrum.
The Query normalization functionality is built around the Open Cybersecurity Schema Framework (OCSF) - named the Query Data Model (QDM) - which expresses all search intents with OCSF/QDM concepts such as Entities/Observables used to represent facts and indicators whereas Event Classes represent things that have happened and are normalized against network, application, file system, identity, and 1st party security findings.
With Query, you do not need to author any SQL and you are also blocked from dispatching notional SQL against your warehouse resources. Query handles the full end-to-end query translation, planning, execution, and normalization of results. Query provides a no-code workflow to map your source data into the OCSF/QDM format so you do not need to craft additional ETL resources or views to take advantage of having the same schemas for your security data.
Some details on searchesAs of 13 DEC 2024, Query can only map one table/view per Connector. You will need to create multiple Connectors and mappings per table/view/etc you have in your Redshift Serverless Workgroups. Each Connector generates a distinct IAM Role External ID as well, you can create multiple Roles per Connector, or define an array of External IDs in the IAM Role Trust Policy.
Query requires an external reachable Workgroup endpoint hostname to connect to. This requires Public Access enabled for your Namespace. Please contact your Query TAM or CSM for our IP ranges to use with a Security Group. You should only allow whichever Port you configured on your cluster access to the specific Query IP Address(es).
Query can use Basic Authentication (Username/Password) OR IAM-role based Authentication to generate temporary roles. Read further to learn how to configure your IAM-role derived users to allow access to your databases, schemas, tables/views, and otherwise.
Prerequisites
To connect Amazon Redshift Serverless with Query Federated Search you'll need different configuration information based on if you're using basic authentication (Username and Password) or IAM-Role based authentication with temporary credentials.
Basic Authentication
If you will use Username and Password you will only need your username, password, the database name, table name(s), the hostname and port.
-
To retrieve your hostname, port, and database name navigate to the Amazon Redshift console --> Serverless dashboard, and select your Workgroup. From the General information tab, copy the value for Endpoint as shown below (FIG. 1). Your configured port number and database name will be appended at the end of the hostname.
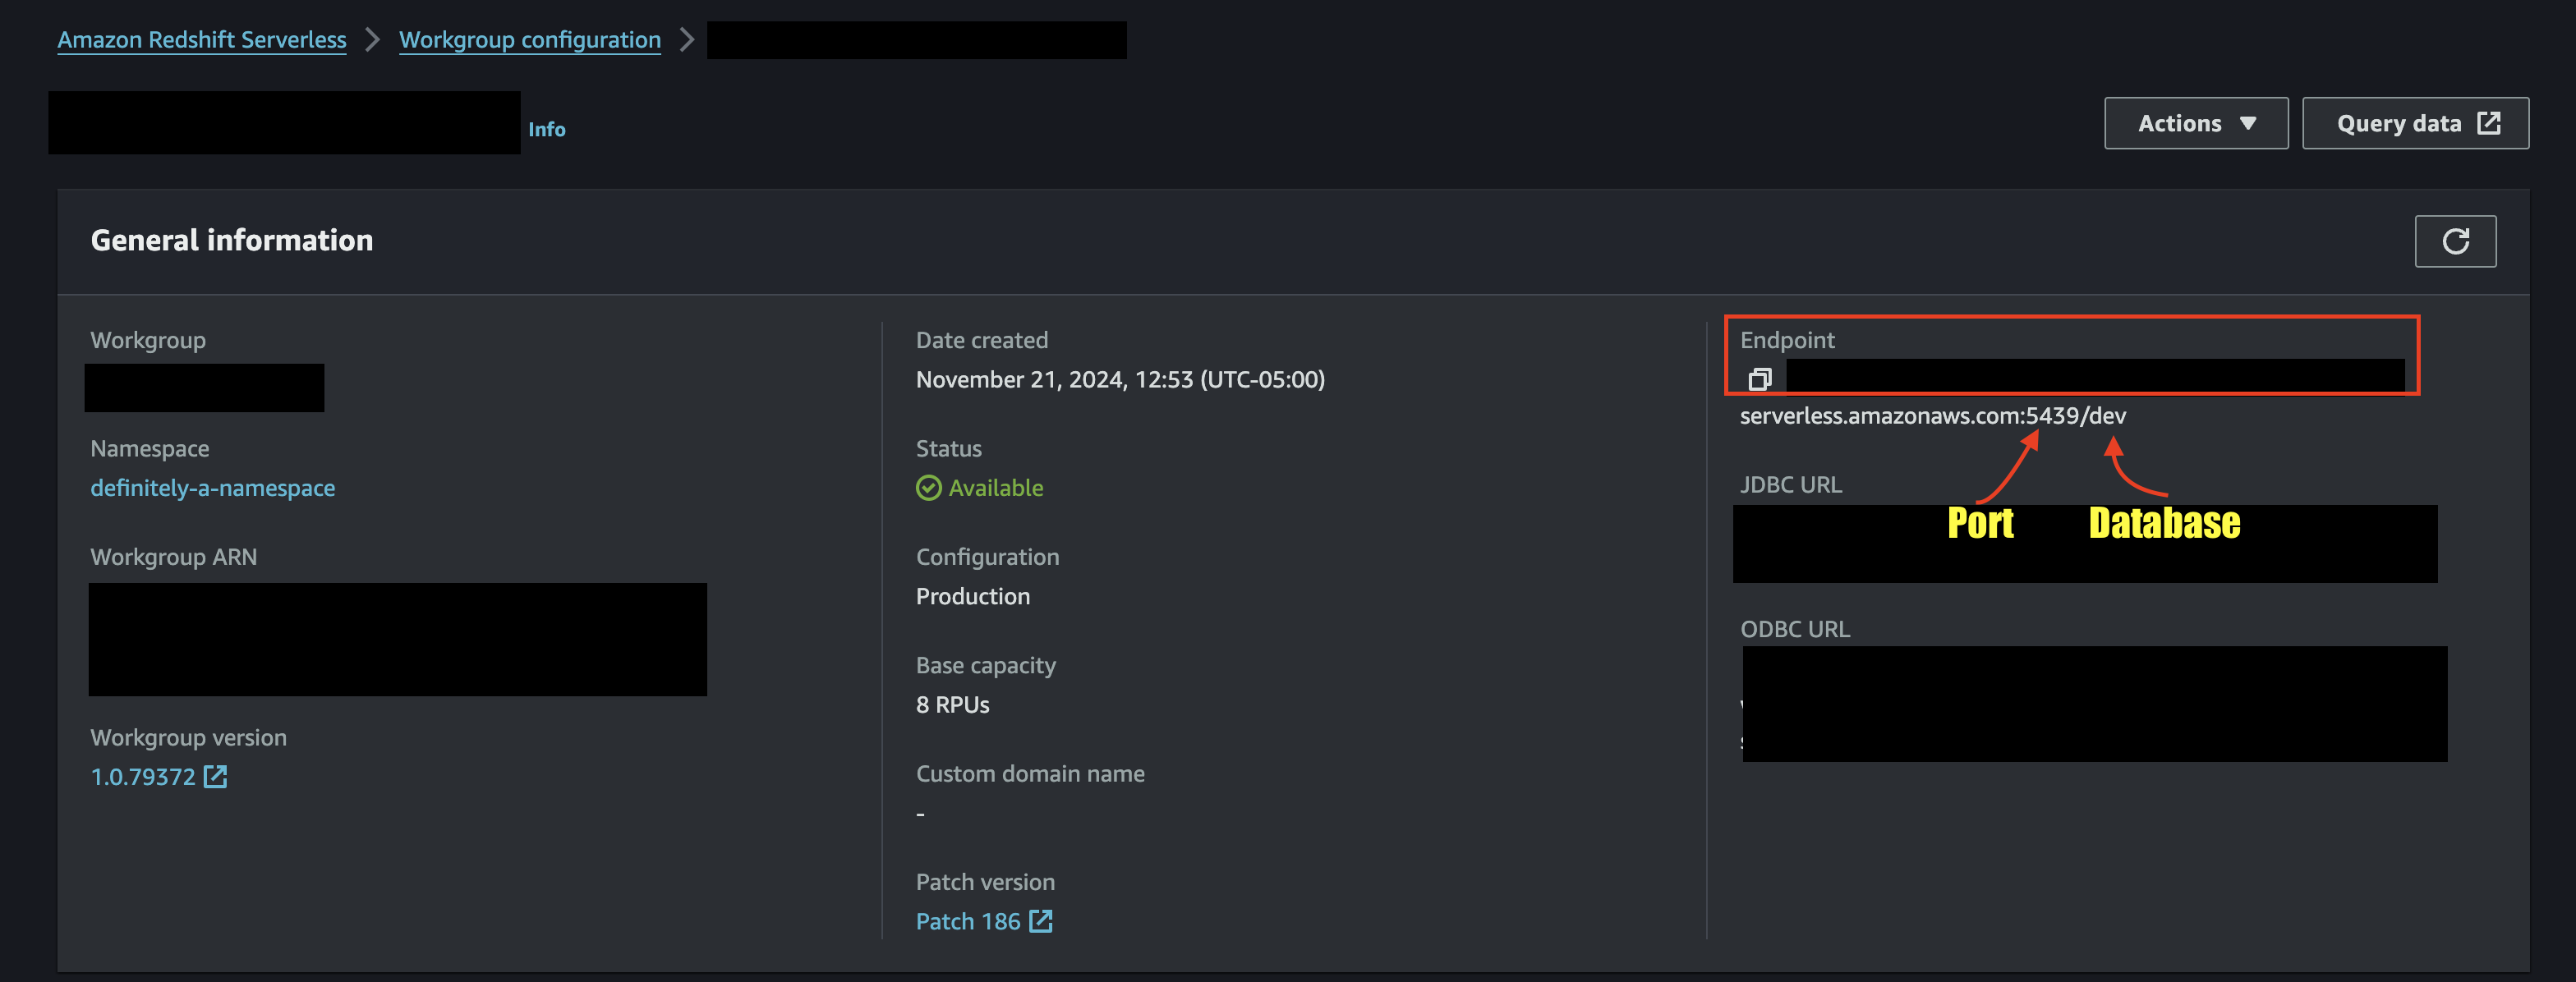
FIG. 1 - Retrieve Hostname, Port, and Database Name information from Amazon Redshift Serverless
-
Retrieve your username and password from your password vaulting solution, or use the following SQL commands to create a new user, and grant it usage to your schema and all tables and views. Replace the values of
query_fed_search,public(schema name), and thePASSWORD.
CREATE USER query_fed_search PASSWORD 'Rizzmaster69420!';

GRANT USAGE ON SCHEMA public TO query_fed_search;
GRANT SELECT ON ALL TABLES IN SCHEMA public TO query_fed_search;
ALTER DEFAULT PRIVILEGES IN SCHEMA public GRANT SELECT ON TABLES TO query_fed_search;- Ensure that Public Access is enabled in your Namespace and then add the Query IP ranges from your TAM or CSM to your AWS VPC Security Group - ONLY FOR THE PORT YOU HAVE OPEN!
AWS IAM Role-based Authentication
To user IAM Role-based authentication with Amazon Redshift Serverless
-
To retrieve your account ID, region, workgroup name, hostname, port, and database name navigate to the Amazon Redshift console --> Serverless dashboard, and select your Workgroup. From the General information tab, copy the value for Endpoint as shown below (FIG. 2). Your configured port number and database name will be appended at the end of the hostname. You can retrieve your Account ID and Region from the Workgroup ARN.

FIG. 2 - Retrieve Hostname, Port, and Database Name information from Amazon Redshift Serverless
-
Create a new AWS IAM Role to use with Query Federated Search, or locate an existing one, when you pre-configure your Amazon Redshift Serverless Connector the External ID, Trust Policy, and Identity Policy will be generated for you so you can attach a temporary Trust Policy.
-
When using IAM-role based authentication a temporary User is created in your Redshift database. Replace the values of the Role Name (
QueryFederatedSearchForRedshift) and the Schema name (public) as necessary. The following SQL will provide full read (SELECT) access to every table and view within the Schema in your Database.
-- Replace 'IAMR:QueryFederatedSearchForRedshift' with your actual IAM Role username
GRANT USAGE ON SCHEMA public TO "IAMR:QueryFederatedSearchForRedshift";
GRANT SELECT ON ALL TABLES IN SCHEMA public TO "IAMR:QueryFederatedSearchForRedshift";
ALTER DEFAULT PRIVILEGES IN SCHEMA public
GRANT SELECT ON TABLES TO "IAMR:QueryFederatedSearchForRedshift";
On Temporary User permissionsYou may need to first attempt connectivity before the above SQL DCL will function correctly, as the user has to be created first.
- Ensure that Public Access is enabled in your Namespace and then add the Query IP ranges from your TAM or CSM to your AWS VPC Security Group - ONLY FOR THE PORT YOU HAVE OPEN!
- To retrieve your External ID, Identity Policy, and Trust Policy for your IAM Role that you created in Step 2, navigate to the Setting up an Amazon Redshift Serverless Connector section and complete up to Step 6.
- Update your IAM Role with the External ID, Identity Policy, and Trust Policy provided by the Connector.
To learn how to configure an Amazon Redshift Serverless Connector, proceed to the next section.
On NHI securityNHI - or, Non-Human Identities - such as your database username and password are extremely sensitive. Query securely stores these sensitive values in dedicated AWS Secrets Manager Secrets per Connector per Tenant.
While this requires you to configure Connectors per Amazon Redshift table/view/etc and continue to enter in your credentials, every copy is stored as securely as each other with minimum necessary permissions that only allows the specific piece of serverless infrastructure to retrieve the secret, it is never cached or persisted outside of the Secret.
Setting up an Amazon Redshift Serverless Connector
Use the following steps to create a new Query Federated Search Connector for Amazon Redshift.
-
Navigate to the Connectors page, select Add Connector, and selectAmazon Redshift Serverless from the
Data Lakes and Data Warehousescategory as shown below (FIG. 3). You can also search for Amazon Redshift Serverless using the search bar in the Add Connector page.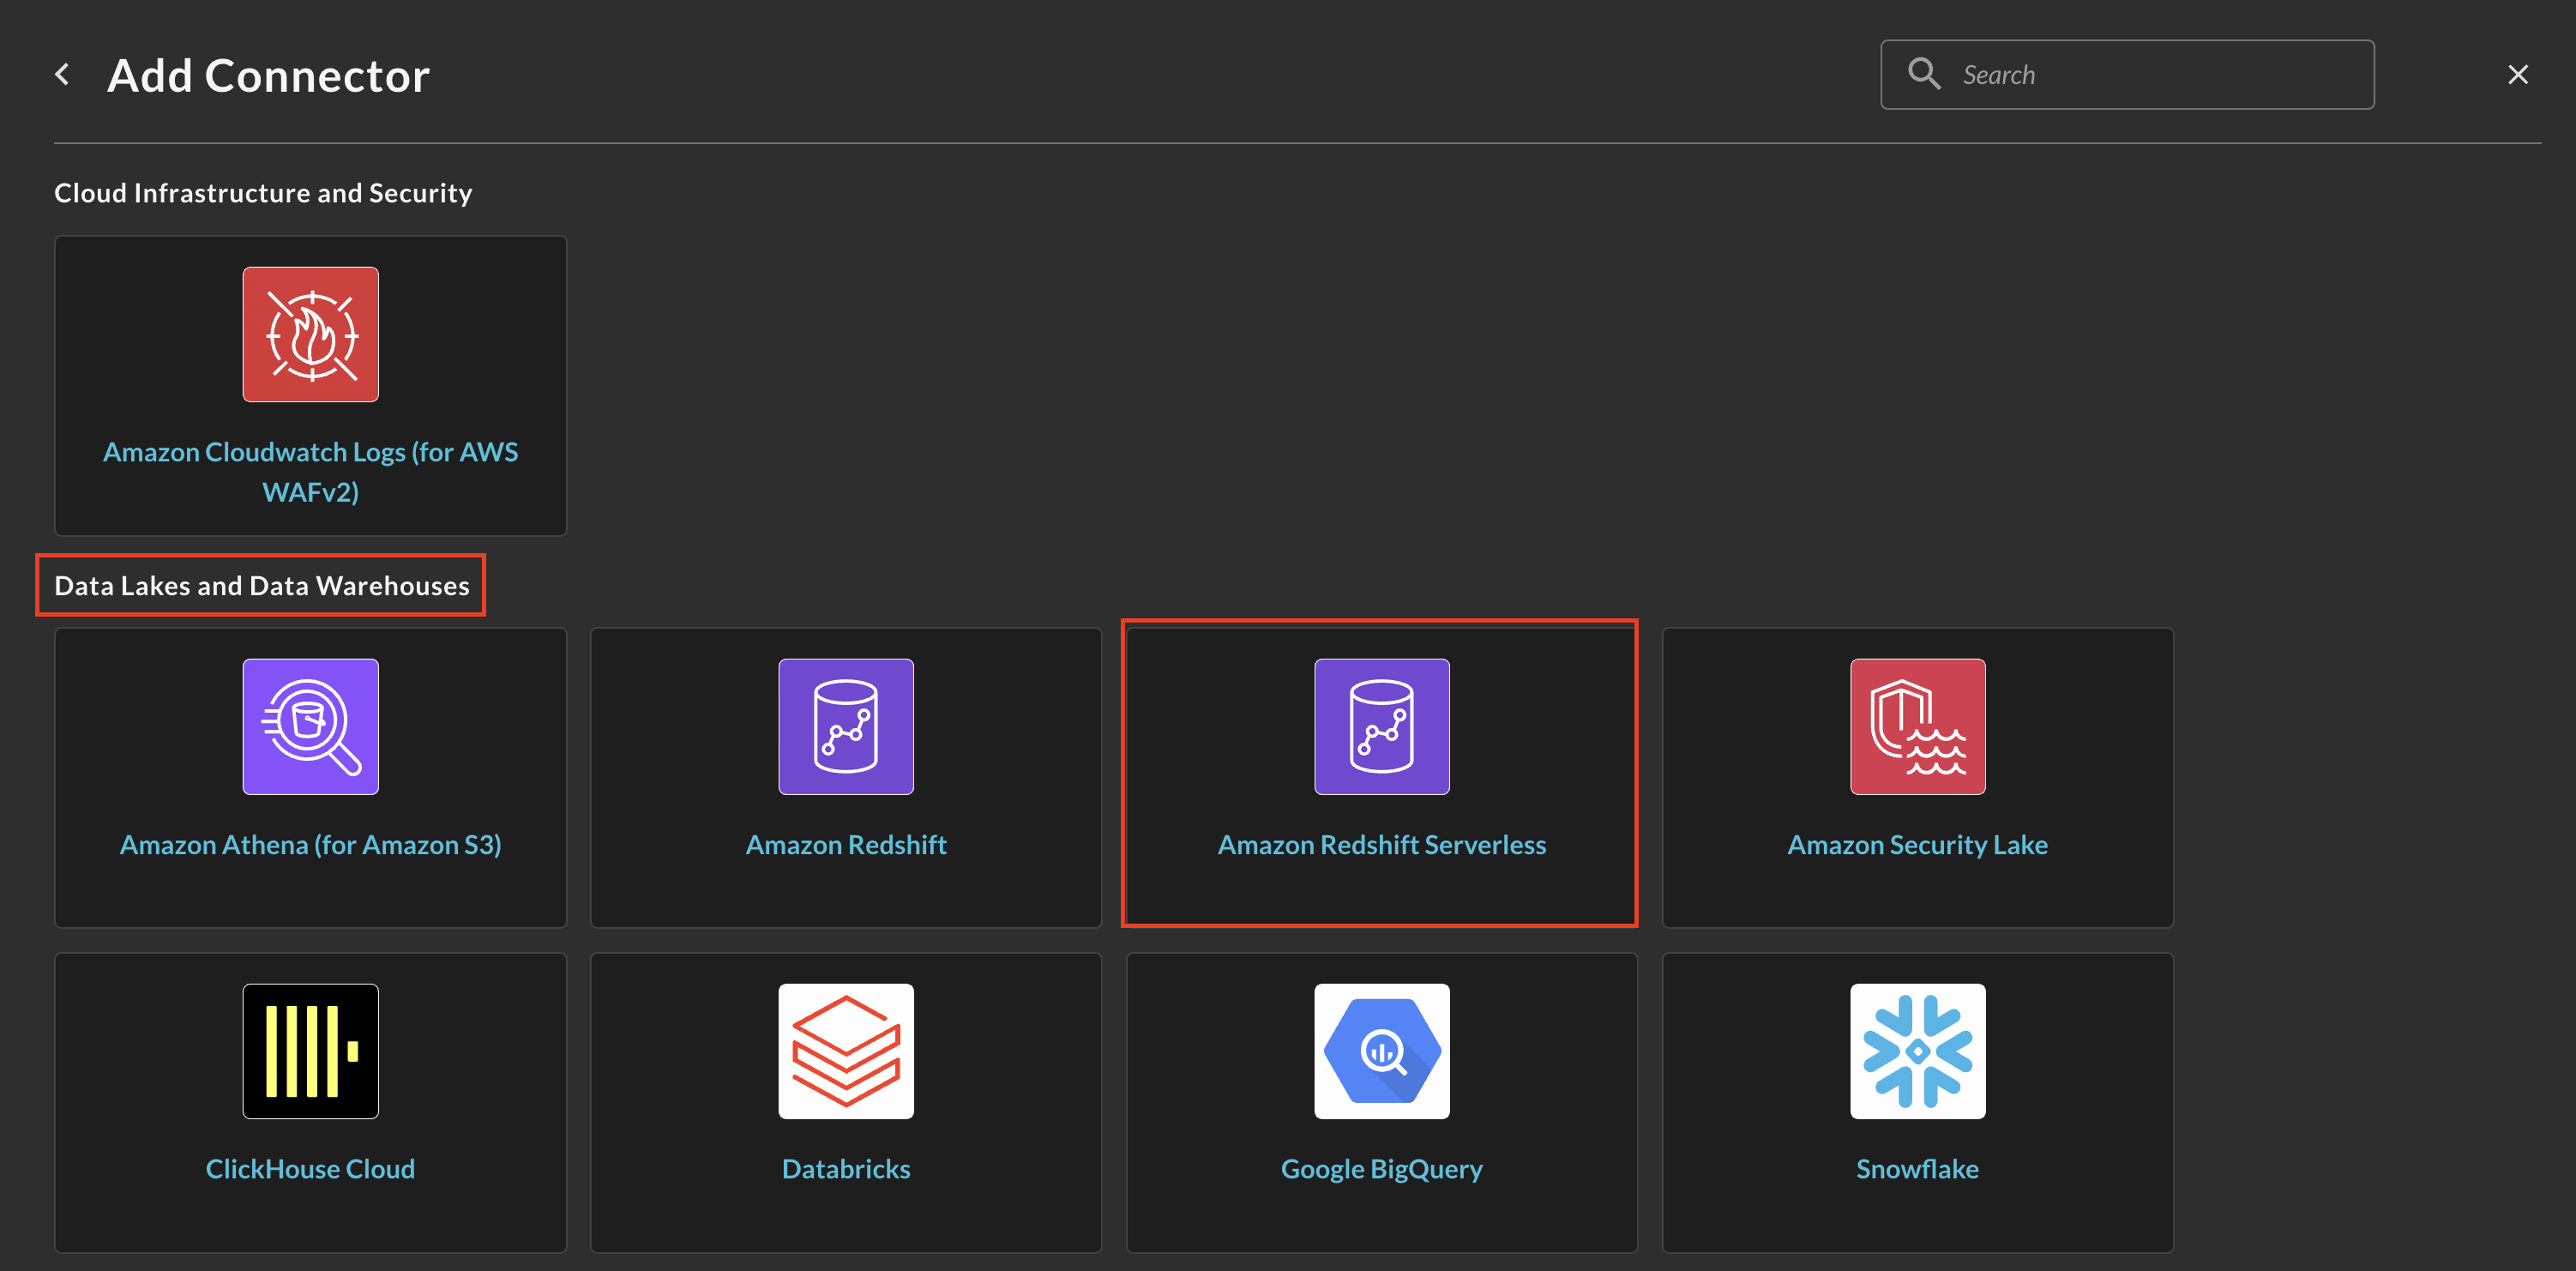
FIG. 3 - Locating the Amazon Redshift Serverless Connector
-
In the Configure Connector tab, add the following detail as shown below (FIG. 4):
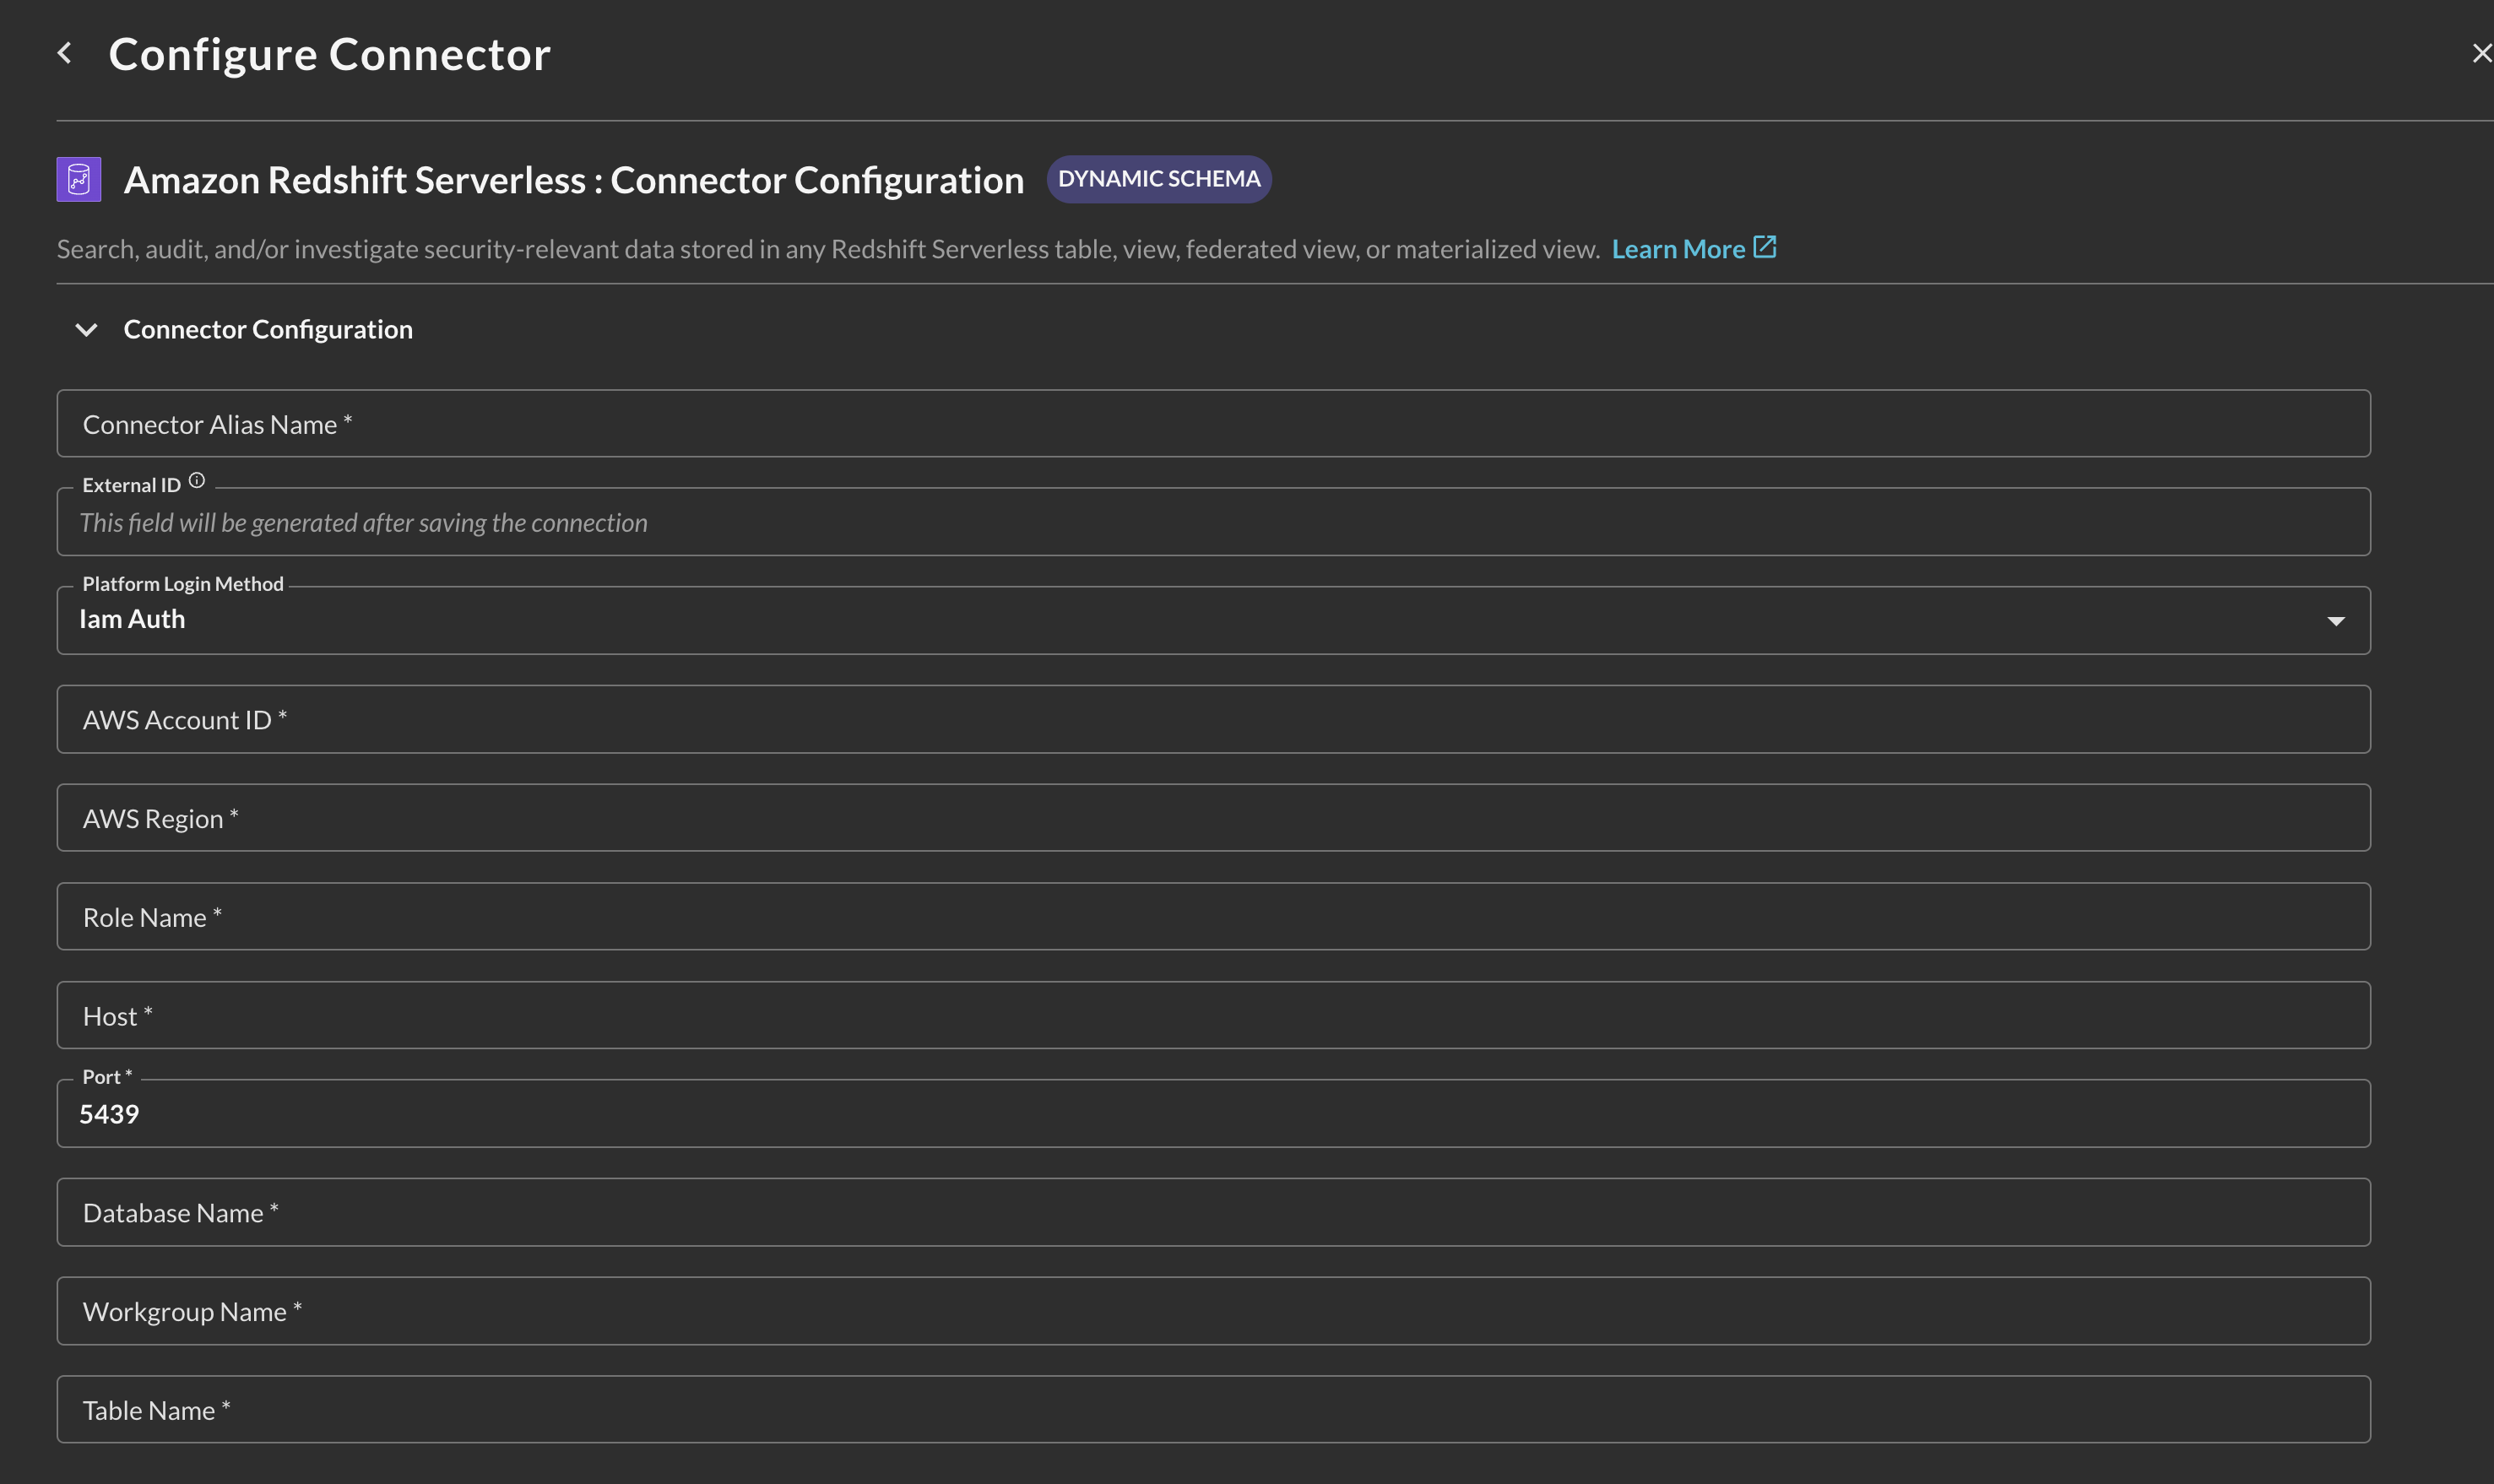
FIG. 4 - Configuring the Amazon Redshift Serverless connector
- Connector Alias Name: The human-readable name you want to give to this connector, you can refer to database:table/view pairs or to any other detail that will help analysts quickly know the source data.
- Default Login: Either select
Basic Authfor username & password based authentication, or selectIam Authto use IAM Role based authentication. - Database Name: the name of your primary database, typically this is
dev. Copied in Step 1 of either subsection of the Prerequisites section. - Host: the hostname of your Workgroup, copied in Step 1 of either subsection of the Prerequisites section.
- Port: the port that you workgroup is reachable on, typically this is
5439. Copied in Step 1 of either subsection of the Prerequisites section. - Table Name: The table name - or name of the view, materialized view, or external table - that you wish to connect to.
- Username: (ONLY FOR
Basic Auth) your username to connect to Redshift Serverless, copied in Step 2 of the Basic Authentication subsection of the Prerequisites section. - Password: (ONLY FOR
Basic Auth) your password to connect to Redshift Serverless, copied in Step 2 of the Basic Authentication subsection of the Prerequisites section. - AWS Account ID: (ONLY FOR
Iam Auth) the AWS Account ID of your Redshift Serverless workgroup, copied in Step 1 of the AWS IAM Role-based Authentication subsection of the Prerequisites section. - AWS Region: (ONLY FOR
Iam Auth) the AWS Region of your Redshift Serverless workgroup, copied in Step 1 of the AWS IAM Role-based Authentication subsection of the Prerequisites section. - Role Name: (ONLY FOR
Iam Auth) the name of the IAM Role you created for Query Federated Search to connect to Redshift Serverless. Copied in Step 2 of the AWS IAM Role-based Authentication subsection of the Prerequisites section. - Workgroup Name: (ONLY FOR
Iam Auth) the name of your Redshift Serverless workgroup, copied in Step 1 of the AWS IAM Role-based Authentication subsection of the Prerequisites section.
-
Select Save to save and activate the Connector.
-
Select Test Connection from the bottom-right of the connection pane to ensure that either your username & password or IAM role were able to successfully authenticate. The test also ensures that your workgroup can be reached from the Query infrastructure. Finally, a
SELECT * FROM <your_table> LIMIT 1query is dispatched to ensure the table exists and your user hasSELECTprivileges granted. -
Finally, proceed to the Preview Data section to begin the Configure Schema process. Refer to the hyperlink to learn how to use the Configure Schema no-code workflow, it is HIGHLY recommended for first time users.
You will now see Amazon Redshift Serverless added as an available Connector within the Query Search and Query Summary Insights UI.
Querying Amazon Redshift Serverless Connectors
Within the Query Search UI, all Connectors are enabled by default. To check that your specified Connector(s) for Amazon Redshift are enabled, navigate to the Data Lakes and Data Warehouses section of the Selected Connectors dropdown and ensure that your specified Amazon Redshift Serverless Connector(s) are are selected (denoted by a checkbox) before running your searches as shown below (FIG. 5).
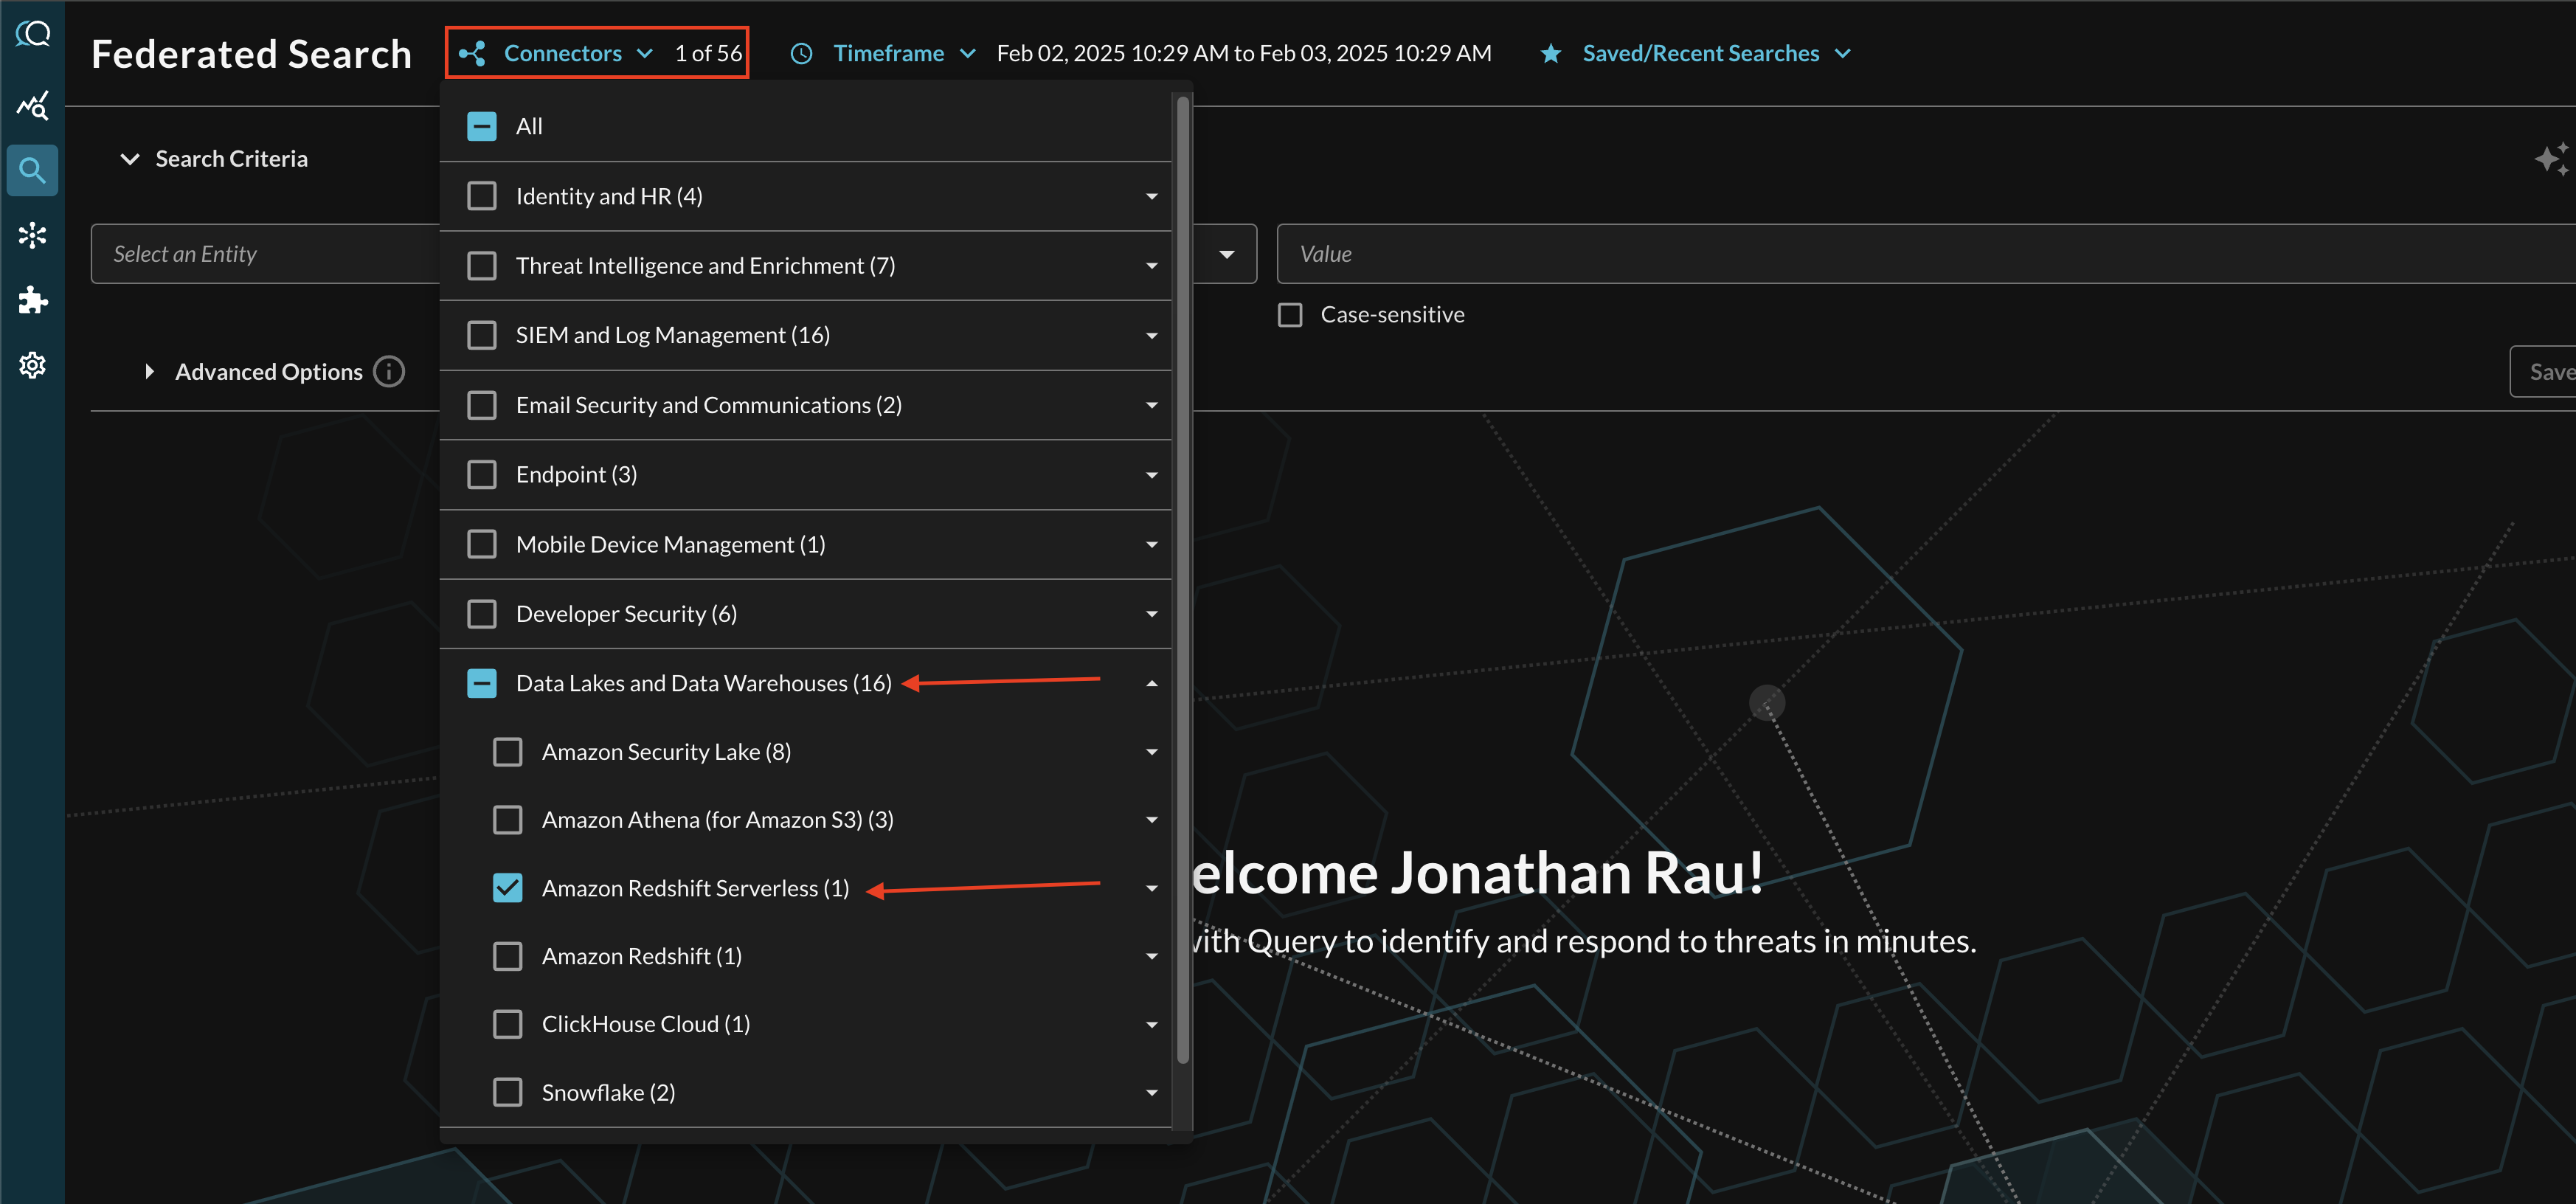
FIG. 5 - Selecting Amazon Redshift Serverless Connectors
The Entities (Observables) and Events you will be able to search determine on how you mapped your data in Configure Schema against a given Amazon Redshift Dataset. For more information about the QDM/OCSF schema itself refer to the About the Query Data Model section of the Query docs, you can also view the Categories, Events, and Objects themselves.
Entity-based Search
To conduct an Entity-based search, ensure that all of the data points you will be searching for are mapped within the Configure Schema wizard as demonstrated in the previous section.
In the Federated Search console, select the search dropdown, ensure the Entities radio button is selected and search for your desired Entity as shown below (FIG. 6).
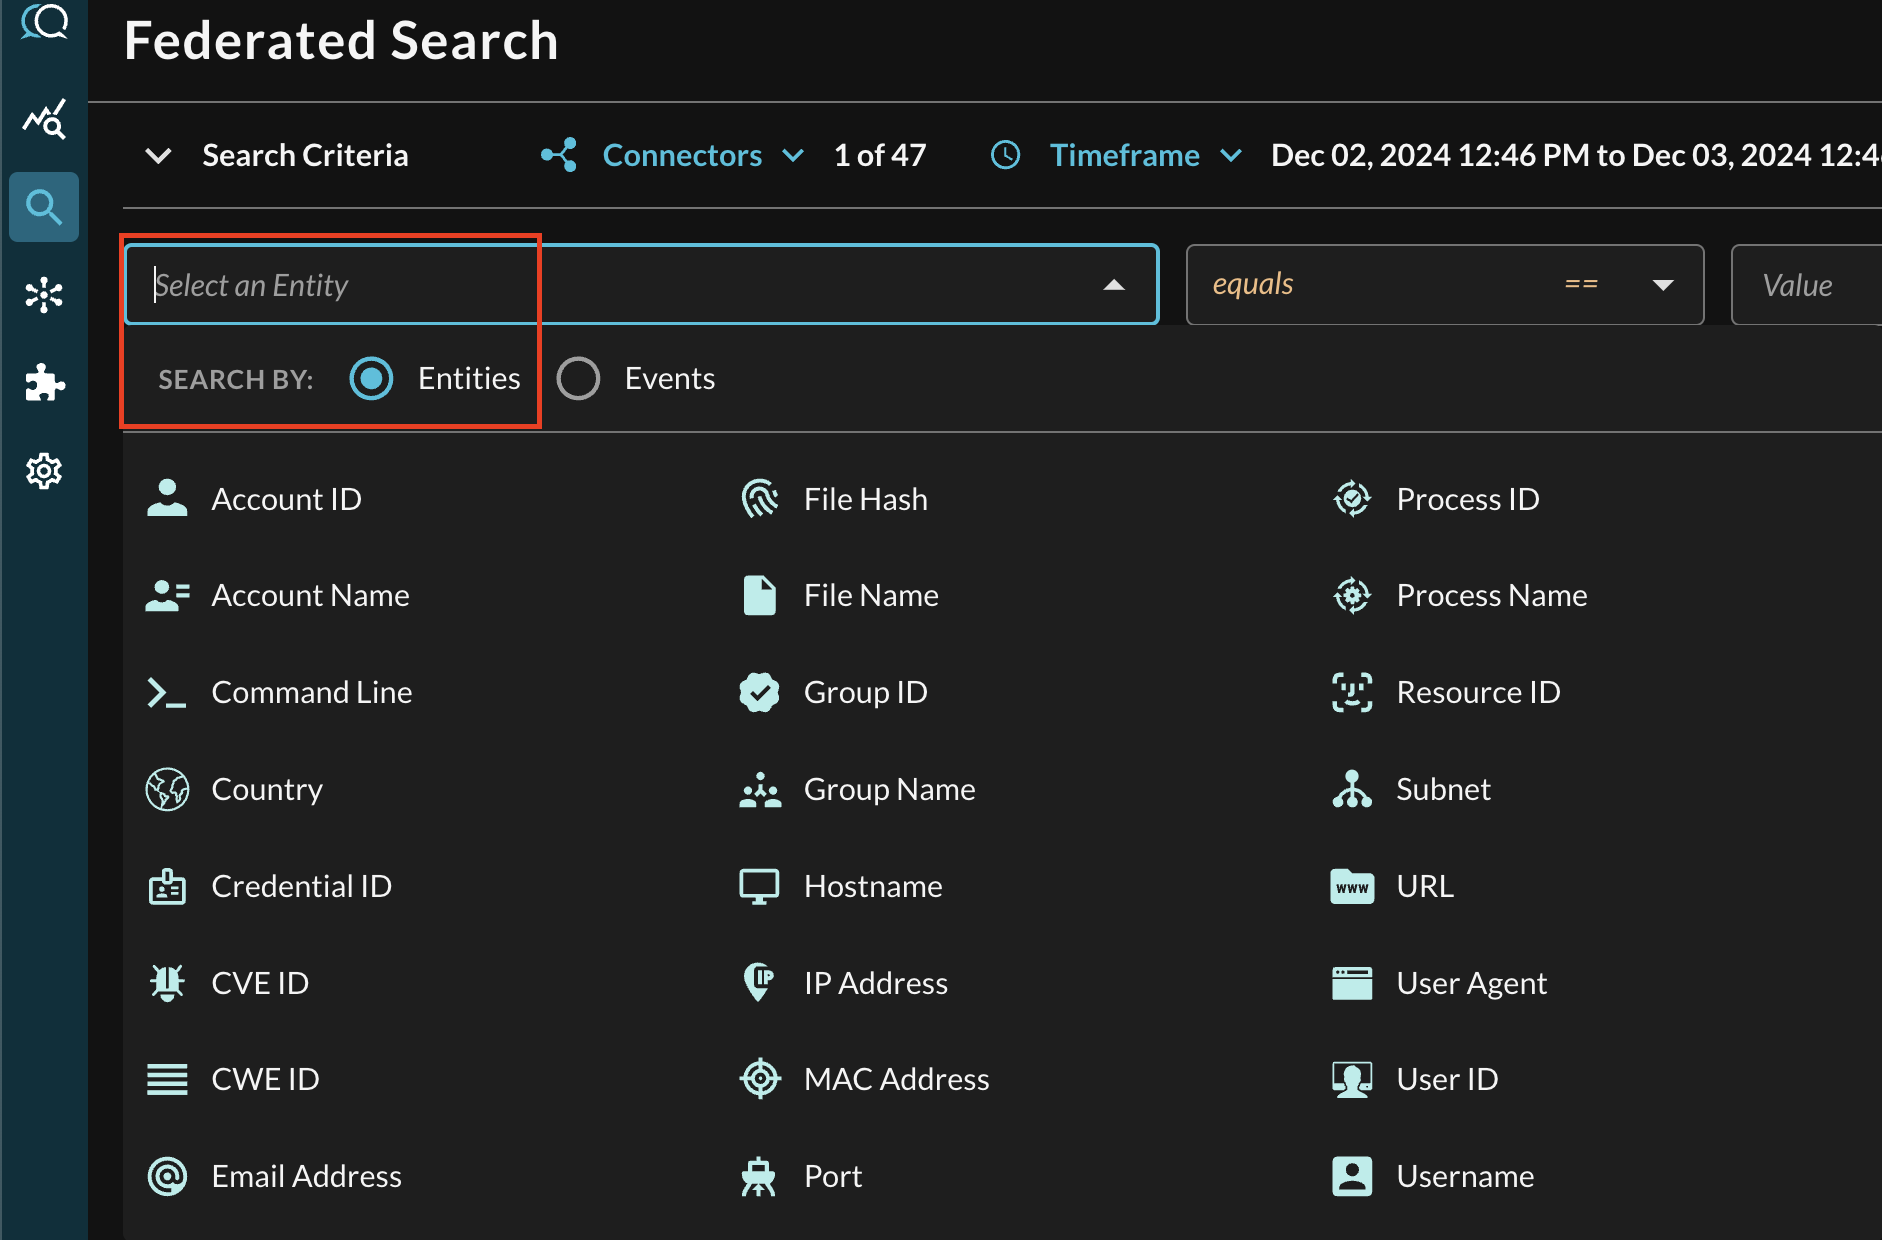
FIG. 6 - Entity-based searching with Query Federated Search
After selecting an Entity, most allow you to specify an Operator. This allows you to perform simple equality searches or to perform more generalized searches using Contains, Starts With, or Ends With Operators. These are mapped against appropriate SQL operators.
When you search for multiple values that may be present across different Connectors, the Query Federated Search query planner inspects the Configure Schema metadata to ensure searches are sent to the appropriate Connectors, this operates more as a collated window function within Query and not as an expensive SQL join.
Additionally, you can specify case-sensitivity for the entire search criteria. An example of a multi-value CVE search that uses the equals operator and toggled case-sensitivity is shown below (FIG. 7).

FIG. 7 - Orientation for Entity-based search in Query Federated Search
Event-based Search
To conduct an Event-based search, ensure that all of the data points you will be searching for are mapped within the Configure Schema wizard as demonstrated in the mapping section. Within the Federated Search console, only mapped Events per the Select Connectors are populated, unlike Entities which has every potential value shown in the list.
In the Federated Search console, select the search dropdown, ensure the Events radio button is selected and search for your desired Event as shown below (FIG. 8). For instance, you can search for all API Activity events which you can normalize against a table of summarization of audit logs from Okta or ZScaler, in addition you can also search across all Connectors normalized to API Activity such as AWS CloudTrail Management Events stored in AWS Security Lake, System Event logs in Okta, and Audit Events in Microsoft Intune.

FIG. 8 - Searching for API Activity events with Query Federated Search
Searching from the Event will pull a sample (up to 1000) of all matching events per Connectors that are mapped to it. For more specific filtering within an Event, you can choose one or more conditions to refine a search. Selecting the plus-sign (+) dropdown next to the Event menu allows you to choose from any specific OCSF/QDM attribute in the event.
For instance, when searching for API Activity events, you can specify a specific Username by filtering for Actor --> User --> Name (which is mapped in Configure Schema as actor.user.name) as shown below (FIG. 9).
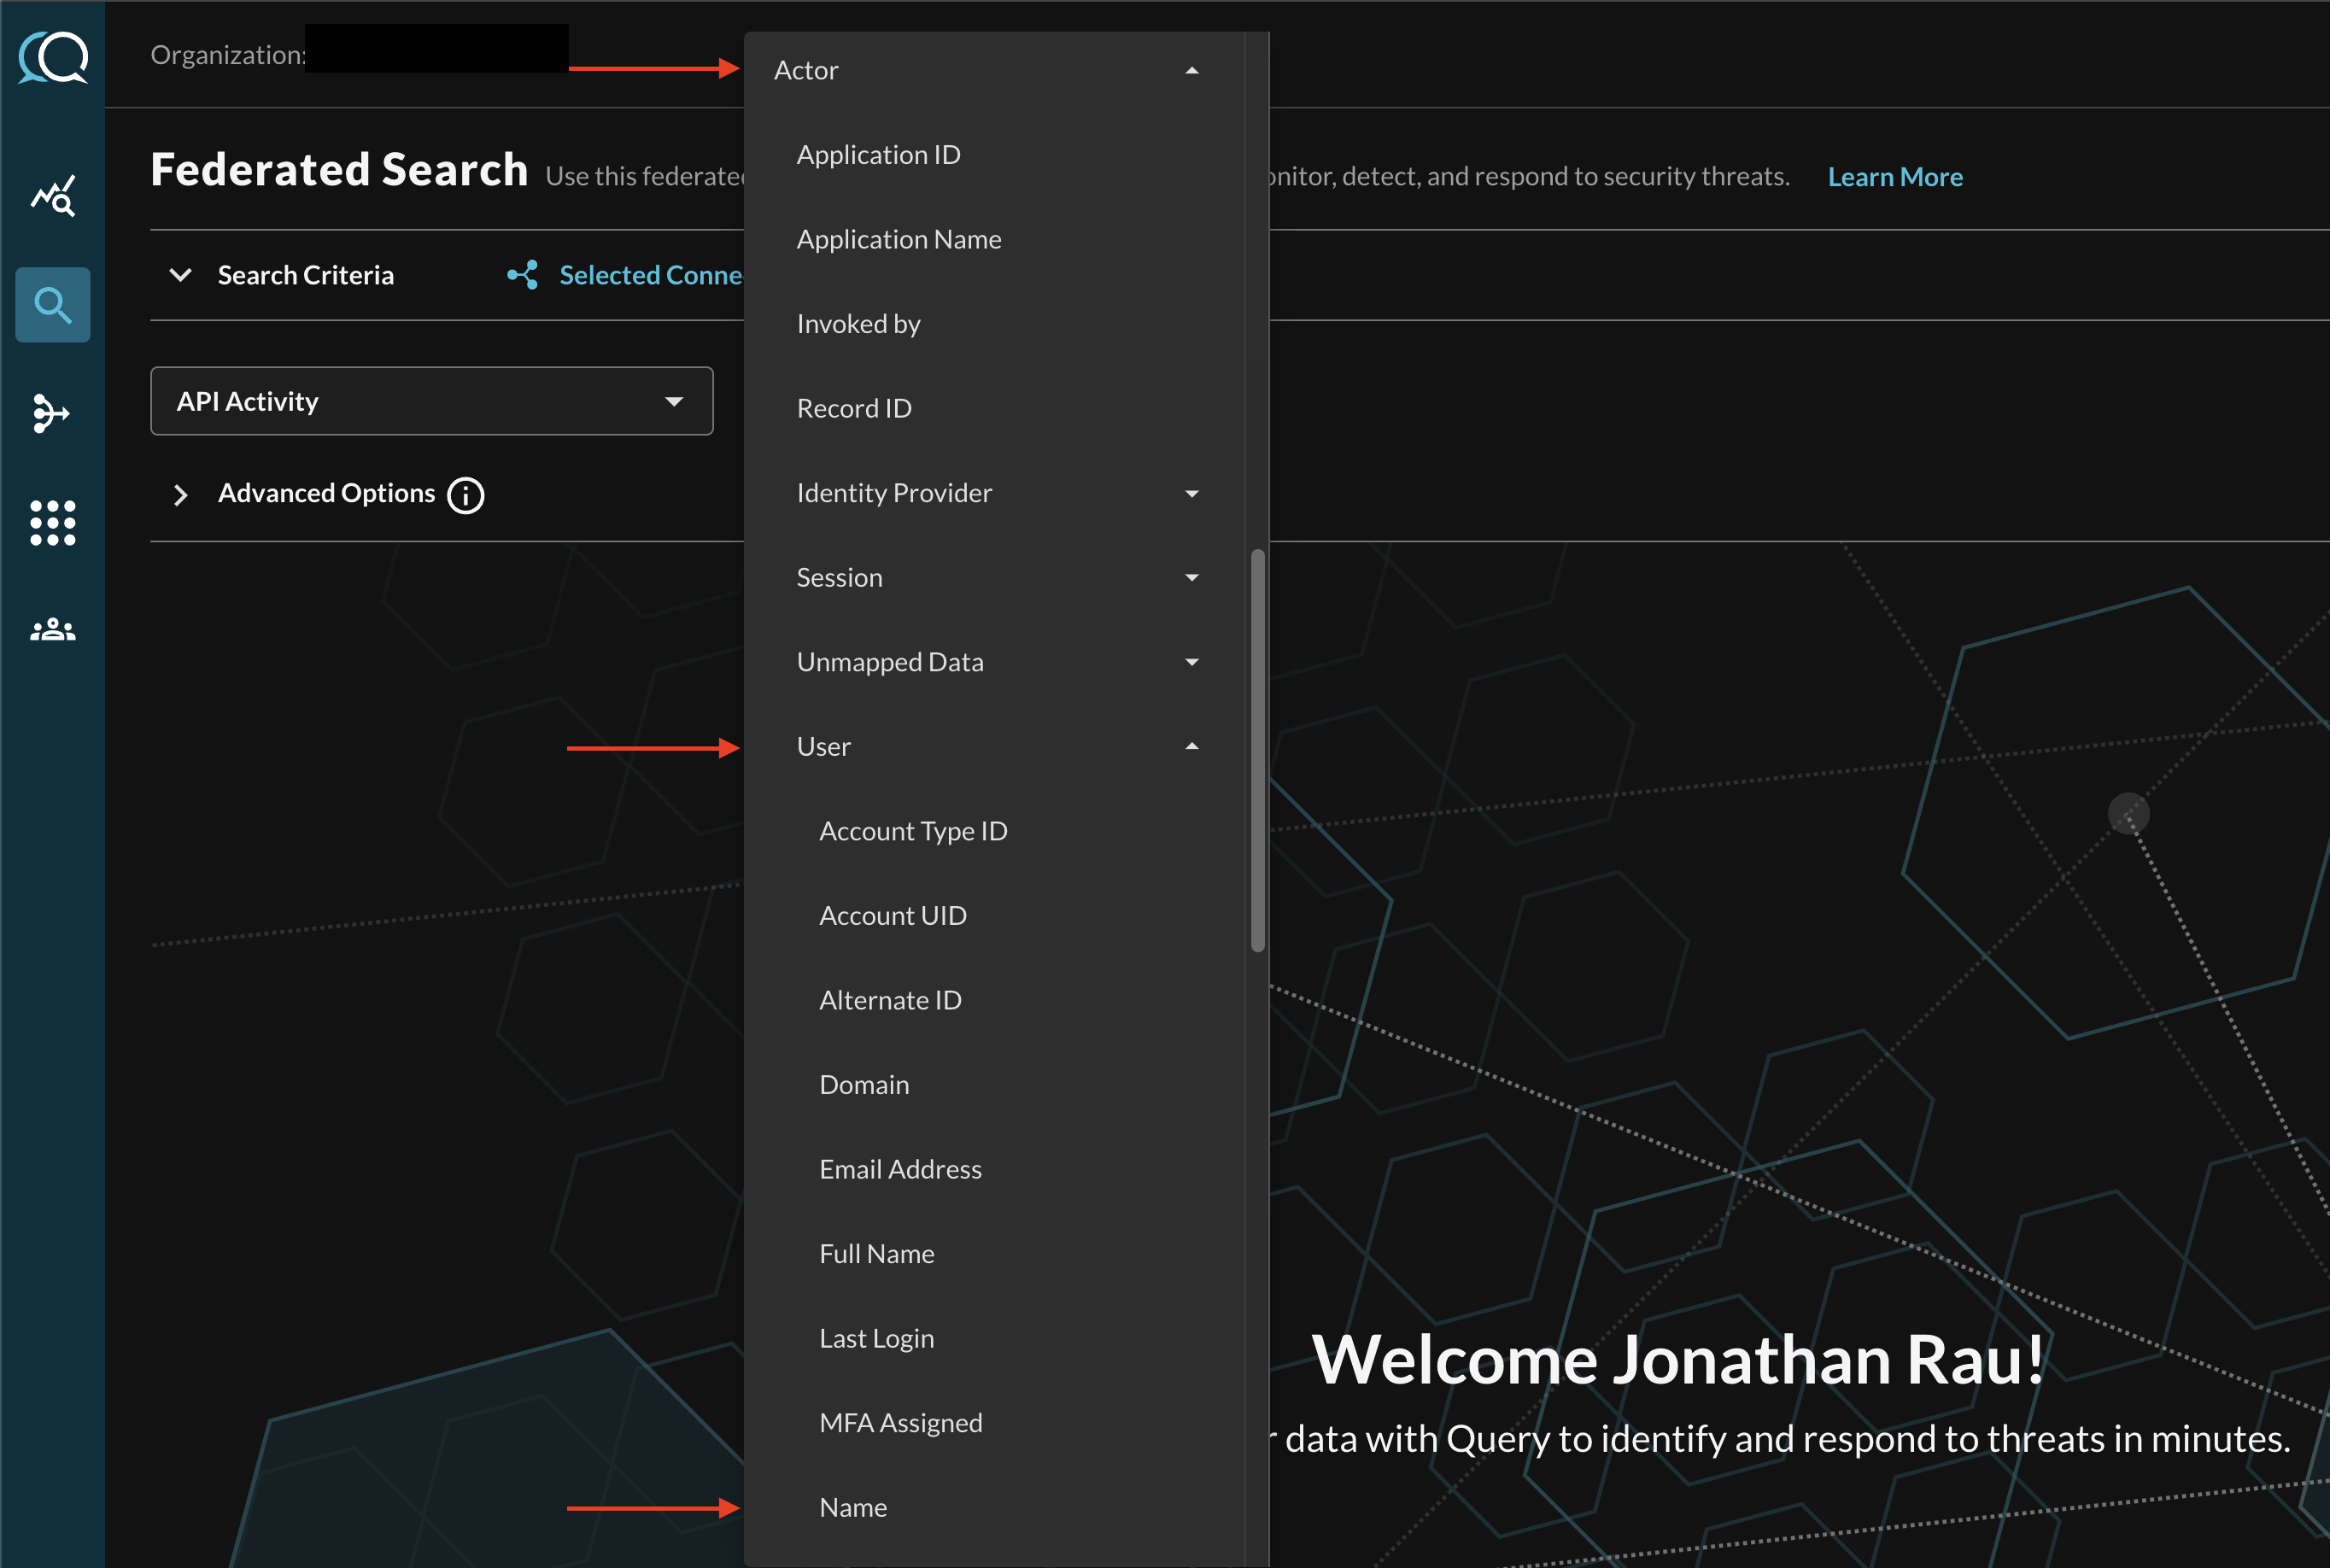
FIG. 9 - Filtering for specific Attributes within an Event Class
When adding two or more Conditions, you can further change the behavior by specifying ANY or ALL quantifiers over the filters for greater levels of specificity or more narrow-but-generalized searches, respectively, as shown below (FIG. 10).

FIG. 10 - Selecting multiple conditional filters
Resources
- Public accessibility with default or custom security group configuration
- Subnets for Redshift resources
Troubleshooting Steps
- Verify your hostname, port, database name, and table/view name(s) are all correct.
- Verify that your Redshift deployment has Public Access enabled.
- Verify that your Redshift deployment is located in publicly reachable subnets, e.g., subnets with a route to the internet via a Transit Gateway leading to an Internet Gateway or directly to an Internet Gateway.
- Verify that you have added rules to your Security Group - and that it is the correct security group - for your port and to the Query environment's IP address range.
- Ensure that your User has been granted
SELECTprivileges to you schema and table(s). If you are using an IAM Role, you must attempt connectivity first before theIAMR:<your_role_name>temporary user is created to grant itSELECTprivileges.
If you have exhausted the above Troubleshooting list, please contact your designated Query Sales Engineer or Customer Success Manager. If you are using a free tenant, please contact Query Customer Success via the Support email in the Help section, or via Intercom within your tenant.
Updated 3 months ago