Amazon OpenSearch Service
Integrate Query Federated Search with Amazon OpenSearch Service to parallelize searches across security-relevant data in any Index to support
TL;DRTo integrate Amazon OpenSearch Service with Query
- Setup an Amazon OpenSearch Service Domain with public access or with a configured proxy in-line for Domains in a VPC.
- Onboard any OpenSearch Index with a Query Connector for Amazon OpenSearch Service.
- Deploy an IAM Role with a Query-provided external ID that provides certain HTTP search permissions for OpenSearch Service.
- Modify your Domain Access Policy to allow the IAM Role access to your Domain with an optional IP allowlist.
- Confirm connectivity into your Index with the Test Connection functionality.
- Map your Index Schema into the Query Data Model (OCSF) using the Configure Schema workflow.
- Use Query Federated Search to support Incident Response, Investigations, Threat Hunting, and other security-relevant tasks against data stored in your OpenSearch Domain(s).
Overview
Amazon OpenSearch Service – formerly known as Amazon Elasticsearch Service – is a managed ELK stack (Elasticsearch, Logstash, Kibana) AWS analytics service based on the OpenSearch project. OpenSearch Service allows customers to perform real-time searching, monitoring, and analysis of business, observability, and security data using a rich set of query languages, built-in machine learning (ML) and artificial intelligence (AI) capabilities, as well as integrations into the wider Amazon Web Services (AWS) ecosystem.
Security teams typically use OpenSearch Service for faster, real-time, log analytics of important security-relevant data sources such as flow logs, authentication logs, EDR, vulnerability management, CSPM, and several other relevant use cases. OpenSearch Service boasts a wide range of ingestion capabilities including “Zero ETL” connectors into popular services such as Amazon DocumentDB (a managed document NoSQL database) and data lakes and data lakehouses built atop Amazon S3.
Query’s Connector for Amazon OpenSearch Service utilizes minimum necessary AWS IAM Roles with External IDs and the official Python SDK for OpenSearch to allow federated searches across all of their data stored in any index. Query uses OpenSearch’s QDSL (Query Domain-Specific Language) to perform all searches. The Query Connector for Amazon OpenSearch Service automatically discovers the schema of any given Index and using our no-code Configure Schema workflow, you can map any index into an appropriate Query Data Model (based on the Open Cybersecurity Schema Framework) Event Class allowing customers to submit specific queries expressed in QDM/OCSF terminology without having to write any QDSL.
Query handles the pagination, query translation, query optimization, parallelization, streaming of results, and normalization of all federated searches so that customers can fulfill complex query plans against data stored in Amazon OpenSearch Service alongside dozens of other Connectors.
Prerequisites
If your OpenSearch Service Domain is configured within a Amazon Virtual Private Cloud (VPC), ensure you setup an Access Proxy to allow internet-borne connections into your Domain. If you use IP Allowlisting for your Proxy (or your Domain Access Policy) please reach out to the Query Customer Success team at [email protected] to get a list of Query outbound IP addresses.
If you do not have the AWS CLI installed and/or configured, refer here. Ensure you have permissions to create and modify IAM Roles and Policies.
iam:CreateRoleiam:CreatePolicyiam:AttachRolePolicy
The Query Connector for Amazon OpenSearch Service can support multiple Domains regardless of what Region(s) or Account(s) they are deployed in, though, if you use a centralized logging Domain - use that instead.
To connect an OpenSearch Index with Query Federated Search you will need to have your domain name, domain endpoint hostname, the AWS Region name, AWS Account ID, and the name of your Index.
-
To retrieve the domain hostname navigate to the Amazon OpenSearch Service console, select your Domain and from the General Information tab copy the IPv4 Domain Endpoint hostname as shown below (FIG. 1). Only the hostname is required, DO NOT copy any other part of the URL. If you are using an Access Proxy, use the hostname of your proxy instead.

FIG. 1 - Retrieve the hostname from the Domain Endpoint (IPv4) for Amazon OpenSearch Service
-
To retrieve your Region name and Account ID, parse them from the Domain ARN entry in the General Information tab as shown below (FIG. 2).

FIG. 2 - Retrieve the AWS Region and AWS Account ID from the Domain ARN
-
To retrieve you Index name(s) login to OpenSearch Dashboards and in the navigation menu, navigate to Management --> Index Management as shown below (FIG. 3).
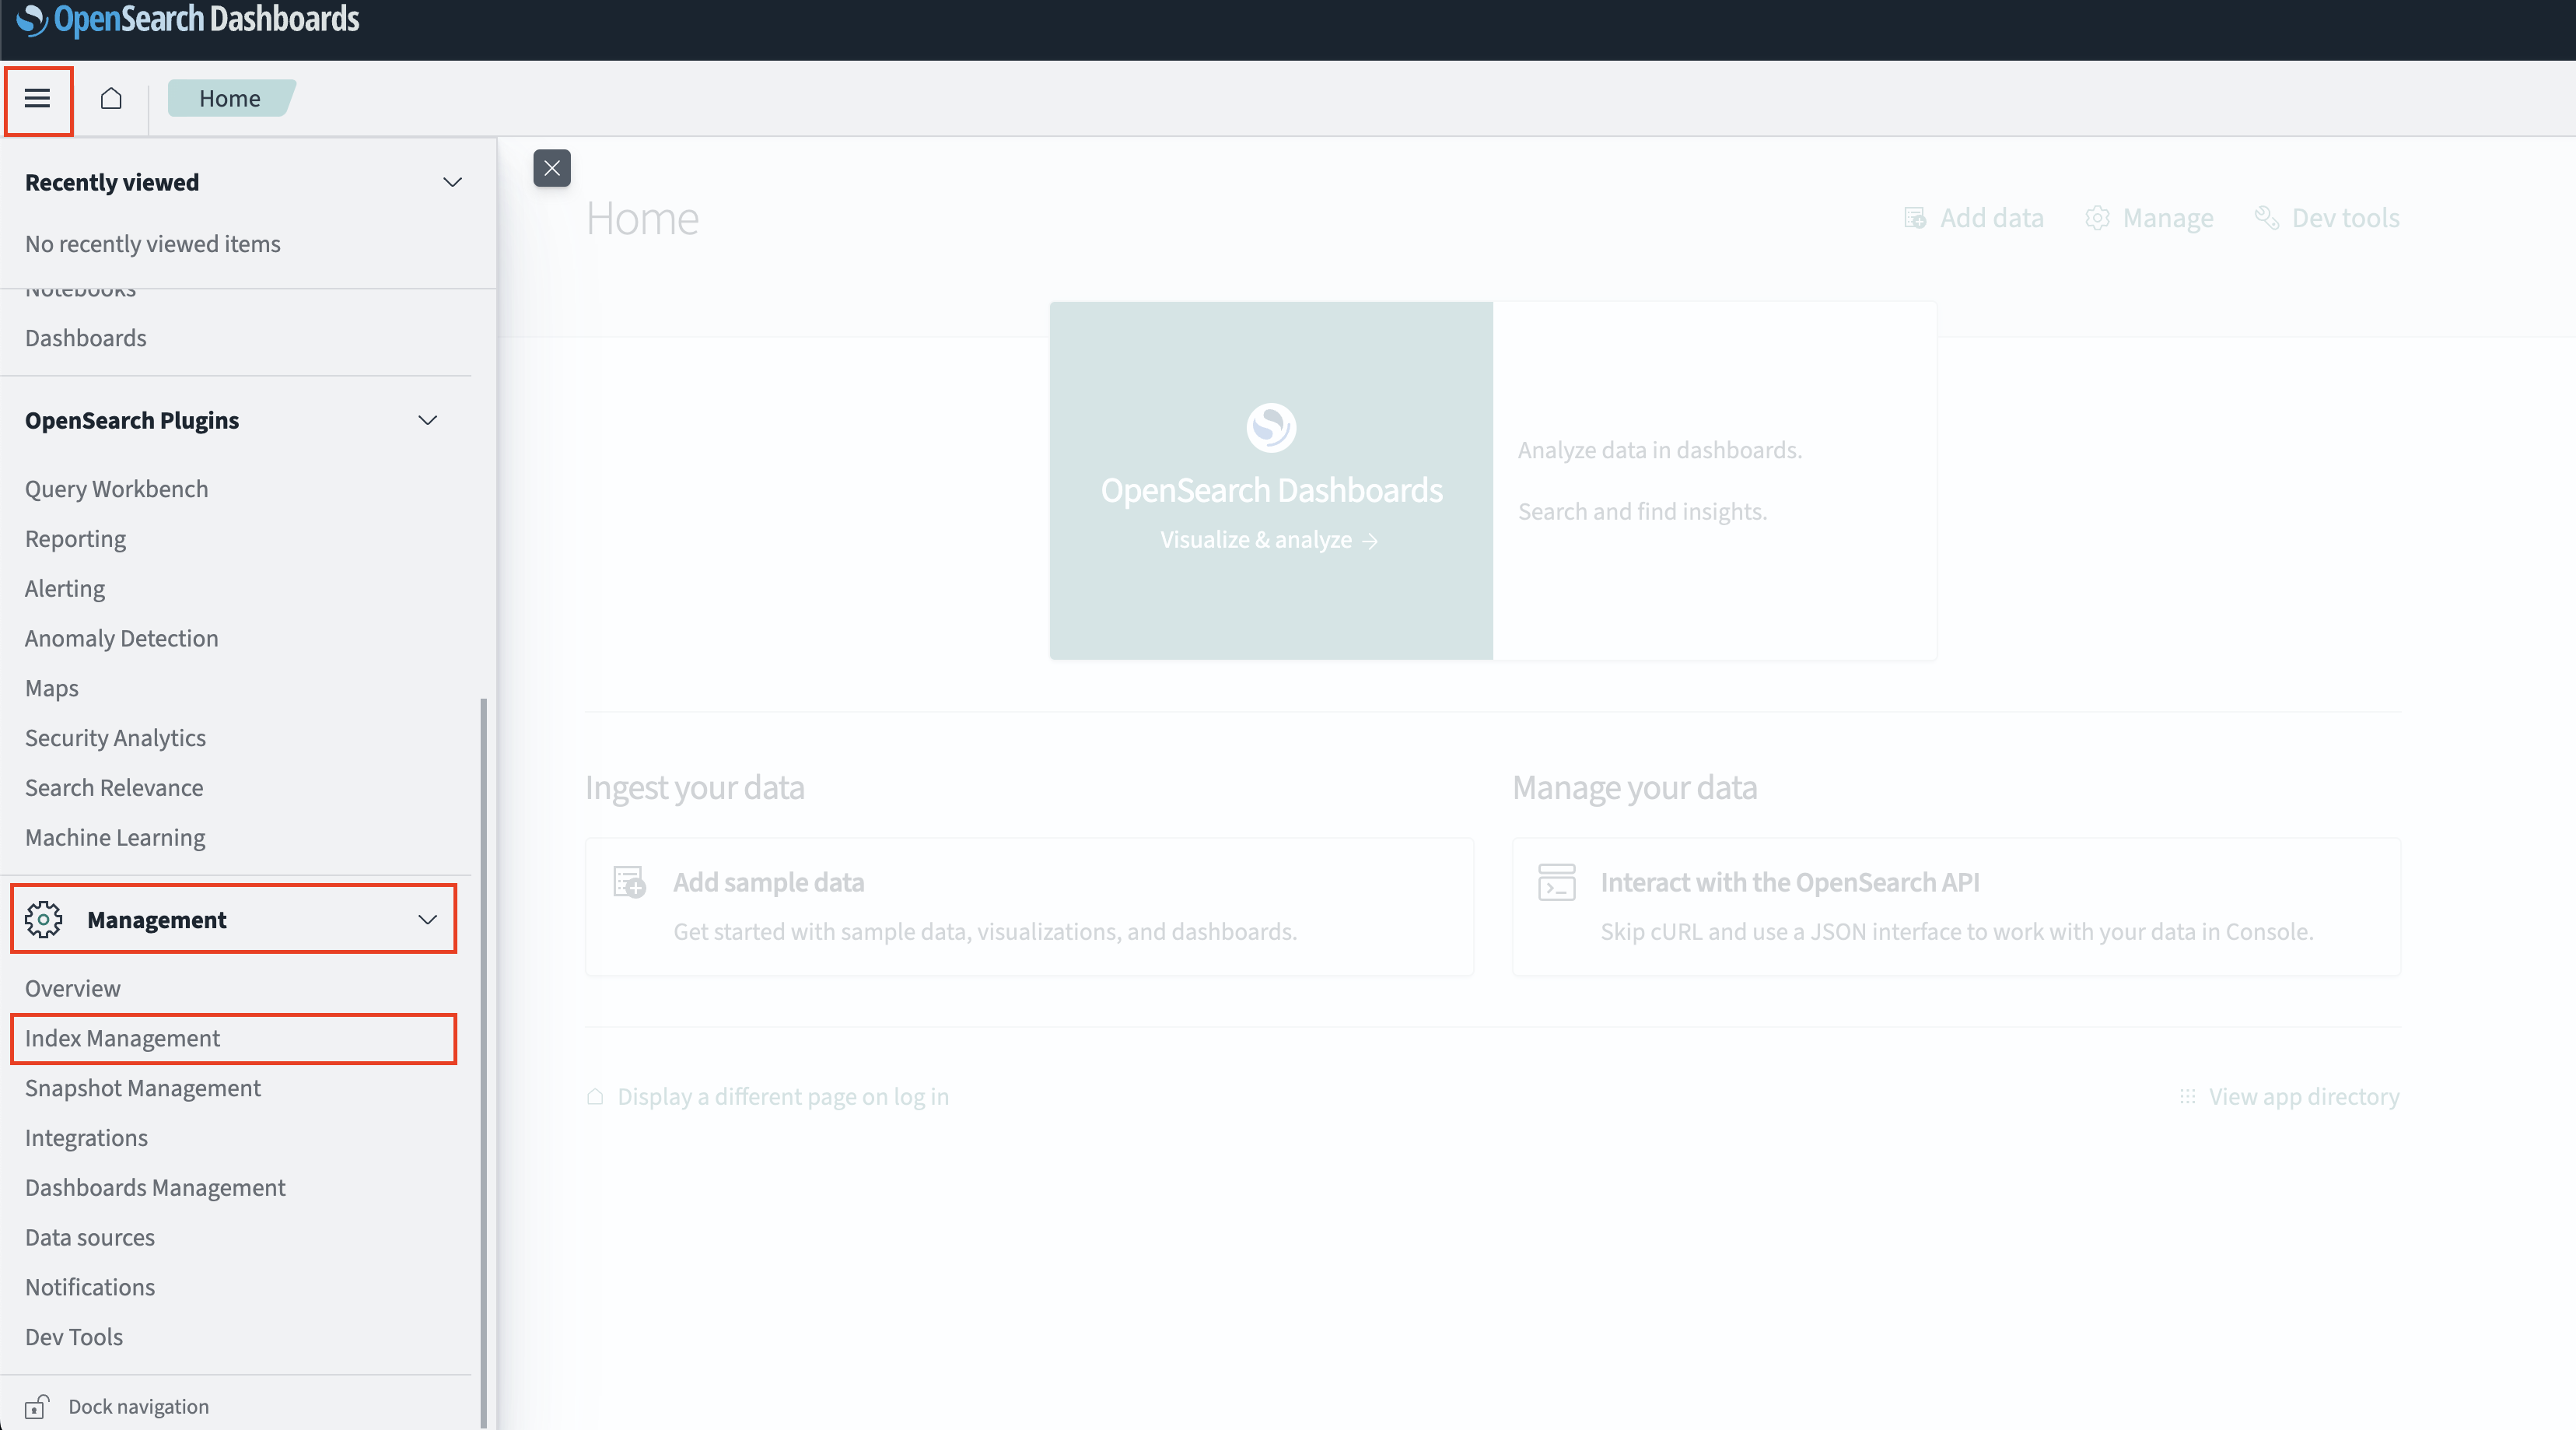
FIG. 3 - Navigating to Index Management in OpenSearch Dashboards
-
Under the Indexes header select Indexes. The index column is the name you require to configure an Amazon OpenSearch Service Connector for Query Federated Search, as shown below (FIG. 4). An exact name is required.
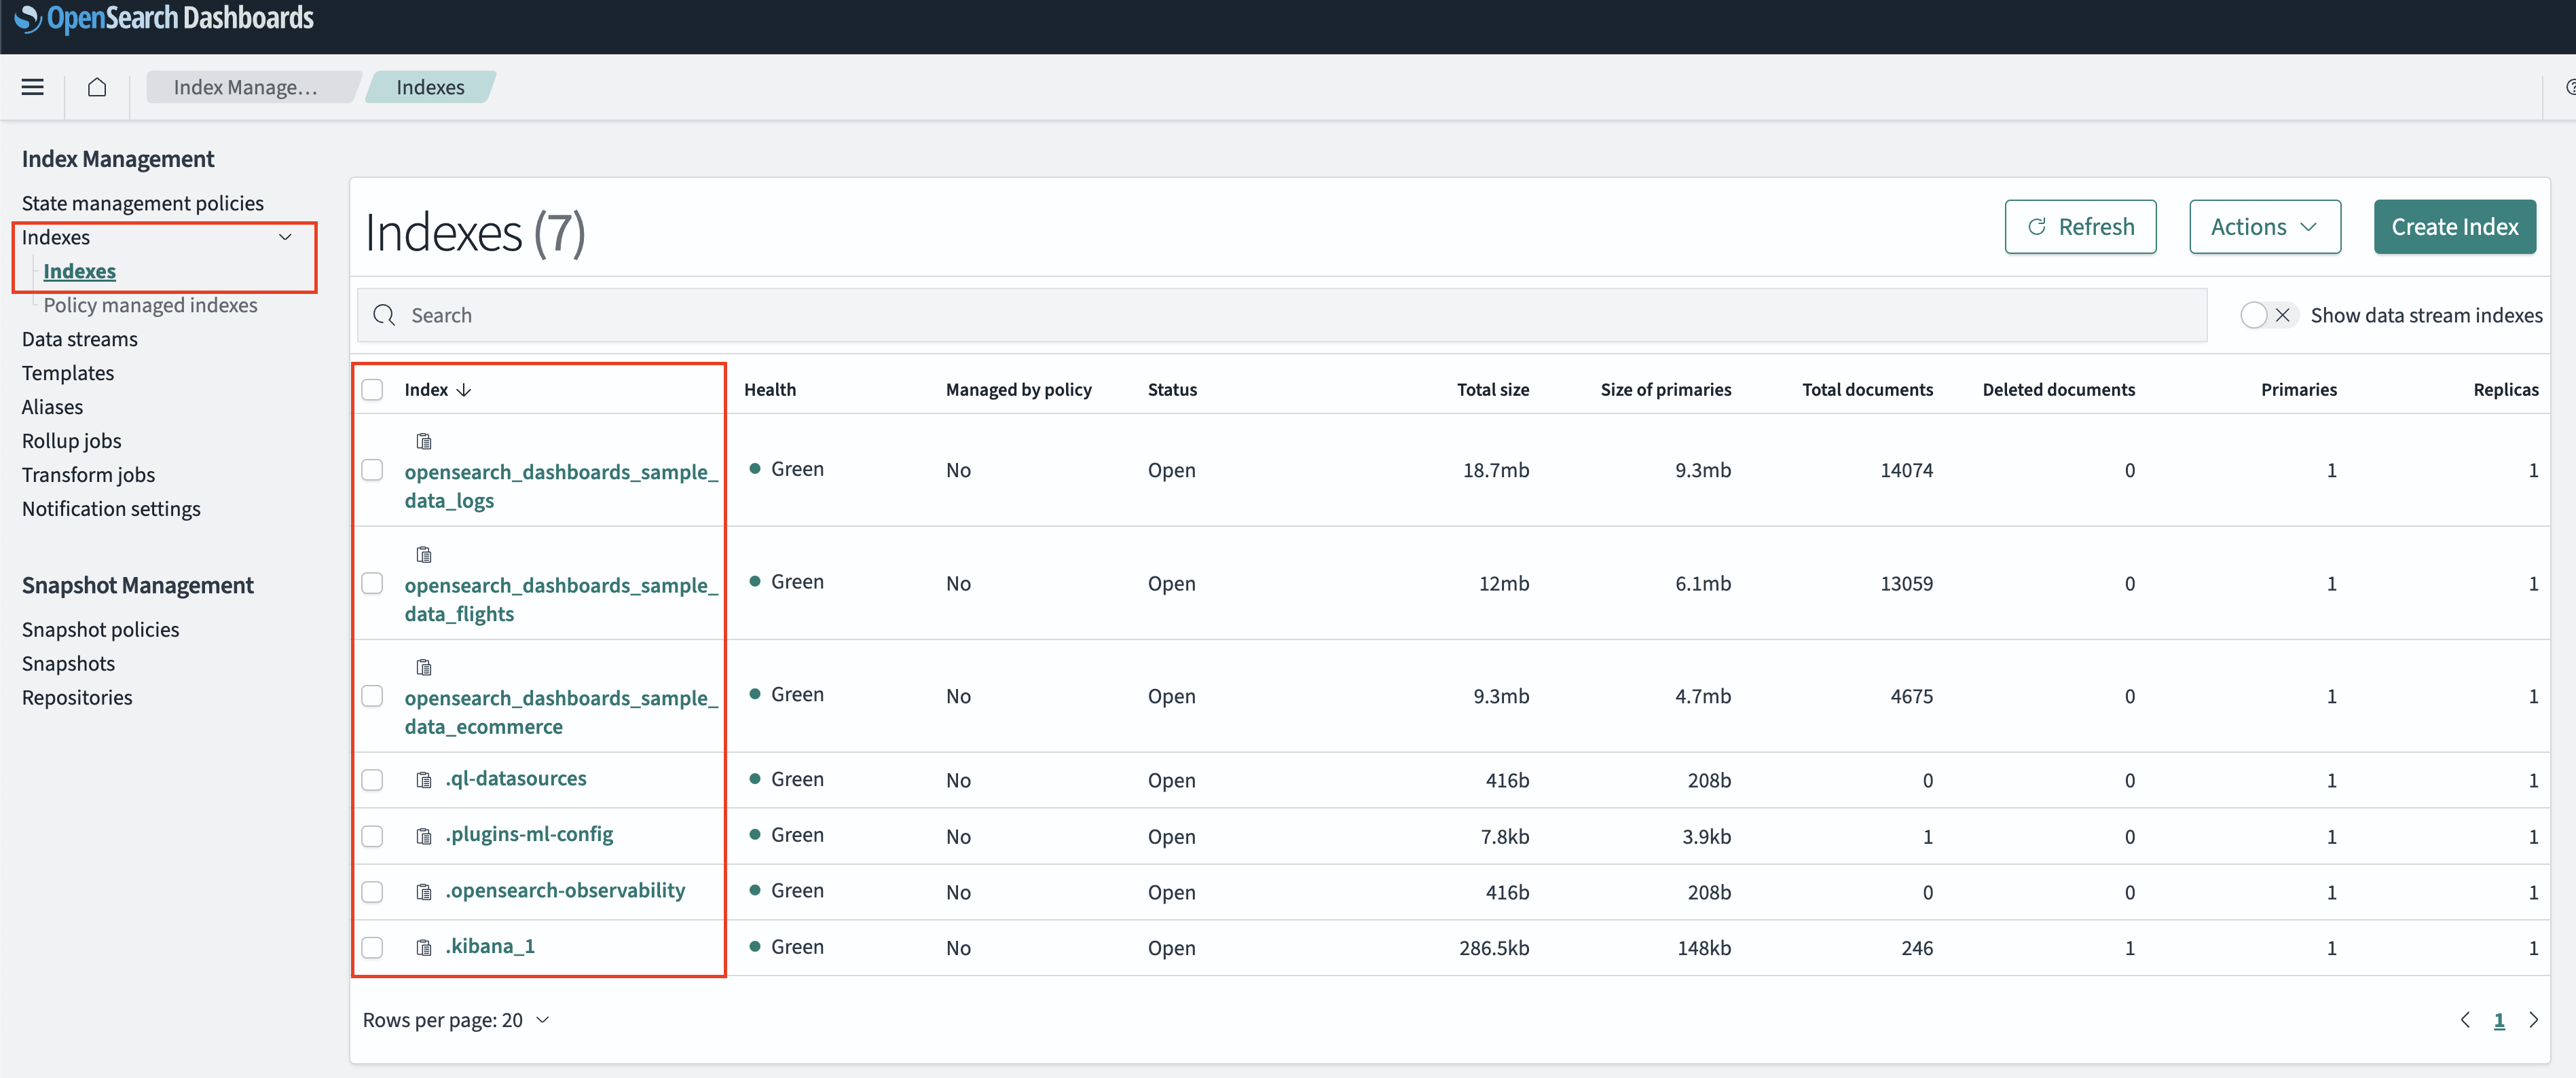
FIG. 4 - Retrieving Index names from the Indexes section of the Index Management settings console
In the next steps your will configure the Amazon OpenSearch Connector for Query Federated Search to be able to generate an IAM Role Trust Policy, an IAM Identity Policy, and an External ID to configure an IAM Role with.
Configure an Amazon OpenSearch Service Connector
To enable connectivity into your AWS Account, the Query Federated Search platform uses AWS IAM Roles with a read-only, randomly generated UUID as the ExternalId per unique connector configured. This random ExternalId is generated after entering in all relevant details, so you will need to determine what you will name your AWS IAM Role ahead of time. As a matter of best practice, this mechanism is intended to create a single Policy, a Single Role, and to be used with a single Index. That said, you can reuse the Policy as well as the IAM Role and provide multiple External IDs in the Trust Policy.
To fully configure your Connector you will need to:
- Provide required details to an Amazon OpenSearch Service Connector.
- Create an IAM Policy with the generated Identity Policy snippet.
- Create an IAM Role with the generated Trust Policy snippet, and attach the IAM Policy.
- Test the Connector and use the Configure Schema workflow to map your data.
Proceed to the next sections to learn how to activate an Amazon OpenSearch Service Connector and start searching.
Pre-configure an Amazon OpenSearch Service Connector
Use the following steps to create a new Query Federated Search Connector for Amazon OpenSearch Service - you'll use the same general Connector for any index. Be sure to change the required details such as the Index Name and use the proper IAM Role.
-
Navigate to the Connectors page, select Add Connector, and selectAmazon OpenSearch Service from the
SIEM and Log Managementcategory as shown below (FIG. 5). You can also search for Amazon OpenSearch Service using the search bar in the Add Connector page.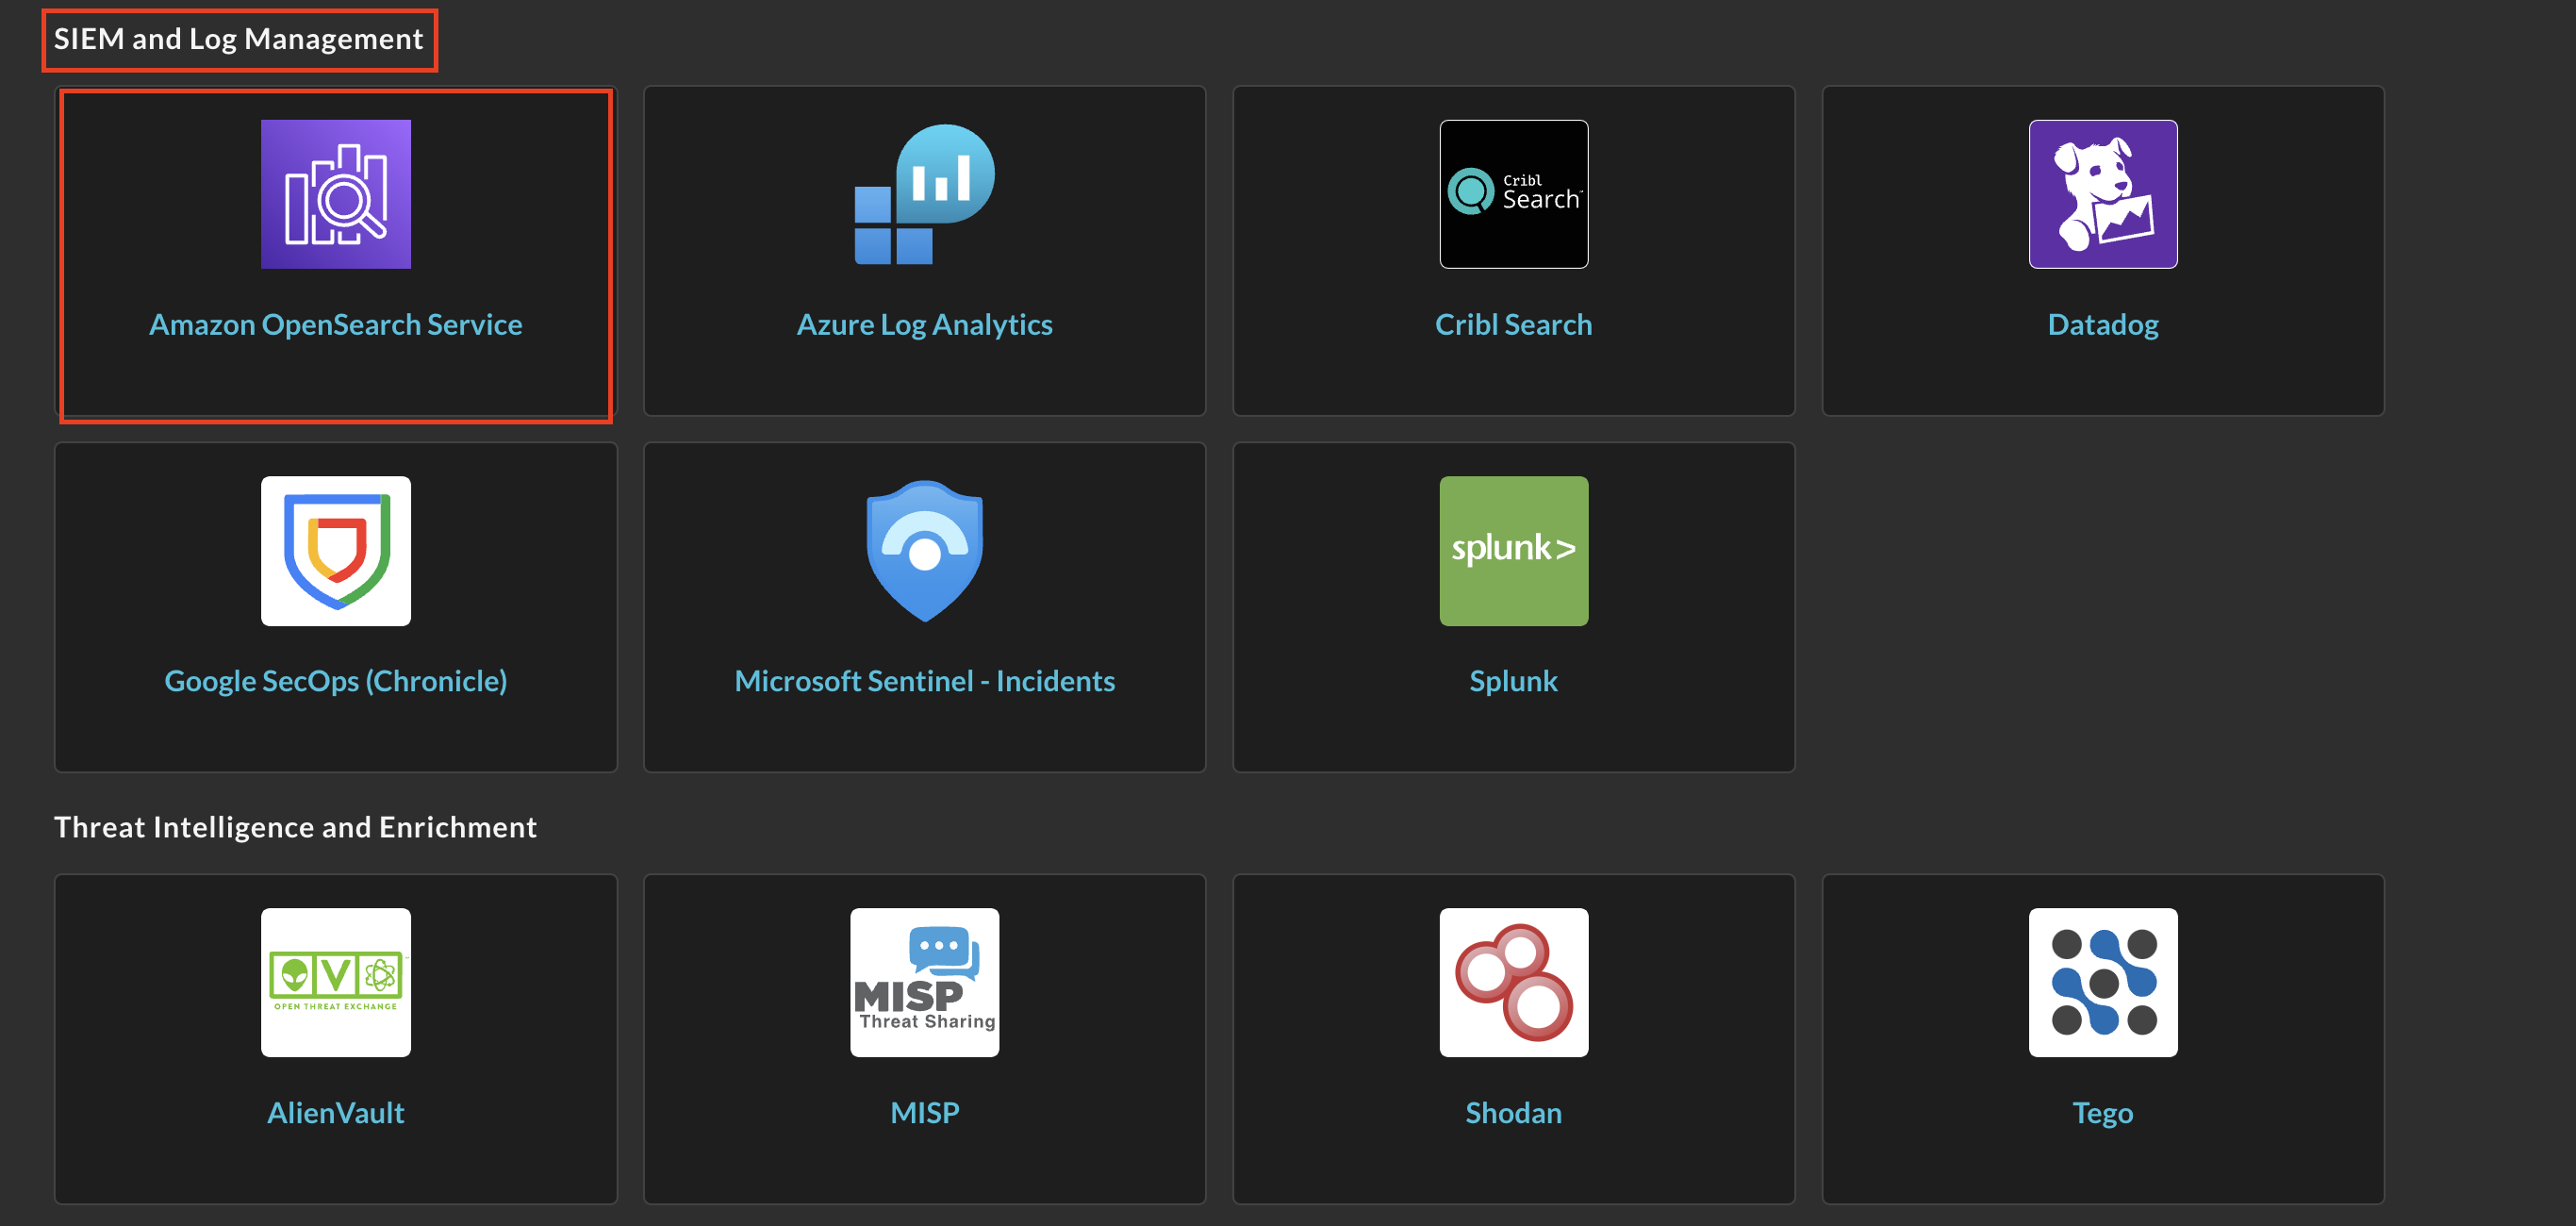
FIG. 1 - Locating the Amazon OpenSearch Service Connector
-
In the Configure Connector section, add the following detail as shown below (FIG. 6):
-
Connector Alias Name: The human-readable name you want to give to this connector, you can provide the name of the indexes, different domains, or use any other naming convention that makes sense for your end users.
-
External ID: This will be auto-generated after you Save the Connector.
-
Default Login: Leave the default value:
Default Login. -
OpenSearch Domain Hostname: Your IPv4 or dual stack hostname for the Domain, copied in Step 1 of the Prerequisites section.
-
OpenSearch Domain Name: The name of the OpenSearch Service domain.
-
AWS Region: The AWS Region your OpenSearch Service Domain is located in, copied in Step 2 of the Prerequisites section.
-
AWS Account ID: The AWS Account ID your OpenSearch Service Domain is located in, copied in Step 2 of the Prerequisites section.
-
AWS IAM Role Name: The name of the AWS IAM Role you intend to use or create for this Connector. You can put any name here, as long as you create the IAM Role with the same name in the later section.
-
Index Name: The name of the OpenSearch Index you want to search, copied in Step 4 of the Prerequisites section.
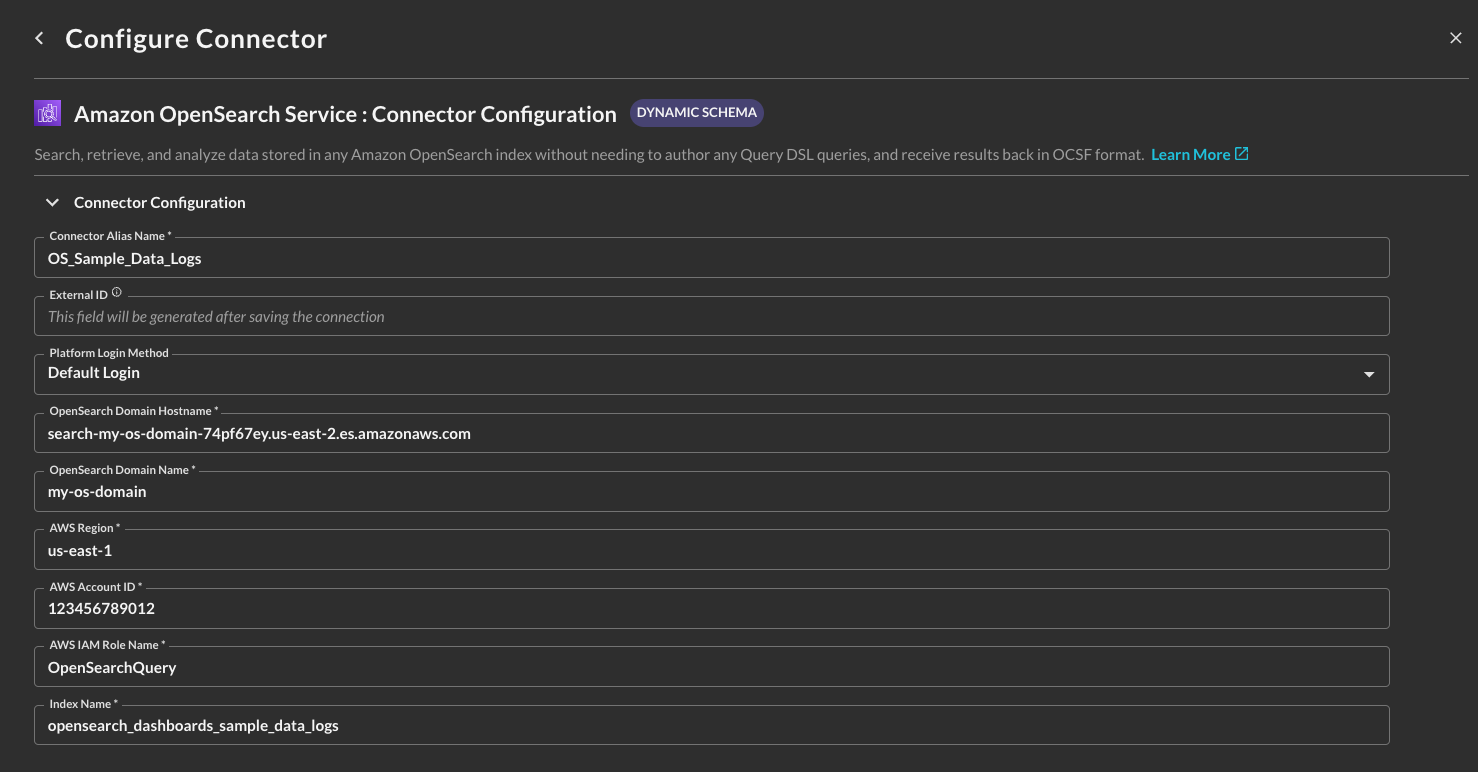
FIG. 6 - Amazon OpenSearch Service Connector configuration details
-
-
Select Save from the bottom-right of the Connector pane as shown below (FIG. 7). This ensures that all supplied information is saved and allows the Query backend to generate IAM Policy JSON snippets and an External ID unique to this Connector.

FIG. 7 - Saving the Amazon OpenSearch Connector
-
Scroll up and copy the AWS IAM policy snippets as shown below (FIG. 8) for both the Trust Policy (for your IAM Role) and Identity Policy (for your IAM Policy) and proceed to the next section.
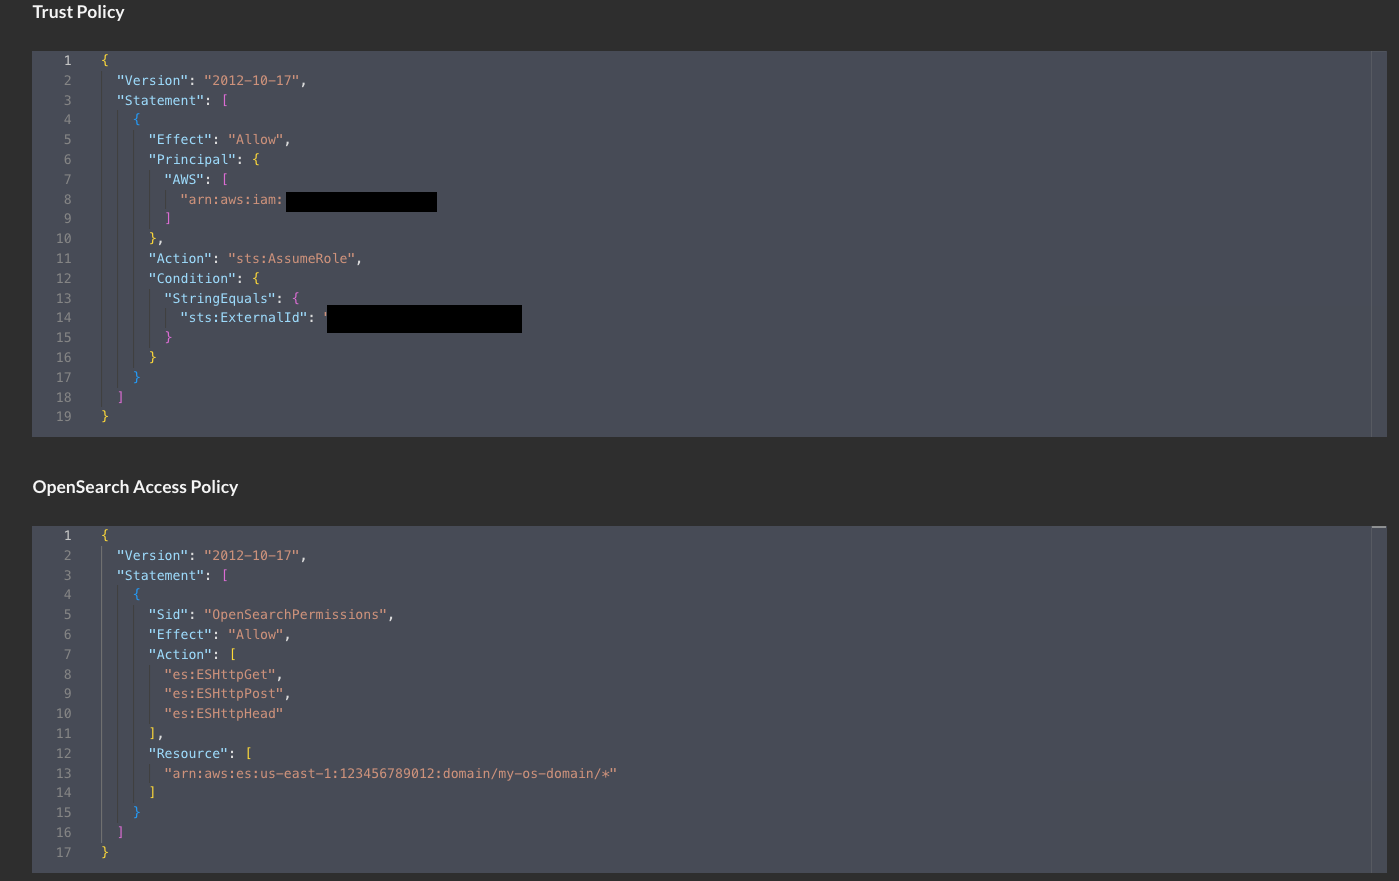
FIG. 8 - Copying the Trust Policy and Identity Policy
Create AWS IAM Policy for the Amazon OpenSearch Service Connector
In this section you will use the supplied Identity Policy from the previous section to create an AWS IAM Policy. While only a specific Glue Database and Table combination is specified, your entire Security Lake and Amazon Athena Results S3 Buckets have permissions granted for them. If you want to limit the Role to a specific prefix (folder/directory) path in Amazon S3 for either bucket, ensure you modify the JSON snippet as necessary.
If you use AWS KMS Customer Managed Keys (CMKs) to apply Encryption of data at rest for Amazon OpenSearch Service, you must also add the following permissions to this IAM Policy:
kms:Decryptkms:GenerateDataKeykms:Encrypt
The following steps use an Amazon Linux 2023 AWS CloudShell environment and the AWS CLI. Adapt these instructions to your specific operating system or deployment strategy (e.g., AWS CloudFormation, Terraform, AWS Console, etc.).
- Create an environment variable that contains the content of your Identity Policy as shown below. Ensure you replace the section
{ "YOUR_POLICY_HERE }with your actual policy!
POLICY_JSON=$(cat <<EOF
{ "YOUR_POLICY_HERE }
EOF
)- Create the AWS IAM Policy with the following command. Ensure you change the
policy-namevalue to whatever name you wish to grant the policy.
aws iam create-policy \
    --policy-name "QueryFederatedSearchOSServicePolicy" \
    --description "Grants the Query Federated Search Platform access to OpenSearch Service HTTP permissions." \
--policy-document "$POLICY_JSON"- (OPTIONAL STEP) if you use AWS KMS CMKs to encrypt the Amazon Athena query results and/or to encrypt the data within your Security Lake S3 Bucket, add the following policy into the created AWS IAM Policy using the AWS Console. Ensure you replace the values of
$AWS_REGION,$AWS_ACCOUNT_IDand$$YOUR_KEY_ID_HEREwith your proper AWS Region, AWS Account ID, and KMS Key ID respectively.
{
	"Version": "2012-10-17",
	"Statement": [
		{
			"Sid": "kmsPermissions",
			"Effect": "Allow",
			"Action": [
				"kms:Decrypt",
				"kms:Encrypt",
				"kms:GenerateDataKey"
			],
			"Resource": "arn:aws:kms:$AWS_REGION:$AWS_ACCOUNT_ID:key/$YOUR_KEY_ID_HERE"
		}
	]
}
In the next section you will create an AWS IAM Role, attach this Policy to it, and optionally modify your AWS KMS Key Policy if you use a KMS CMK. Ensure you copy the value of the IAM Policy ARN as you will need it in the next section!
Create AWS IAM Role & attach IAM Policy
In this section you will use the supplied Trust Policy from the previous section to create an AWS IAM Role that trusts the Query Production Account and delegates access to your OpenSearch Service and (optionally) KMS resources. The ExternalId that is generated is to prevent a Confused-Deputy flaw within the role assumption logic.
Despite it being an AWS best practice, we realize this can be cumbersome to maintain multiple specific IAM Roles per-Connector. To that end, if your own internal identity governance (and other) requirements allow it, you can specify multiple ExternalId entries in one IAM Trust Policy.
{
  "Version": "2012-10-17",
  "Statement": [
    {
      "Effect": "Allow",
      "Principal": {
        "AWS": [
          "arn:aws:iam::822484525064:root"
        ]
      },
      "Action": "sts:AssumeRole",
      "Condition": {
        "StringEquals": {
          "sts:ExternalId": [
            "foo",
            "bar",
            "69420",
            "vampirevampire"
            ]
        }
      }
    }
  ]
}
If you use AWS KMS Customer Managed Keys (CMKs) to apply Encryption of data at rest for Amazon OpenSearch Service, you must also add the following permissions to your AWS KMS Key Policy and trust the Principal (the IAM Role) you will create:
kms:Decryptkms:GenerateDataKeykms:Encrypt
The following steps use an Amazon Linux 2023 AWS CloudShell environment and the AWS CLI. Adapt these instructions to your specific operating system or deployment strategy (e.g., AWS CloudFormation, Terraform, AWS Console, etc.).
- Create an environment variable that contains the content of your Trust Policy as shown below. Ensure you replace the section
{ "YOUR_TRUST_POLICY_HERE }with your actual policy!
TRUST_POLICY_JSON=$(cat <<EOF
{ "YOUR_TRUST_POLICY_HERE }
EOF
)- Create the AWS IAM Role with the following command. Ensure you change the
role-namevalue to whatever name you pre-configured the Connector with! You can change the name in the Connector, but not the AWS IAM Role.
aws iam create-role \
    --role-name "QueryFederatedSearchForOSService" \
    --description "Delegates access to OpnenSearch Service to the Query Federated Search Platform" \
--assume-role-policy-document "$TRUST_POLICY_JSON"- Attach the IAM Policy you created in the previous section with your IAM Role with the following command. Ensure you replace the values for
role-nameandpolicy-arnfor your actual values.
aws iam attach-role-policy \
    --role-name "QueryFederatedSearchForOSService" \
--policy-arn "arn:aws:iam::ACCOUNT_ID:policy/QueryFederatedSearchOSServicePolicy"- (OPTIONAL STEP) if you use AWS KMS CMKs to encrypt the Amazon Athena query results and/or to encrypt the data within your Security Lake S3 Bucket, you must add the following Statement to your AWS KMS Key Policy. Replace
$AWS_ACCOUNT_IDand$ROLE_NAMEwith your AWS Account ID and the created IAM Role name, respectively.
{
    "Sid": "queryFederatedSearchPermissions",
    "Effect": "Allow",
    "Principal": {
        "AWS": "${IAMRoleArn}"
    },
    "Action": [
        "kms:Decrypt",
        "kms:Encrypt",
        "kms:GenerateDataKey"
    ],
    "Resource": "arn:aws:iam::$AWS_ACCOUNT_ID:role/$ROLE_NAME"
}- Finally, modify your Domain Access Policy such that it trusts the IAM Role you created to perform
es:ESHttp*activities in the Domain. If you require additional conditional access such as IP allowlisting, please reach out to your Query Customer Success Manager to get a list of our outbound IP addresses.
{
    "Version": "2012-10-17",
    "Statement": [
        {
        "Effect": "Allow",
        "Principal": {
            "AWS": "arn:aws:iam::ACCOUNT_ID:role/ROLE_NAME"
        },
        "Action": "es:ESHttp*",
        "Resource": "arn:aws:es:AWS_REGION:ACCOUNT_ID:domain/DOMAIN_NAME/*"
        }
    ]
}
In the next section you will finalize configuring the Connector for your Amazon OpenSearch Service domain.
Finalize configuring your Amazon OpenSearch Service Connector
In this section you will verify all of your permissions, test that the connection works, and enable it so that you can dispatch searches to Amazon Security Lake from the Query Federated Search Platform.
-
Back in the Connectors page, select the Amazon OpenSearch Service Connector you configured and select Test Connector. You should receive the following message:
The connection was tested successfullyas shown below (FIG. 9).
FIG. 9 - Successful testing of the Amazon OpenSearch Service Connector
-
Toggle the Preview Data dropdown and select Fetch Sample. This will take a sample of 10 events from your Index. Any failures here are typically due to missing IAM permissions. Once complete, a table and JSON view will appear after a brief loading sequence as shown below (Fig. 10).
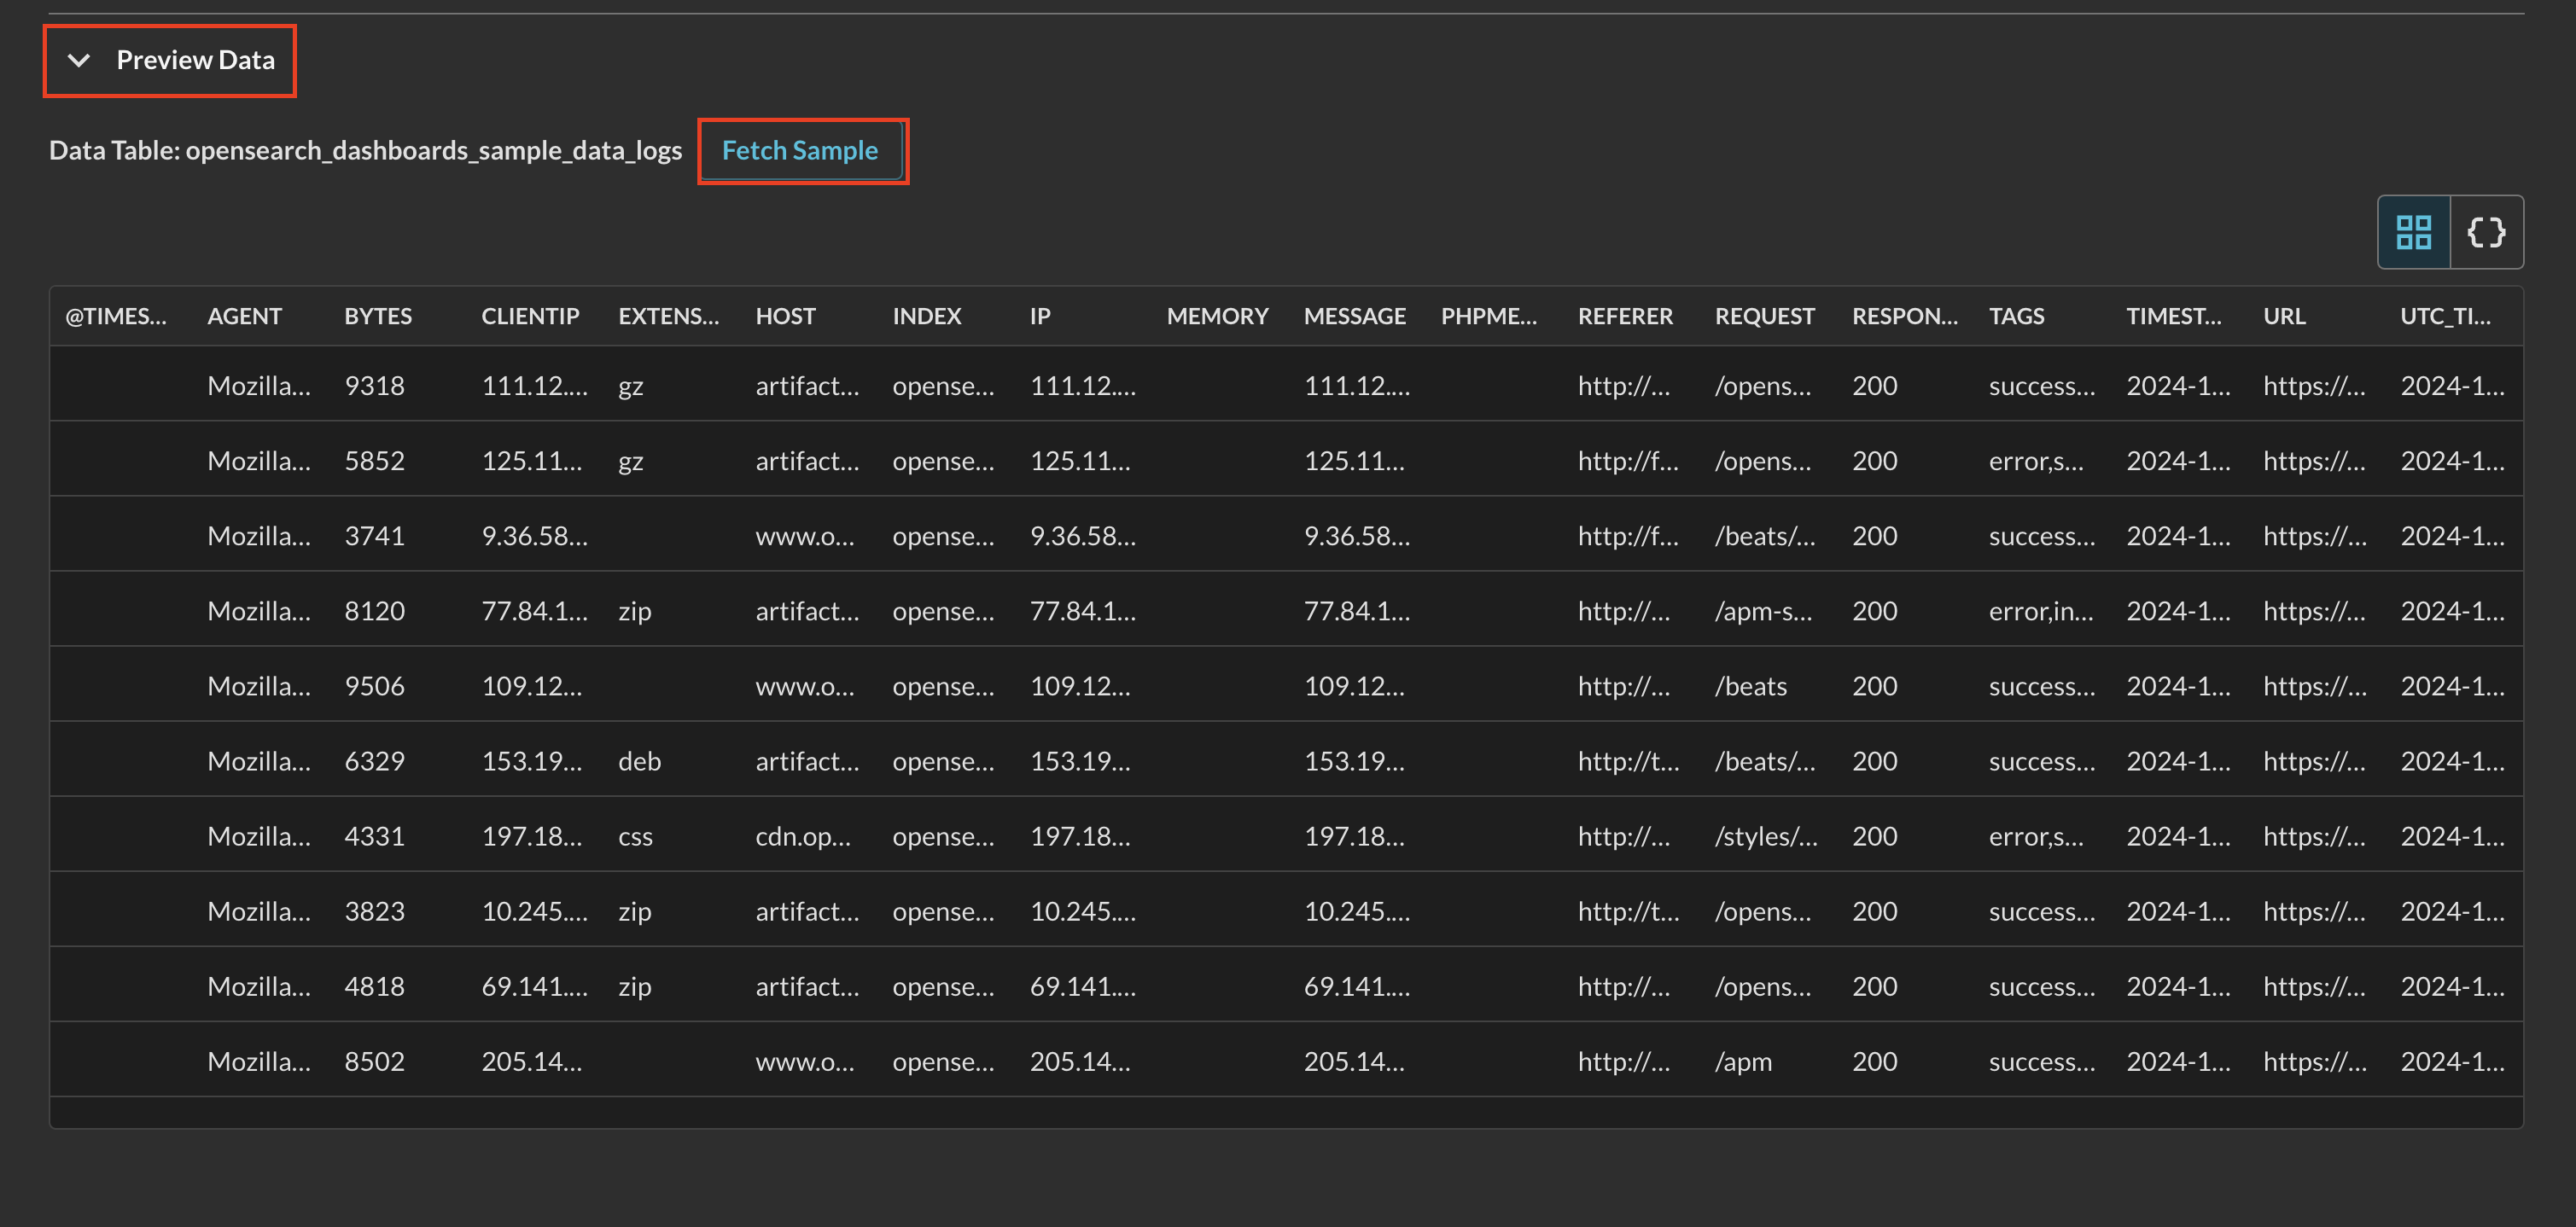
FIG. 10 - Previewing a table of data from an OpenSearch Service index
-
Finally, proceed to the Map Data section to begin the Configure Schema process. Refer to the hyperlink to learn how to use the Configure Schema no-code workflow, it is HIGHLY recommended for first time users.
You will now see Amazon OpenSearch Service added as an available Connector within the Query Search and Query Summary Insights UI.
Querying Amazon OpenSearch Service Connectors
Within the Query Search UI, all Connectors are enabled by default. To check that your specified Connector(s) for Amazon OpenSearch Service are enabled, navigate to the SIEM and Log Management section of the Selected Connectors dropdown and ensure that your specified Amazon OpenSearch Service Connector(s) are are selected (denoted by a checkbox) before running your searches as shown below (FIG. 11).
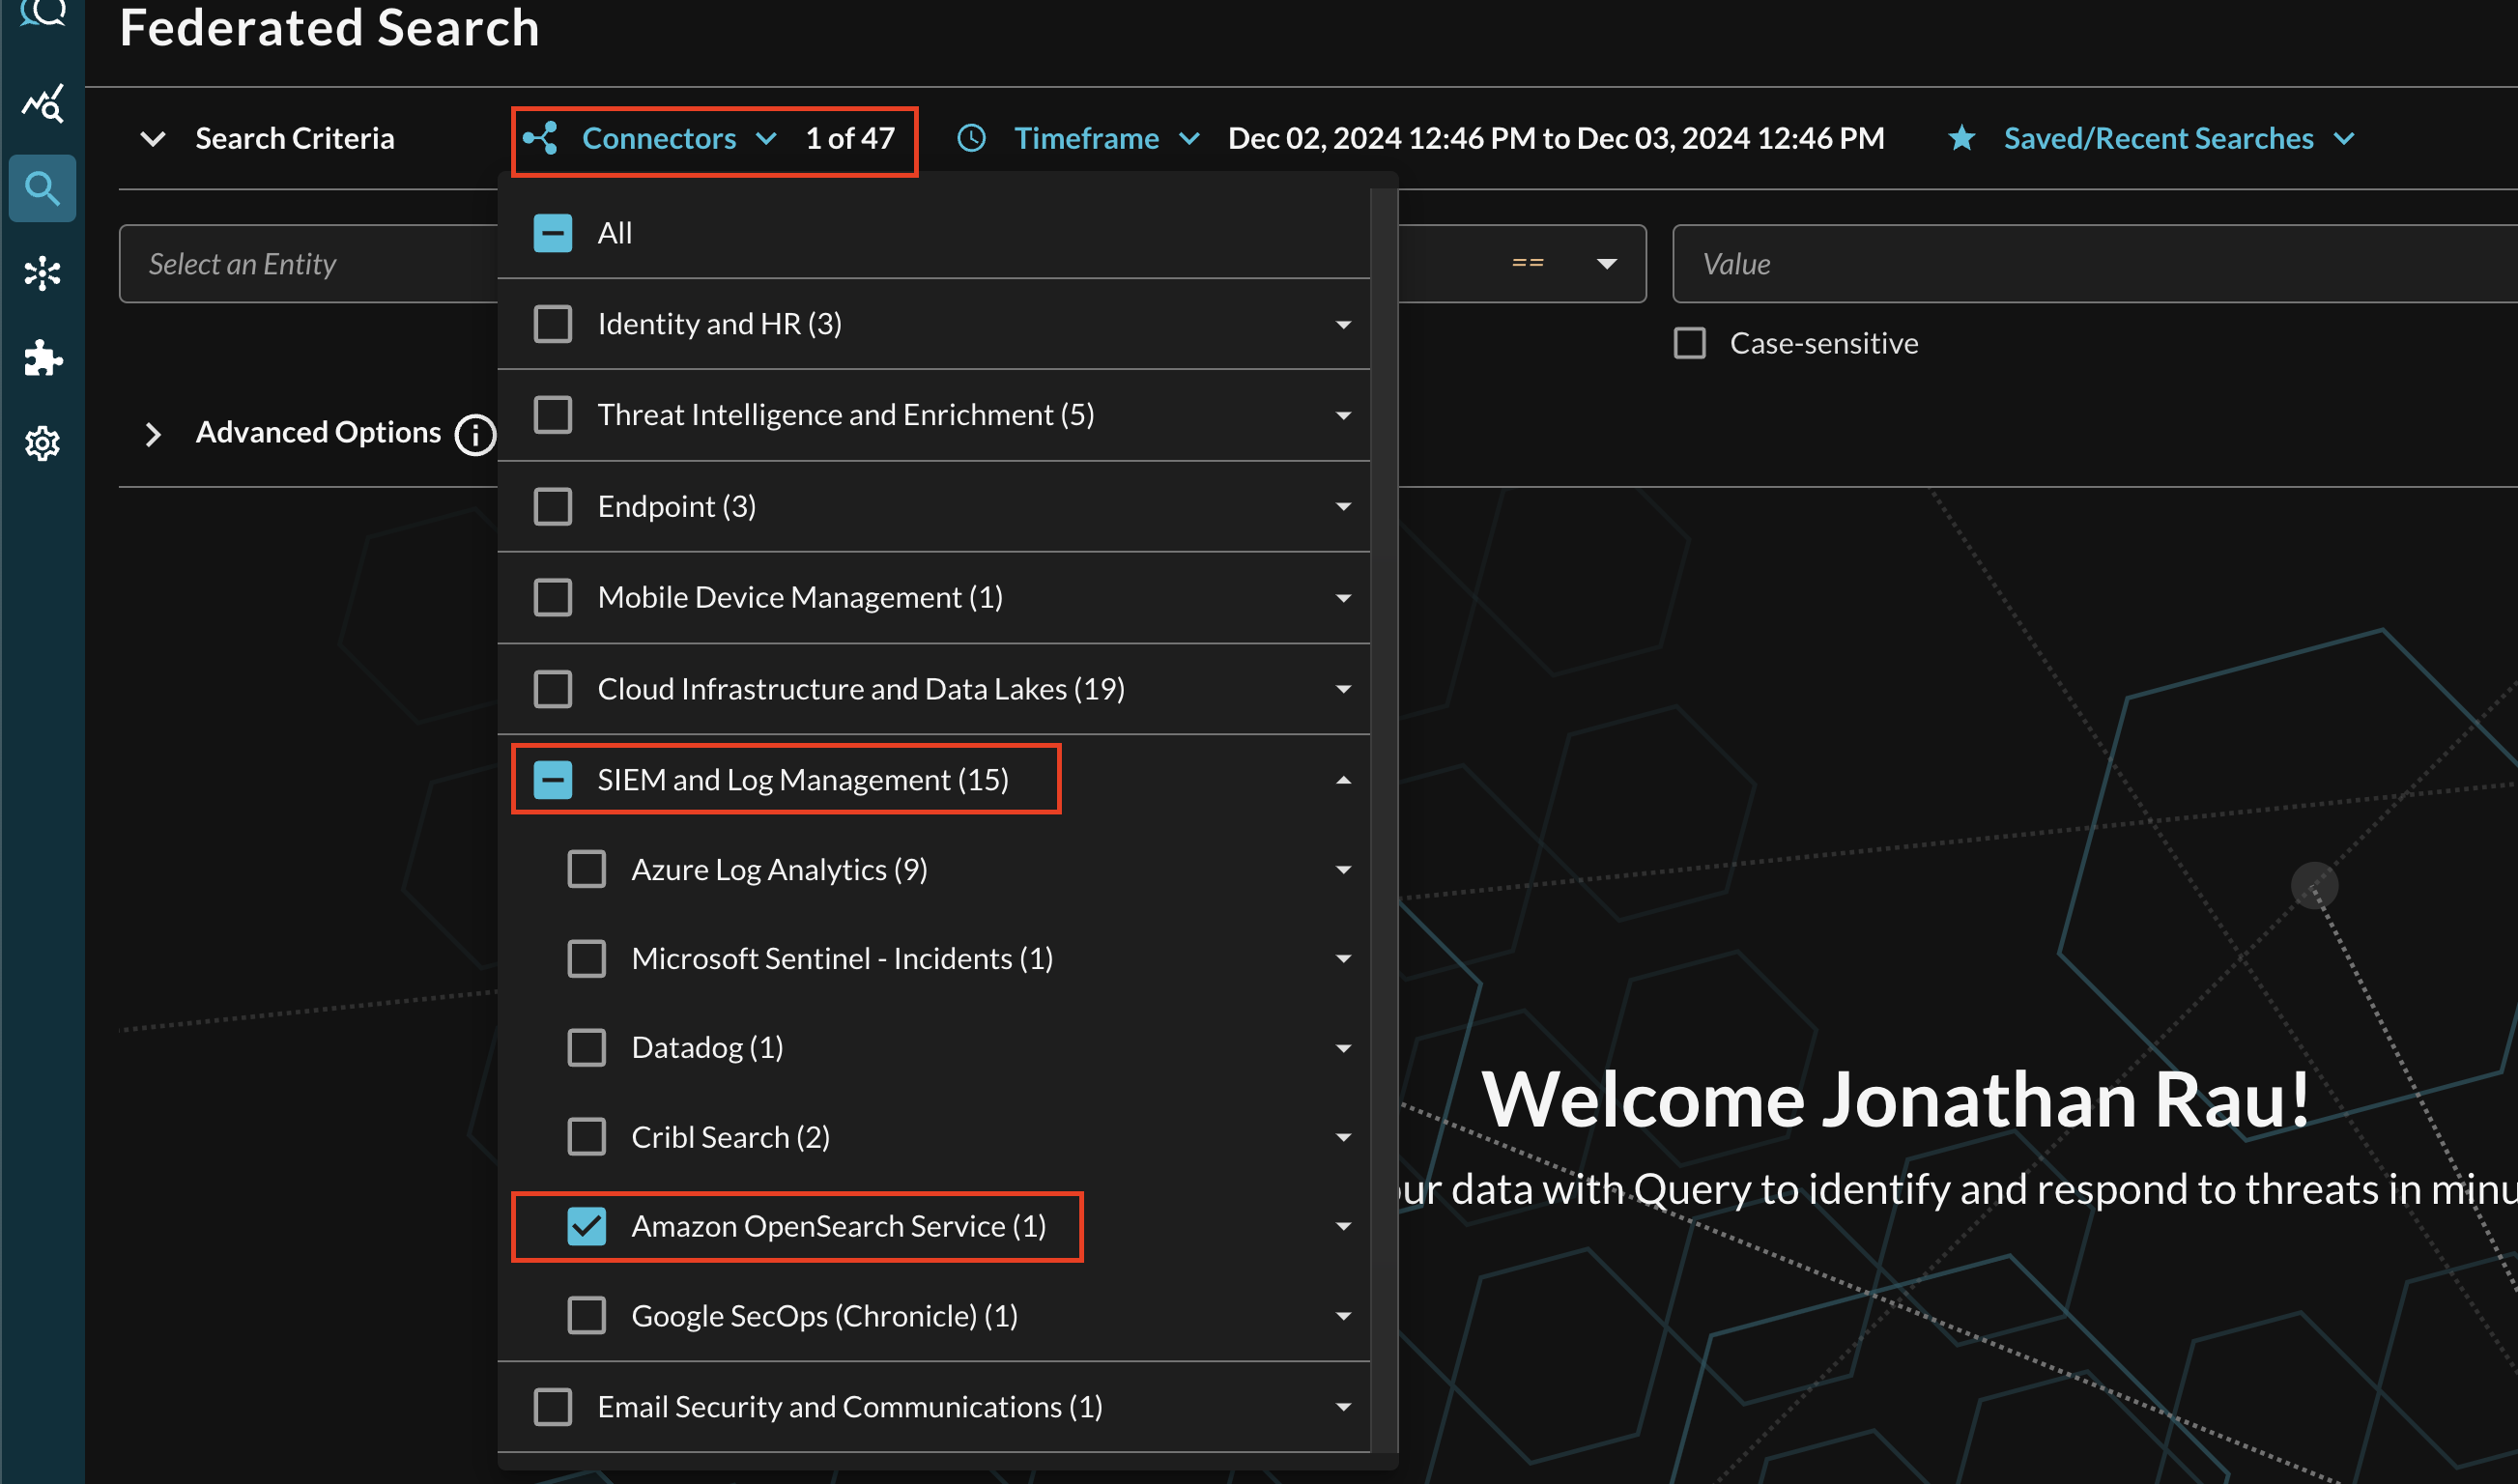
FIG. 11 - Selecting Amazon OpenSearch Service from the Query Connectors picker menu
The Entities (Observables) and Events you will be able to search determine on how you mapped your data in Configure Schema against a given Cribl Search Dataset. For more information about the QDM/OCSF schema itself refer to the About the Query Data Model section of the Query docs, you can also view the Categories, Events, and Objects themselves.
Example Amazon OpenSearch Service Mapping
As an example, consider mapping one of the Amazon OpenSearch Service indexes that are available in the OpenSearch Samples, such as opensearch_dashboards_sample_data_logs, which contain synthetic HTTP requests which can be mapped to HTTP Activity. For an example mapping, consider the following.
- Event Class: Select HTTP Activity from the dropdown.
- Event Time: Select the
timestampfield, which is the default Epoch seconds (Unix time) within the Dataset. This is used to prune searches by setting the upper and lower bounds for start and end times within the underlying QDSL query. - Entities: These are multi-selection fields that correspond to all scalar OCSF Observables (see the
Type IDsection of the table.- Country:
geo.srcandgeo.dst, these are 2-digit Country codes for the source and destination IP addresses. - Hostname:
host. - IP Address:
ipandclientip- typically these are the same value in the example logs in this Index. - URL:
requestandreferrer. - User Agent:
agent.
- Country:
- Attributes: These are the individual key-value pairs that make up the OCSF/QDM schema, you do not need to actually map any of these if you do not wish to. The following IS NOT an exhaustive list, it will populate most important elements to display in the Results and Summary Insights visualizations. Attributes help you construct very specific Event-based searches in the Query Federated Search query builder.
action_id: Chooseindexand map the following enums to constant values, using a constant value such as theindexensures the Attribute is properly populated.- ALLOWED:
opensearch_dashboards_sample_data_logs
- ALLOWED:
activity_id: Chooseindexand map the following enums to constant values, using a constant value such as theindexensures the Attribute is properly populated.- GET:
opensearch_dashboards_sample_data_logs
- GET:
disposition_id: Chooseindexand map the following enums to constant values, using a constant value such as theindexensures the Attribute is properly populated.- ALLOWED:
opensearch_dashboards_sample_data_logs
- ALLOWED:
message:messageseverity_id: Chooseindexand map the following enums to constant values, using a constant value such as theindexensures the Attribute is properly populated.- INFORMATIONAL:
opensearch_dashboards_sample_data_logs
- INFORMATIONAL:
status_id: Chooseindexand map the following enums to constant values, using a constant value such as theindexensures the Attribute is properly populated.- SUCCESS:
opensearch_dashboards_sample_data_logs
- SUCCESS:
type_uid: Chooseindexand map the following enums to constant values, using a constant value such as theindexensures the Attribute is properly populated.- HTTP_ACTIVITY_GET:
opensearch_dashboards_sample_data_logs
- HTTP_ACTIVITY_GET:
device.ip:ipdevice.location.country:geo.srcdevice.os.name:machine.oshttp_request.length:byteshttp_request.referrer:referrerhttp_request.user_agent:agenthttp_response.content_type:extensionhttp_response.message:message
Entity-based Search
To conduct an Entity-based search, ensure that all of the data points you will be searching for are mapped within the Configure Schema wizard as demonstrated in the previous section.
In the Federated Search console, select the search dropdown, ensure the Entities radio button is selected and search for your desired Entity as shown below (FIG. 12). For instance, you can search for an IP Address or Hostname of a requester, or the URL, these can be further correlated against other OpenSearch Service Connectors as well as different Query Connectors.
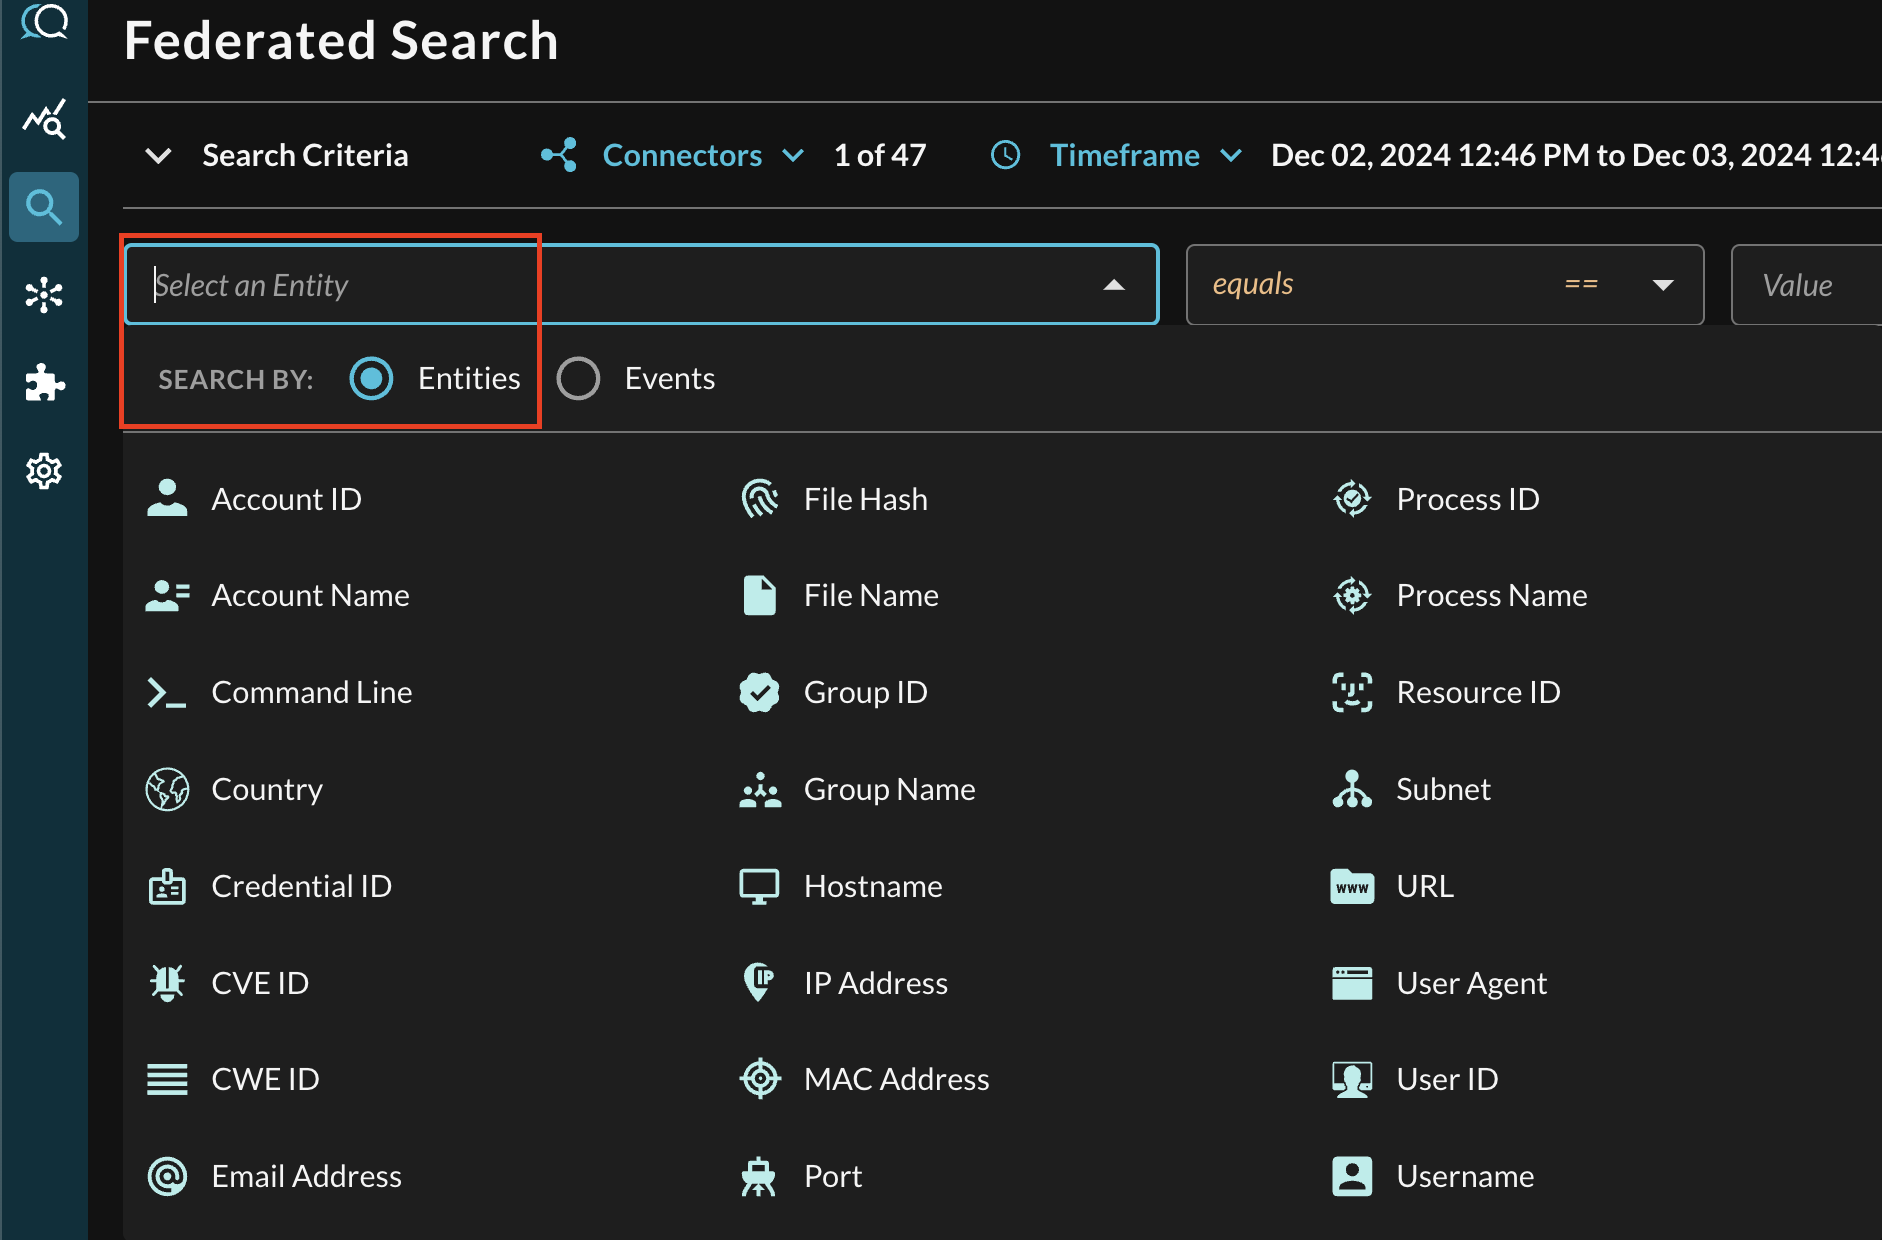
FIG. 12 - Entity-based searching with Query Federated Search
After selecting an Entity, most allow you to specify an Operator. This allows you to perform simple equality searches or to perform more generalized searches using Contains, Starts With, or Ends With Operators. These are mapped against its appropriate OpenSearch QDSL operators.
When you search for multiple values that may be present across different Connectors, the Query Federated Search query planner inspects the Configure Schema metadata to ensure searches are sent to the appropriate Connectors, this operates more as a collated window function within Query and not as an expensive SQL join.
Additionally, you can specify case-sensitivity for the entire search criteria. An example of a multi-value CVE search that uses the equals operator and toggled case-sensitivity is shown below (FIG. 13).

FIG. 13 - Orientation for Entity-based search in Query Federated Search
Event-based Search
To conduct an Event-based search, ensure that all of the data points you will be searching for are mapped within the Configure Schema wizard as demonstrated in the mapping section. Within the Federated Search console, only mapped Events per the Select Connectors are populated, unlike Entities which has every potential value shown in the list.
In the Federated Search console, select the search dropdown, ensure the Events radio button is selected and search for your desired Event as shown below (FIG. 14), in this case select the Network Activity category to find the HTTP Activity Event Class. If you mapped opensearch_dashboards_sample_data_logs against HTTP Activity as demonstrated in the previous section, you can also search across all Connectors normalized to HTTP Activity such as AWS WAFv2 access logs stored in AWS Security Lake or other data lake or SIEM resources mapped to HTTP Activity such as IDS logs, load balancer access logs, and otherwise.
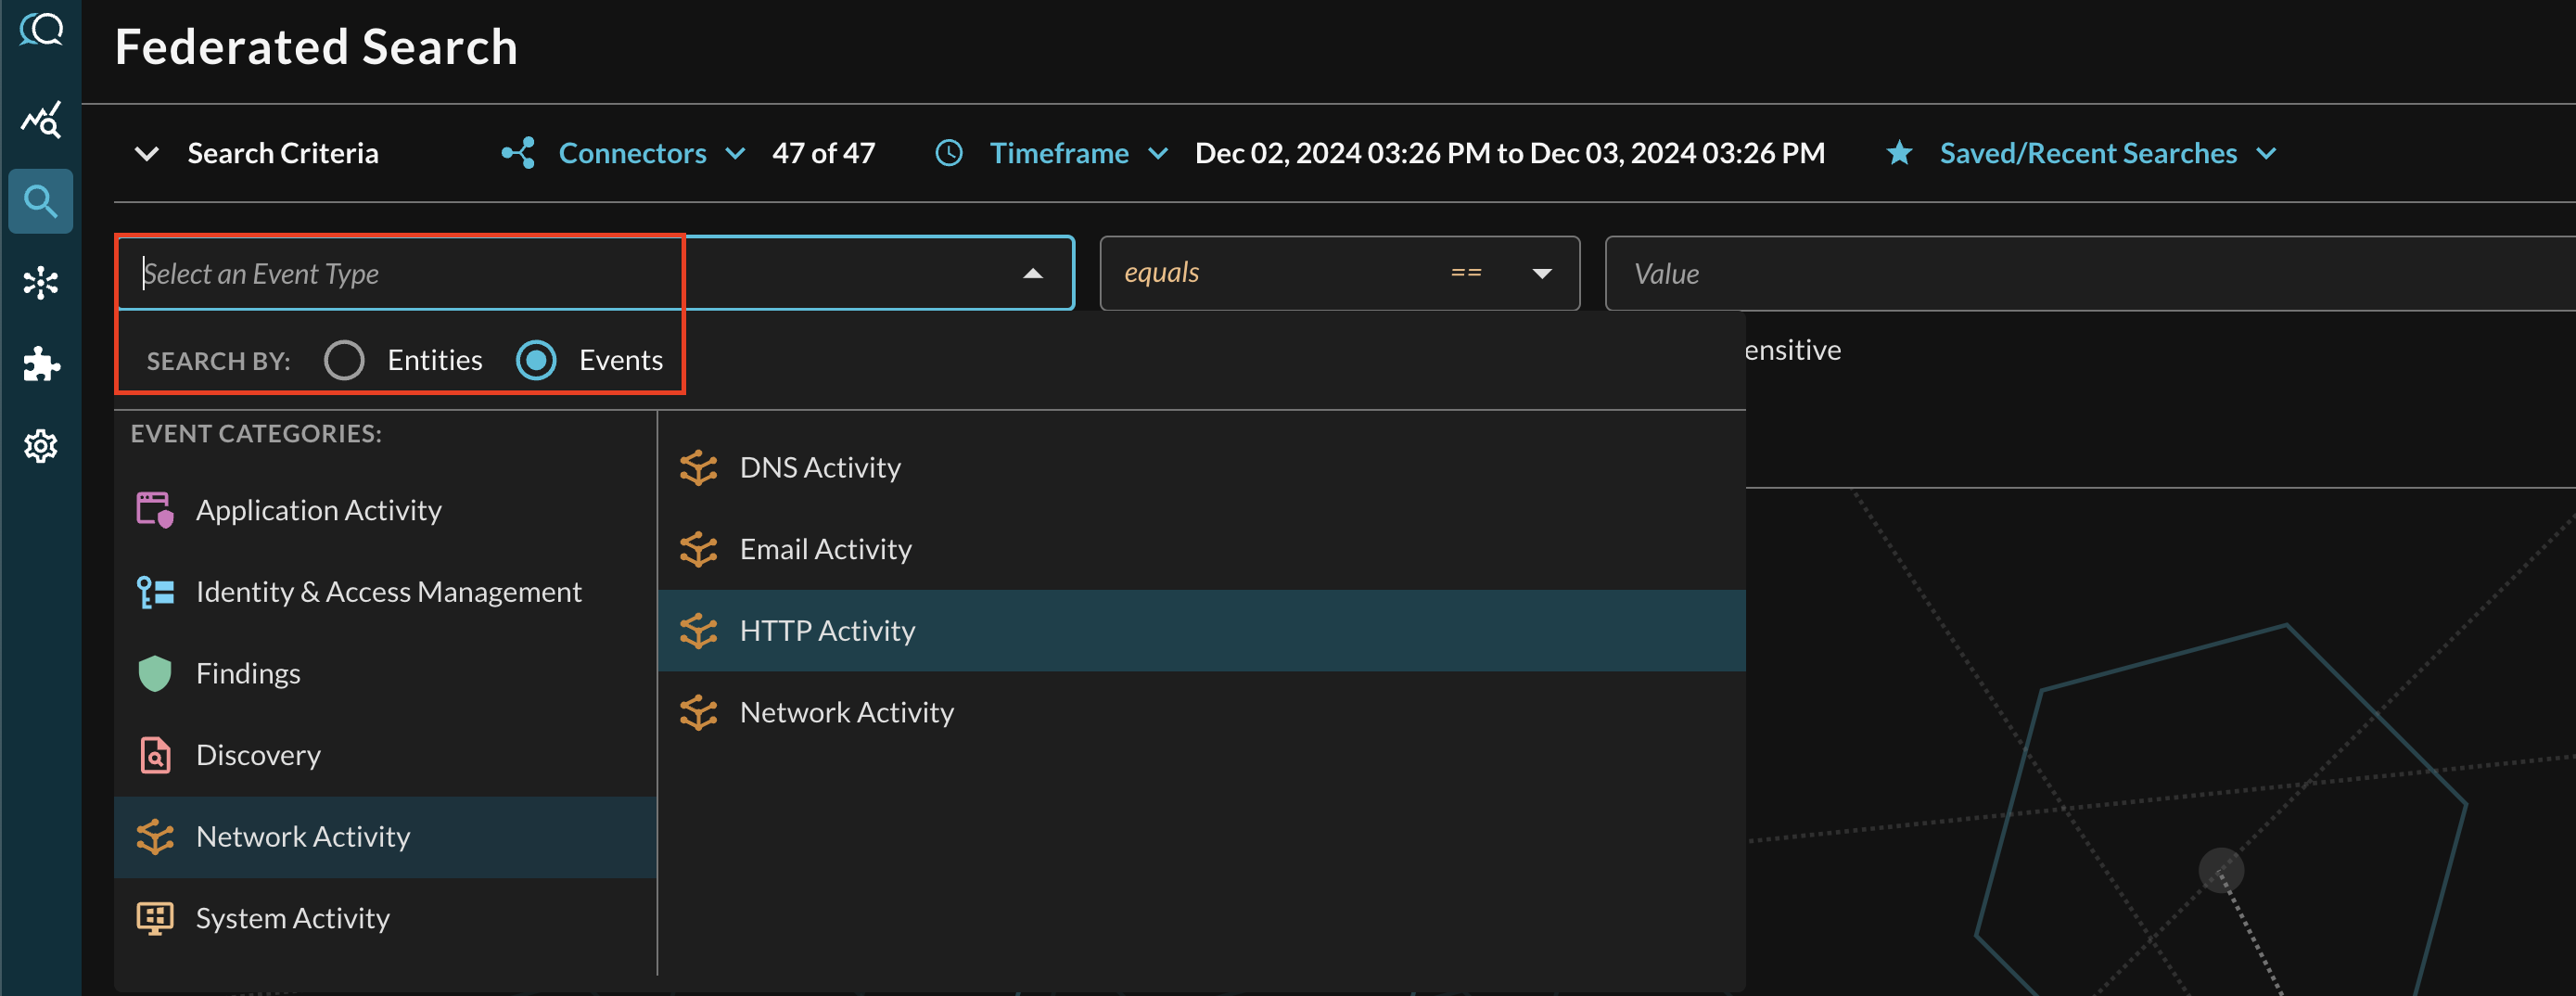
FIG. 14 - Searching for HTTP Activity Event Classes
Searching from the Event will pull a sample (up to several 10s of 1000s) of all matching events per Connectors that are mapped to it. For more specific filtering within an Event, you can choose one or more conditions to refine a search. Selecting the plus-sign (+) dropdown next to the Event menu allows you to choose from any specific OCSF/QDM attribute in the event.
For instance, when searching for HTTP Activity events, you can specify a specific referrer URL by filtering for HTTP Request --> Referrer (which is mapped in Configure Schema as http_request.referrer) as shown below (FIG. 15).
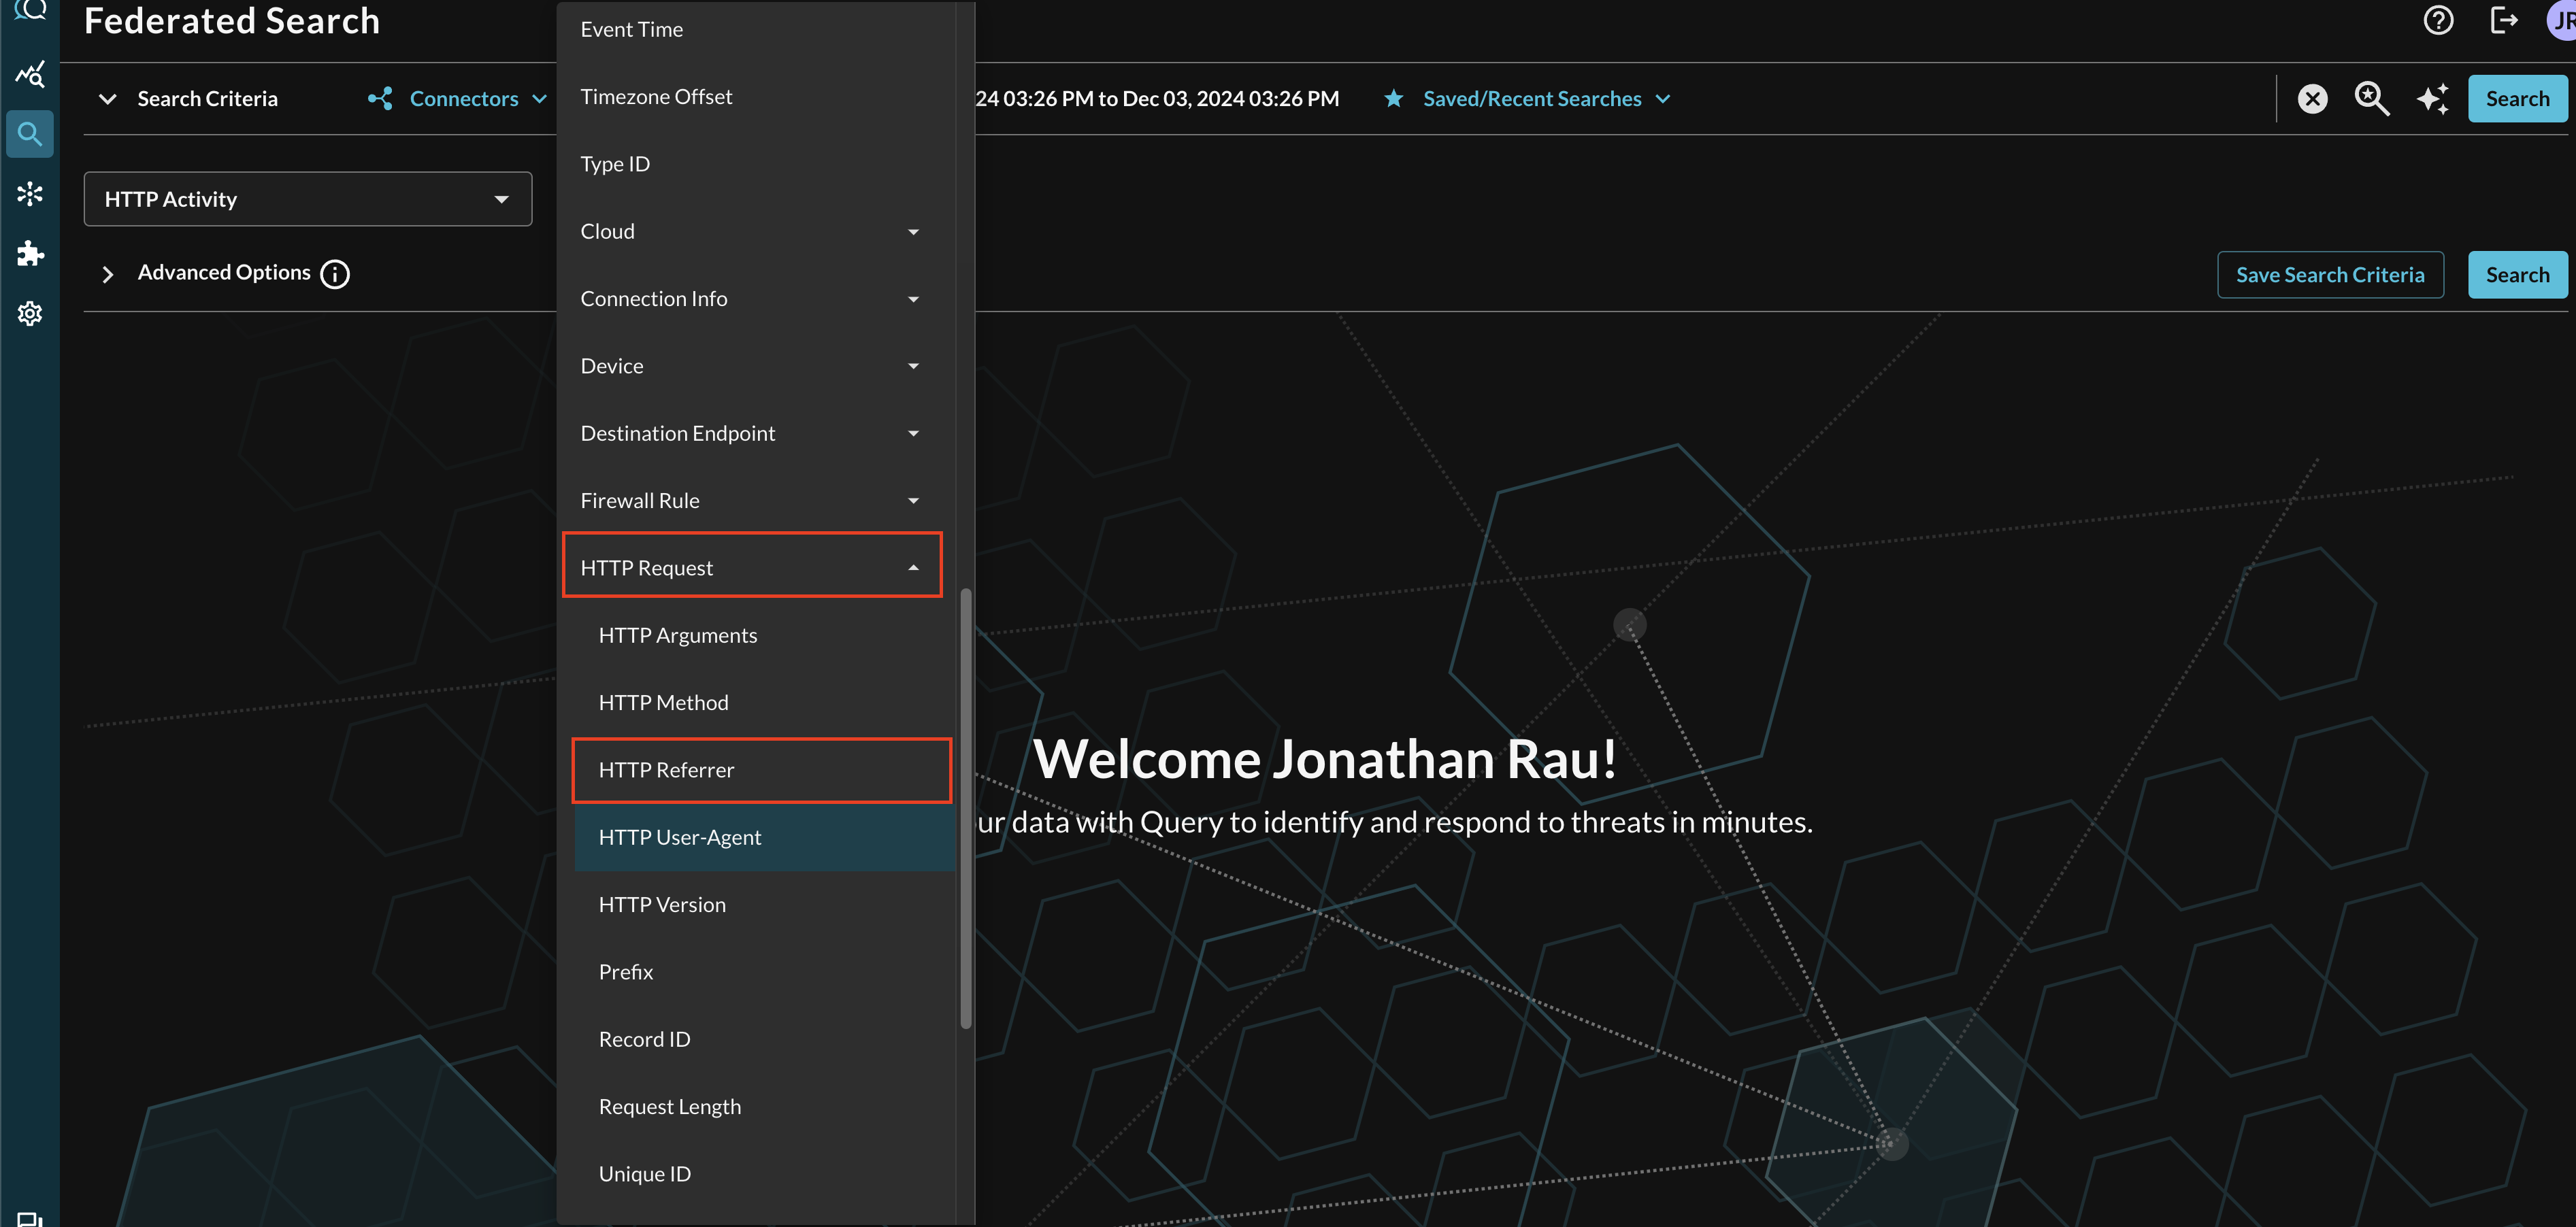
FIG. 15 - Selecting nested conditional attributes in Event Class search
When adding two or more Conditions, you can further change the behavior by specifying ANY or ALL quantifiers over the filters for greater levels of specificity or more narrow-but-generalized searches, respectively, as shown below (FIG. 16). In this case a multiple values were used for an equality search against http_request.referrer, a Starts With operator was used against http_request.user_agent to find any user agents with Mozilla, and a specific enumeration-backed ID was searched for (Disposition ID: Allowed).
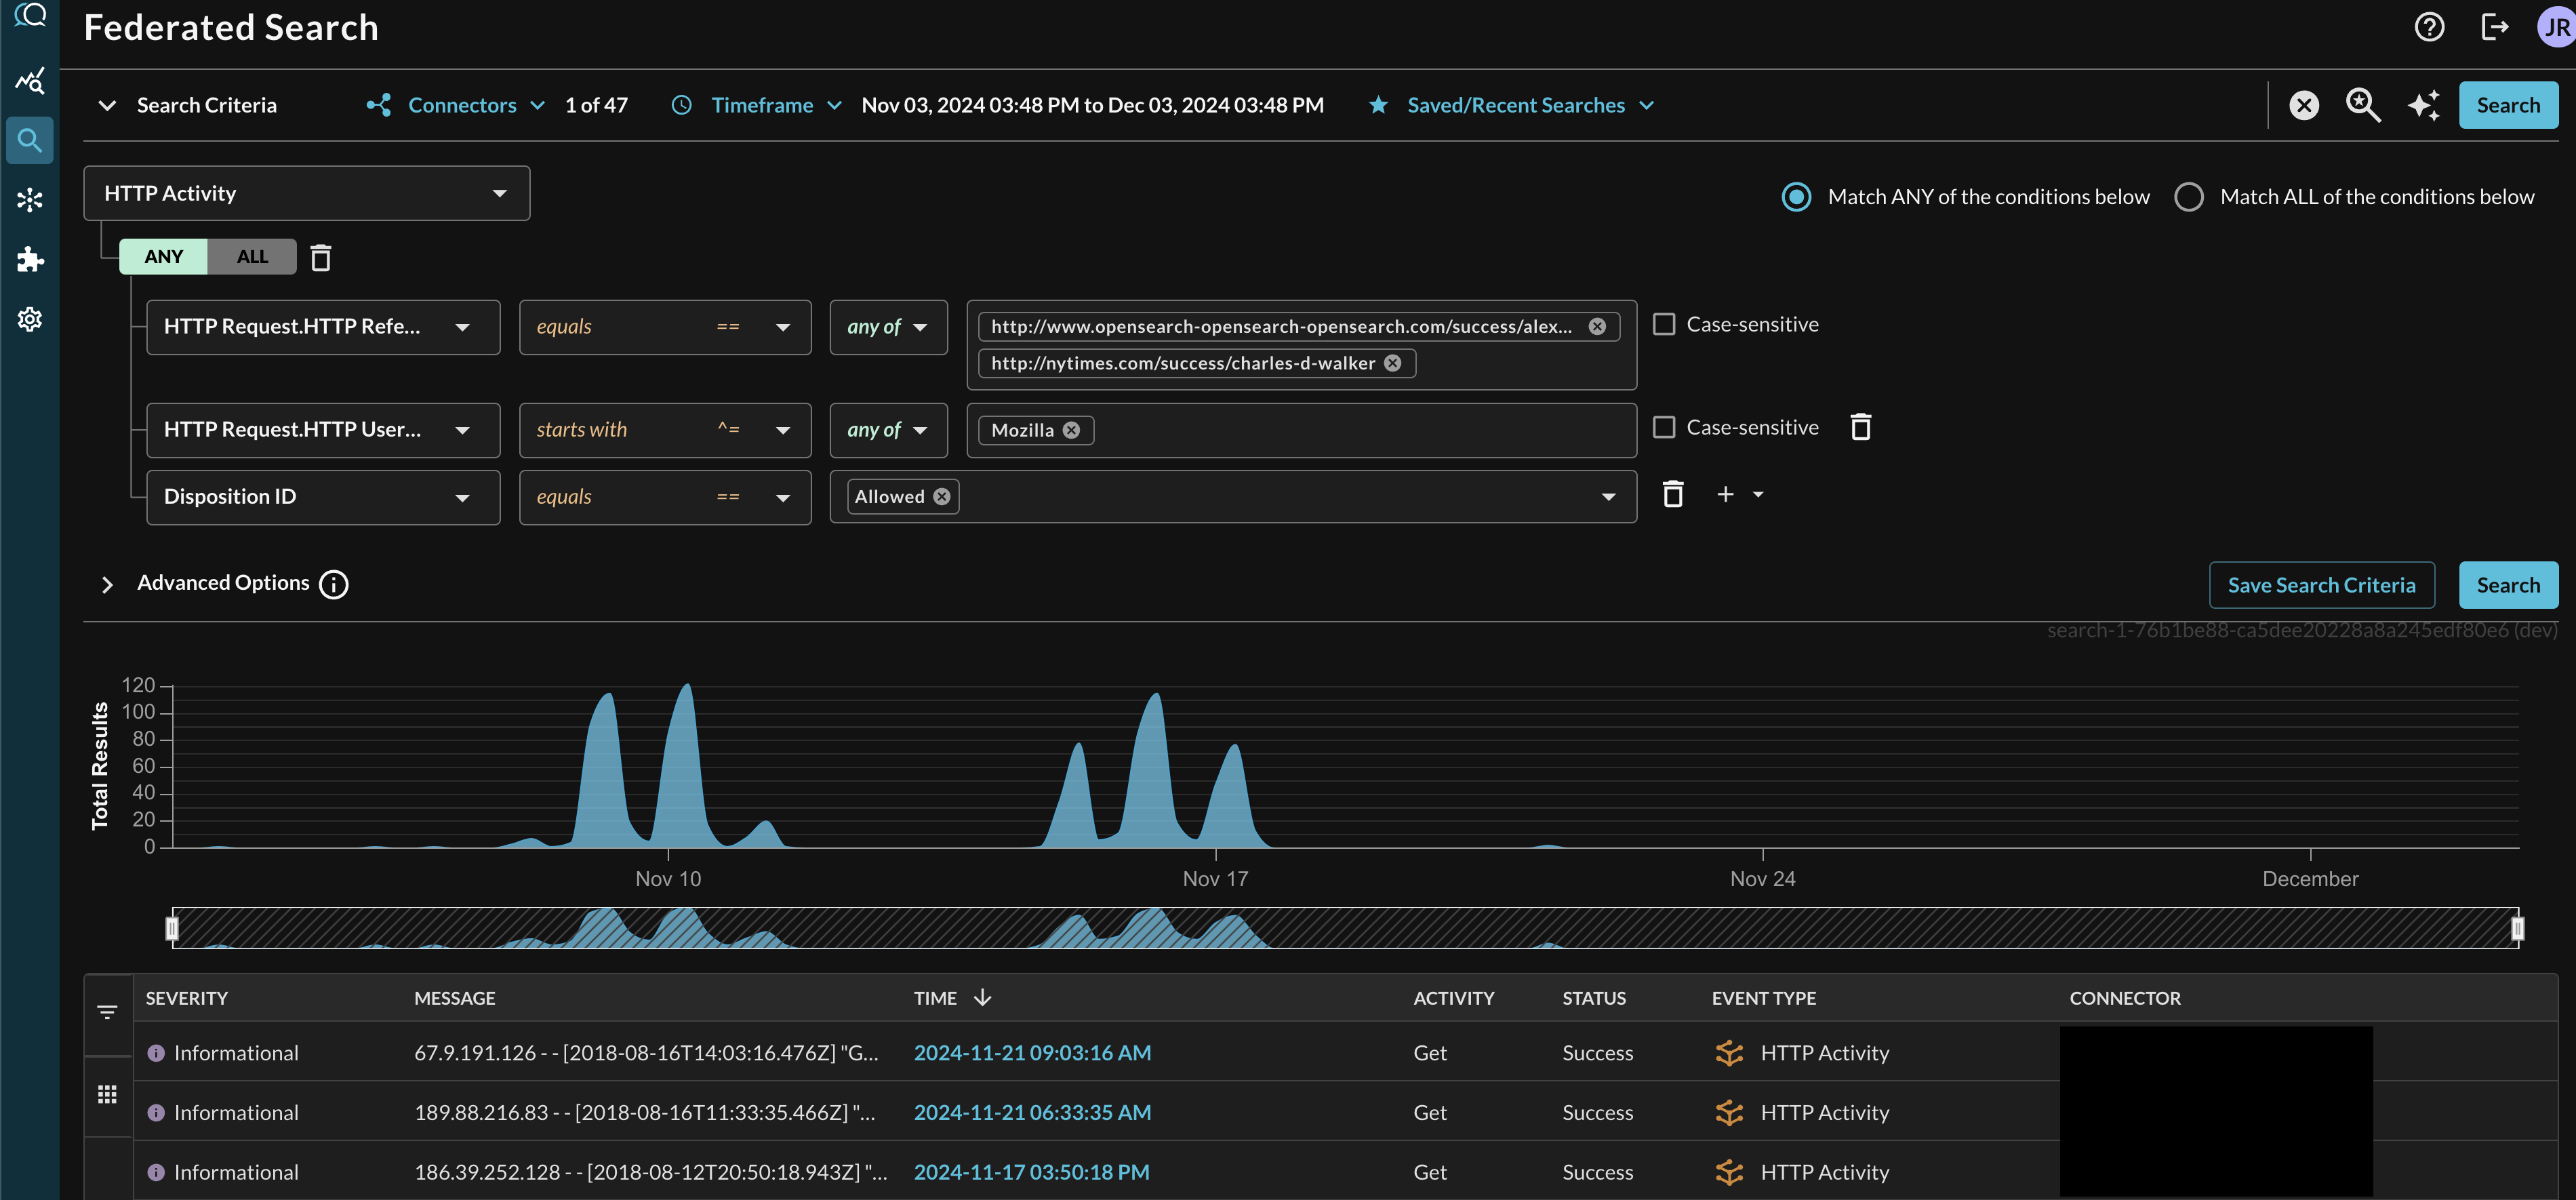
FIG. 16 - A complex multi-nested conditional Event-based search
Resources
- Encryption of data at rest for Amazon OpenSearch Service
- Launching your Amazon OpenSearch Service domains within a VPC
- Identity and Access Management in Amazon OpenSearch Service
- Access proxy
Troubleshooting Steps
- Ensure the the name of your IAM Role matches the IAM Role Name parameter you entered in for the Connector.
- Ensure that the External ID matches between your IAM Role and the Connector.
- Ensure that you have the right Index Name. Wildcard Indexes are not supported as of 1 DEC 2024.
- Ensure that you are providing the Hostname - not the URL - for either your OpenSearch Domain or a Proxy.
- Ensure that your Proxy is configured correctly, if you are using one because your OpenSearch Domain is in a VPC.
- Ensure that you updated your Domain Access Policy (Resource-based policy) to allow access to your IAM Role.
- If you are using Source IP conditional access in your Domain Access Policy (Resource-based policy), ensure that the proper IP addresses are included for your Query tenant.
- If you are using a KMS CMK for Encryption, ensure that your IAM Policy has the proper KMS permissions.
If you have exhausted the above Troubleshooting list, please contact your designated Query Sales Engineer or Customer Success Manager. If you are using a free tenant, please contact Query Customer Success via the Support email in the Help section, or via Intercom within your tenant.
Updated 3 months ago