Azure Data Explorer (ADX)
Integrate Query with any tables in Azure Data Explorer
TL;DRTo integrate Azure Data Explorer (ADX) with Query:
- Create an Entra ID App Registration with Client Secret.
- Retrieve the cluster URL, database name(s), and table name(s) from ADX.
- Configure a Federated Search Connector for Azure Data Explorer with your credentials and table metadata.
- Perform mapping of your ADX data into the Query Data Model (QDM) using the Configure Schema AI CoPilot or no-code Wizard.
- Use Query Search to parallelize searches and surface details from ADX for incident response (IR), threat hunting, investigations, and other security and observability use cases.
Overview
Azure Data Explorer (ADX) is a petabyte-scale Azure-native Exploratory Data Analysis (EDA) service that allows IT administrators, SysOps personnel, Security Data Operations (SecDataOps) teams, and others to use Kusto Query Language (KQL) to query native and external tables from a variety of sources in (near) real-time. Teams can use ADX to ingest security logs from SaaS tools and other platforms with the Ingest API, as well as create External Tables for data sources in other SQL systems, Azure Blob Storage, Azure Data Lake Store Gen 2 (ADLSv2), or in Delta Lake tables stored in Azure Blob or ADLSv1/ADSLv2.
Query's entire data model is built around the Open Cybersecurity Schema Framework (OCSF) - named the Query Data Model (QDM) - which expresses all search intents with OCSF/QDM concepts such as Entities/Observables used to represent facts and indicators whereas Event Classes represent things that have happened and are normalized against network, application, file system, identity, and 1st party security findings. Query provides a mechanism to model any data in any ADX table (external or native) into the QDM to support in-situ normalization and a common lingua franca for expressing searches and interacting with results.
Query integrates with ADX by providing a parallelized query planning and execution engine atop ADX that supports
- Automatic translation of queries into best-practices KQL
- Perform automatic transformation and normalization of data into QDM in-situ
- Enables parallel searches across tables without the use of expensive operations such as
join - Respects data sovereignty controls, your ADX data is never duplicated nor durable stored in our backend
- Analysis using various Query features such as Summary Insights (Investigation Hub), the Query Results CoPilot, the Query MCP Server, and/or Query Agents.
Some details on searchesQuery does not support mapping or querying
dynamictype data due to volatility and diversity of data sub-types that can be stored (e.g., arrays, structs, maps, etc.). Consider creating new tables that flatten the data withindynamiccolumns that you wish to analyze.Query does not allow you to author ad-hoc KQL queries, all searches are expressed using the Query Builder, Federated Search Query Language (FSQL), or the Query App for Splunk (SPL) and then translated into appropriate and best-practices aligned KQL.
Only one table can be modeled at a time in Configure Schema.
Prerequisites
You must have Global Administrator permissions for your Entra ID tenant and Owner permissions for your Azure Subscription to be able to create an App Registration, generate Client Credentials, and grant the App Registration Service Principal proper roles in your Subscription to integrate with LAW tables.
Create an Application Registration & Grant an Azure Role
On NHI securityNHI - or, Non-Human Identities - such as your Entra ID App Registration client secrets are extremely sensitive. Query securely stores the Client Secret in a dedicated AWS Secrets Manager Secret per Connector per Tenant.
While this requires you to configure Connectors per ADX Table and continue to enter in your credentials, every copy is stored as securely as each other with minimum necessary permissions that only allows the specific piece of serverless infrastructure to retrieve the secret, it is never cached or persisted outside of the Secret.
-
In the Microsoft Azure portal navigate to Microsoft Entra ID -> Add -> App Registration as shown below (FIG. 1).
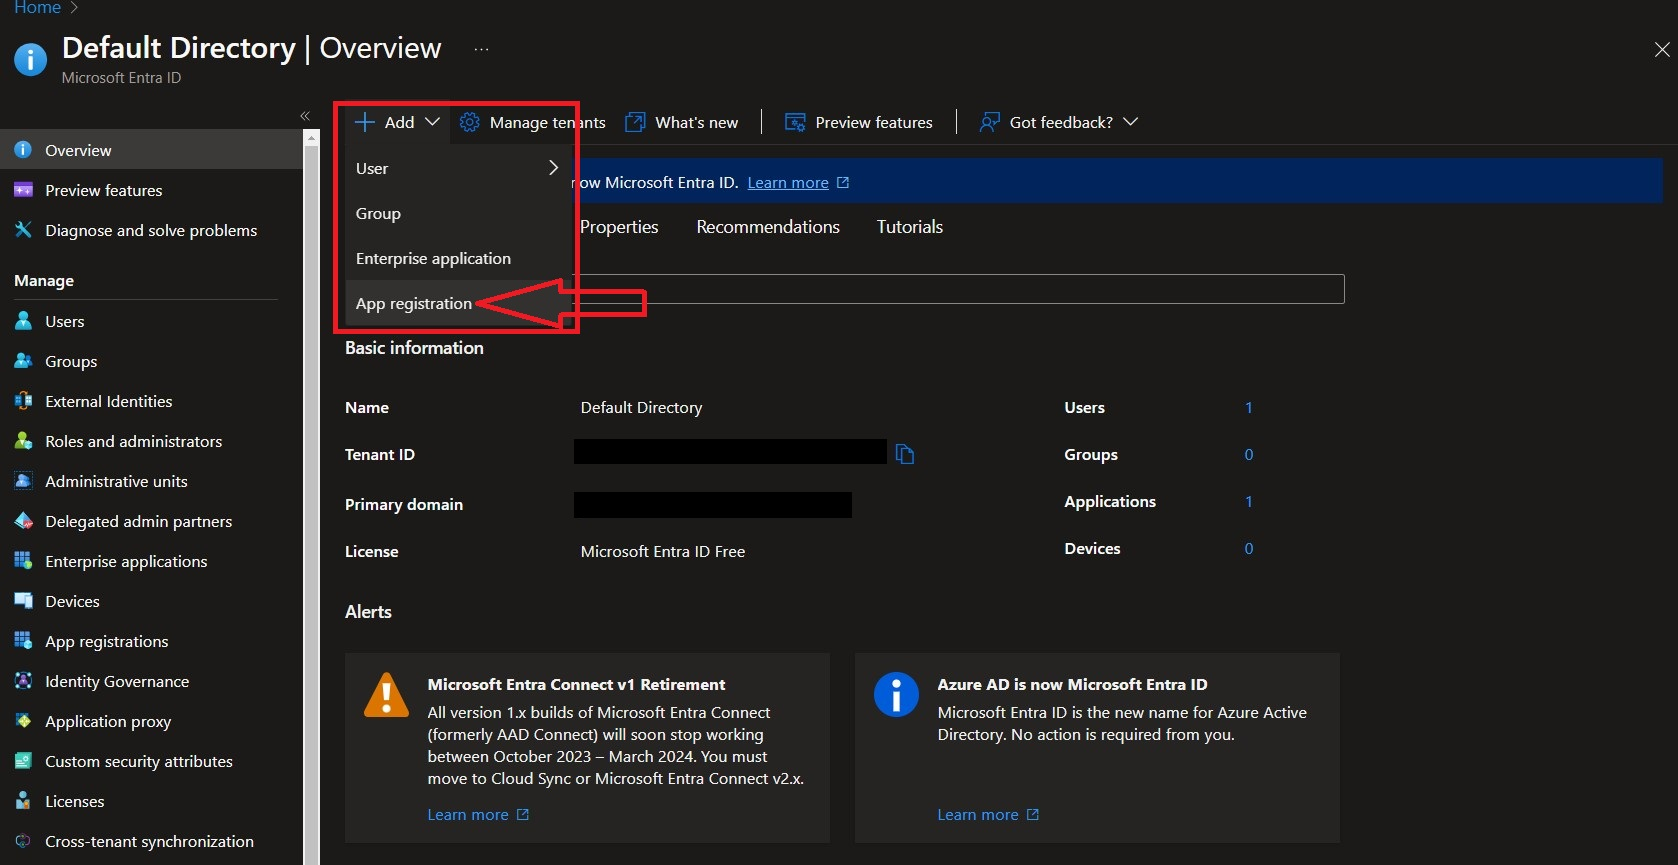
FIG. 1 - Creating a new App Registration
-
Populate a Name for the application, leave the Supported account types option as the default (
Accounts in this organizational directory only (Default Directory only - Single tenant)) then select Register as shown below (FIG. 2).
FIG. 2 - Configuring the supported Account type for your App Registration
-
By default you will be taken to the Overview screen of your new application. Navigate to Certificates & Secrets -> Client Secrets -> New client secret. Enter a Description, choose an Expires date from the selector, and finally choose Add as shown below (FIG. 3).
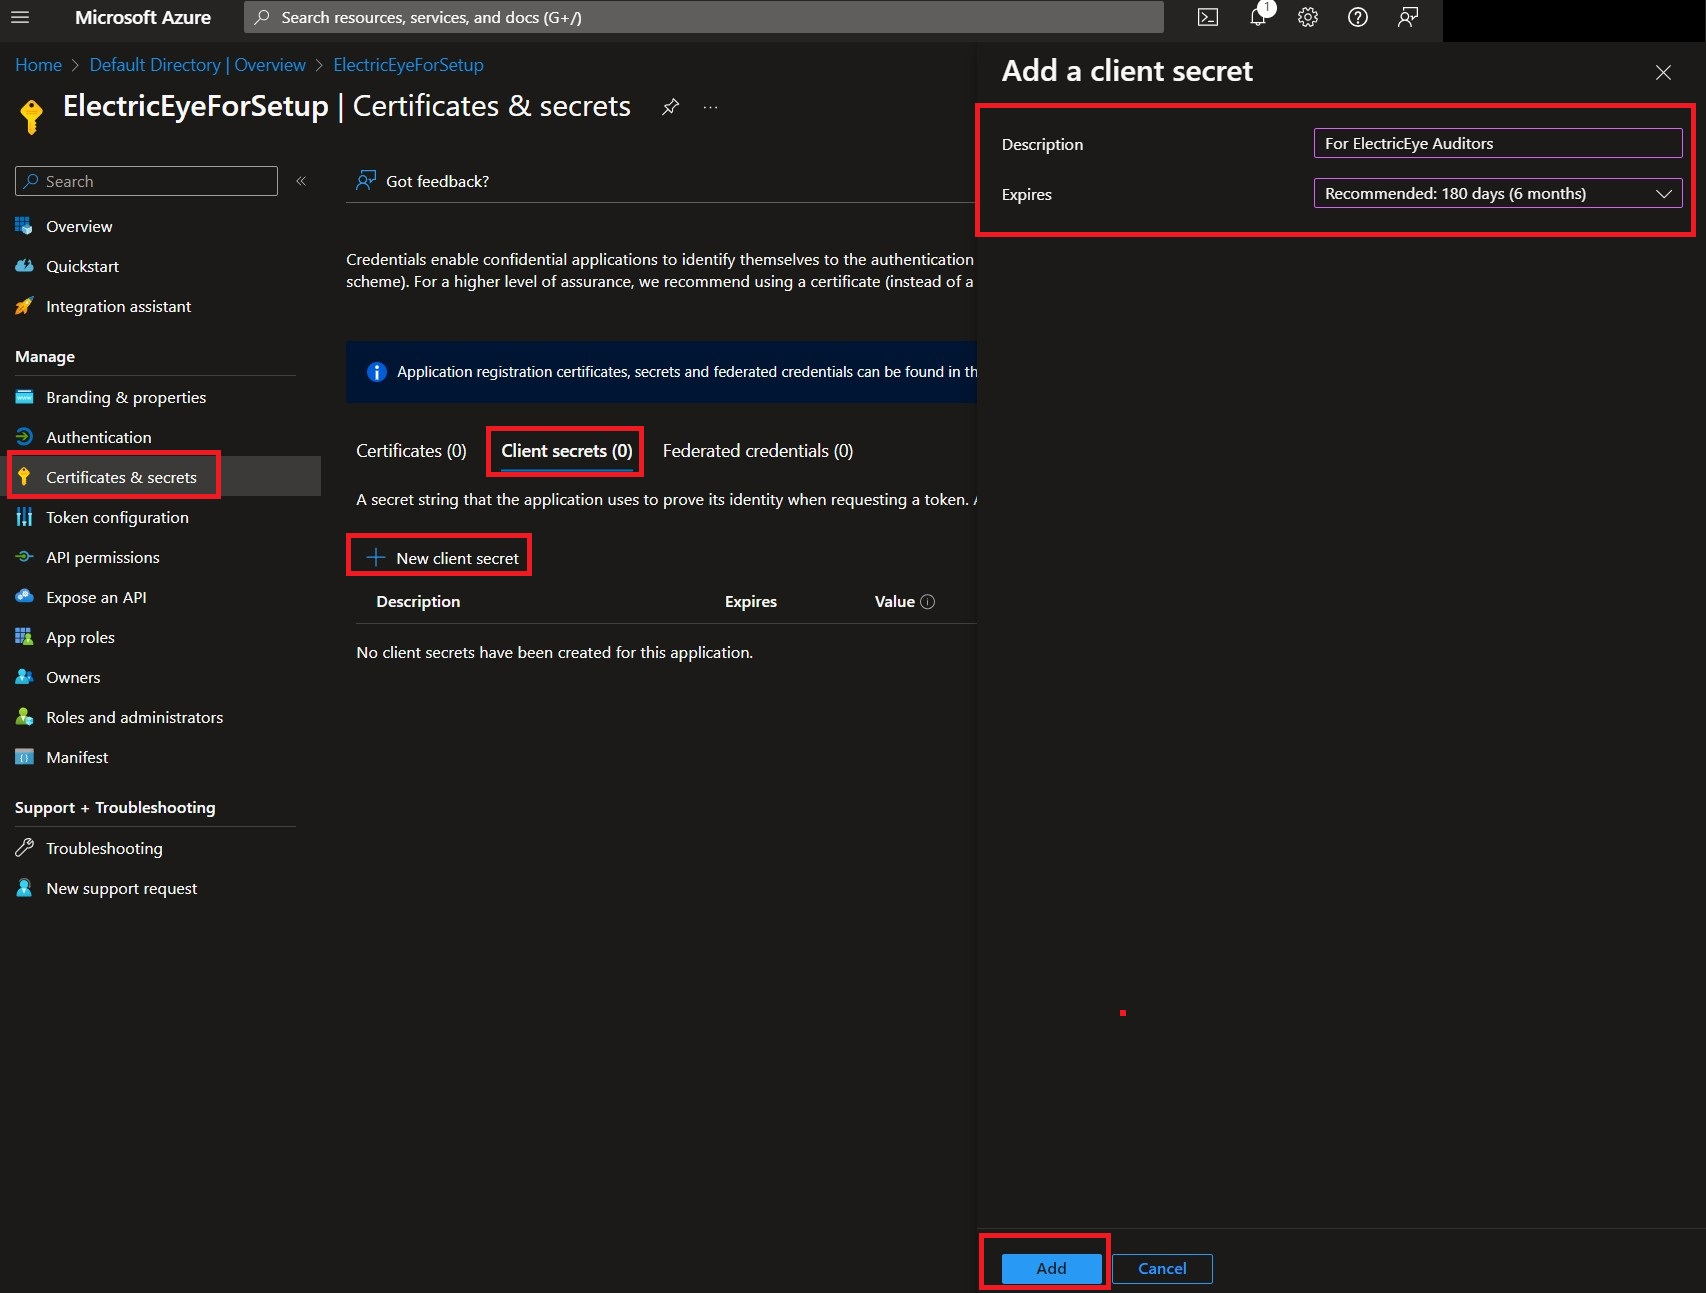
FIG. 3 - Creating a Client Secret for your App Registration
-
WARNING! Before navigating away copy the Value entry and save it somewhere secure, this is the Client Secret Value required to perform authentication into your Azure Subscriptions. If you did not copy it, no big deal, just delete the Client Secret and create another - but remember to copy the Value that time - as shown below (FIG. 4).
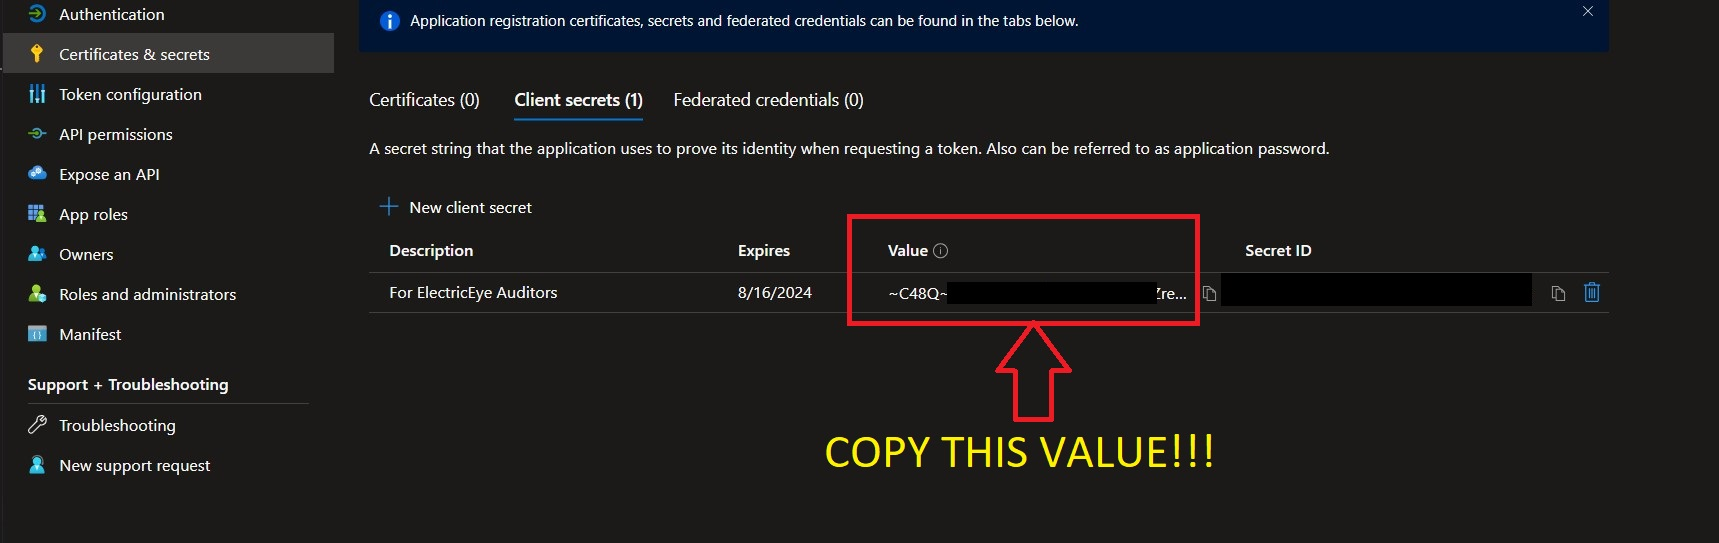
FIG. 4 - Showing the proper location to copy the App Registration Client Secret Value
-
Navigate to the Overview screen and copy the values for the Application (client) ID and Directory (tenant ID) as shown below (FIG. 5). The App ID and Tenant ID are also required to perform authentication into your Azure subscription.
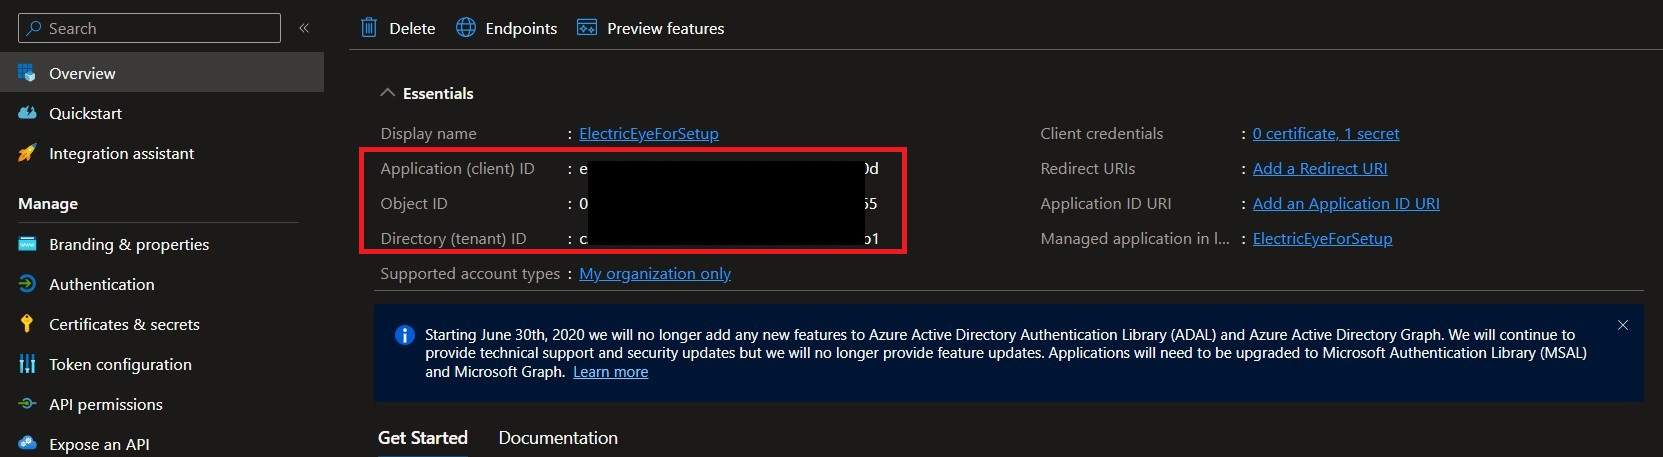
FIG. 5 - Copying the Tenant ID and Client ID for your App Registration
Before moving to the next section, copy the Tenant ID, App (Client) ID, and the App Secret Value as these are required for the Query Connectors to configure access.
Retrieve Azure Data Explorer Cluster, Database and Table Information
In addition to the App Registration information, you will need to retrieve your ADX Cluster URI and the names of the database(s) and their table(s) you wish to connect to.
-
Navigate to the Microsoft Azure portal -> Azure Data Explorer Clusters -> your Cluster name -> Overview tab.
-
Copy the URI for your Cluster, DO NOT copy the value for Data Ingestion URI, as shown below (FIG. 6).
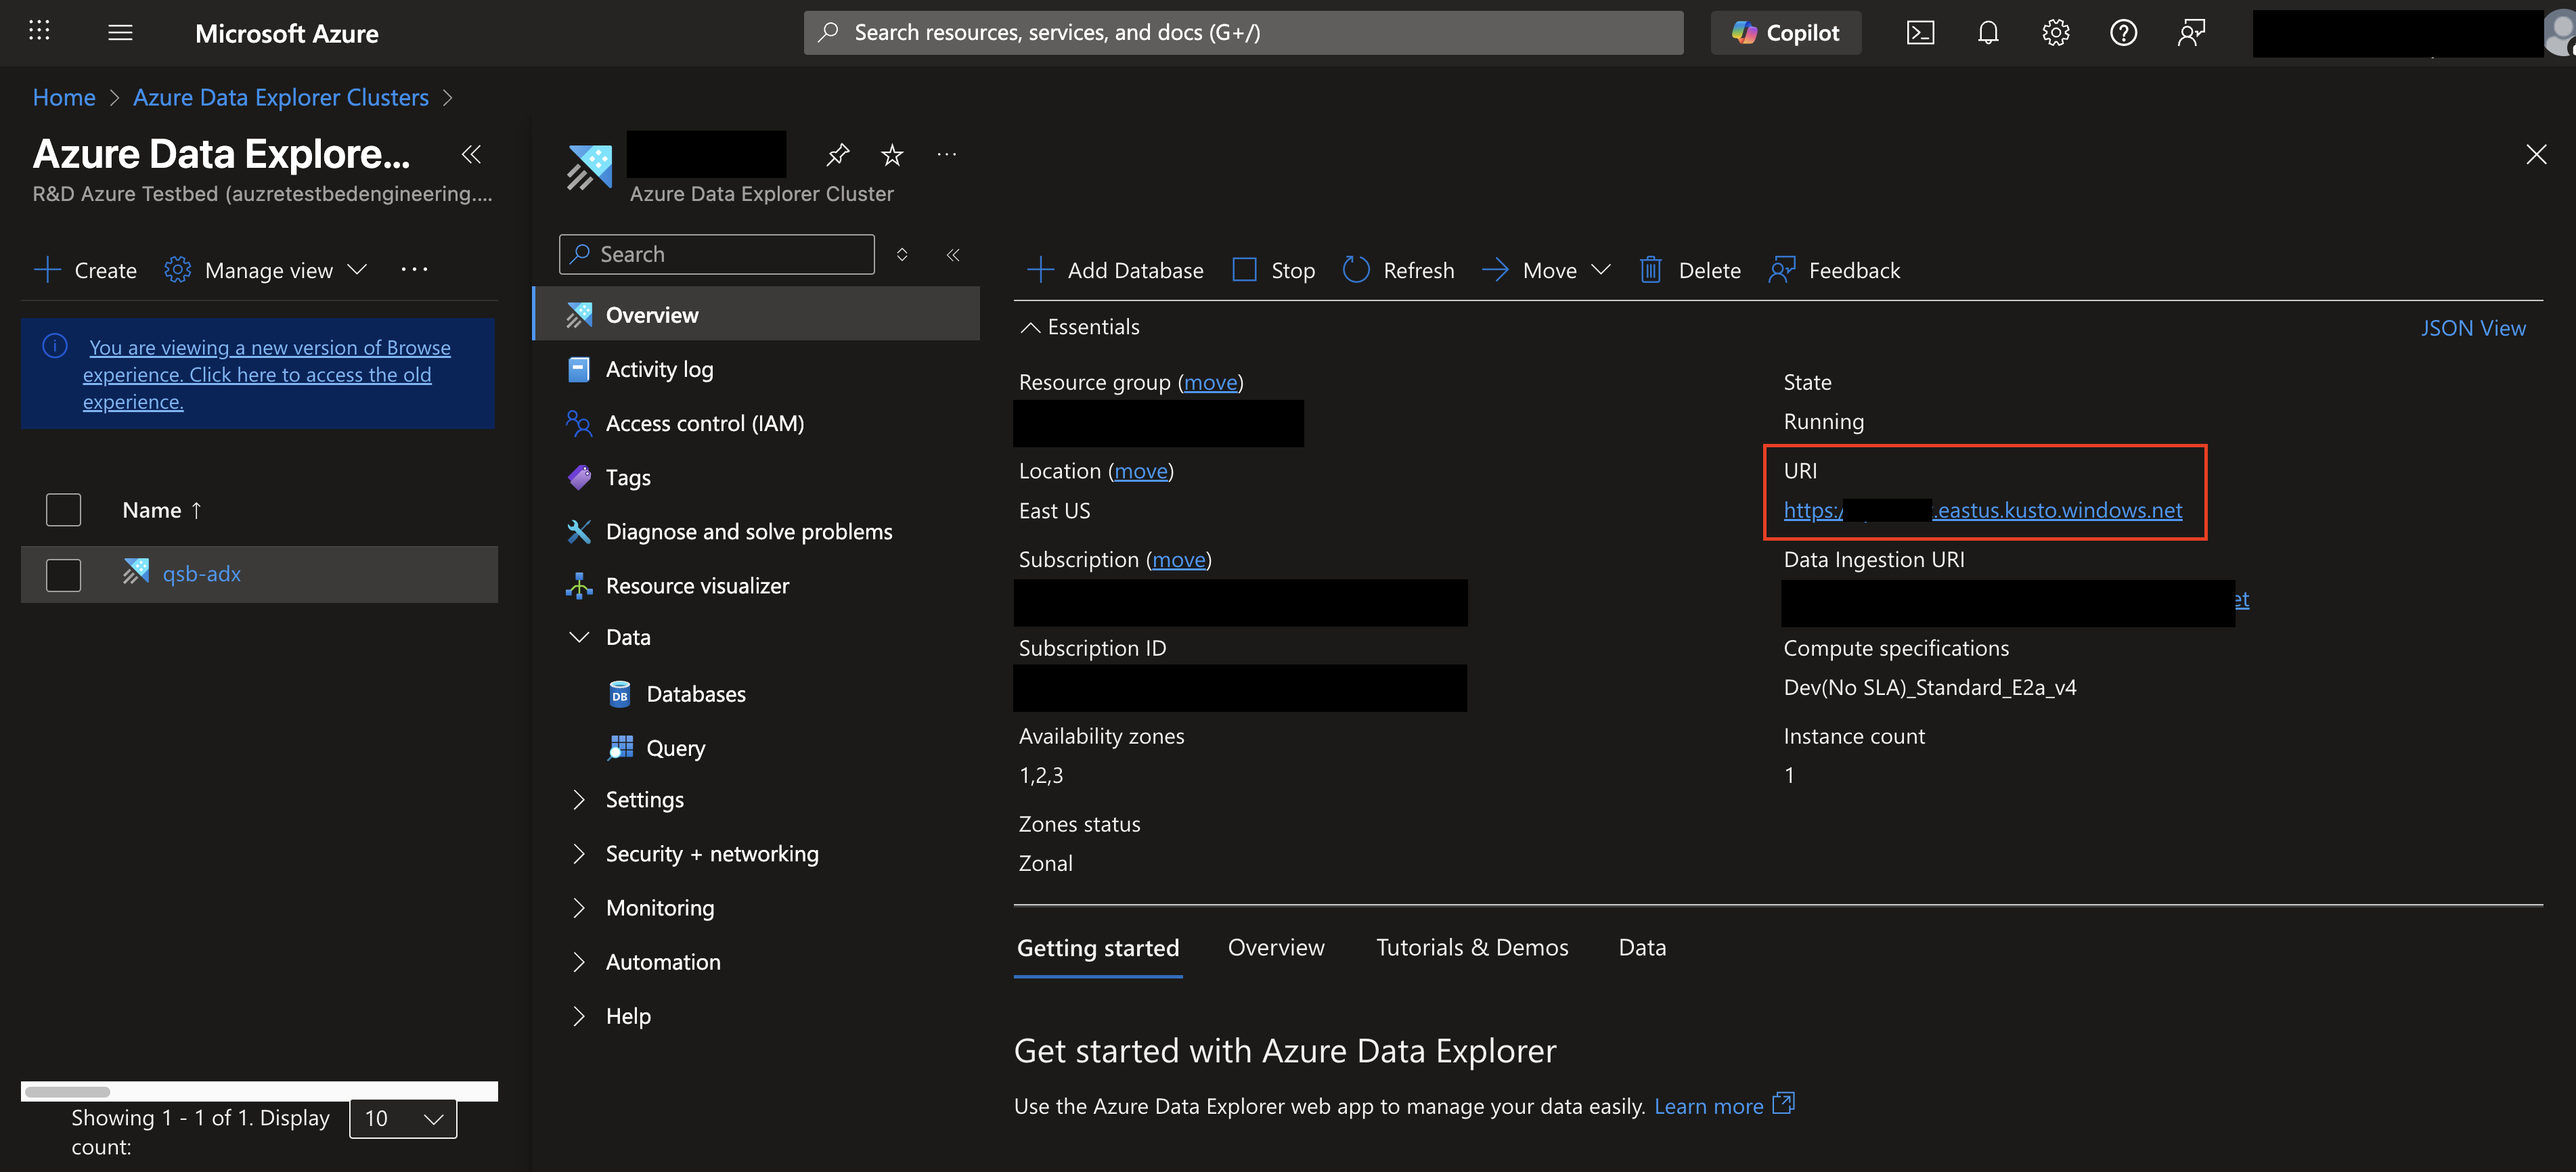
FIG. 6 - Copying the Cluster URI for the ADX Cluster
-
In the left-hand navigation pane, select the Data dropdown, select Databases and select the name of your Database as shown below (FIG. 7).
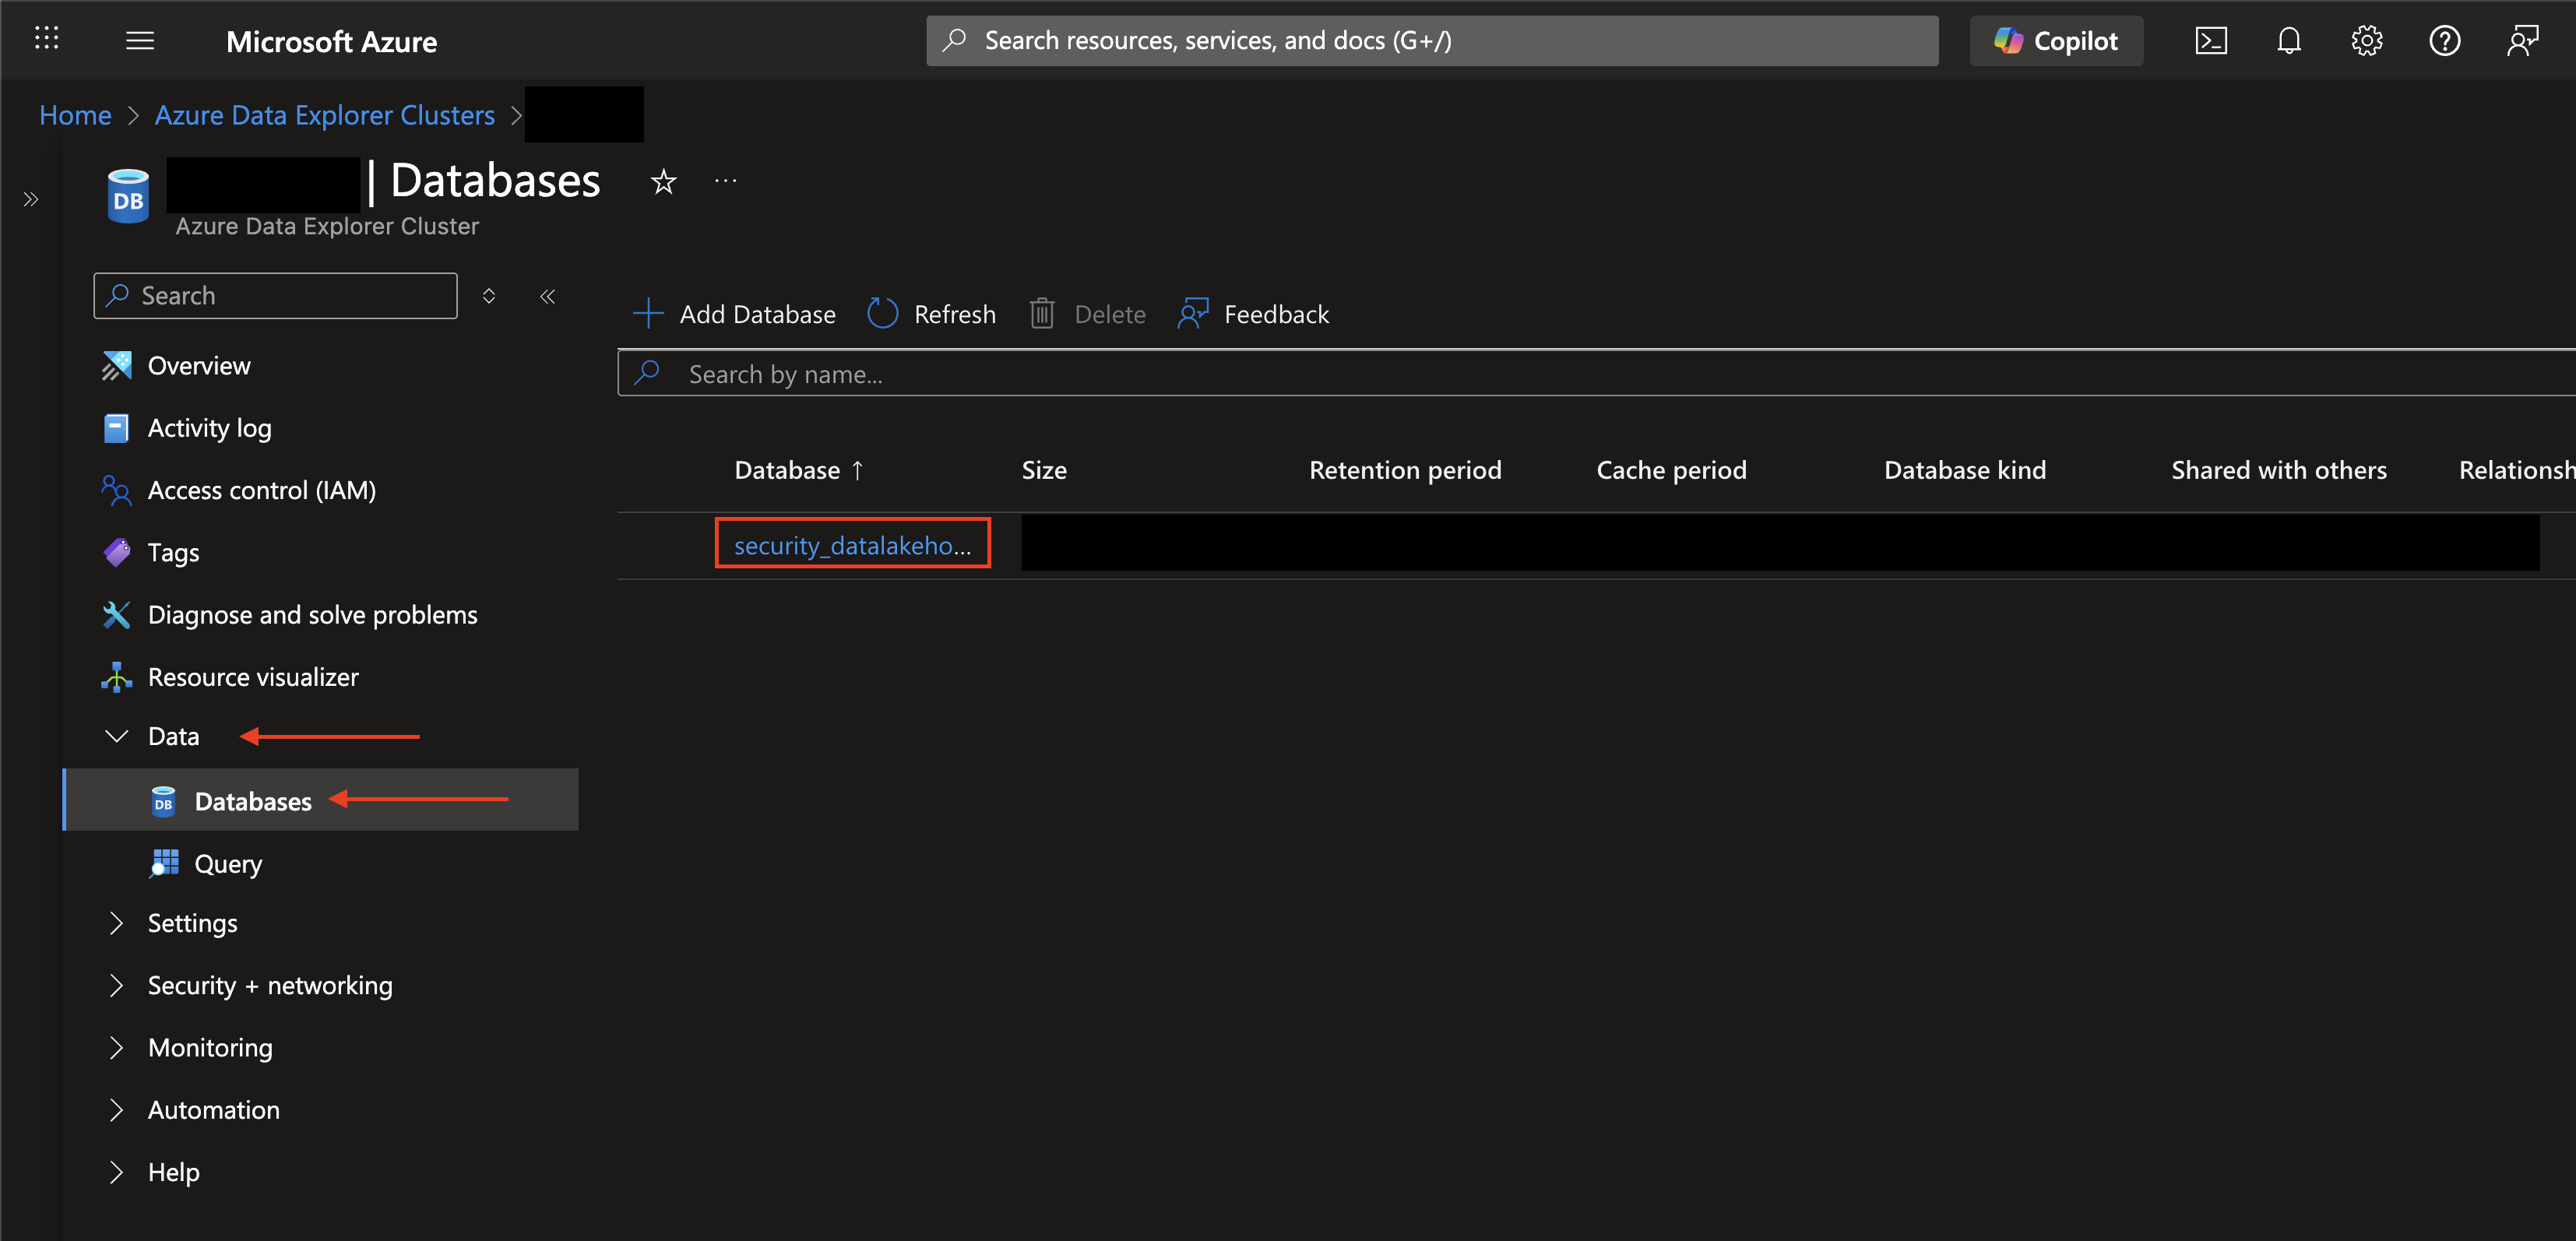
FIG. 7 - Navigating to the ADX Databases
-
Under the Overview section, select Query for a list of the tables in your database. Take note of which tables are External Tables or not, as denoted by their hierarchal ordering underneath the
External tablessection as shown below (FIG. 8).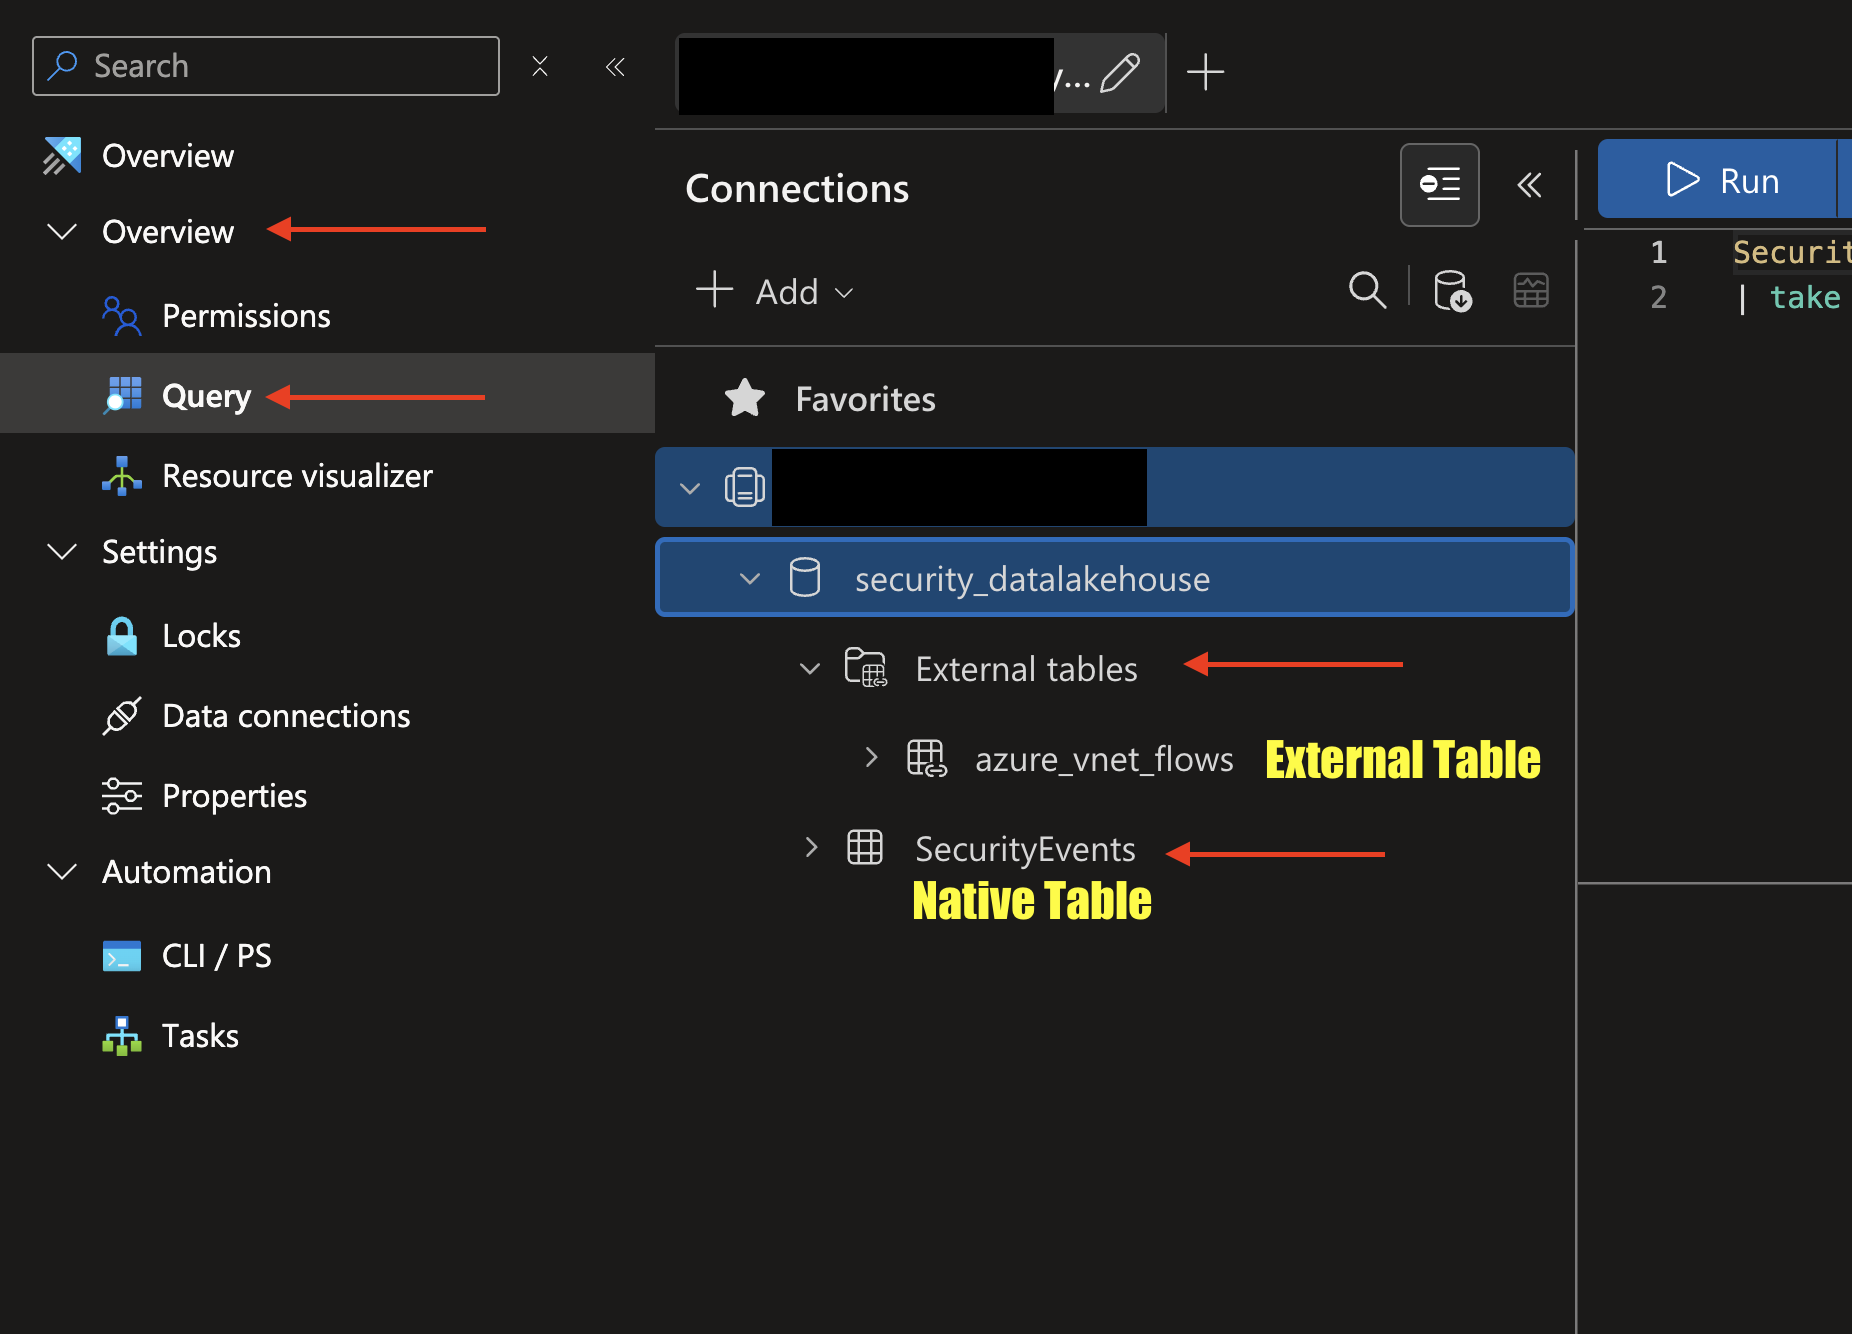
FIG. 8 - Copying Database and Table names, finding External Tables
To learn how to configure a Azure Data Explorer (ADX) Connector, proceed to the next section.
Setting up the Azure Data Explorer (ADX) Connector
Use the following steps to create a new Query Federated Search Connector for Azure Data Explorer (ADX).
-
Navigate to the Connectors page, select Add Connector, and selectAzure Data Explorer from the
Data Lake and Data Warehousecategory as shown below (FIG. 9). You can also search for Azure Data Explorer using the search bar in the Add Connector page.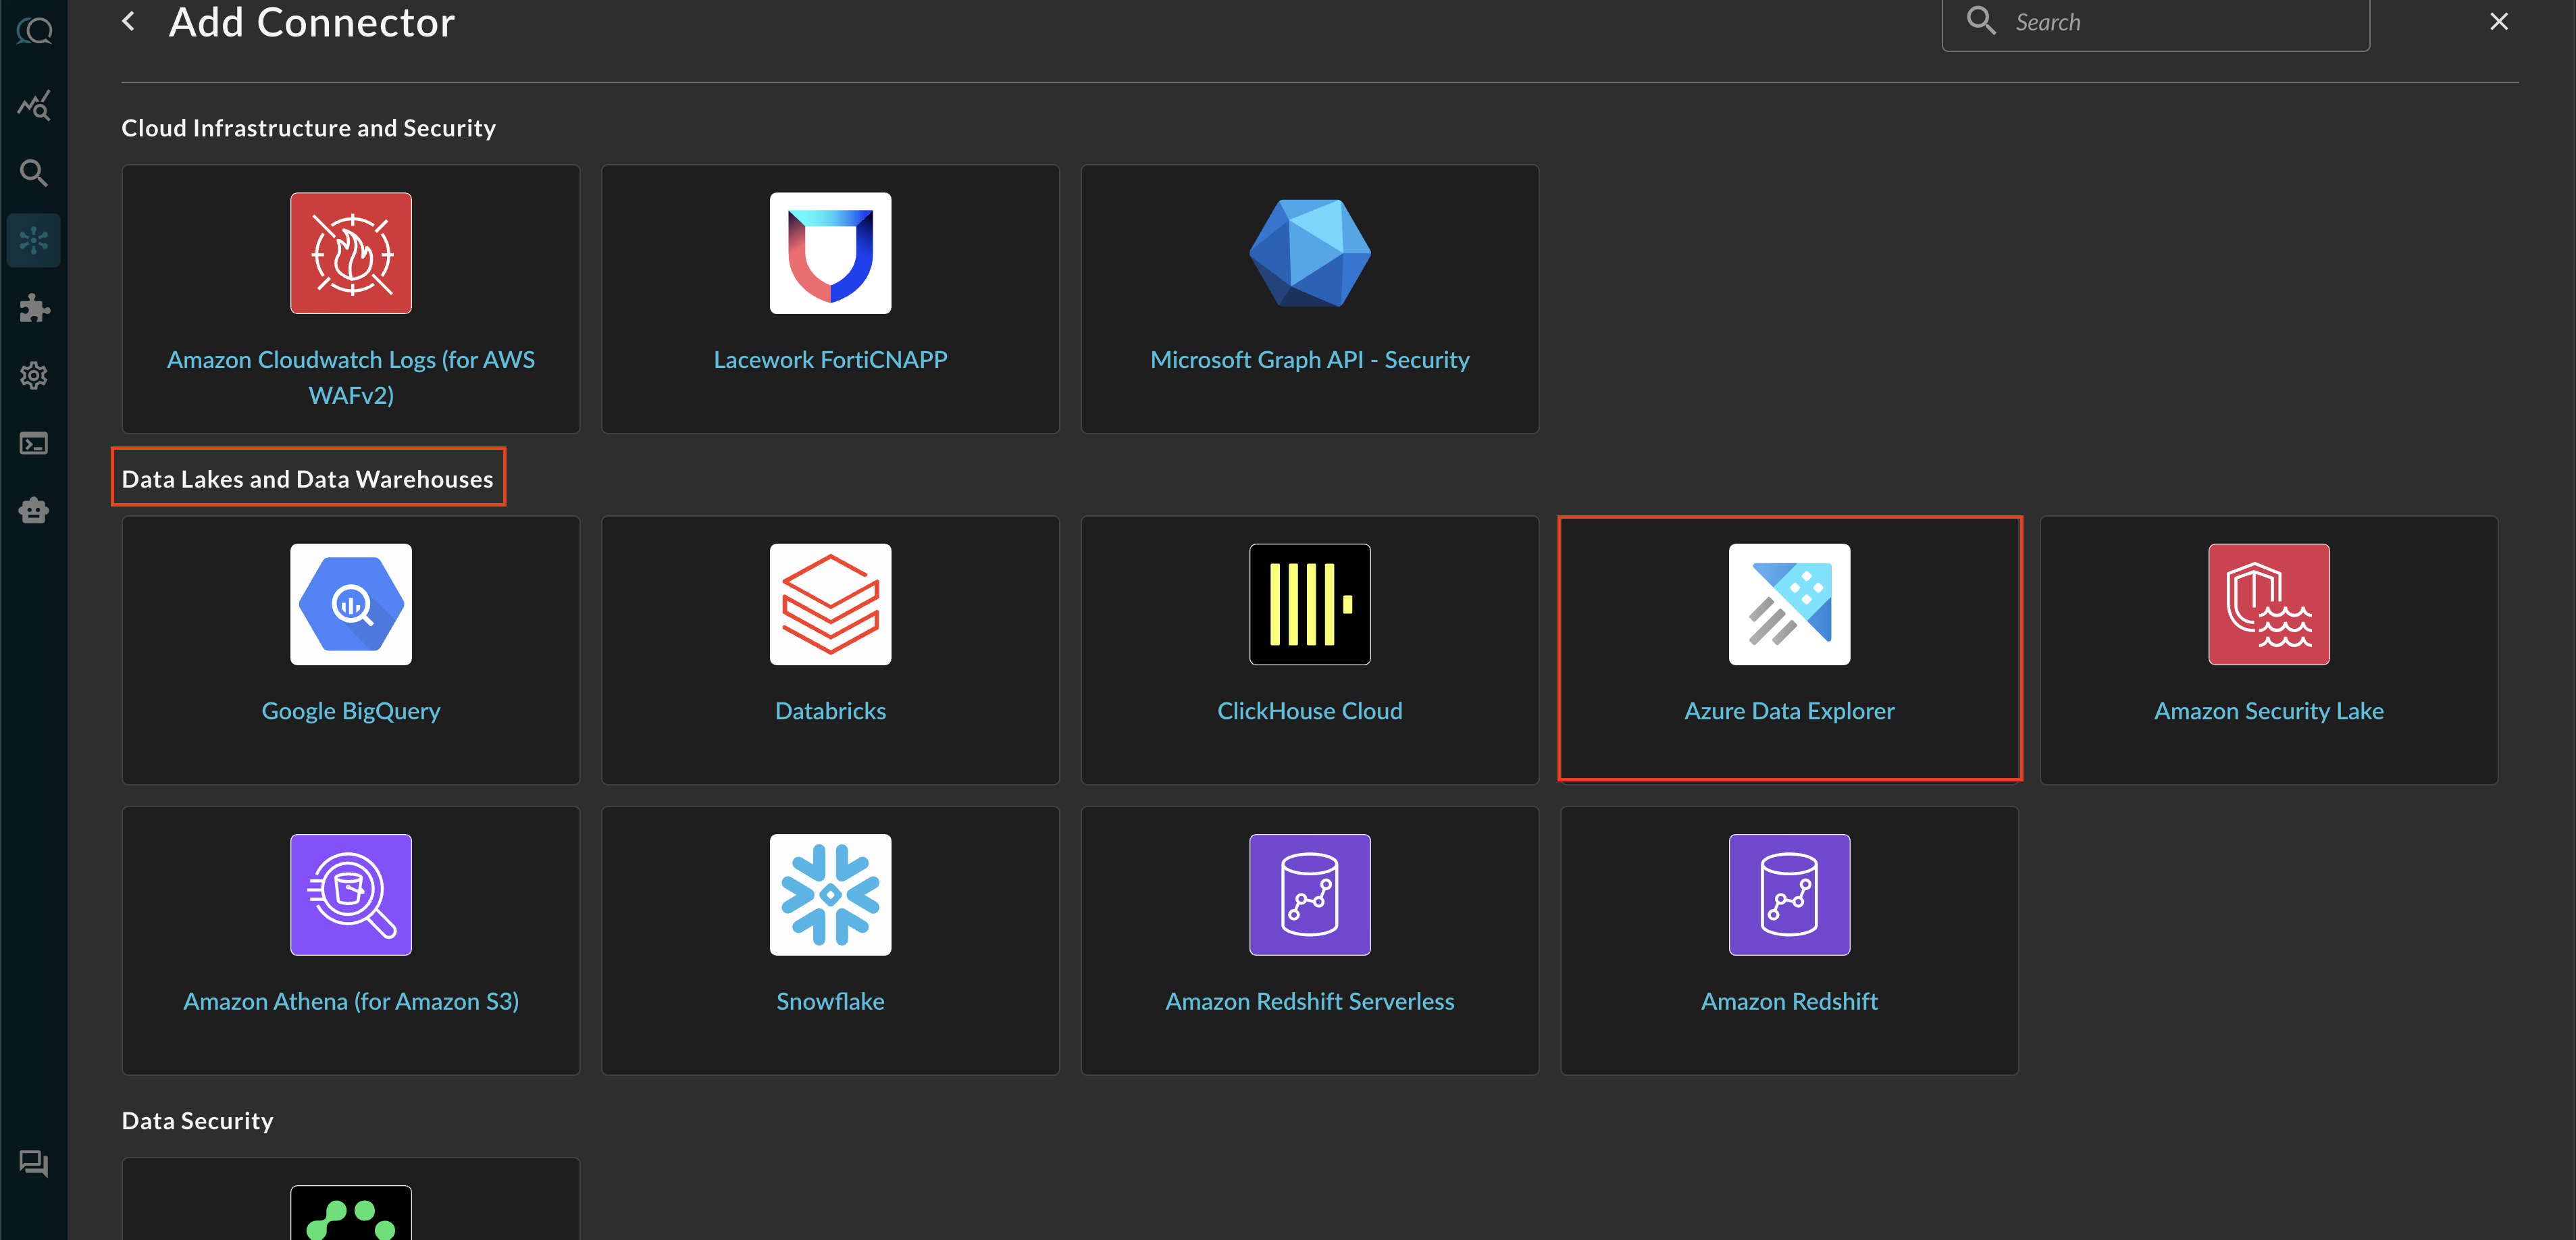
FIG. 9 - Locating the ADX Connector in the Query Connectors UI
-
In the Configure Connector tab, add the following detail as shown below (FIG. 10):

FIG. 10 - ADX Configuration Parameters
- Connector Alias Name: The human-readable name you want to give to this connector, you can provide the name of the specific table or the contents therein.
- Default Login: Leave the default value:
Default Login. - Microsoft Tenant ID (Authority ID): Your Entra ID Tenant ID, copied in Step 6 of the Prerequisites section.
- App Registration Client ID: The Client ID for your App Registration, copied in Step 6 of the Prerequisites section.
- Azure Data Explorer (ADX) Cluster URI: Your Cluster URI where your target Database and Table are contained, copied in Step 7 of the Prerequisites section.
- Azure Data Explorer (ADX) Database Name: The name of your ADX Database that contains your Table, copied in Step 9 of the Prerequisites section.
- Azure Data Explorer (ADX) Table Name: The name of your Table containing the data you want to onboard - ensure that it is in the correct Cluster and Database, copied in Step 9 of the Prerequisites section.
- App Registration Client Secret Value: The Client Secret Value for your App Registration, copied in Step 5 of the Prerequisites section.
- Is External Table: Boolean flag depending on if your Table is an ADX Native Table or External Table. This is a crucial flag the ensure that the KQL query built is correct for your table type. External Tables will be under an External Table subsection of your Database explorer as shown in Step 9 of the Prerequisites section.
-
Select Save to save and activate the Connector.
-
Select Test Connection from the bottom-right of the connection pane to ensure that your credentials are correct and that we can retrieve data from your
cluster.database.tabledetails. -
Finally, proceed to the Preview Data section to begin the Configure Schema process. Refer to the hyperlink to learn how to use the Configure Schema no-code workflow, it is HIGHLY recommended for first time users.
You will now see Azure Data Explorer added as an available Connector within the Query Search and Query Summary Insights UI.
Querying Azure Data Explorer (ADX) Connectors
Within the Query Search UI, all Connectors are enabled by default. To check that your specified Connector(s) for Azure Data Explorer are enabled, navigate to the Data Lake and Data Warehouse section of the Selected Connectors dropdown and ensure that your specified Azure Data Explorer Connector(s) are are selected (denoted by a checkbox) before running your searches as shown below (FIG. 11).
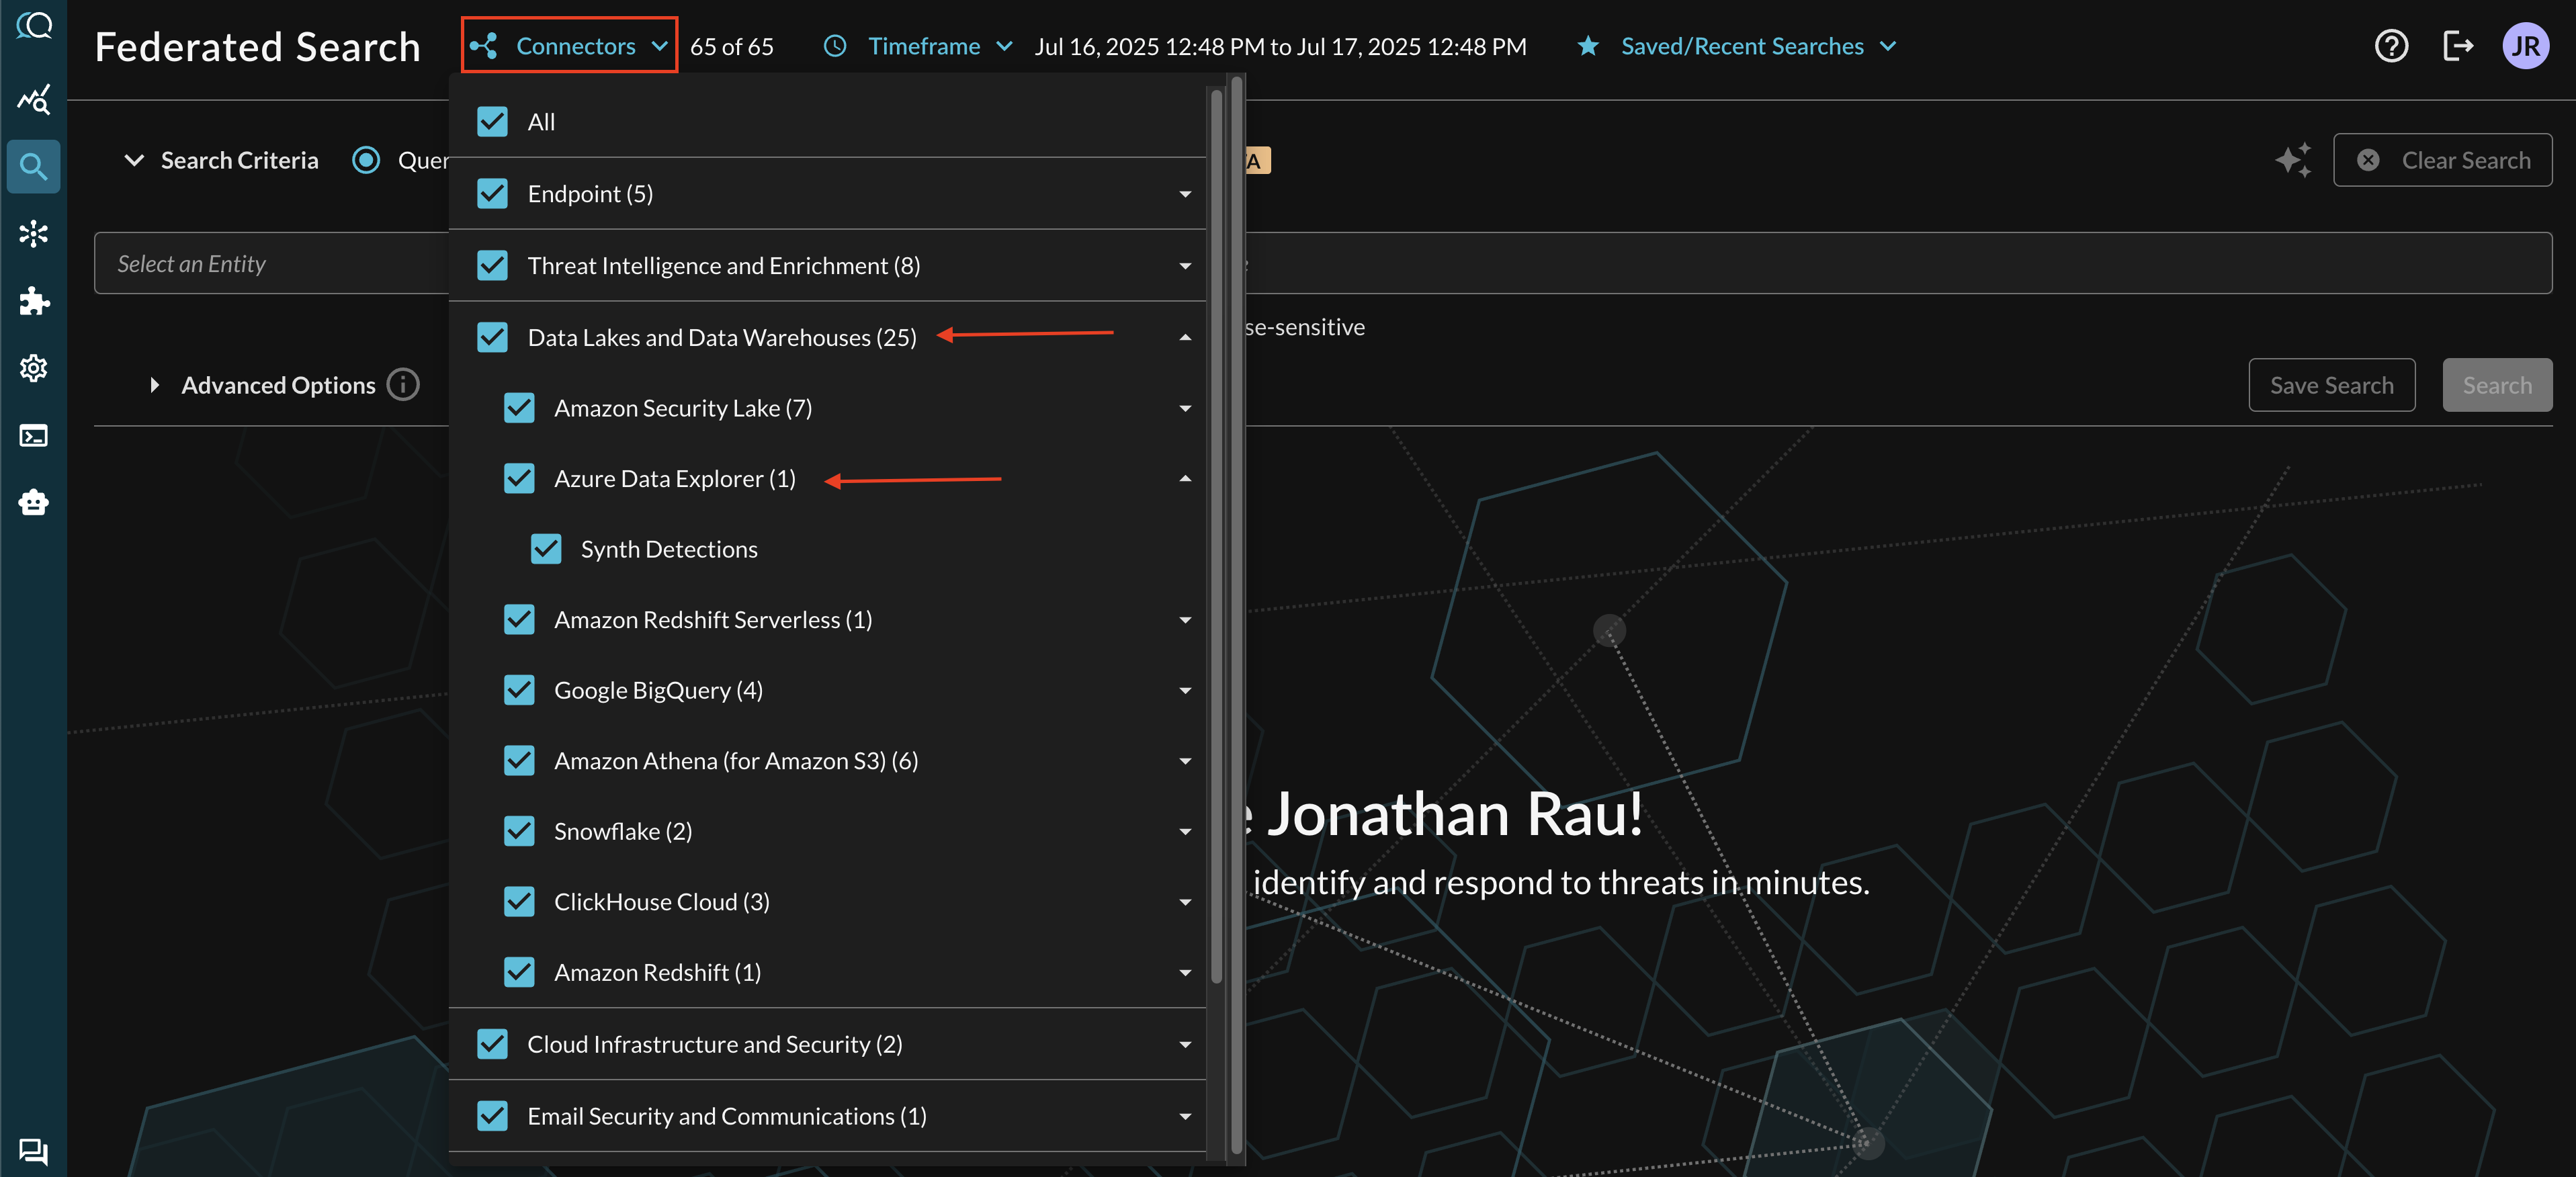
FIG. 11 - Locating ADX Connectors in the Query Federated Search Query Builder UI
The Entities (Observables) and Events you will be able to search determine on how you mapped your data in Configure Schema against a given Azure Data Explorer Table. For more information about the QDM/OCSF schema itself refer to the About the Query Data Model section of the Query docs, you can also view the Categories, Events, and Objects themselves.
Resources
- Register an application in Microsoft Entra ID
- How to Get Your client_id and client_secret from Entra ID
- Create a Microsoft Entra application registration in Azure Data Explorer
Troubleshooting Steps
- Ensure that you have the correct Tenant ID and Client ID from your App Registration, and you did not accidentally copy the Object ID.
- Ensure you have created a Client Secret, and you copied the value for the Client Secret VALUE and not the Secret ID.
- Ensure that your ADX Cluster is running.
- Ensure that you provided the ADX Cluster URI and NOT the Cluster Ingest URI.
- Ensure that your Database and Table name(s) are correct and belong to that appropriate Cluster and Database, respectively.
- Ensure that you have data in the Cluster within the last 3 weeks, otherwise data cannot be retrieved.
- Ensure that you properly flagged the
Is External Tableparameter, the KQL query is not interchangeable. - Ensure that you have processed your data appropriately to flatten Array types, for instance, Azure Virtual Network (VNET) Flow Logs have multiple levels of nested arrays when ingested from Azure Blob Storage.
If you have exhausted the above Troubleshooting list, please contact your designated Query Sales Engineer or Customer Success Manager. If you are using a free tenant, please contact Query Customer Success via the Support email in the Help section, or via Intercom within your tenant.
Updated 8 months ago