Amazon Security Lake
Integrate Query with Amazon Security Lake AWS-managed and Custom Sources via Amazon Athena
TL;DRTo integrate Amazon Security Lake with Query:
- Set up Amazon Security Lake for your AWS Account(s) or AWS Organization in one or more Regions
- Onboard any Security Lake table with a Query Connector for Amazon Security Lake
- Deploy an IAM Role with Query-provided external ID that provides permissions to interact with Amazon Athena, AWS Glue, Amazon S3, and AWS KMS (optionally)
- Grant the IAM Role
SELECTandDESCRIBEpermissions within AWS Lake Formation to specific Databases and Tables in Amazon Security Lake data lake- Confirm connectivity into your source with the Test Connection functionality in your Connector
- Use Query Federated Search to surface information about any Entity, Attribute, or Event within the OCSF.
Overview
Amazon Security Lake is an Amazon Web Services (AWS) Cloud service that "automatically centralizes security data from AWS environments, SaaS providers, on premises, and cloud sources into a purpose-built data lake stored in your account. With Security Lake, you can get a more complete understanding of your security data across your entire organization. You can also improve the protection of your workloads, applications, and data. Security Lake has adopted the Open Cybersecurity Schema Framework (OCSF), an open standard. With OCSF support, the service normalizes and combines security data from AWS and a broad range of enterprise security data sources".
Security Lake supports AWS first-party sources as well as a wide variety of Partner-provided data sources. Additionally, customers can create their own custom sources in the lake. Query supports any data source within the Security Lake in the Version 1 (OCSF 1.0.0-rc2) and Version 2 (OCSF 1.1.0) format, as well as custom sources using OCSF 1.2.0 and 1.3.0 formats. Query's own data model - the Query Data Model - is based on the OCSF, and schemas can be auto-discovered within Amazon Security Lake. See the OCSF Source Identification documentation to learn more about how AWS maps into various OCSF Event Classes.
Query supports both AWS Glue Hive and Iceberg table formats, and full translation and normalization of search criteria into SQL using Amazon Athena. Users do not need to learn how to write complex SQL, how to properly use partitions, how to optimize SQL, or how to extract and normalize data. All of this burden is handled automatically, with most queries scanning minimal amounts of data (~dozens of MBs) to control Athena and Glue costs. This frees your security and observability teams to glean insights and decision enablement from data in the Security Lake.
Using Security Lake with Query enables incident responders, investigation teams, threat hunters, purple teams, security architects, IT operations, and several other personas to extract immediate value. For instance, using Query's Entity-based search you can parallelize indicator- or notable-based searches such as CVE IDs, Hostnames, IP Addresses, Process Names, or Resource IDs across every Security Lake table without needing to create custom Views or use unions or joins.
Likewise, Query can also orient on Event-based searches within the OCSF, allowing users to search for all Network Activity or DNS Activity, these searches can be further specified using the Query Builder to retrieve Authentication Events where the actor.user.name matches a specific AWS IAM Role or Federated identity.
Prerequisites
Before using the Query Federated Search Connector for Amazon Security Lake, ensure that you have followed the steps within the Amazon Security Lake Getting Started guide.
Additionally, you must create an Amazon S3 bucket and configure Amazon Athena to write results to it. The S3 bucket itself can be referenced using the Bucket Name or the Amazon Athena Workgroup Name for the Connector.
Lastly, if you do not have the AWS CLI installed and/or configured, refer here. Ensure you have permissions to create and modify IAM Roles and Policies, and to add AWS Lake Formation principal permissions.
iam:CreateRoleiam:CreatePolicyiam:AttachRolePolicylakeformation:GrantPermissions
For the best experience for your Security Operations and other supported functions that use Amazon Security Lake, strongly consider onboarding all of the AWS Accounts within your AWS Organization and additionally consider using "Rollup Regions" to consolidate and centralize cross-Region data into a single Account and single Region.
However, it is worth noting that the Query Federated Search Platform can create multiple different Connectors per Amazon Security Lake Source if you would rather not use Rollup Regions.
Additionally, Query contains the credentials necessary for querying Amazon Security Lake with each unique Connector, enabling you to onboard lakes in multiple different AWS Accounts and Regions regardless of the principal AWS Organization.
Configure an Amazon Security Lake Connector
Important Note for mappingBoth Security Lake v1 and v2 collate multiple event classes per source into a table. Query's Connector only allows you to map one Event Class per Connector. In cases where there are multiple events in a table you must create multiple Connectors.
For example, in CloudTrail Management Events there are three different Event Classes:
Authentication,Account Change, andAPI Activity.To check for the specific Event Classes in any given Security Lake, execute the following SQL query against your table using Amazon Athena.
SELECT DISTINCT class_uid, class_name FROM "security_lake_db"."security_lake_table"
Amazon Security Lake Connectors within the Query Federated Search Platform is a specialized Connector that works in a "hybrid" mode. Query will auto-map all OCSF source data in the Amazon Security Lake tables and let you pick your own Entities. Entities are analogous to OCSF Observables, which represent "pointers" to scalar values of note within the OCSF - such as Resource IDs, CVE IDs, User Agents, Hostnames, etc. With the "hybrid" Connector you can map your own Entities regardless of whether or not Observables are present downstream.
To enable connectivity into your AWS Account, the Query Federated Search platform uses AWS IAM Roles with a read-only, randomly generated UUID as the ExternalId per unique connector configured. This random ExternalId is generated after entering in all relevant details, so you will need to determine what you will name your AWS IAM Role ahead of time. As a matter of best practice, this mechanism is intended to create a single Policy, a Single Role, and to be used with a single Connector with its own distinct Lake Formation permissions.
In the tasking order, you will:
- Provide required details to a selected Amazon Security Lake Connector. For the purpose of this documentation, CloudTrail Management Events will be used as the example.
- Create an IAM Policy with the generated Identity Policy snippet
- Create an IAM Role with the generated Trust Policy snippet, and attach the IAM Policy
- Grant the IAM Role appropriate Lake Formation permissions to the specific Security Lake Database and Table
- Test Connection and enable the Connector
Proceed to the next sections to learn how to activate an Amazon Security Lake Connector and start searching.
Pre-configure an Amazon Security Lake Connector
Use the following steps to create a new Query Federated Search Connector for Amazon Security Lake - you'll use the same general Connector for any source data, AWS-provided or custom sources. Be sure to change the required details such as the Table Name and use the proper IAM Role.
-
Navigate to the Connectors page, select Add Connector, and selectAmazon Security Lake from the
Data Lakes and Data Warehousescategory. Optionally type Amazon Security Lake in the search bar as shown below (FIG. 1).
FIG. 1 - Locating the Amazon Security Lake Connector
-
In the General tab, add the following details listed below the screenshot (FIG. 2).
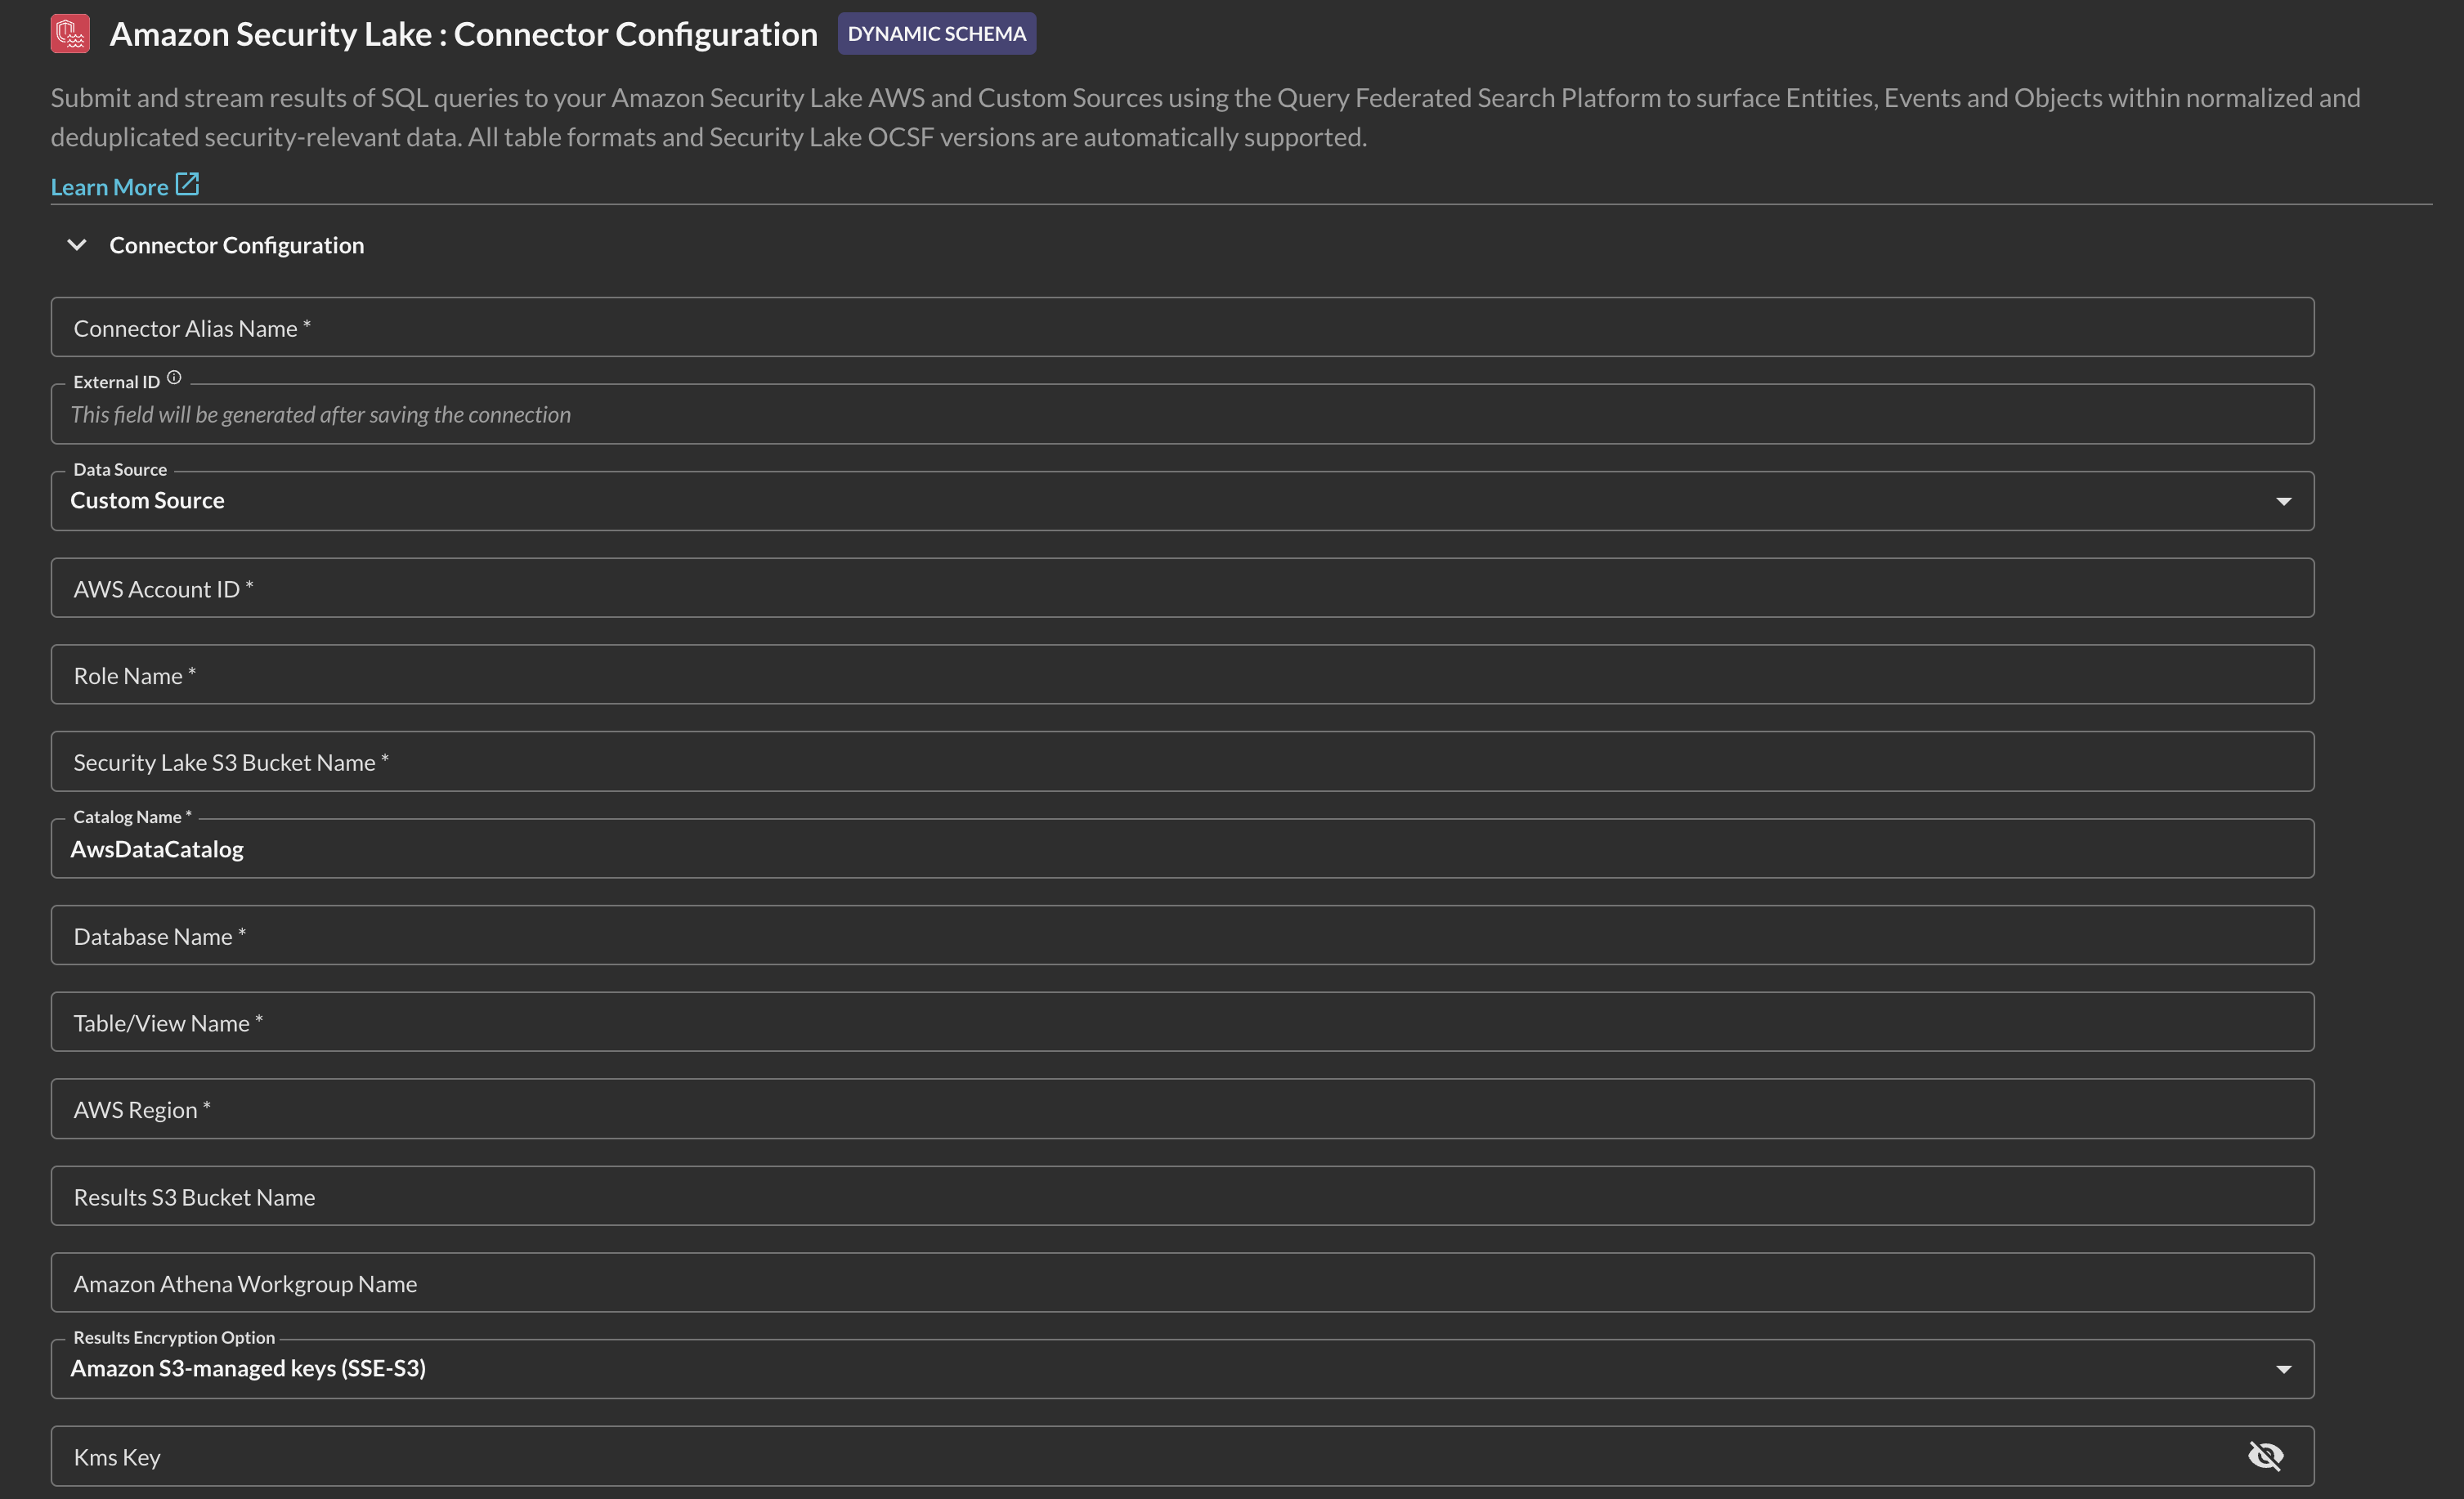
FIG 2. - Amazon Security Lake Connector configuration details
-
Connection Alias Name: The human-readable name you want to give to this connector. You can name it whatever you want, such as naming it after the source data in each Table you query.
-
External ID: This value will be generated after you Save the Connector.
-
Data Source: Pick from AWS-provided sources, or select Custom Source for any other value - custom source or otherwise.
-
AWS Account ID: The same AWS Account ID where your Athena Workgroup, Target and Results Amazon S3 Buckets are located.
-
Role Name: The name of the AWS IAM Role that delegates access to the Query Federated Search AWS Account. Remember, you will create this Role AFTER pre-configuration. Ensure you use the same Role Name when you do so.
-
Security Lake S3 Bucket Name: The name of the Amazon S3 bucket created by Amazon Security Lake.
-
Catalog Name: The name of the AWS Glue Data Catalog in your AWS Account. This should be
AwsDataCatalogin most cases but can also bedefault. -
Database Name: The name of the AWS Glue Database that contains the AWS Glue Table or Amazon Athena View that you query - typically named
aws_security_lake_<region>. -
Table/View Name: The name of the AWS Glue Table or Athena View that corresponds to the Security Lake Source you are trying to query, e.g.,
amazon_security_lake_table_us_east_2_cloud_trail_mgmt_1_0 -
AWS Region: The name of the AWS Region where your Database/Table is located, e.g.,
us-east-2. -
Results S3 Bucket Name: The name of the Amazon S3 bucket that you configured to write Amazon Athena query results into.
-
Amazon Athena Workgroup Name (OPTIONAL): In lieu of supplying a value for Results S3 Bucket Name and KMS Key you can supply a custom Amazon Athena Workgroup that defines these values.
-
Results Encryption Option: A dropdown selection for the type of encryption used: either Amazon S3-managed Keys (SSE-S3), your own AWS KMS CMK, or an external encryption key used for Customer-Side Encryption (CSE). You must use the SAME type of encryption in both areas. If you do not specify any encryption in Amazon Athena, leave this as
Amazon S3-managed keys (SSE-S3). -
KMS Key (OPTIONAL): The AWS Resource Name (ARN) or the GUID of the AWS KMS CMK used for SSE-CMK or SSE-CSE, if used. If you use SSE-S3 encryption, leave this option blank.
-
-
Select Save from the bottom-right of the connection pane as shown below (FIG. 3). This ensures that all supplied information is saved and allows the Query backend to generate IAM Policy JSON snippets and an External ID unique to this Connector.

FIG. 3 - Saving the Connector
-
Scroll up and copy the AWS IAM policy snippets as shown below (FIG. 4) for both the Trust Policy (for your IAM Role) and Identity Policy (for your IAM Policy) and proceed to the next section.
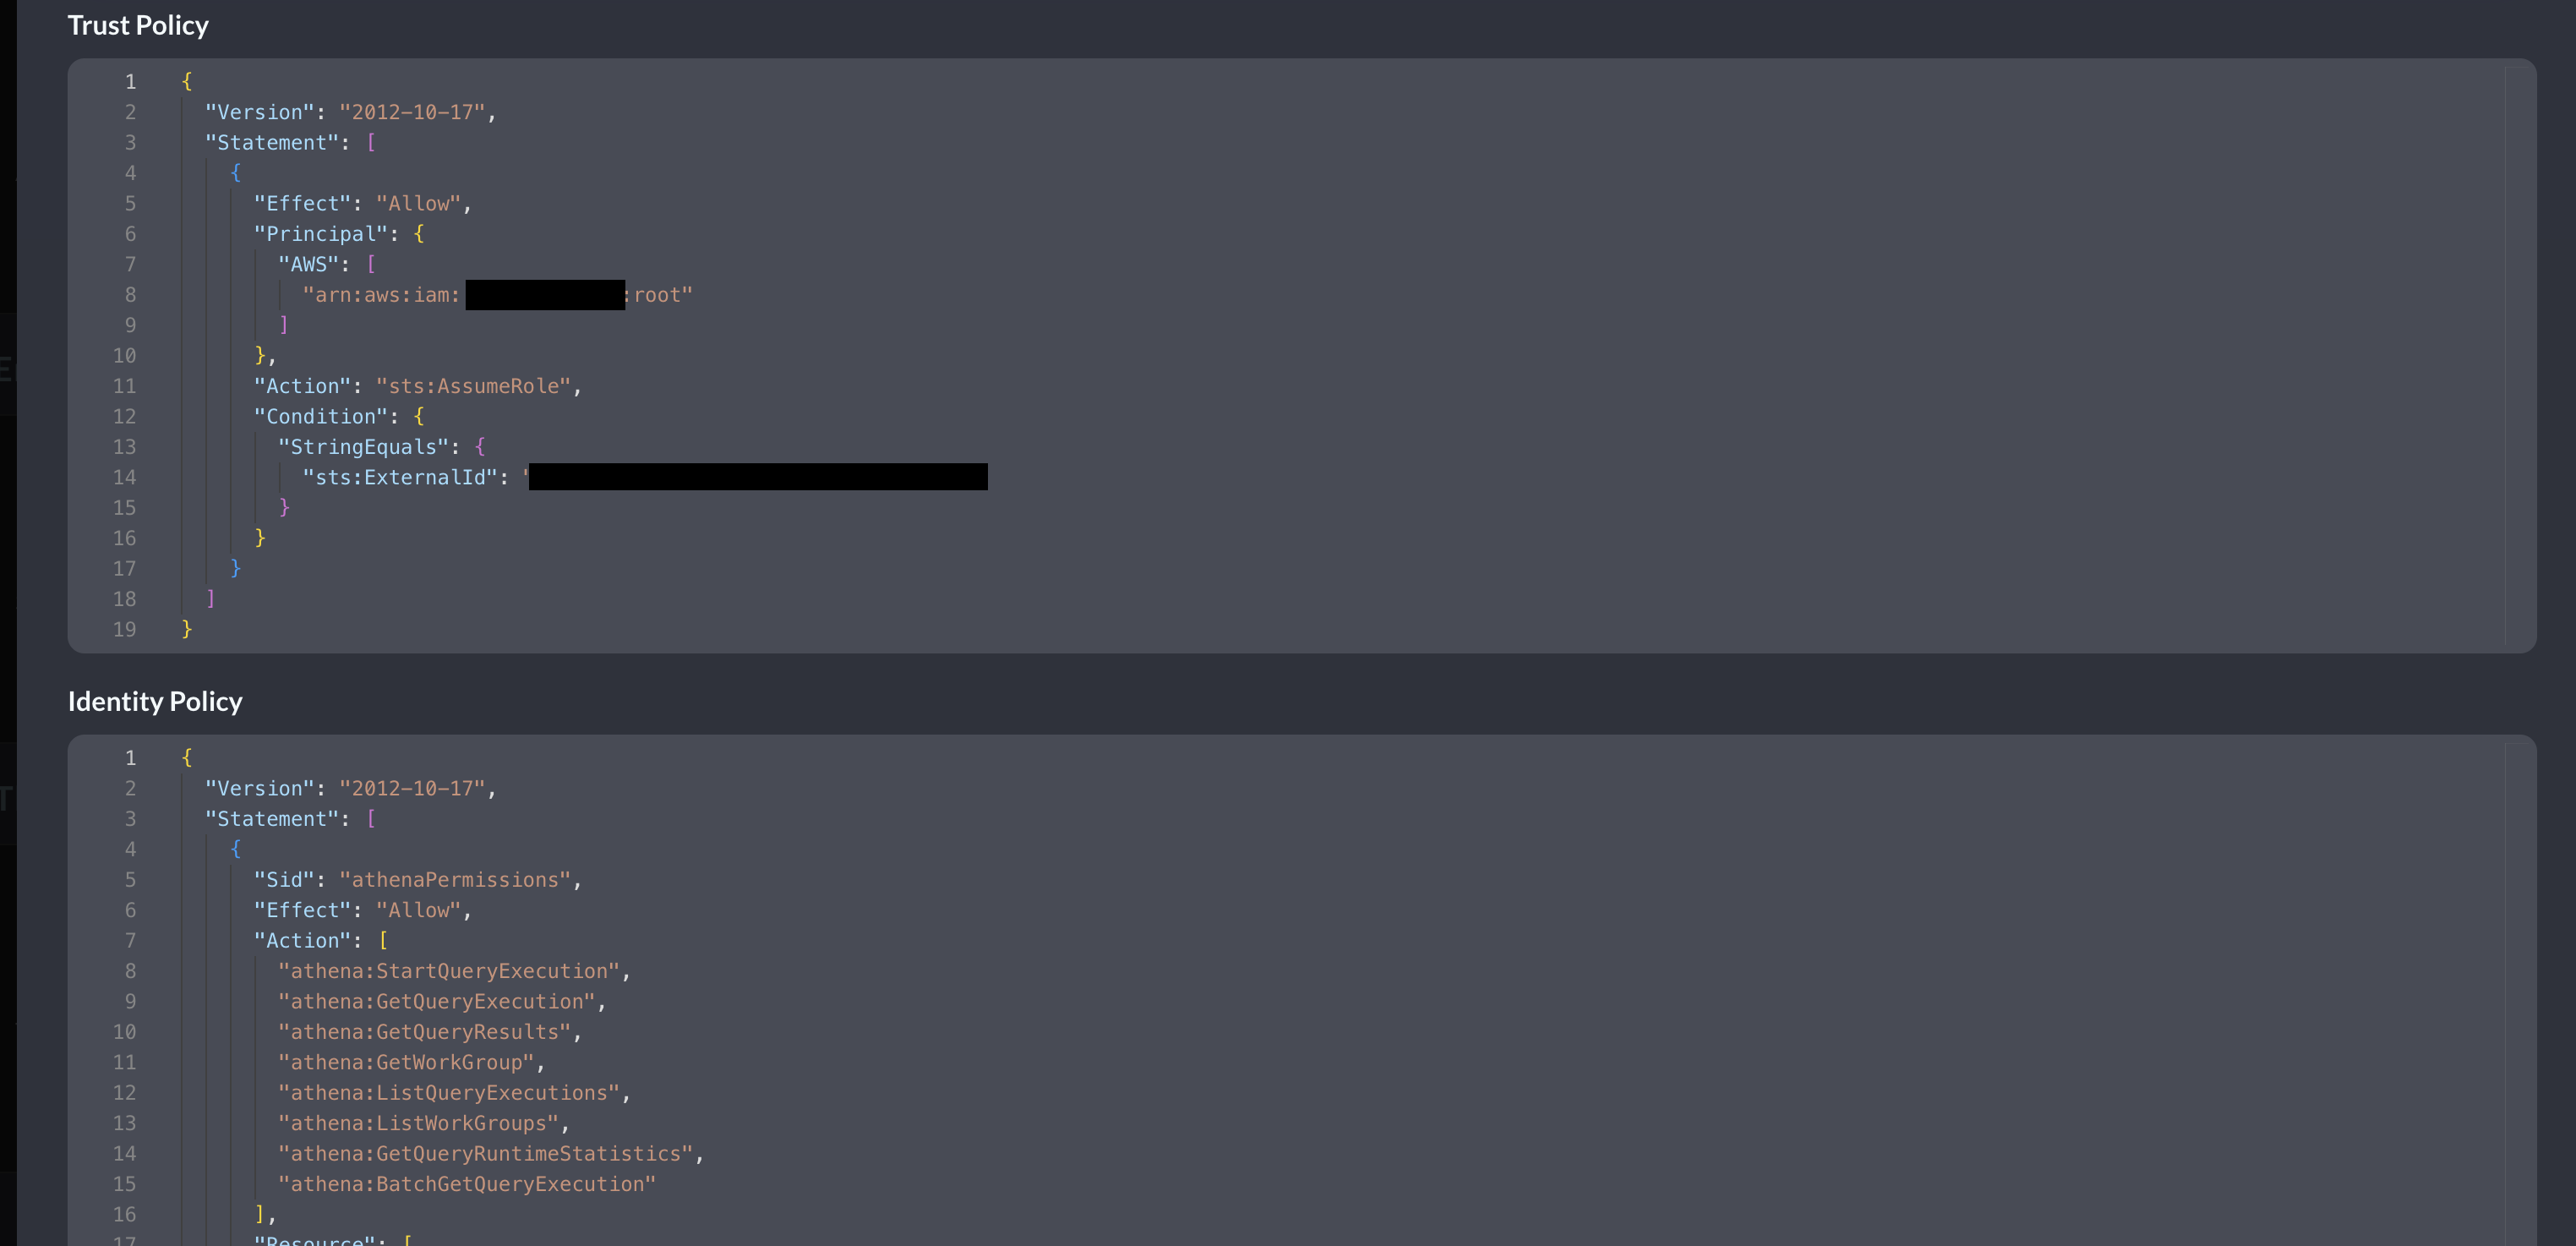
FIG. 4 - Copying generate IAM Policy JSON snippets
Create AWS IAM Policy for Amazon Security Lake Connector
In this section you will use the supplied Identity Policy from the previous section to create an AWS IAM Policy. While only a specific Glue Database and Table combination is specified, your entire Security Lake and Amazon Athena Results S3 Buckets have permissions granted for them. If you want to limit the Role to a specific prefix (folder/directory) path in Amazon S3 for either bucket, ensure you modify the JSON snippet as necessary.
If you encrypt your data in S3 using AWS KMS Customer Managed Keys (CMKs) and/or encrypt your Amazon Athena query results, you must also add the following permissions to this IAM Policy:
kms:Decryptkms:GenerateDataKeykms:Encrypt
The following steps use an Amazon Linux 2023 AWS CloudShell environment and the AWS CLI. Adapt these instructions to your specific operating system or deployment strategy (e.g., AWS CloudFormation, Terraform, AWS Console, etc.).
- Create an environment variable that contains the content of your Identity Policy as shown below. Ensure you replace the section
{ "YOUR_POLICY_HERE }with your actual policy!
POLICY_JSON=$(cat <<EOF
{ "YOUR_POLICY_HERE }
EOF
)- Create the AWS IAM Policy with the following command. Ensure you change the
policy-namevalue to whatever name you wish to grant the policy.
aws iam create-policy \
    --policy-name "QueryFederatedSearchSecLakePolicy" \
    --description "Grants the Query Federated Search Platform Glue, Athena, and S3 permissions to Security Lake resources" \
--policy-document "$POLICY_JSON"- (OPTIONAL STEP) if you use AWS KMS CMKs to encrypt the Amazon Athena query results and/or to encrypt the data within your Security Lake S3 Bucket, add the following policy into the created AWS IAM Policy using the AWS Console. Ensure you replace the values of
$AWS_REGION,$AWS_ACCOUNT_IDand$$YOUR_KEY_ID_HEREwith your proper AWS Region, AWS Account ID, and KMS Key ID respectively.
{
	"Version": "2012-10-17",
	"Statement": [
		{
			"Sid": "kmsPermissions",
			"Effect": "Allow",
			"Action": [
				"kms:Decrypt",
				"kms:Encrypt",
				"kms:GenerateDataKey"
			],
			"Resource": "arn:aws:kms:$AWS_REGION:$AWS_ACCOUNT_ID:key/$YOUR_KEY_ID_HERE"
		}
	]
}
In the next section you will create an AWS IAM Role, attach this Policy to it, and optionally modify your AWS KMS Key Policy if you use a KMS CMK. Ensure you copy the value of the IAM Policy ARN as you will need it in the next section!
Create AWS IAM Role & attach IAM Policy
In this section you will use the supplied Trust Policy from the previous section to create an AWS IAM Role that trusts the Query Production Account and delegates access to your Glue, Athena, S3 (and optionally KMS) resources. The ExternalId that is generated is to prevent a Confused-Deputy flaw within the role assumption logic.
Despite it being an AWS best practice, we realize this can be cumbersome to maintain multiple specific IAM Roles per-Connector. To that end, if your own internal identity governance (and other) requirements allow it, you can specify multiple ExternalId entries in one IAM Trust Policy.
{
  "Version": "2012-10-17",
  "Statement": [
    {
      "Effect": "Allow",
      "Principal": {
        "AWS": [
          "arn:aws:iam::822484525064:root"
        ]
      },
      "Action": "sts:AssumeRole",
      "Condition": {
        "StringEquals": {
          "sts:ExternalId": [
            "foo",
            "bar",
            "69420",
            "vampirevampire"
            ]
        }
      }
    }
  ]
}
If you encrypt your data in S3 using AWS KMS Customer Managed Keys (CMKs) and/or encrypt your Amazon Athena query results, you must also add the following permissions to your AWS KMS Key Policy and trust the Principal (the IAM Role) you will create:
kms:Decryptkms:GenerateDataKeykms:Encrypt
The following steps use an Amazon Linux 2023 AWS CloudShell environment and the AWS CLI. Adapt these instructions to your specific operating system or deployment strategy (e.g., AWS CloudFormation, Terraform, AWS Console, etc.).
- Create an environment variable that contains the content of your Trust Policy as shown below. Ensure you replace the section
{ "YOUR_TRUST_POLICY_HERE }with your actual policy!
TRUST_POLICY_JSON=$(cat <<EOF
{ "YOUR_TRUST_POLICY_HERE }
EOF
)- Create the AWS IAM Role with the following command. Ensure you change the
role-namevalue to whatever name you pre-configured the Connector with! You can change the name in the Connector, but not the AWS IAM Role.
aws iam create-role \
    --role-name "QueryFederatedSearchForSecLake" \
    --description "Delegates access to Amazon Athena and related services to the Query Federated Search Platform" \
--assume-role-policy-document "$TRUST_POLICY_JSON"- Attach the IAM Policy you created in the previous section with your IAM Role with the following command. Ensure you replace the values for
role-nameandpolicy-arnfor your actual values.
aws iam attach-role-policy \
    --role-name "QueryFederatedSearchForSecLake" \
--policy-arn "arn:aws:iam::ACCOUNT_ID:policy/QueryFederatedSearchSecLakePolicy"- (OPTIONAL STEP) if you use AWS KMS CMKs to encrypt the Amazon Athena query results and/or to encrypt the data within your Security Lake S3 Bucket, you must add the following Statement to your AWS KMS Key Policy. Replace
$AWS_ACCOUNT_IDand$ROLE_NAMEwith your AWS Account ID and the created IAM Role name, respectively.
{
    "Sid": "queryFederatedSearchPermissions",
    "Effect": "Allow",
    "Principal": {
        "AWS": "${IAMRoleArn}"
    },
    "Action": [
        "kms:Decrypt",
        "kms:Encrypt",
        "kms:GenerateDataKey"
    ],
    "Resource": "arn:aws:iam::$AWS_ACCOUNT_ID:role/$ROLE_NAME"
}
In the next section you will grant this IAM Role the SELECT and DESCRIBE Lake Formation permissions to be able to gain read access to your Database, Tables (and optionally, any future Views) created for Amazon Security Lake.
Grant AWS Lake Formation Principal Permissions to your AWS IAM Role
AWS Lake Formation helps you centrally govern, secure, and globally share data for analytics and machine learning. With Lake Formation, you can manage fine-grained access control for your data lake data on Amazon Simple Storage Service (Amazon S3) and its metadata in AWS Glue Data Catalog. Amazon Security Lake uses Lake Formation to control fine-grained access to your security data lake's Databases, Tables, and the specific Actions (e.g., SELECT, CREATE, DROP) that can be taken by certain principals.
You can use the AWS Console to provide the IAM Role you created with access to every Action and Table within your Amazon Security Lake deployment, or, you can use more Bash scripts and the AWS CLI to provide "exactly one" minimum necessary permissions per IAM Role that corresponds to a specific Database and Table. Like other resource-based and session-based policies in the AWS Cloud, you will require Identity-based permissions in addition to Principal Permissions from Lake Formation to successfully integrate the Query Federated Search Platform with your data in Amazon Security Lake.
Grant AWS Lake Formation permissions using the AWS Console
Ensure that you set your AWS Region to the same Region where your Security Lake rollup Region is located.
-
In the AWS Console navigate to AWS Lake Formation -> Data lake permissions and select Grant as shown below (FIG. 5)
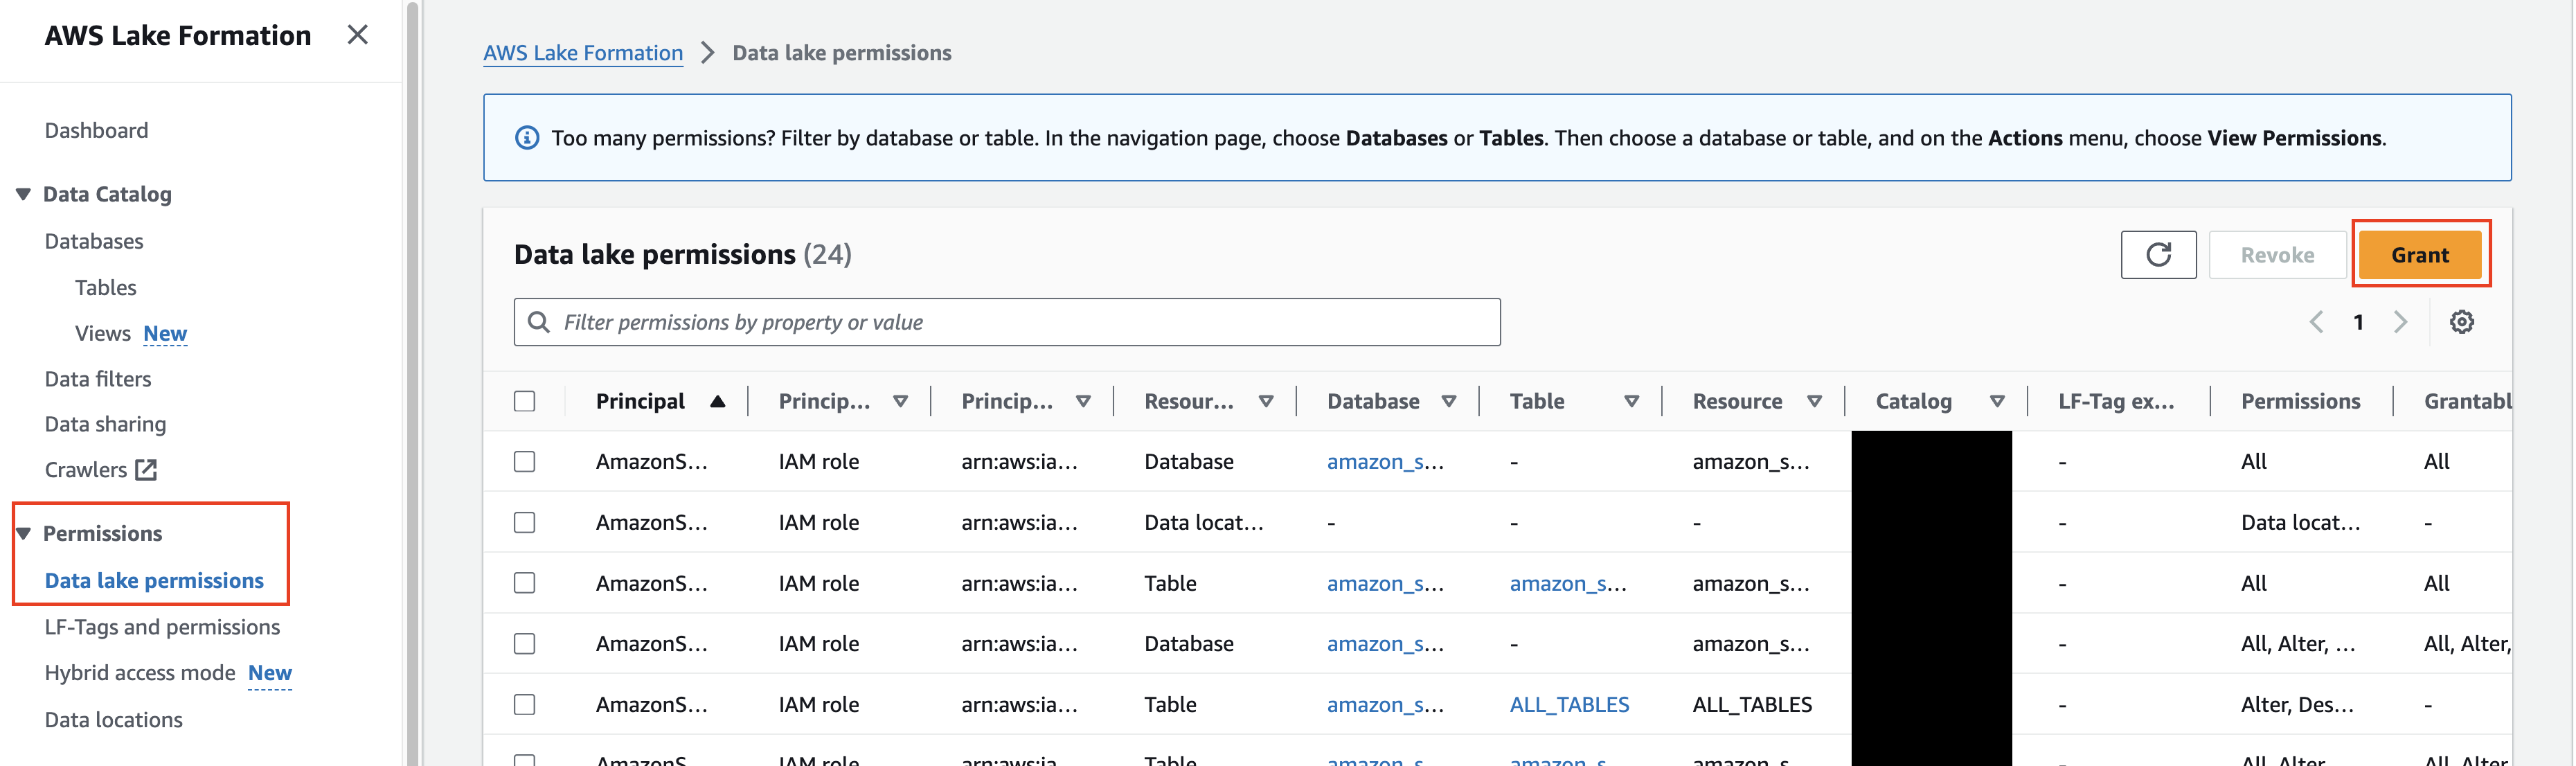
FIG. 5 - Grant data lake permissions
-
In the Principals section, select IAM users and roles, and in the dropdown search bar labeled
IAM users and rolesenter the IAM Role you created previously in this guide. -
In the LF-Tags or catalog resources section, select Named Data Catalog resources and choose the Amazon Security Lake created Database(s) as shown below (FIG. 6). The below screenshot also encompasses Step 2.
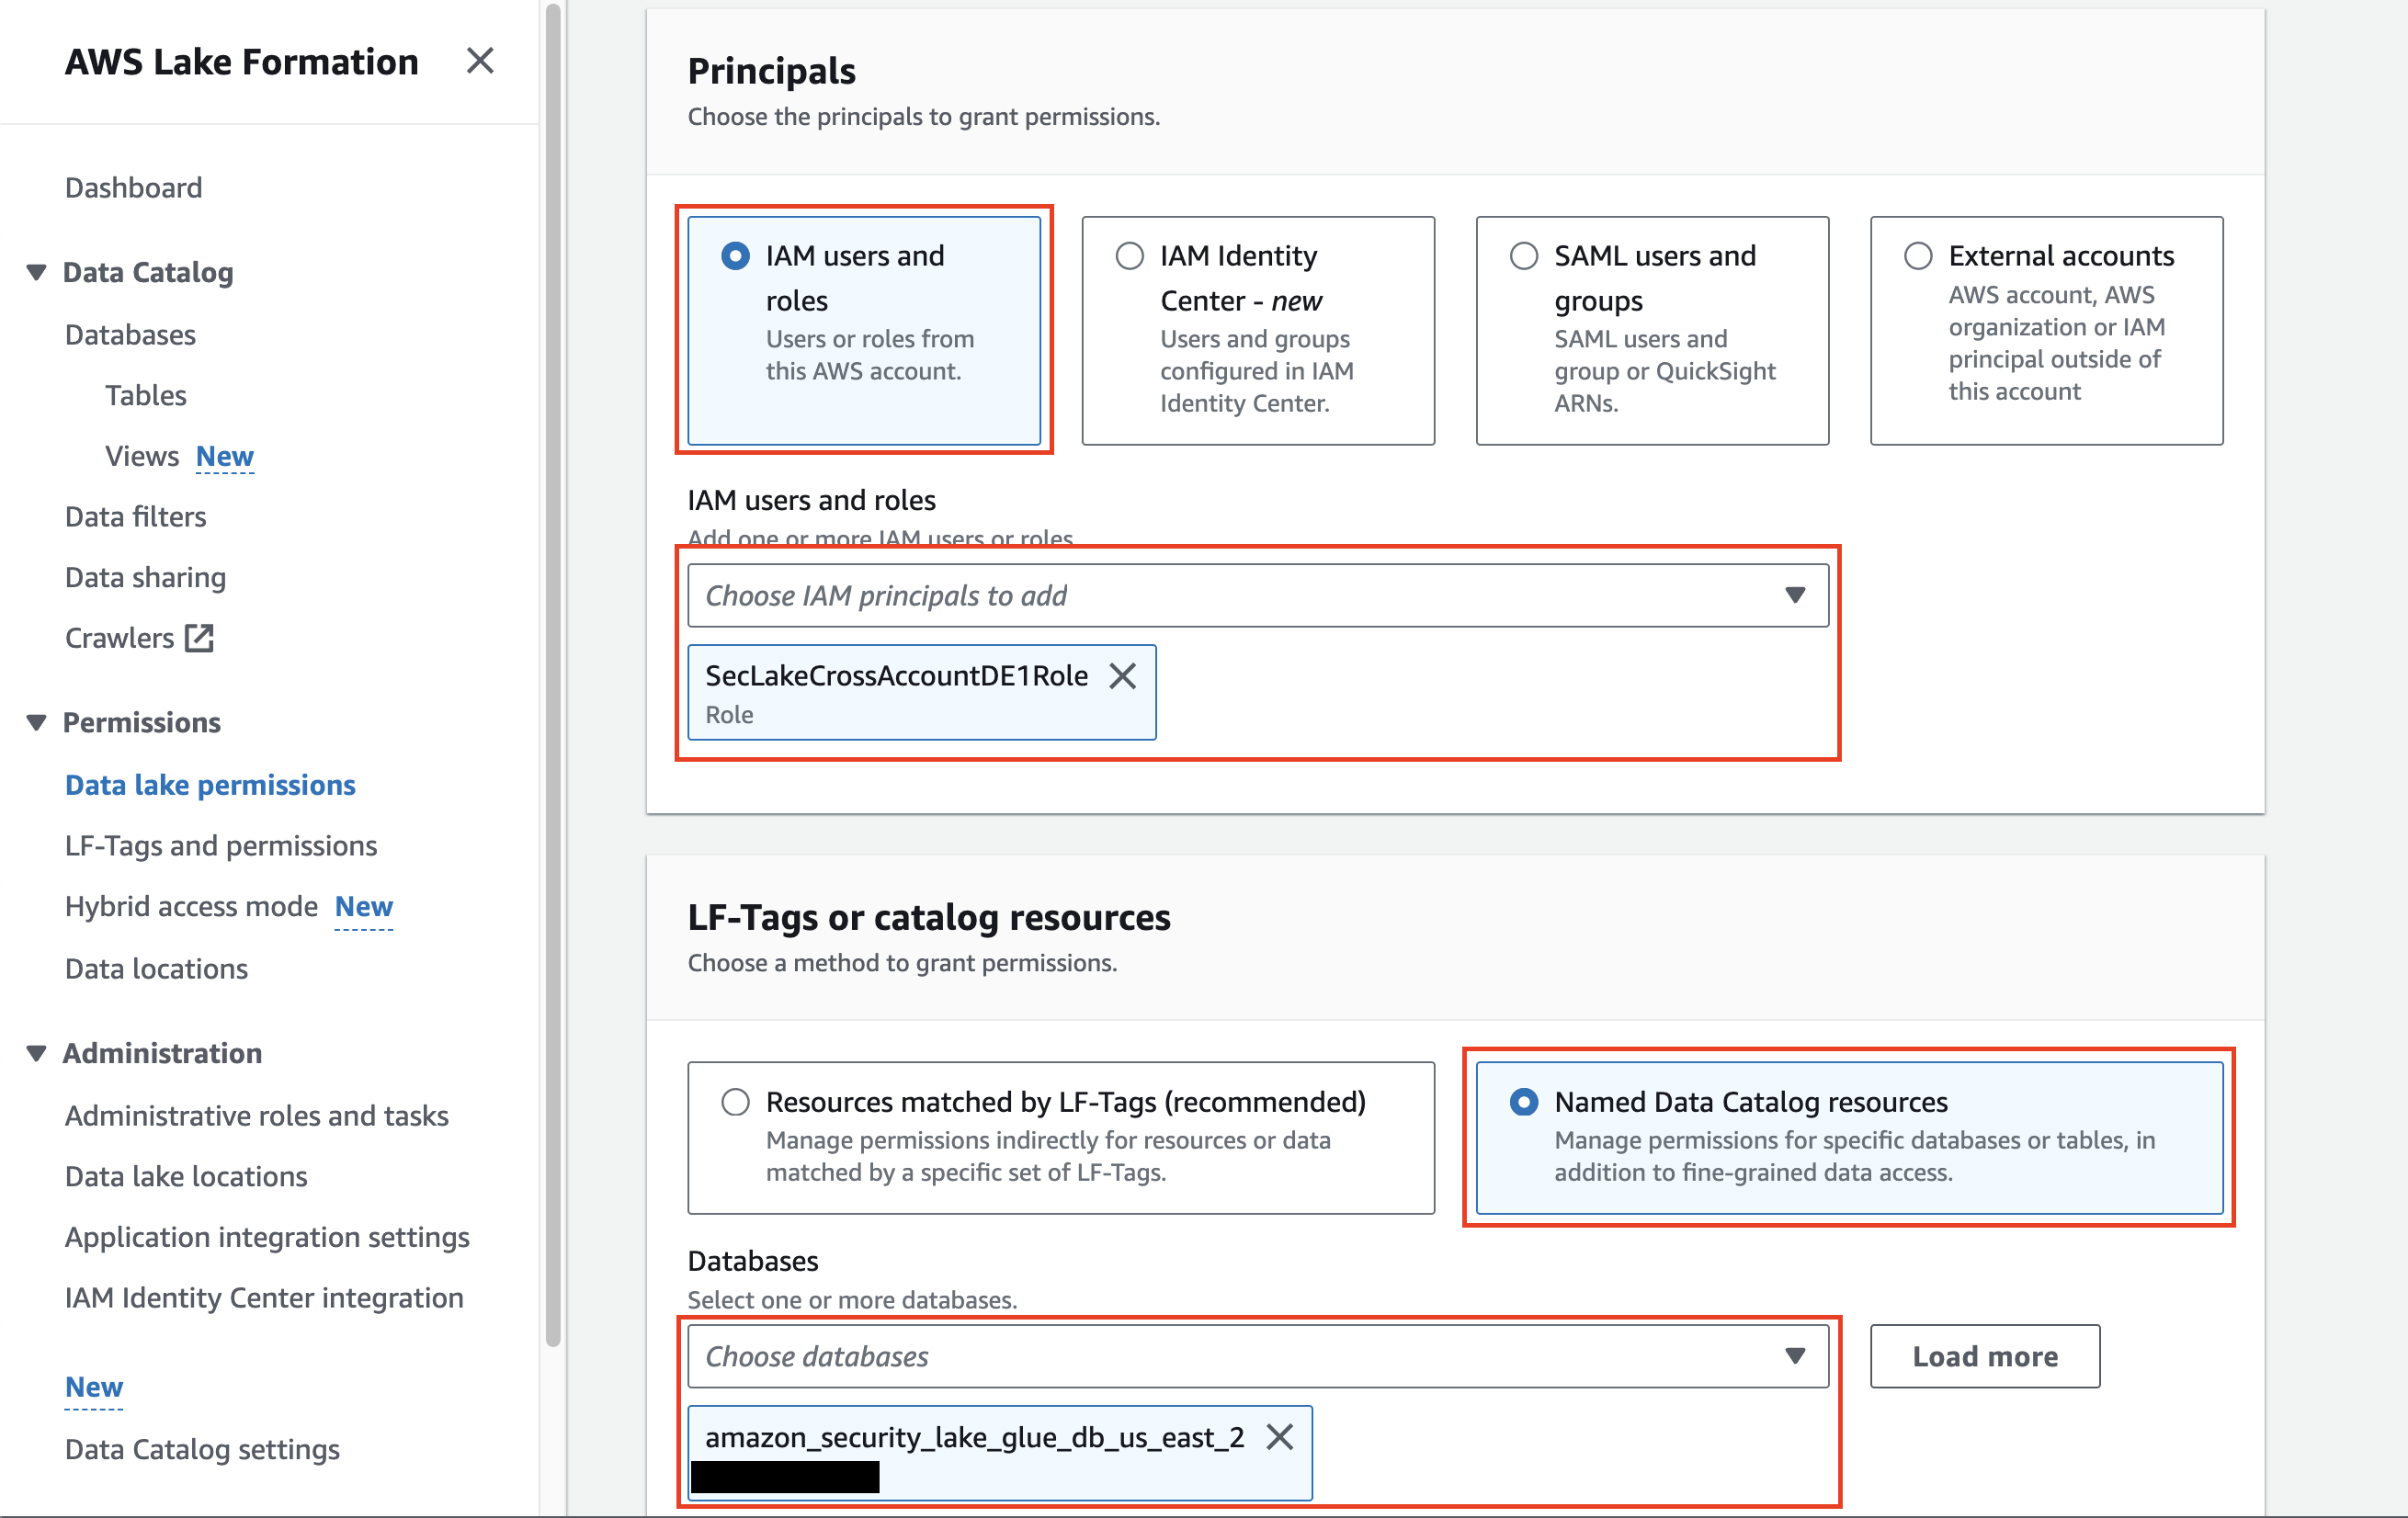
FIG 6. - Selecting Principals and Named Data Catalog resources
-
In the Tables dropdown, either select the specific AWS Glue Table you setup permissions for in your IAM Role, or, select
All tablesto grant access to every single Amazon Security Lake table within the Database as shown below (FIG. 7).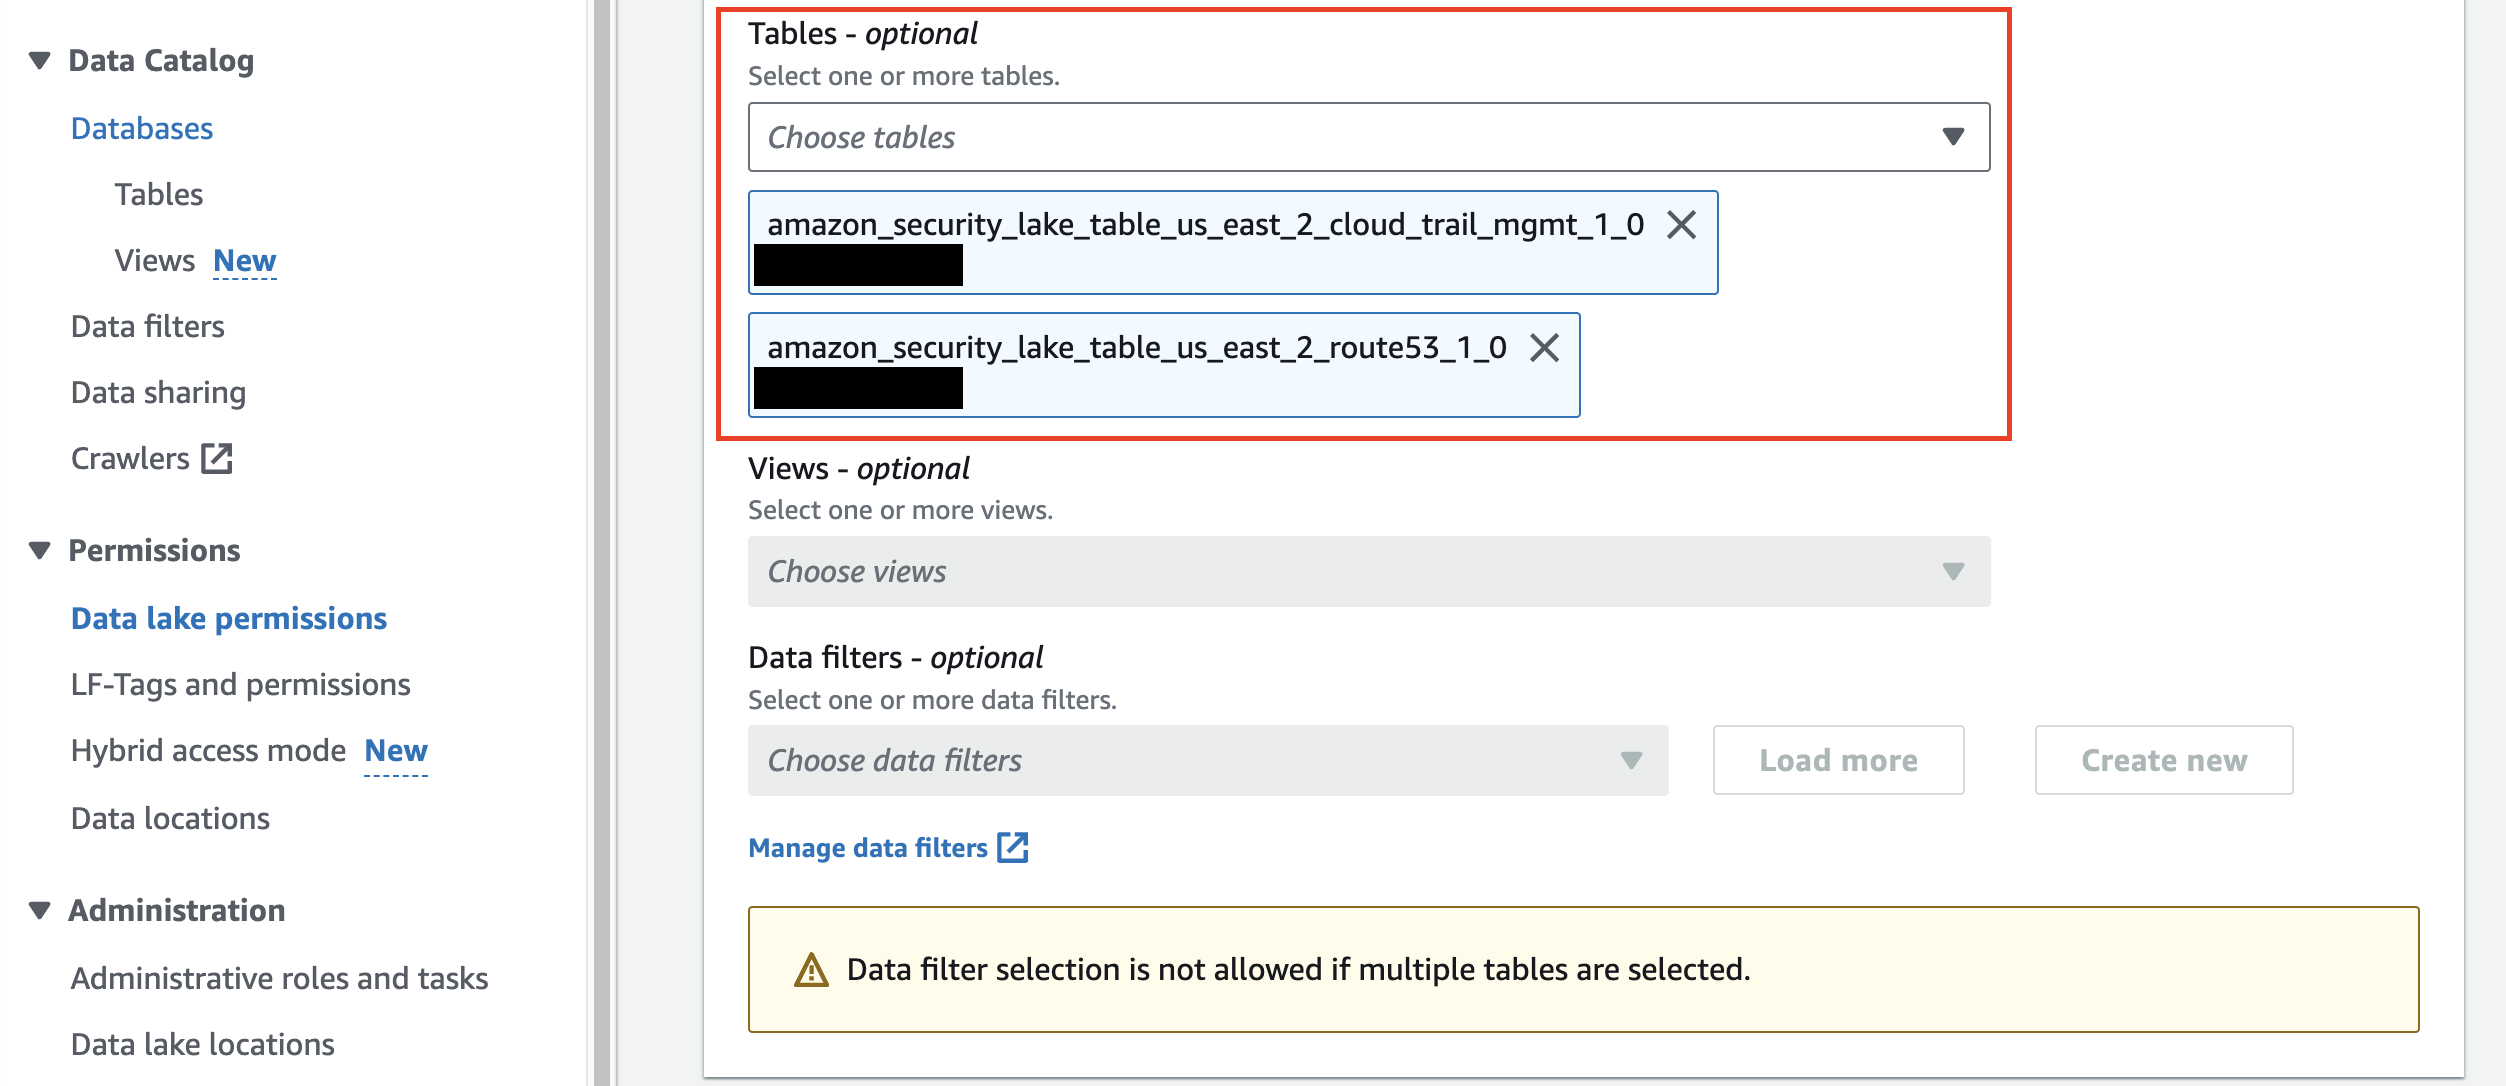
FIG 7. - Select Amazon Security Lake Tables for Lake Formation permissions
-
(OPTIONAL STEP) if you have created Amazon Athena Views based on your Security Lake data lake Tables, select them in the Views dropdown to choose
All viewsto account for future created Views. This option only works if you do not specify Tables. -
Finally, in the Table permissions section choose
SelectandDescribefor both Table permissions and Grantable permissions, chooseAll data accessin the Data permissions section, and select Grant as shown below (FIG. 8).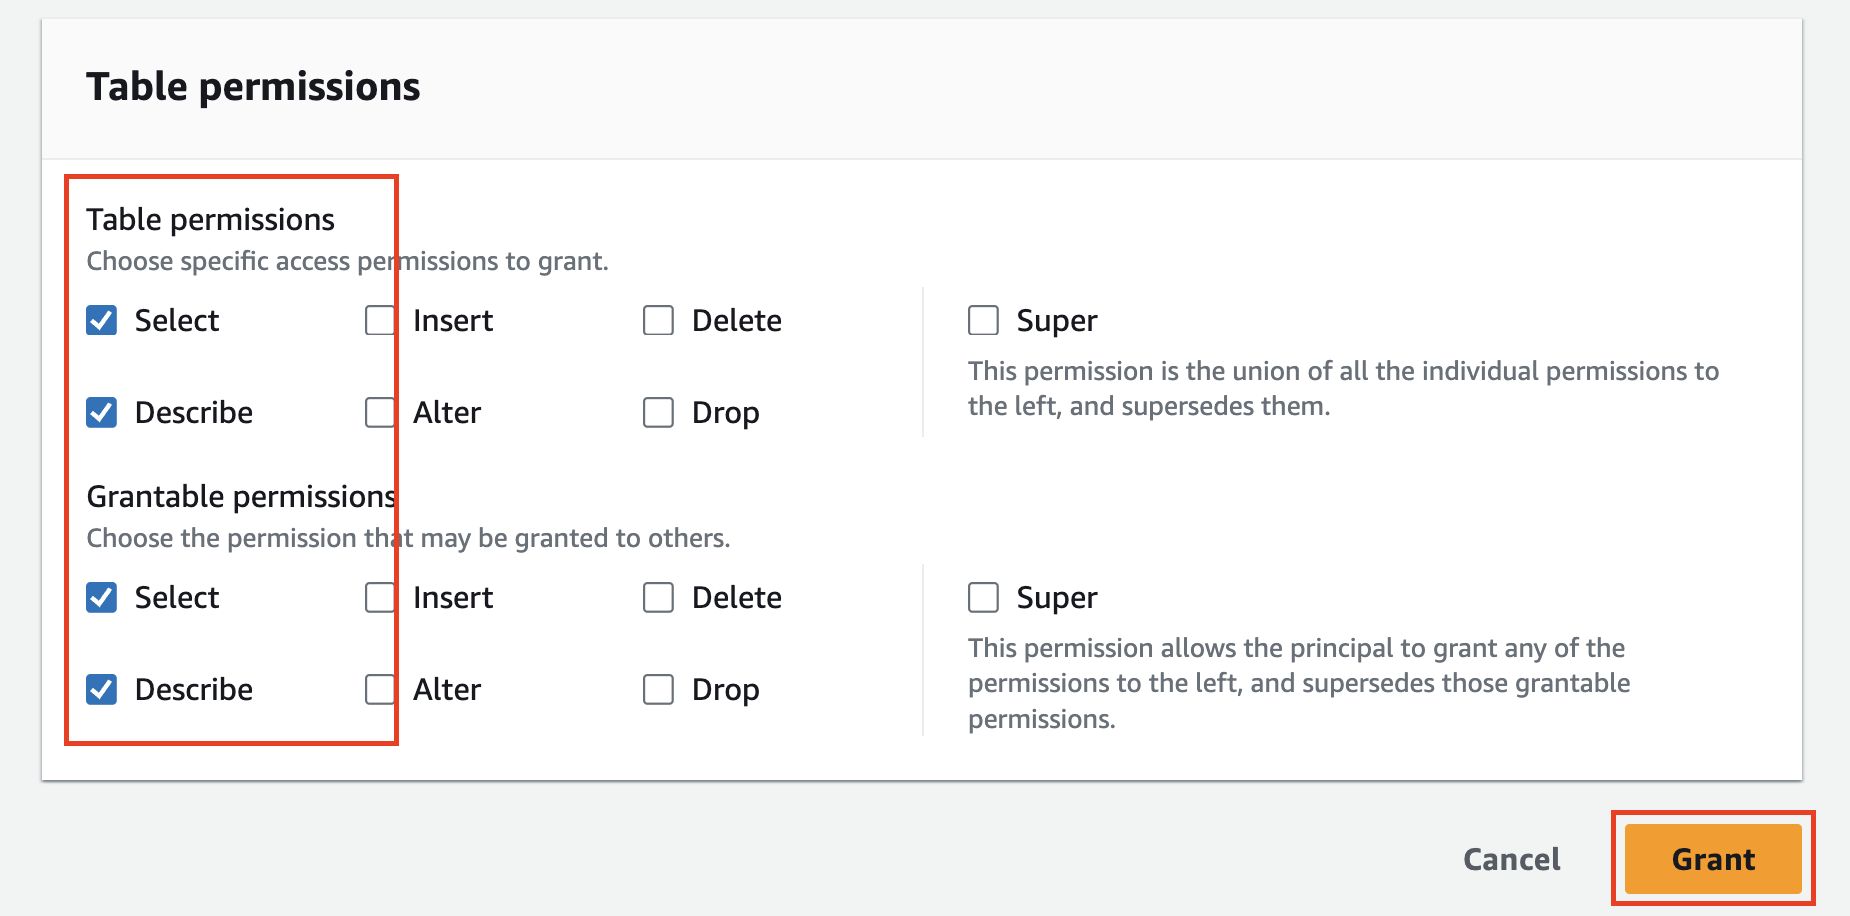
FIG. 8 - Grant
SelectandDescribeTable and Grantable Permissions
You have now successfully added AWS Lake Formation Principal Permissions to the AWS IAM Role used for the Query Federated Search Platform to access your Amazon Security Lake resources. In the next section you will finalize configuring the Connector for your Amazon Security Lake resources.
Grant AWS Lake Formation permissions using the AWS CLI
If you want to have "exactly one" minimum necessary permissions per Lake Formation Grant, use the following bash script to use the AWS CLI to create the Grant to a specific Database:Table Pair.
- Create a Shell script with the following code snippet and save it to file (e.g.,
grant_lakeformation_permissions.sh)
#!/bin/bash

echo "Enter Database Name:"
read DATABASE_NAME
echo "Enter Table Name:"
read TABLE_NAME
echo "Enter AWS Account ID:"
read AWS_ACCOUNT_ID
echo "Enter Role Name:"
read ROLE_NAME

ROLE_ARN="arn:aws:iam::$AWS_ACCOUNT_ID:role/$ROLE_NAME"

aws lakeformation grant-permissions \
    --principal "{\"DataLakePrincipalIdentifier\": \"$ROLE_ARN\"}" \
    --resource "{ \"Table\": { \"DatabaseName\": \"$DATABASE_NAME\", \"Name\": \"$TABLE_NAME\" }}" \
    --permissions "SELECT" \
    --permissions-with-grant-option "SELECT"

echo "Granted SELECT permission to $ROLE_ARN for $DATABASE_NAME.$TABLE_NAME"

aws lakeformation grant-permissions \
    --principal "{\"DataLakePrincipalIdentifier\": \"$ROLE_ARN\"}" \
    --resource "{ \"Table\": { \"DatabaseName\": \"$DATABASE_NAME\", \"Name\": \"$TABLE_NAME\" }}" \
    --permissions "DESCRIBE" \
    --permissions-with-grant-option "DESCRIBE"

echo "Granted DESCRIBE permission to $ROLE_ARN for $DATABASE_NAME.$TABLE_NAME"- Make the script executable:
chmod +x grant_lakeformation_permissions.sh. - Run the script and enter the following pieces of information when prompted:
./grant_lakeformation_permissions.sh- Database Name: The name of the AWS Glue Database that contains your intended Table (or View) you intend to query.
- Table Name: the name of the Table you wish you query - this can be a table created using CREATE TABLE or a table created directly by AWS Glue Crawlers or another mechanism (e.g., AWS CLI, etc.).
- AWS Account ID: Your own AWS Account ID.
- Role Name The name of the AWS IAM Role you created in the previous section to attach the Policy to.
You have now successfully added AWS Lake Formation Principal Permissions to your AWS IAM Role used for the Query Federated Search Platform to access your Amazon Security Lake resources. In the next section you will finalize configuring the Connector for your Amazon Security Lake resources.
Finalize configuring your Amazon Security Lake Connector
In this section you will verify all of your permissions, test that the connection works, and enable it so that you can dispatch searches to Amazon Security Lake from the Query Federated Search Platform.
-
Back in the Connections page, select the Amazon Security Lake Connector you configure and select Test Connection. You should receive the following message:
The connection was tested successfullyas shown below (FIG. 9).
FIG. 9 - Testing the Security Lake Connector
-
Toggle the Preview Data dropdown and select Fetch Sample. This will take a sample of 10 events from your Security Lake target Table/View. Any failures here are typically due to missing IAM permissions or Lake Formation grants. Once complete, a table and JSON view will appear after a brief loading sequence as shown below (Fig. 10).
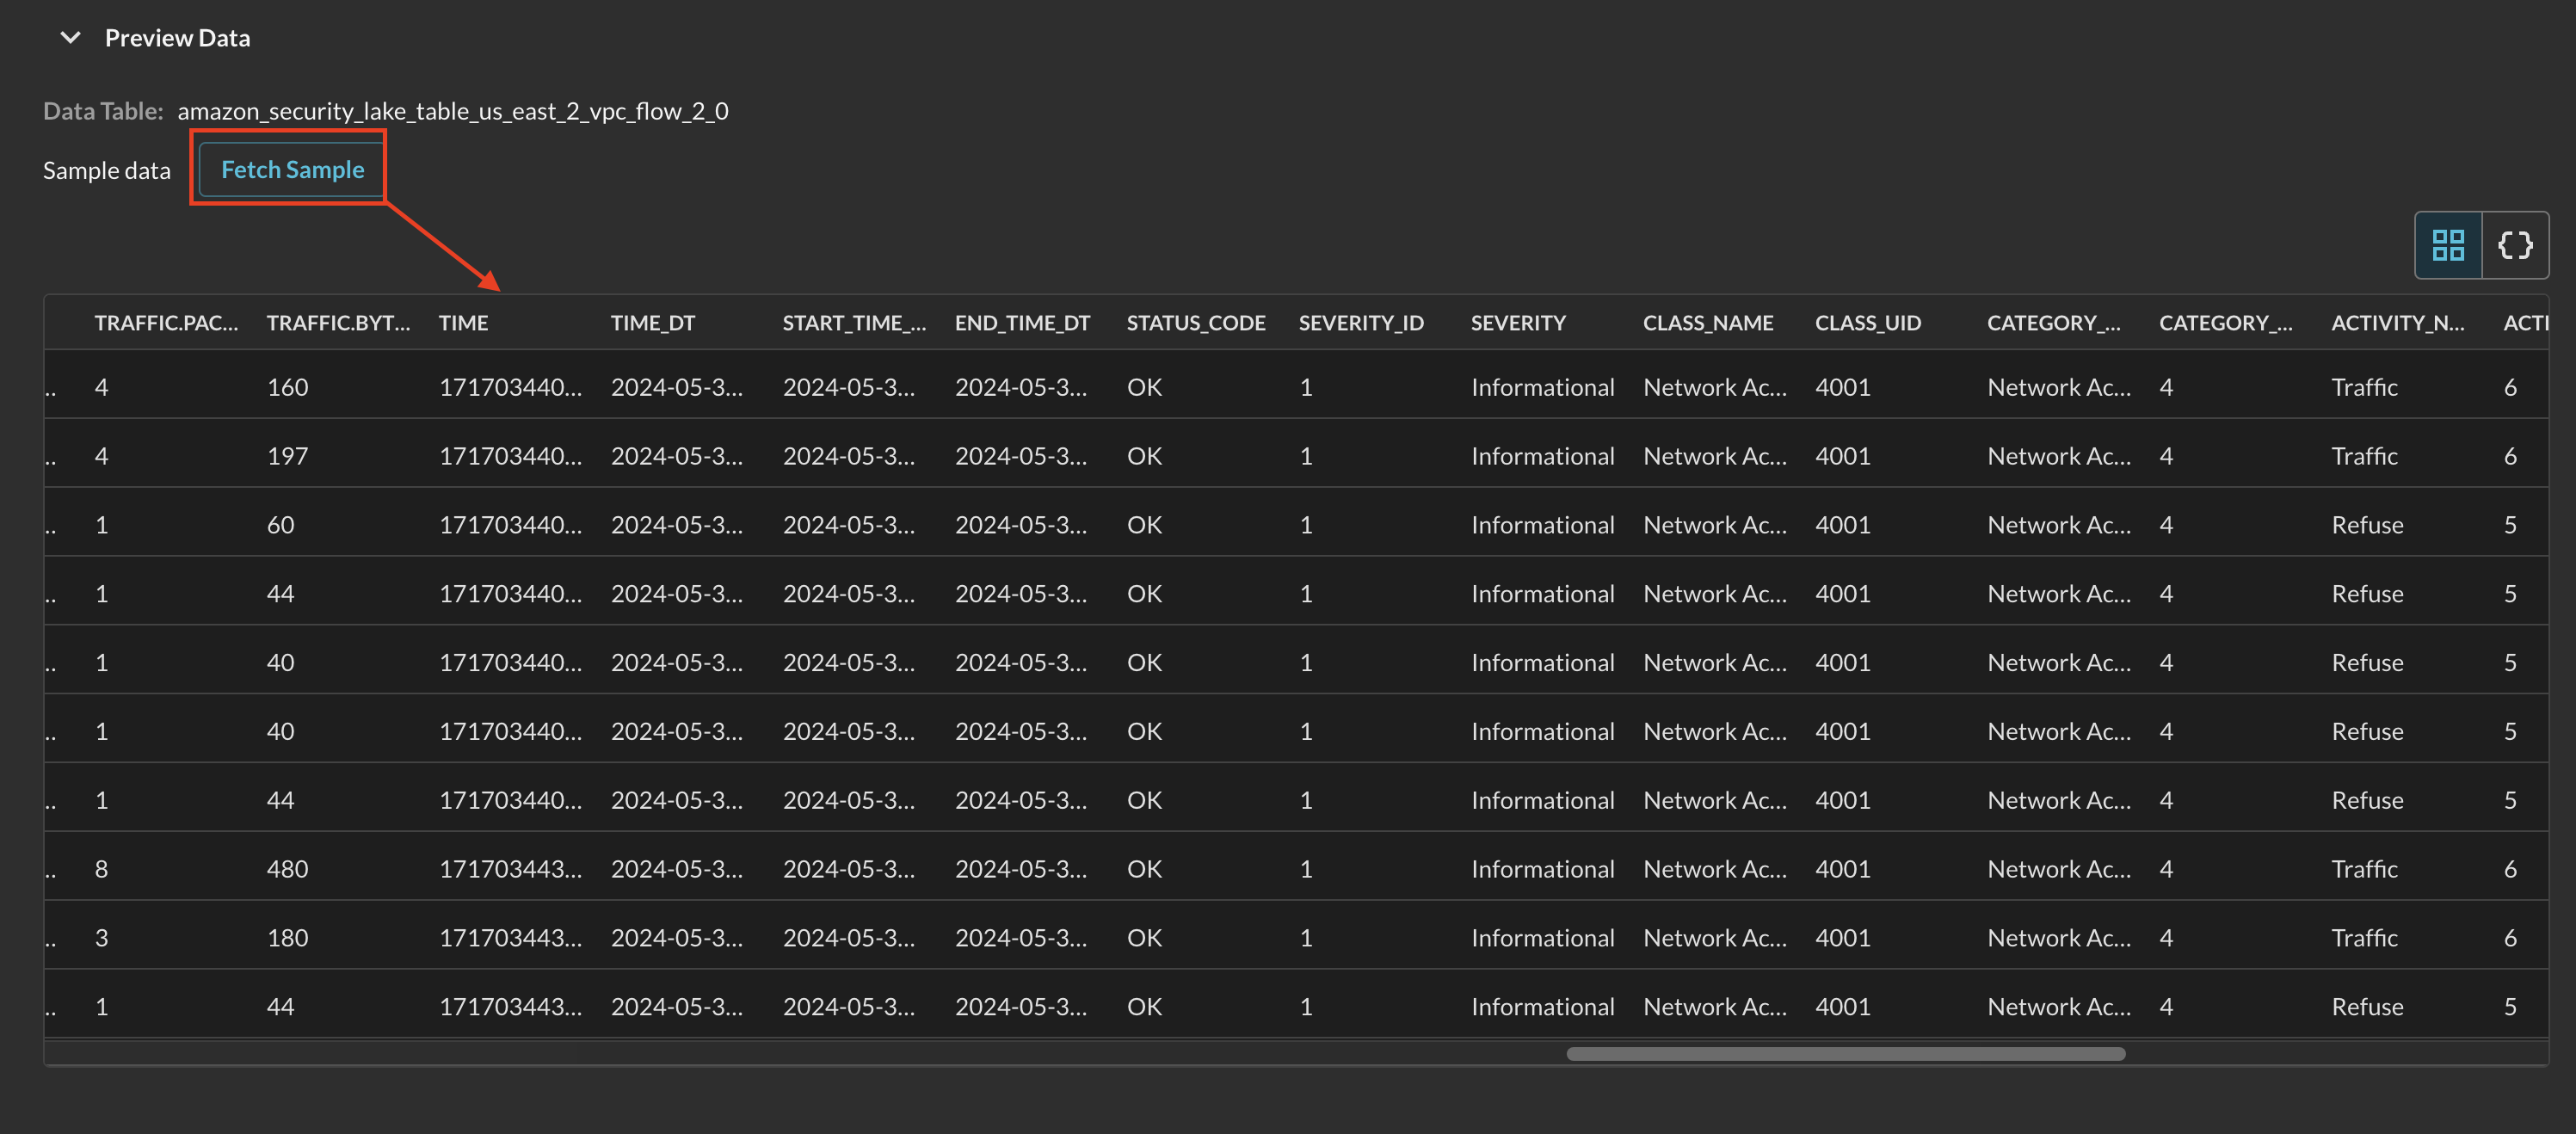
FIG. 10 - Fetching and receiving sample data from Amazon Security Lake
-
Toggle the Map Data dropdown and you will be presented with a no-code wizard for mapping data into the Query Data Model. If you selected an AWS data source in the Connector Configuration, you will have an Event Class pre-mapped. If not, select your matching Event Class based on OCSF as shown below (Fig 11).
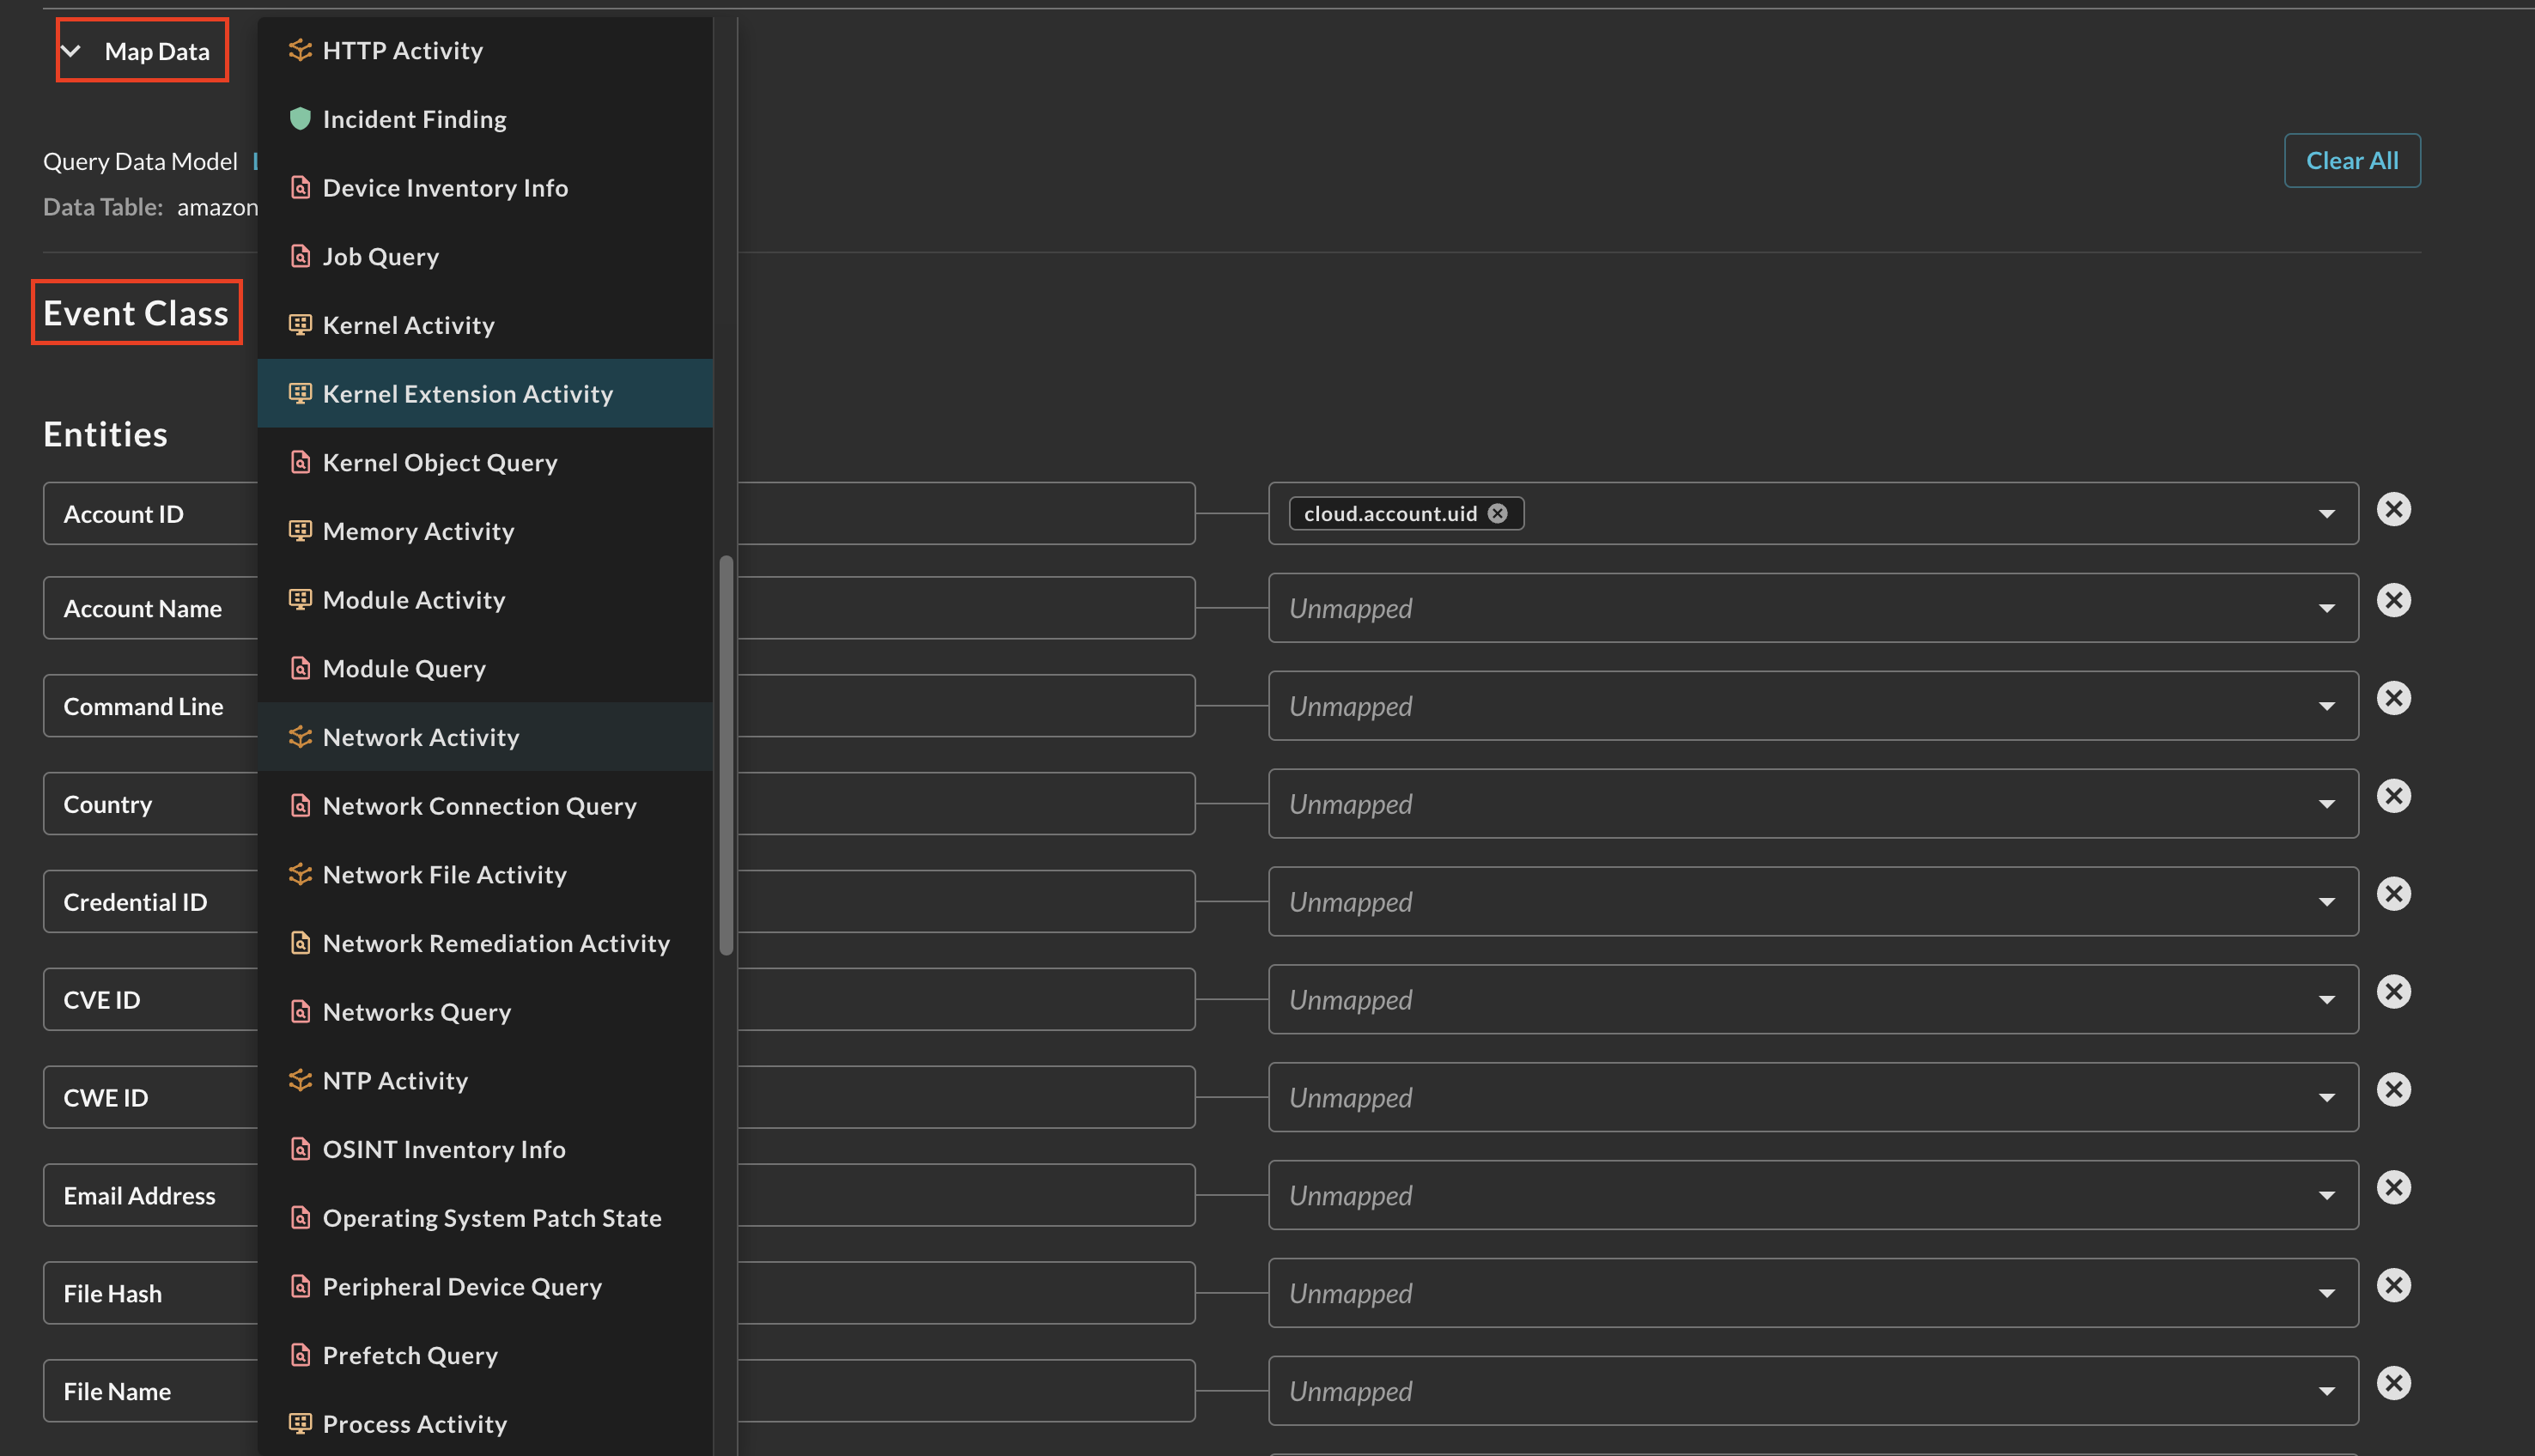
FIG. 11 - Selecting an Event Class within the Configure Schema Map Data section
-
After selecting your Event Class you can customize your Entities (Observables), used in the Entity-based searches within the Query Builder. Each dropdown is a multi-selector that can be used to pick any data downstream from your mapped source. The types are not enforced, allowing you to map any scalar value to any Entity that best matches your investigatory and detection intent. As shown below (Fig. 12), the OCSF attribute
cloud.account.uidis mapped into the Account ID Entity (Observable) from a VPC Flow Log table mapped against the Network Activity event class.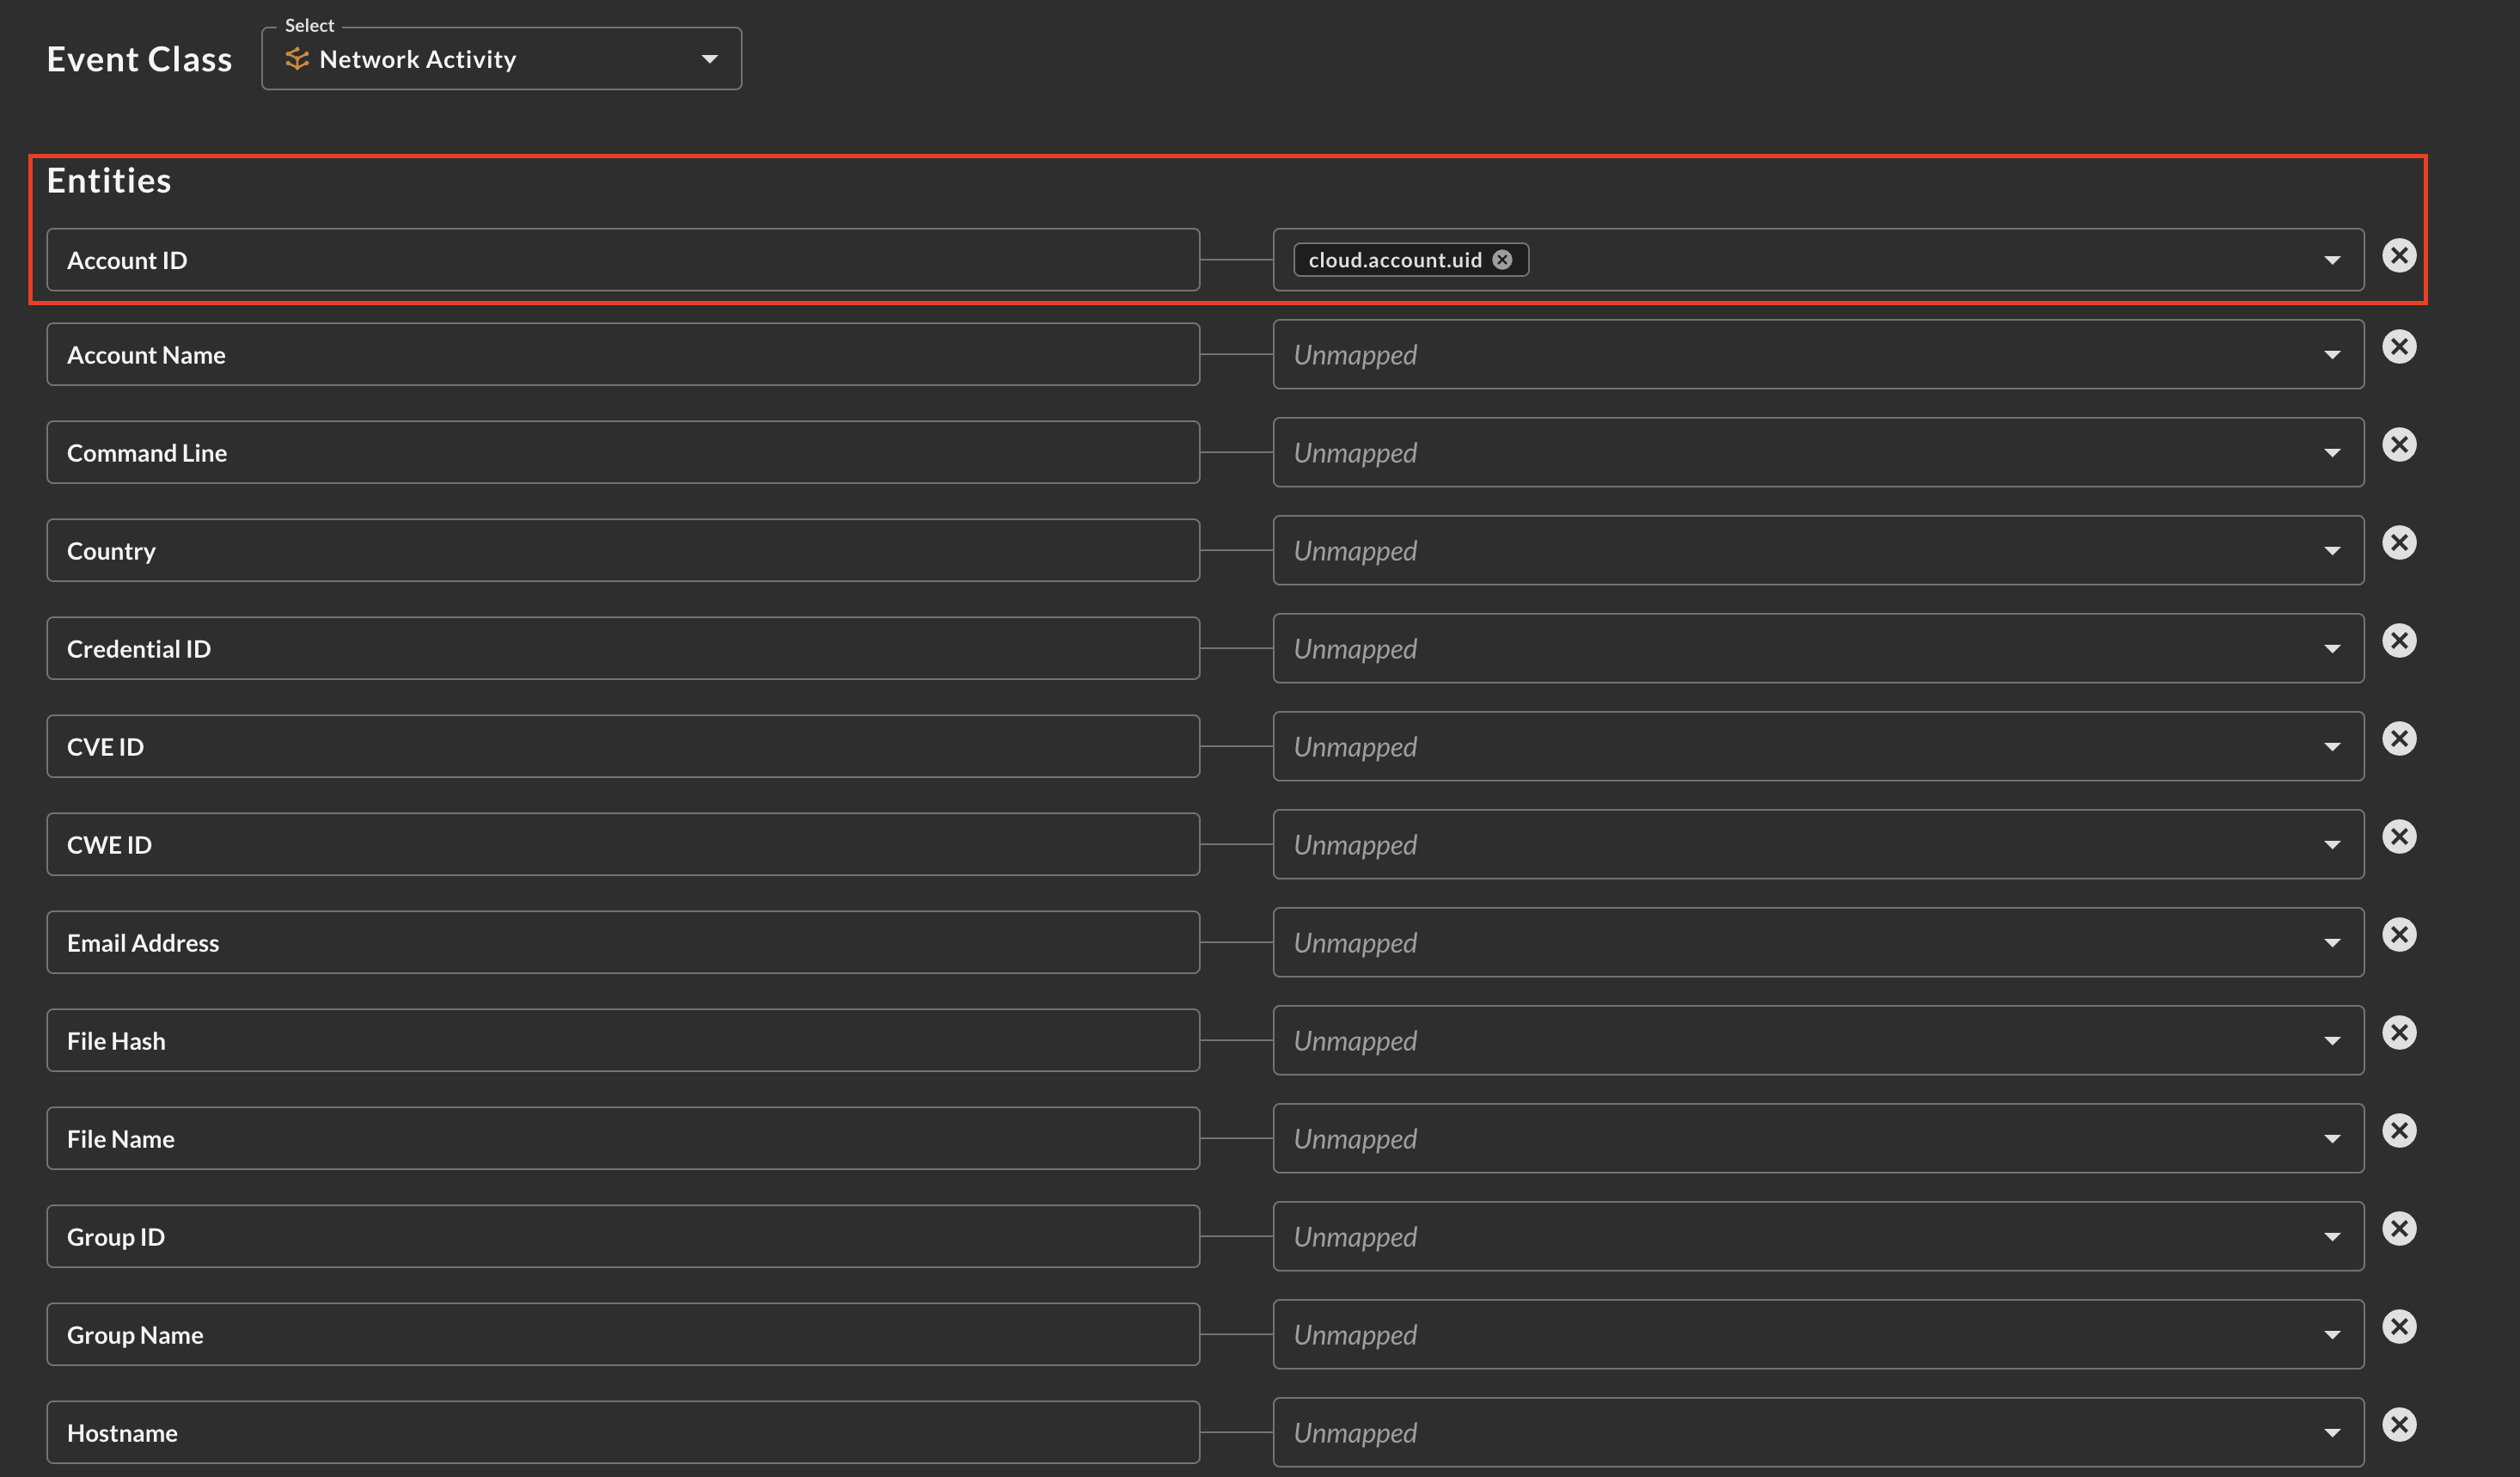
Fig. 12 - Mapping Entities (Observables) from your source data in Configure Schema
-
After finalizing your Entity mappings, scroll to the bottom and select Save.
You will now see the name of your particular Amazon Athena Connector added as a new Platform within the Query Search UI. The term"platform" is synonymous with "Connector" and "integration."
In the event that you have not achieved a successful Test Connection, refer to the Troubleshooting sub-section of Resources, below.
Querying Amazon Security Lake Connectors
Within the Query Search UI, all Connectors are enabled by default. To check that your specified Connector(s) for Amazon Security Lake are enabled, navigate to the Data Lakes and Data Warehouses dropdown and ensure that your specified Amazon Security Lake Connector(s) are are selected (denoted by a checkbox) before running your searches as shown below (Fig. 13).
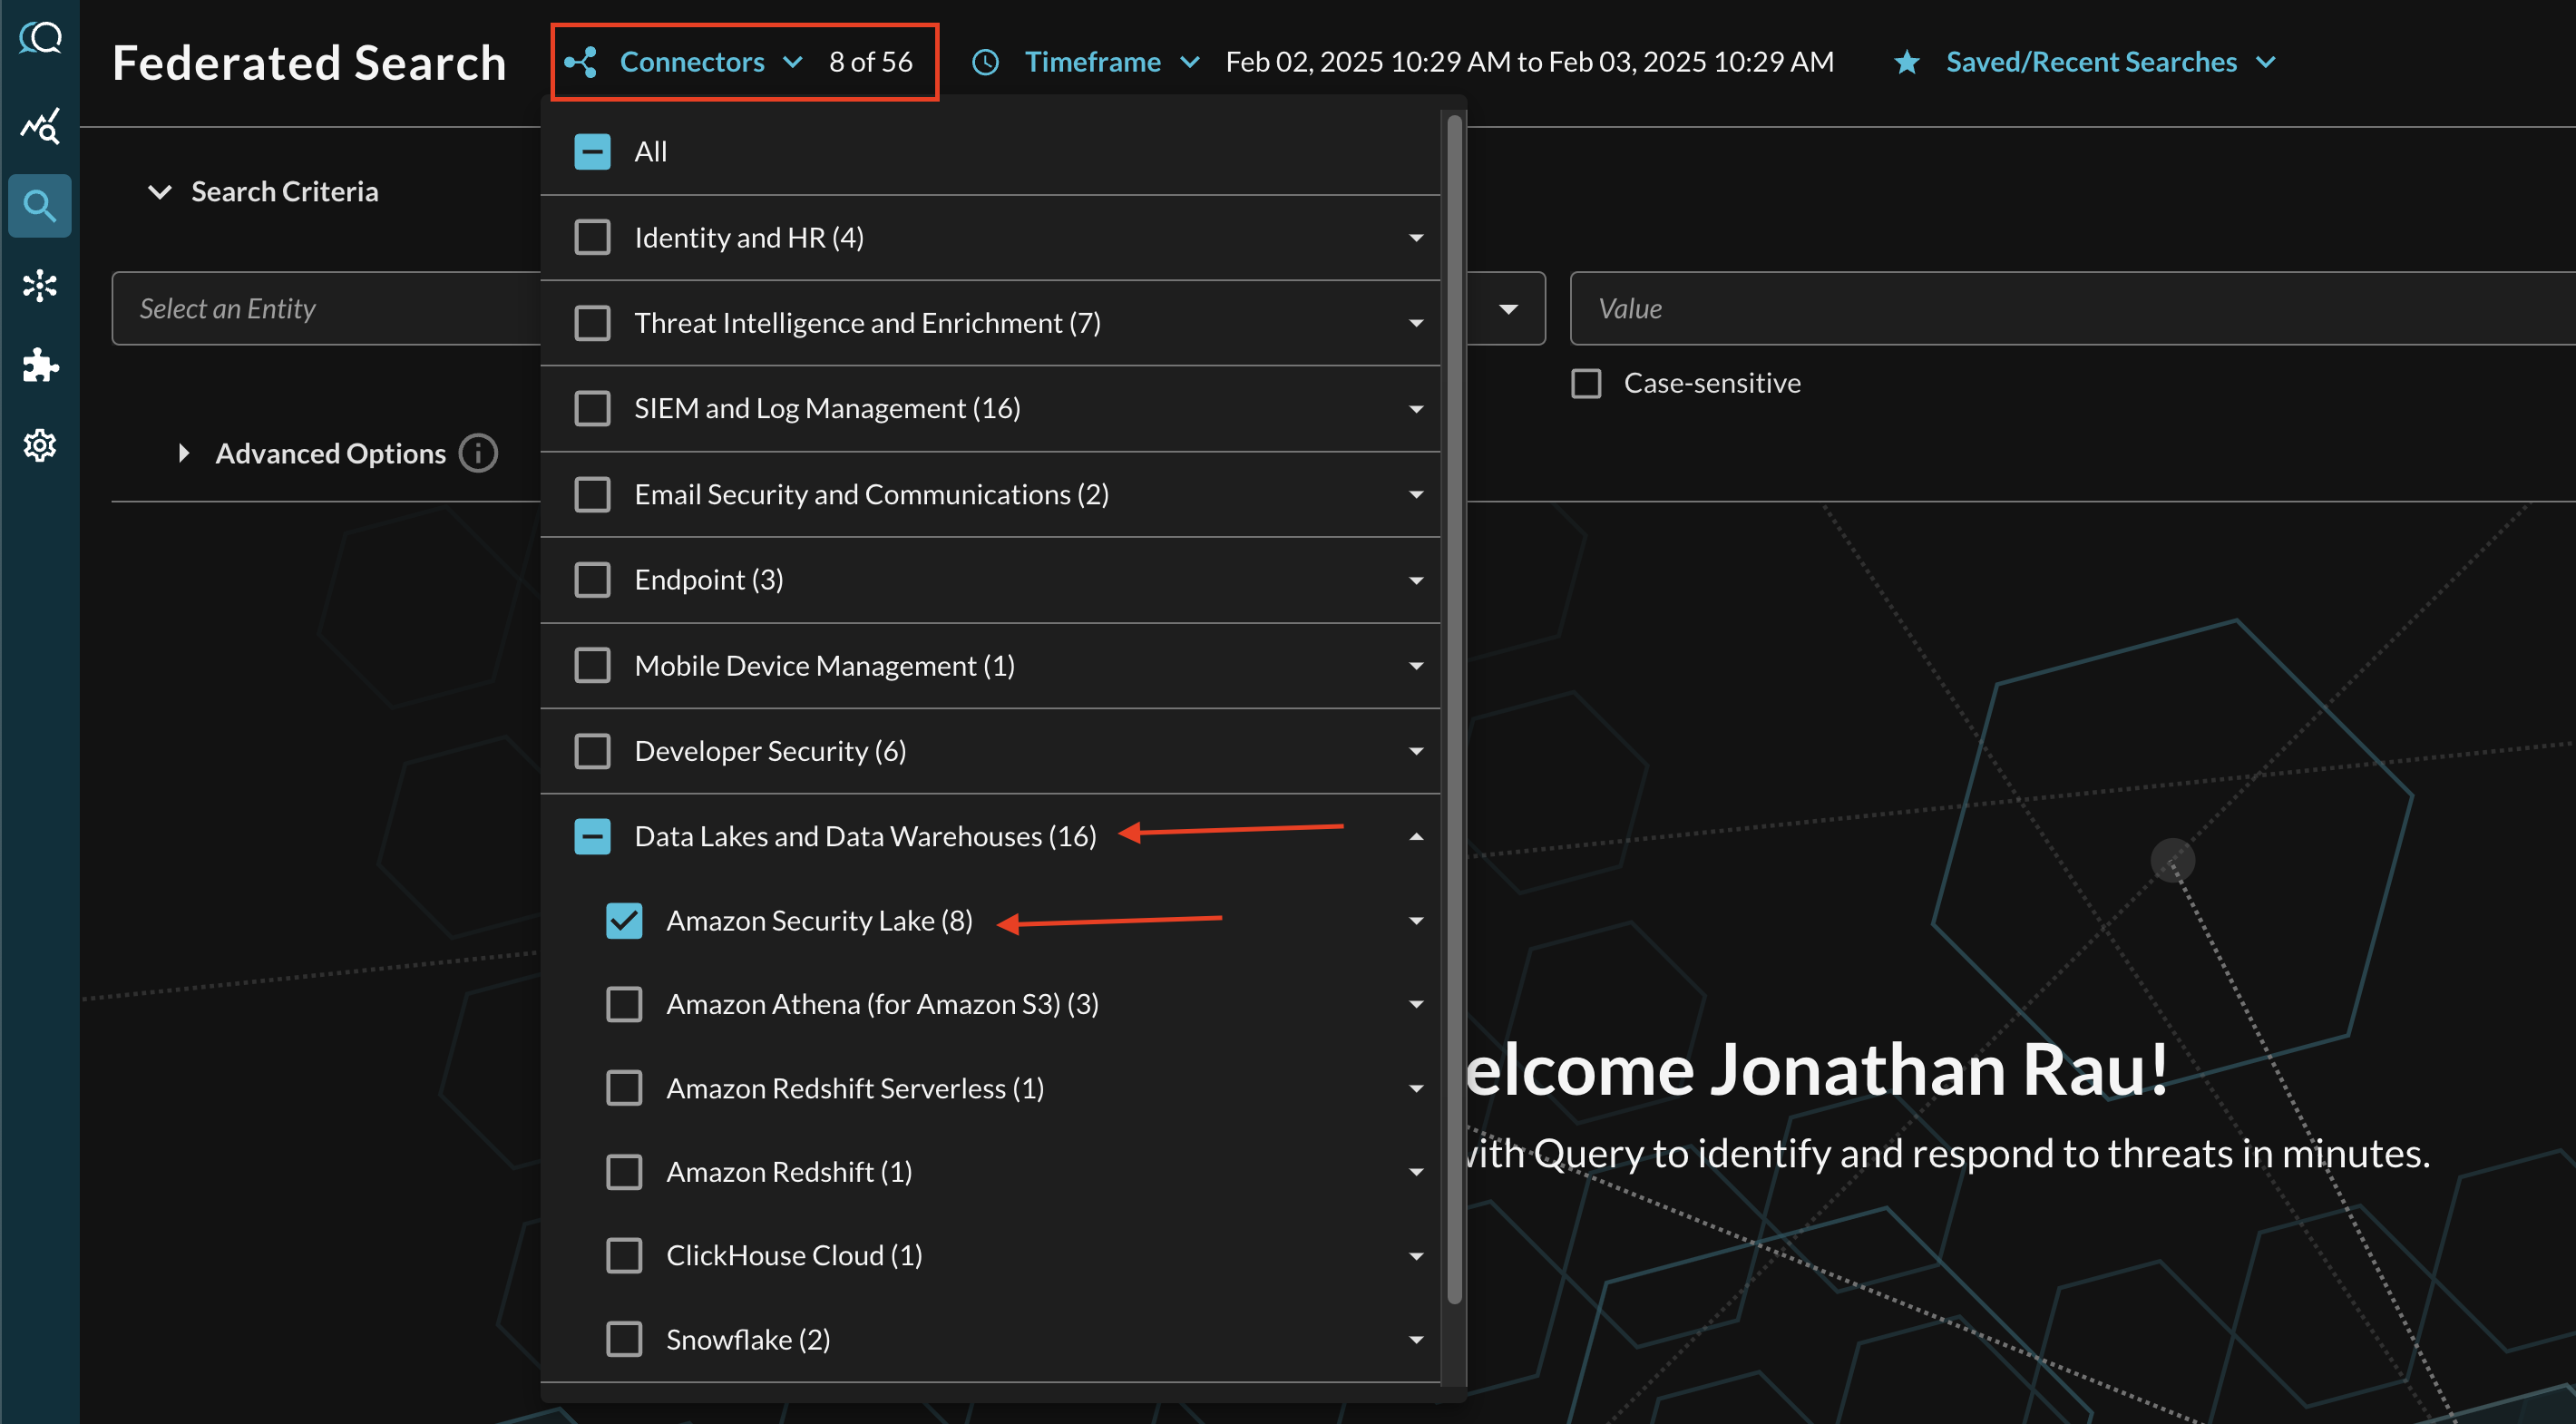
FIG. 13 - Selecting Amazon Security Lake Connectors
The Query Data Model is essentially 1:1 with the latest General Availability (GA) OCSF schema at any given time. This allows you to search for the same types of Observables, Events, and specific Attributes in QDM as there are in OCSF. For more information about this terminology, refer to the Normalization and the Query Data Model (QDM) section of the docs or check out our QDM Schema website. For some specific examples, see the following sections.
Entity-based Search
To conduct an Entity-based search, ensure that all of the data points you will be searching for are mapped within the Configure Schema wizard as demonstrated in the previous section. Query will not automatically map Event Classes nor Entities on your behalf, even for AWS-specific Sources.
In the Federated Search console, select the search dropdown, ensure the Entities radio button is selected and search for your desired Entity as shown below (Fig. 14). For instance, you can search for an IP Address that you mapped across your CloudTrail, Route53 DNS Query Resolver, and VPC Flow Logs, or you can search for specific Account IDs across all Security Lake logs.
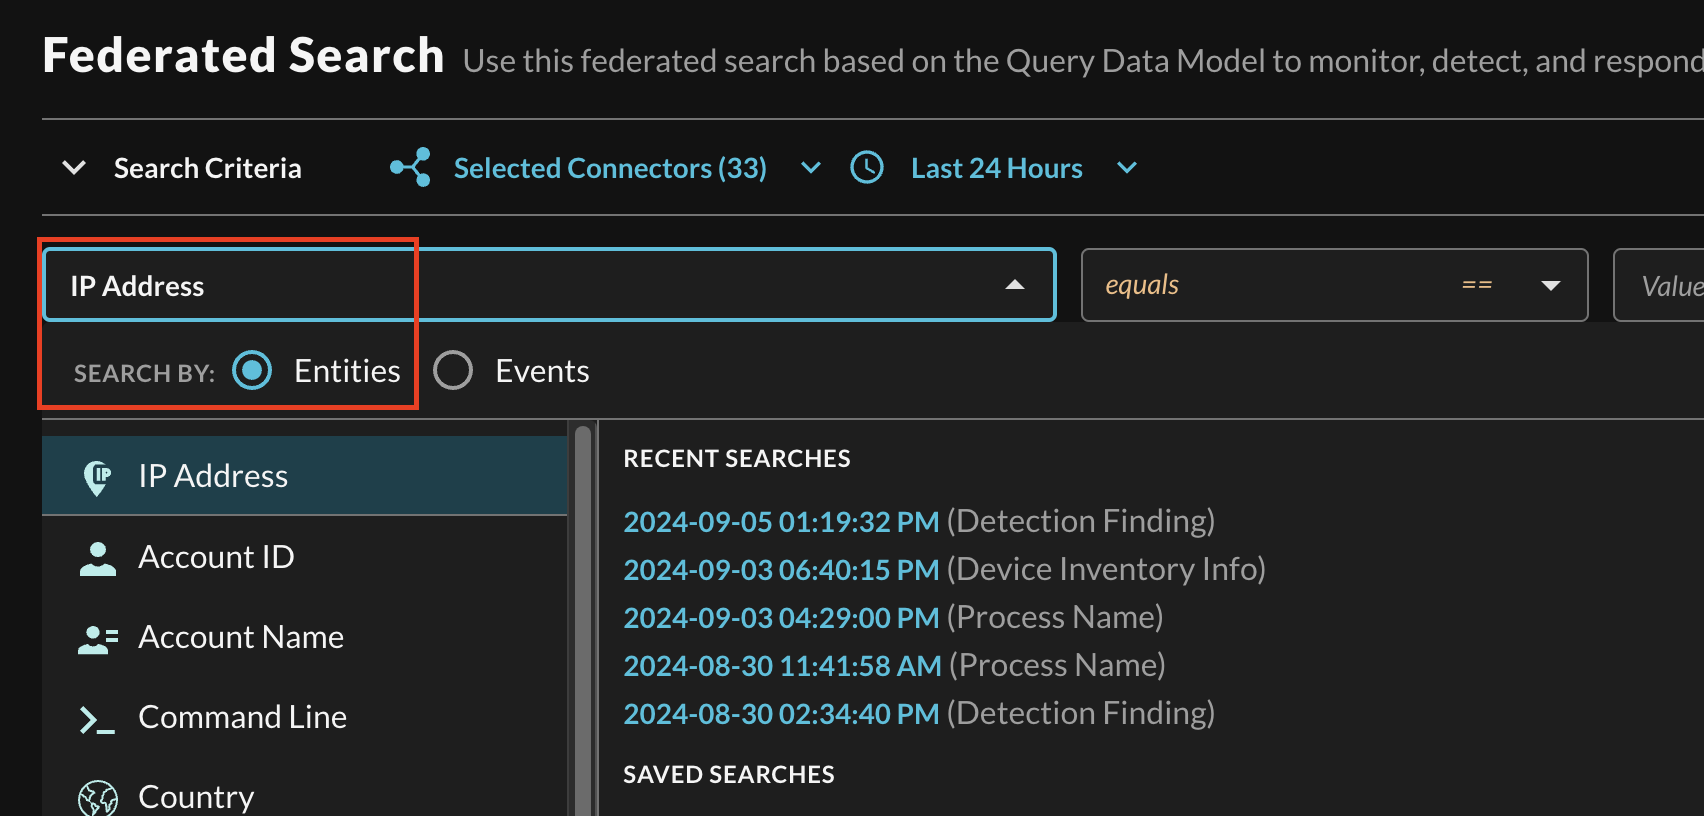
FIG 14. - Selecting a specific Entity from the search dropdown
After selecting an Entity, most allow you to specify an Operator. This allows you to perform simple equality searches or to perform more generalized searches using Contains, Starts With, or Ends With Operators. These more generic operators use the regexp_like() function within Amazon Athena's SQL syntax.
You can search for multiple values at once which are OR'ed within Athena but parallelized as an independent search per table without requiring the usage of expensive JOIN or UNION operations. Additionally, you can specify case-sensitivity for the entire search criteria. An example of a multi-value "Hostname contains" search is shown below (Fig. 15).

FIG. 15 - Orientation for Entity-based search in Query
Event-based Search
To conduct an Event-based search, ensure that all of the data points you will be searching for are mapped within the Configure Schema wizard as demonstrated in the previous section. Query will not automatically map Event Classes nor Entities on your behalf, even for AWS-specific Sources.
In the Federated Search console, select the search dropdown, ensure the Events radio button is selected and search for your desired Event as shown below (Fig. 16). For instance, you can search for all HTTP Activity for AWS WAFv2 Logs and a custom source such as Amazon Application Load Balancer access logs, or search for API Activity to retrieve events from both EKS Audit Logs and AWS CloudTrail tables at the same time. You can also use this to pull specific Events out of multi-event tables, such as AWS CloudTrail Management Events. Event-based search allows you to search for Authentication, Account Change, or API Activity specifically.
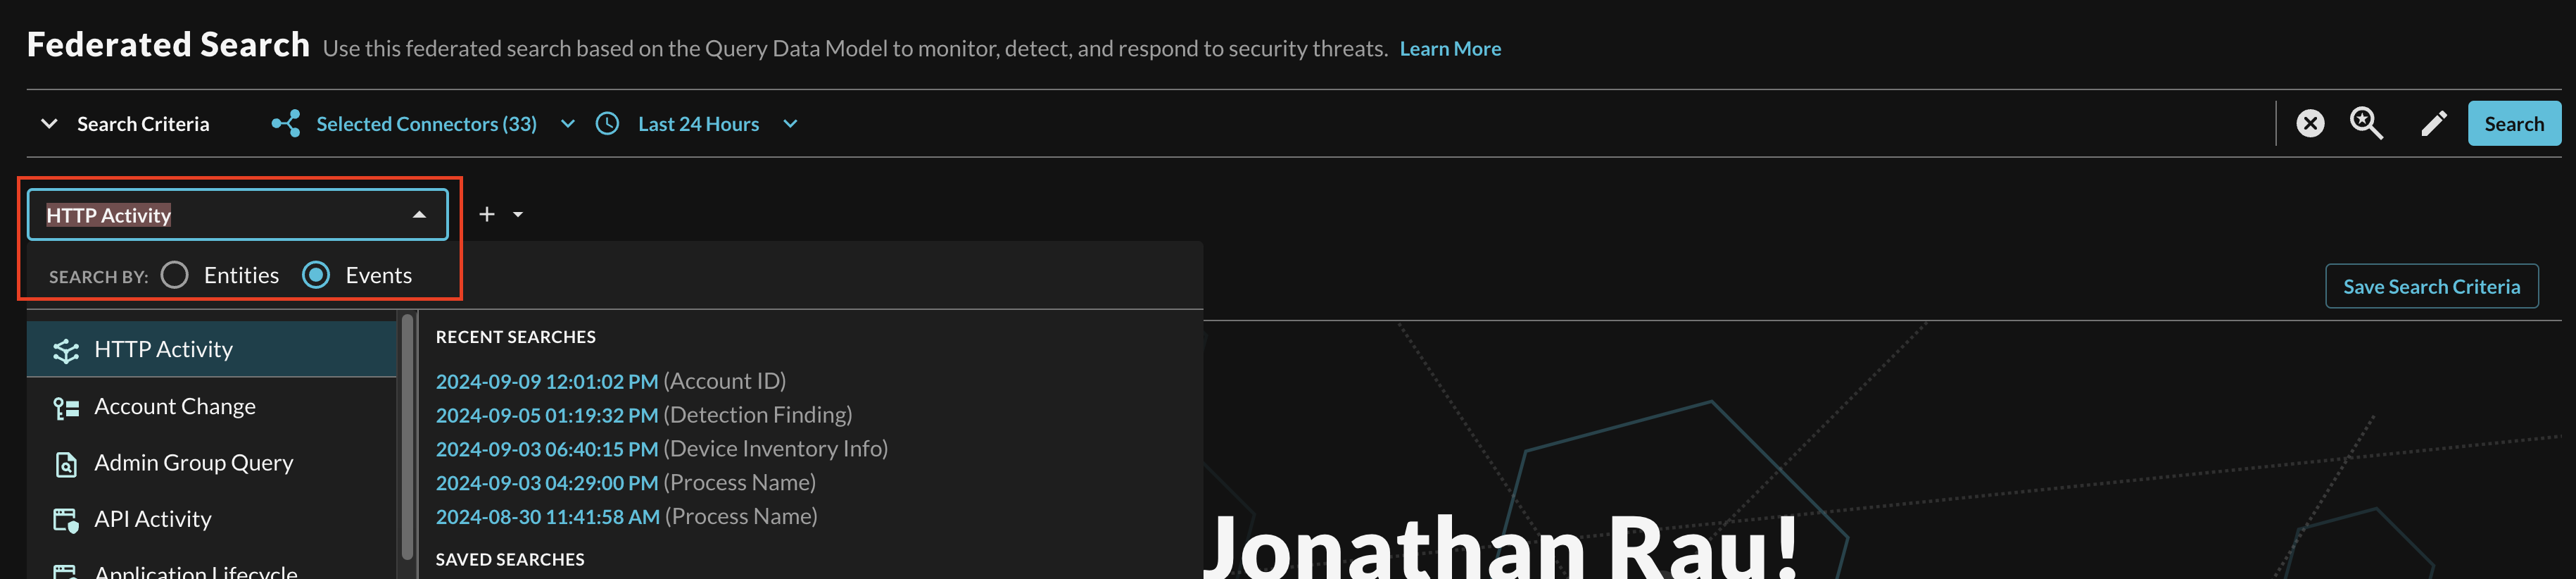
FIG. 16 - Selecting a specific Event from the search dropdown
Searching from the Event will pull a sample (several 1000) of all matching events from Connectors that are mapped to it. For more specific filtering within an Event, you can choose one or more conditions to refine a search. Selecting the plus-sign (+) dropdown next to the Event menu allows you to choose from any specific OCSF/QDM attribute in the event.
For instance, when searching for HTTP Activity events, you can specify a HTTP method or specific Referrers, or you can search within a URL query string as shown below (Fig. 17).
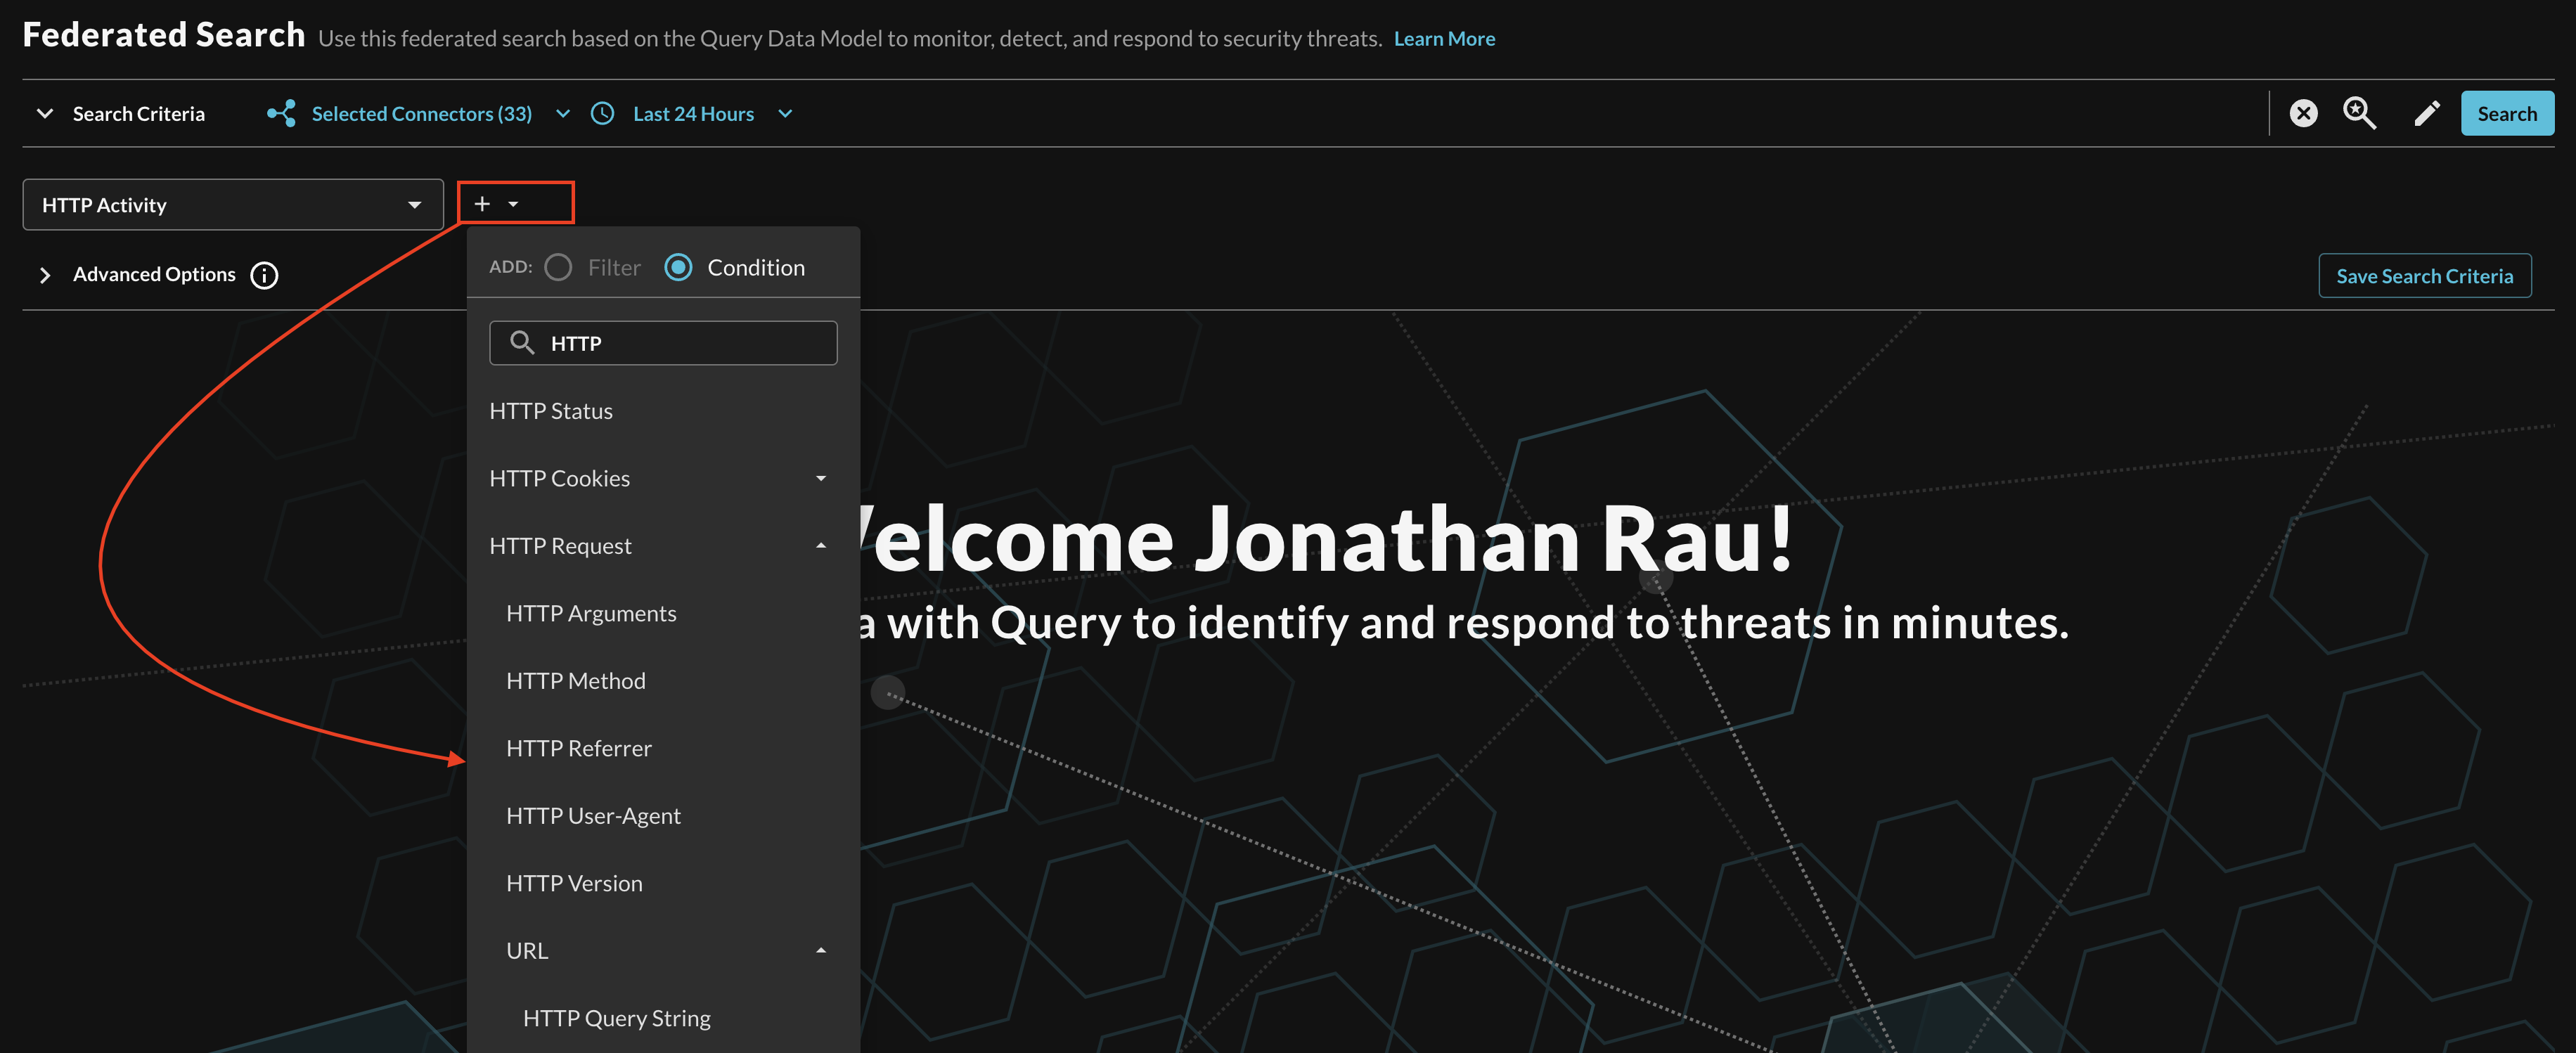
FIG. 17 - Adding Conditions to Event-based search
When adding two or more Conditions, you can further change the behavior by specifying ANY or ALL quantifiers over the filters for greater levels of specificity or more narrow-but-generalized searches, respectively, as shown below (Fig. 18).
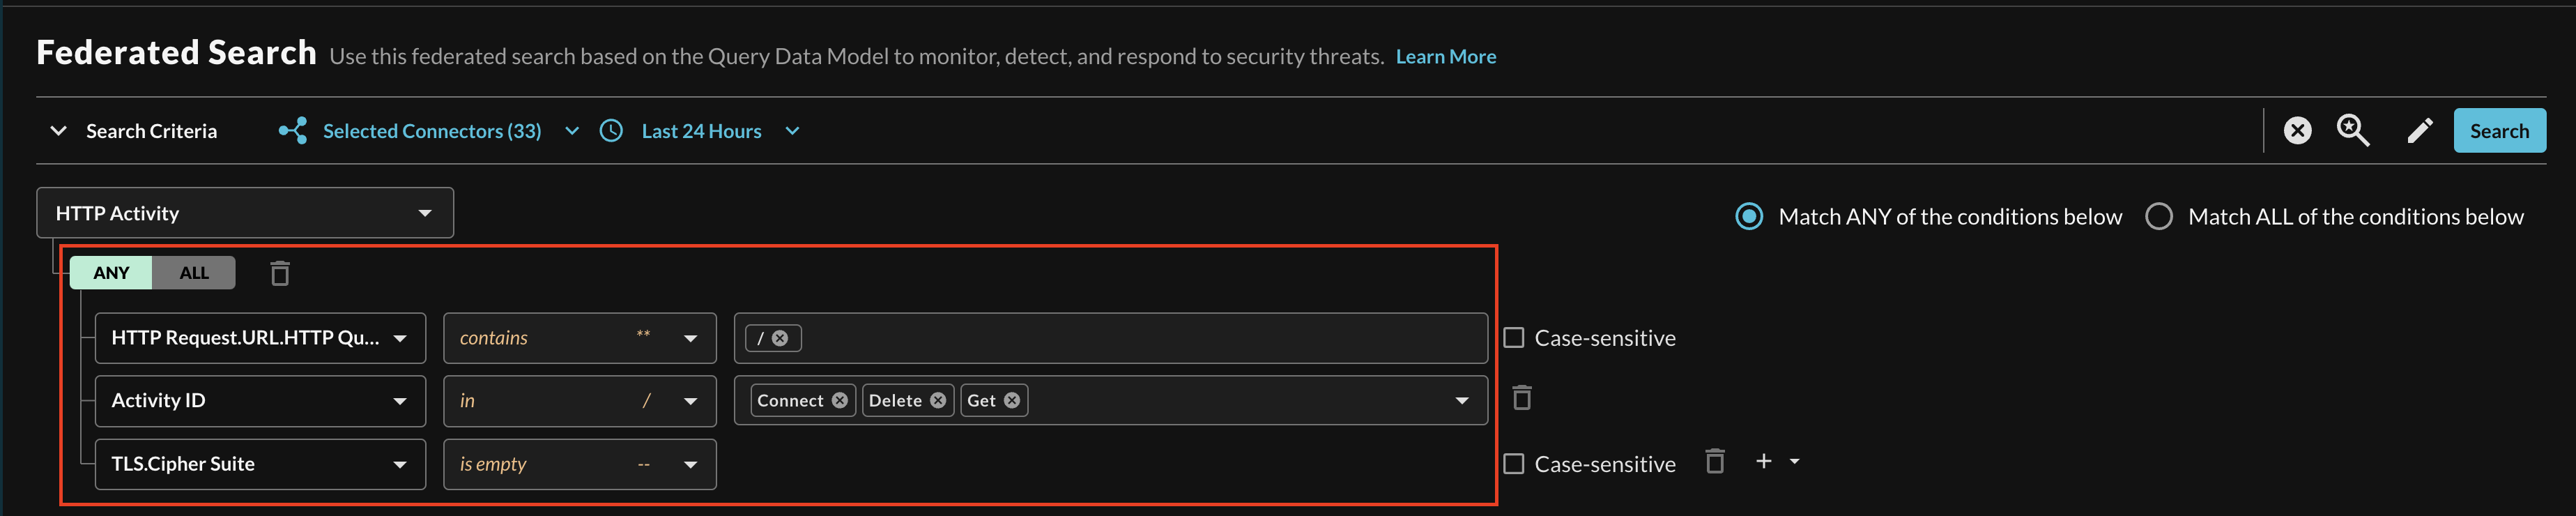
FIG. 18 - Multi-condition quantifier support for Event-based search
Resources
Refer to the previous sections' hyperlinks for more information on specific resources, services, tools and concepts. For further help with creating tables and performance tuning, consider some of the resources below.
- What is Amazon Security Lake?
- Managing multiple accounts with AWS Organizations
- Managing multiple Regions
- Managing query access for Security Lake subscribers
- Security Lake queries
- SQL reference for Athena
- Working with views
- Performance tuning in Athena
- Top 10 Performance Tuning Tips for Amazon Athena
Troubleshooting Tips
- If you recently changed your permissions / Role in Query, log out and in again and clear your cache if you cannot Save or Test Connection.
- Verify that you were able to create the IAM Policy and Role and that they successfully attached.
- Ensure that you picked the correct Event Class for the correct table. To verify the event classes for a specific Security Lake table, execute the following SQL statement, and replace the placeholder values:
SELECT DISTINCT class_name, class_uid FROM my_db.my_table - Ensure that Amazon Security Lake does not have reported Issues and that there is data in your AWS Glue Tables from Security Lake.
- Ensure that your Amazon Athena, Amazon S3, AWS KMS and Amazon Security Lake resources are all deployed in the same Region - despite Amazon S3 being a "global" resource - Athena and Security Lake do not respect this.
- Ensure that you entered the proper AWS Region for your Connector.
- Ensure that the Role Name you created matches the Role Name in your Connector
- Ensure that the AWS Account ID you entered in your Connector matches the AWS Account you have deployed Amazon Security Lake to, the Query Federated Search Platform does not use Subscriber Access.
- Ensure that other details such as the Glue Database, Glue Table, and the Amazon Security Lake S3 Bucket or Amazon Athena Results S3 Bucket names are correct and are aligned to the data source you're attempting to create.
- Verify that you gave the correct IAM Role Lake Formation
SELECTandDESCRIBEpermissions to the correct Database(s), Table(s) and/or Views. - Verify that you are not using an AWS KMS CMK for either your Amazon Security Lake S3 Bucket or Amazon Athena Results S3 Buckets. If you are, refer back to the previous sections to update your AWS IAM Policy and your KMS Key Policies.
- Verify that an S3 Bucket Policy was not added to your Bucket.
- Verify that the Objects in your given time range are present in S3. When setting up Security Lake, administrators can configure Lifecycle Policies to archive or delete objects.
- Verify that your Organization, Organizational Unit(s), and/or AWS Account does not have a Service Control Policy (SCP) blocking external principals from
sts:AssumeRoleor other IAM actions related to Athena, Glue, and/or S3.
If you have exhausted the above Troubleshooting list, please contact your designated Query Sales Engineer or Customer Success Manager. If you are using a free tenant, please contact Query Customer Success via the Support email in the Help section, or via Intercom within your tenant.
Updated 9 months ago