Amazon CloudWatch Logs (for AWS WAFv2)
Search AWS WAFv2 access logs stored in CloudWatch Logs Group
TL;DRTo integrate AWS WAFv2 access stored in Amazon CloudWatch Logs with Query:
- Identify AWS CloudWatch Logs Groups identifiers in the AWS Region and Account you wish to onboard
- Deploy an AWS IAM Role with External ID and permissions to use the Amazon CloudWatch Logs APIs
- Use Query Search to surface normalized data in your AWS WAFv2 logs based on IP Address, Resource ID, and User Agent (coming soon!)
Overview
AWS WAFv2 (Web Application Firewall Version 2) is a managed AWS service that protects web applications and Application Programming Interfaces (APIs) by monitoring HTTP and HTTPS requests to them and control access based on conditions such as forbidding certain paths, IP addresses, URI strings, payload sizes, headers, country of origin, and more. Users can take advantage of built-in CAPTCHA challenges, Bot Control, AWS Managed Rules (AMRs), and custom rules to protect web apps and APIs built-on and in-line of Amazon CloudFront, Amazon API Gateway REST APIs, Amazon ELBv2 Application Load Balancers, AWS AppSync GraphQL APIs, Amazon Cognito User Pools, AWS AppRunner Services, and AWS Verified Access instances.
From AWSv2, the Access Logs can be forwarded to Amazon S3 buckets (which Query supports!), to Amazon Kinesis Data Firehose (which can send to Splunk or Datadog, both of which Query supports!), and to Amazon CloudWatch Logs. Within CloudWatch Logs are Log Groups which make up a collection of Log Streams which are an appended sequence of logs from a source, with the Group applying retention, data loss protection and encryption settings. To query these logs effectively, analysts and engineers would use CloudWatch Log Insights which is an interactive query-language similar to Kusto Query Language (KQL) with wildcard and glob-like behaviors within it. As WAFv2 Access Logs is a static JSON schemata, it is well-suited for building search, analysis and detection use cases with CloudWatch Logs Insights, and that is the engine that powers the Query integration.
As of 12 FEB 2024, Query integrations with Amazon CloudWatch Logs (for AWS WAFv2) to surface details about IP Addresses (httpRequest.clientIp), Resource IDs (the protected resource httpSourceId which is typically an ARN and webaclId which is always an ARN despite the name), and coming soon we will have support for User Agent searches (httpRequest.headers[].name = User Agent OR User-Agent). This allows analysts to quickly search for the full and partial GUIDs and ARNs of protected resources and WAF WAFv2 Web ACLs, the IP Address of a connecting Client, or the User Agent if it's available. All of the keys are normalized to the Query Data Model, a derivative of the Open Cybersecurity Format (OCSF) data model, using the HTTP Activity Event Class which is modeled on OCSF's HTTP Activity from OCSF v1.0.0-rc2.
Prerequisites
The Query integration with AWS WAFv2 relies on CloudWatch Logs Insights, this is a regionally-bound service, so you can only use CloudWatch Log Groups in the same AWS Region and AWS Account per Connector you configure. There is no upper limit to how many Connectors you create if you had several CloudWatch Log Groups to connect.
If you do not have the AWS CLI installed and/or configured, refer here. Ensure you have permissions to create and modify IAM Roles and Policies.
iam:CreateRoleiam:CreatePolicyiam:AttachRolePolicy
Configure an Amazon CloudWatch Logs (for AWS WAFv2) Connector
Amazon CloudWatch Logs (for AWS WAFv2) Connectors within the Query Federated Search Platform are static schema platform configurations. Static schemas are platforms in which the Query team pre-configures the type of data normalization that happens, as noted, all AWS WAFv2 logs are normalized into the HTTP Activity QDM/OCSF Event Class which captures all of the relevant detail provided in the source log.
To enable connectivity into your AWS Account, the Query Federated Search platform uses AWS IAM Roles with a read-only, randomly generated UUID as the ExternalId per unique connector configured. This random ExternalId is generated after entering in all relevant details, so you will need to determine what you will name your AWS IAM Role ahead of time. As a matter of best practice, this mechanism is intended to create a single Policy, a Single Role, and to be used with a single Connector.
In the tasking order, you will:
- Provide required details to a selected Amazon CloudWatch Logs (for AWS WAFv2) Connector.
- Create an IAM Policy with the generated Identity Policy snippet
- Create an IAM Role with the generated Trust Policy snippet, attach the IAM Policy
Proceed to the next sections to learn how to activate an Amazon CloudWatch Logs (for AWS WAFv2) Connector and start searching.
Pre-configure an Amazon CloudWatch Logs (for AWS WAFv2) Connector
Use the following steps to create a new Query Federated Search Connector for Amazon CloudWatch Logs (for AWS WAFv2). You can create as many as you need, however, this is a regionally bound service so you can only group Log Groups within the same AWS Account and Region together.
- Navigate to the Connections page, select Add Connections, and select Amazon CloudWatch Logs (for AWS WAFv2) from the Cloud Infrastructure and Data Lakes category, optionally type "WAFv2" in the search bar as shown below (FIG. 1).
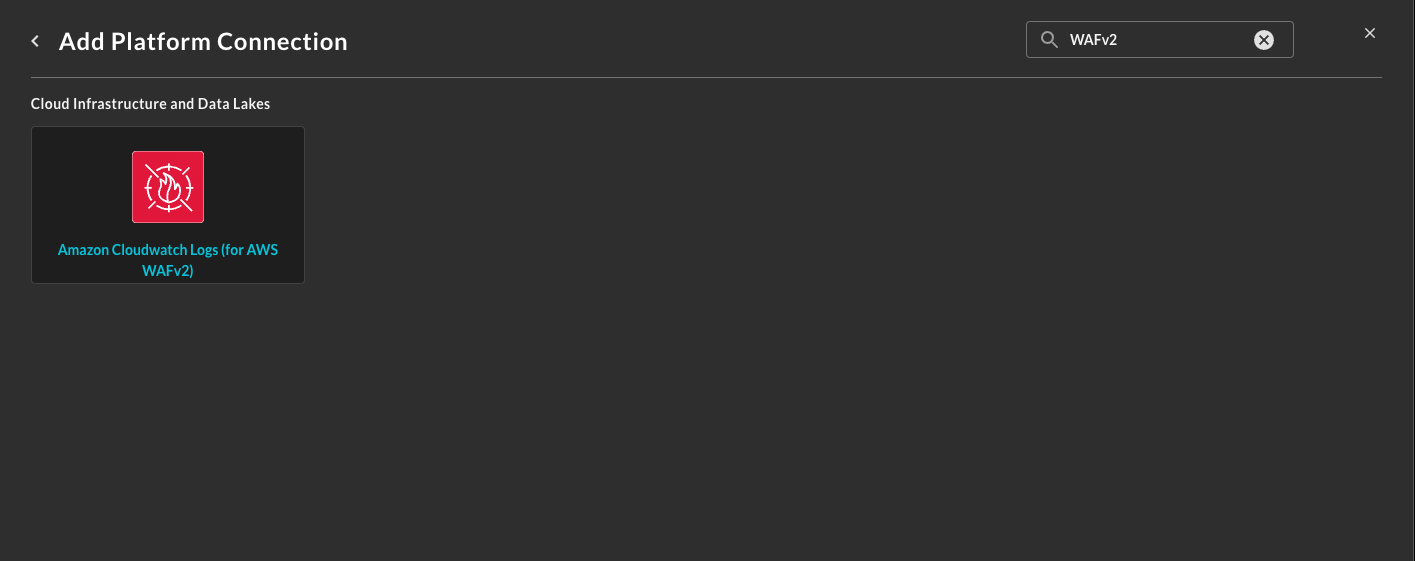
FIG 1 - Locating Amazon CloudWatch Logs (for AWS WAFv2) Connector
-
In the General tab, add the following details listed below and in the screenshot (FIG. 2) further down.
- Connection Alias Name: The human readable name for the Connector, you can set this to a business- or security-contextual naming convention for help disambiguating across several of the same type of Connector.
- External ID: This read-only value is auto-generated for you after saving the Connector. You will retrieve this value in the next step, ignore it for now.
- AWS Account ID: The AWS Account that contains the CloudWatch Log Group(s) that contain the AWS WAFv2 access logs you wish to onboard.
- AWS IAM Role Name: The name of an AWS IAM Role that you will delegated access to the Query Federated Search Platform from. You can change this value after creation.
- AWS Region: The AWS Region code (e.g.,
us-east-2,eu-central-1, etc.) that contains the CloudWatch Log Group(s) that contain the AWS WAFv2 access logs you wish to onboard. - CloudWatch Log Group IDs: A comma-separated list of CloudWatch Log Group(s) that you wish to search. These must all be in the same AWS Account and AWS Region that you have provided. You can enter up to 50 different Log Group IDs per Region per Account per Connector.
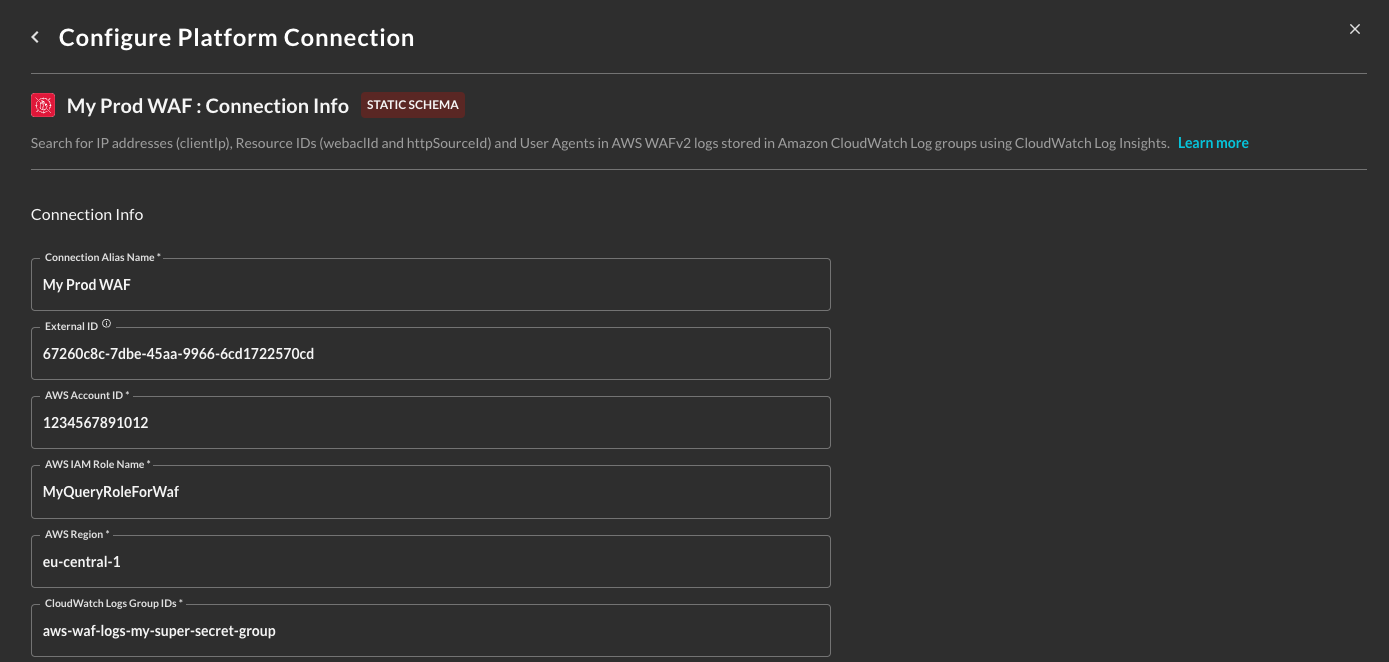
FIG. 2 - Configuring the Connector
-
Select Save at the bottom-right of the Connector card as shown below (FIG. 3). This ensures that all supplied information is saved and allows the Query backend to generate IAM Policy JSON snippets and an External ID unique to this Connector. NOTE After saving, the Connector card will automatically close, this is not a bug!
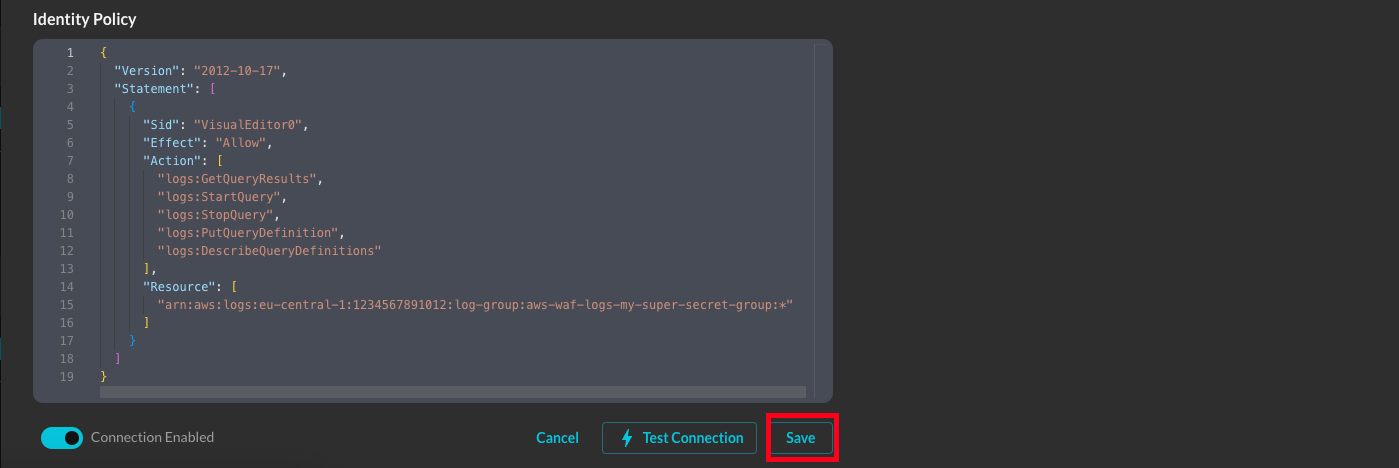
FIG. 3 - Save the Connector configuration
-
Open the Connector you just saved and scroll down to copy the AWS IAM policy snippets as shown below (FIG. 4). The Trust Policy is for your AWS IAM Role and the Identity Policy is for your AWS IAM Policy and then proceed to the next section of the documentation.
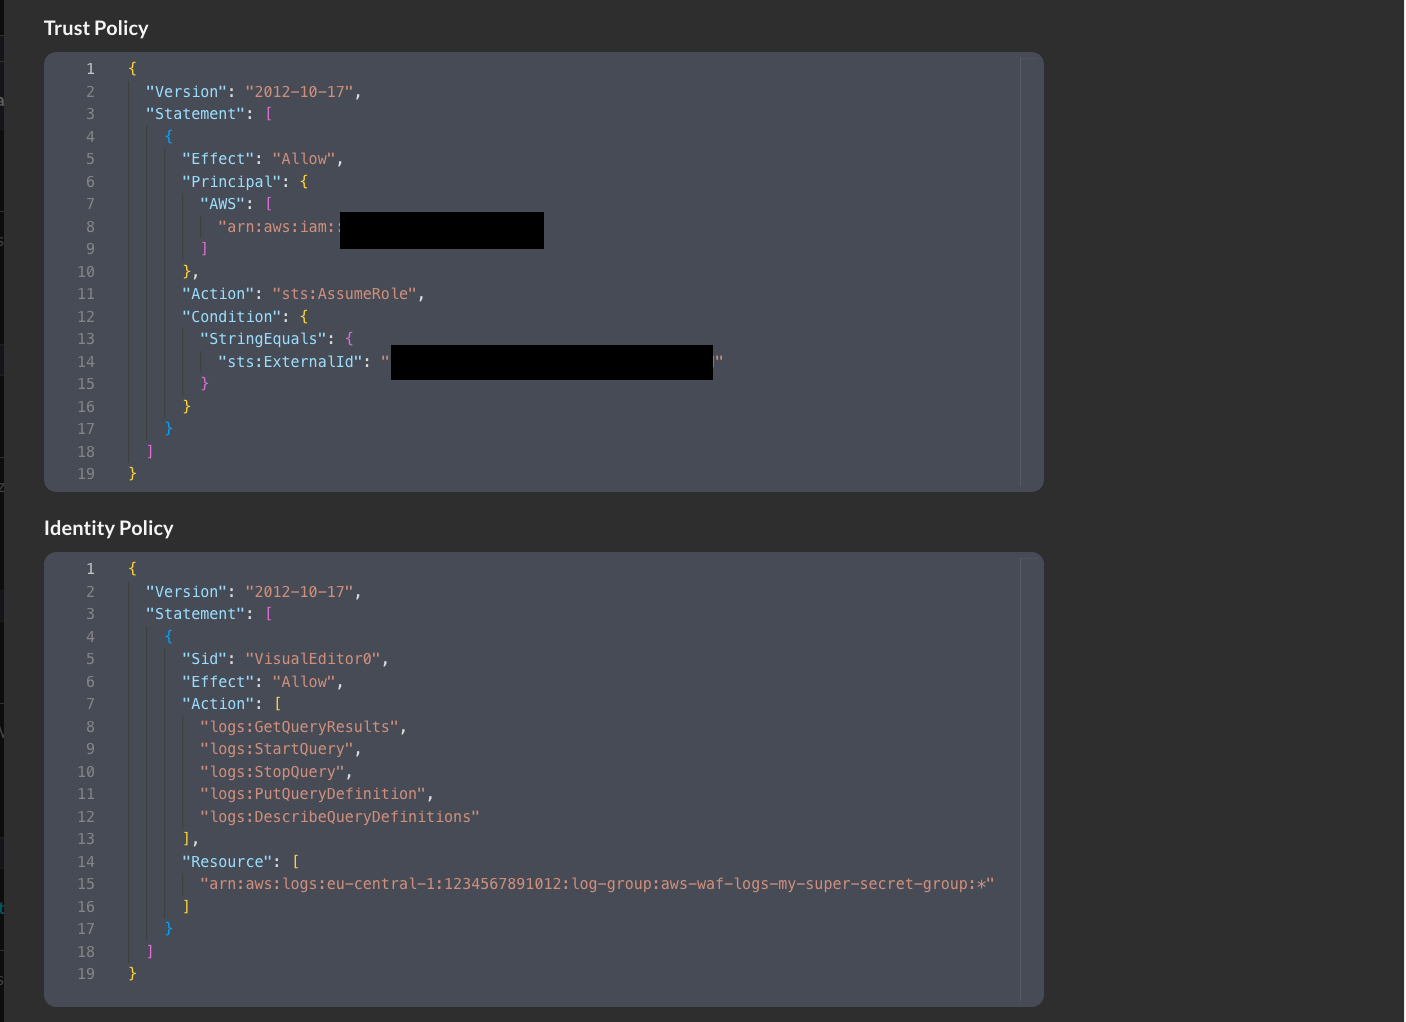
FIG. 4 - Copying the Trust Policy and Identity Policy snippets
Create AWS IAM Policy for the Amazon CloudWatch Logs (for AWS WAFv2) Connector
In this section you will use the supplied Identity Policy from the previous section to create an AWS IAM Policy to allows access to CloudWatch Logs.
If you are using an AWS Key Management Service (KMS) Customer Managed Key (CMK) to encrypt your CloudWatch Log groups ensure you add the following permissions to your policy:
kms:Decryptkms:GenerateDataKeykms:Encrypt
The following steps use an Amazon Linux 2023 AWS CloudShell environment and the AWS CLI, adapt these instructions to your specific operating system or deployment strategy (e.g., AWS CloudFormation, Terraform, AWS Console, etc.).
- Create an environment variable that contains the content of your Identity Policy as shown below, ensure you replace the section
{ "YOUR_POLICY_HERE }with your actual policy!
POLICY_JSON=$(cat <<EOF
{ "YOUR_POLICY_HERE }
EOF
)- Create the AWS IAM Policy with the following command, ensure you change the
--policy-namevalue for whatever name you wish to grant the policy.
aws iam create-policy \
    --policy-name "QueryFederatedSearchForCWLWAFPolicy" \
    --description "Grants the Query Federated Search Platform access to CloudWatch Logs resources" \
--policy-document "$POLICY_JSON"- (OPTIONAL STEP) if you use AWS KMS CMKs to encrypt the Amazon Athena query results and/or to encrypt the data within your Athena Target S3 Bucket, add the following policy into the created AWS IAM Policy using the AWS Console. Ensure you replace the values of
$AWS_REGION,$AWS_ACCOUNT_IDand$YOUR_KEY_ID_HEREwith your proper AWS Region, AWS Account ID, and KMS Key ID respectively.
{
	"Version": "2012-10-17",
	"Statement": [
		{
			"Sid": "kmsPermissions",
			"Effect": "Allow",
			"Action": [
				"kms:Decrypt",
				"kms:Encrypt",
				"kms:GenerateDataKey"
			],
			"Resource": "arn:aws:kms:$AWS_REGION:$AWS_ACCOUNT_ID:key/$YOUR_KEY_ID_HERE"
		}
	]
}
In the next section you will create an AWS IAM Role, attach this Policy to it, and optionally modify you AWS KMS Key Policy if you use a KMS CMK. Ensure you copy the value of the IAM Policy ARN as you will need it in the next section!
Create AWS IAM Role & attach IAM Policy
In this section you will use the supplied Trust Policy from the previous section to create an AWS IAM Role which trusts the Query Production Account and delegates access to your CloudWatch Logs resources. The ExternalId that is generated is to prevent a Confused Deputy flaw within the role assumption logic, however, this can be cumbersome to maintain multiple specific IAM Roles per-Connector despite it being a best practice. To that end, if this matches with your own internal identity governance (and other) requirements, you can specify multiple ExternalId entires in one IAM Trust Policy.
{
  "Version": "2012-10-17",
  "Statement": [
    {
      "Effect": "Allow",
      "Principal": {
        "AWS": [
          "arn:aws:iam::822484525064:root"
        ]
      },
      "Action": "sts:AssumeRole",
      "Condition": {
        "StringEquals": {
          "sts:ExternalId": [
            "foo",
            "bar",
            "69420",
            "vampirevampire"
            ]
        }
      }
    }
  ]
}
If you encrypt your data in S3 using AWS KMS Customer Managed Keys (CMKs) and/or encrypt your Amazon Athena query results, you must also add the following permissions to your AWS KMS Key Policy and trust the Principal (the IAM Role) you will create.
If you are using an AWS Key Management Service (KMS) Customer Managed Key (CMK) to encrypt your CloudWatch Log groups you must also add the following permissions to your AWS KMS Key Policy and trust the Principal (the IAM Role) you will create.
kms:Decryptkms:GenerateDataKeykms:Encrypt
The following steps use an Amazon Linux 2023 AWS CloudShell environment and the AWS CLI, adapt these instructions to your specific operating system or deployment strategy (e.g., AWS CloudFormation, Terraform, AWS Console, etc.).
- Create an environment variable that contains the content of your Trust Policy as shown below, ensure you replace the section
{ "YOUR_TRUST_POLICY_HERE }with your actual policy!
TRUST_POLICY_JSON=$(cat <<EOF
{ "YOUR_TRUST_POLICY_HERE }
EOF
)- Create the AWS IAM Role with the following command, ensure you change the
--role-namevalue for whatever name you pre-configured the Connector with, you can change the name in the Connector but not the AWS IAM Role!
aws iam create-role \
    --role-name "QueryFederatedSearchForCWLWAF" \
    --description "Delegates access to CloudWatch Logs to the Query Federated Search Platform" \
--assume-role-policy-document "$TRUST_POLICY_JSON"- Attach the IAM Policy you created in the previous section with your IAM Role with the following command, ensure you replace the values for
--role-nameand--policy-arnfor your actual values - the Policy ARN placeholder for$AWS_ACCOUNT_IDshould have your proper AWS Account ID.
aws iam attach-role-policy \
    --role-name "QueryFederatedSearchForCWLWAF" \
--policy-arn "arn:aws:iam::$AWS_ACCOUNT_ID:policy/QueryFederatedSearchForCWLWAFPolicy"- (OPTIONAL STEP) if you use AWS KMS CMKs to encrypt the Amazon Athena query results and/or to encrypt the data within your Athena S3 Bucket you must add the following Statement to your AWS KMS Key Policy. Replace
$AWS_ACCOUNT_IDand$ROLE_NAMEwith your AWS Account ID and the created IAM Role name, respectively.
{
    "Sid": "queryFederatedSearchPermissions",
    "Effect": "Allow",
    "Principal": {
        "AWS": "${IAMRoleArn}"
    },
    "Action": [
        "kms:Decrypt",
        "kms:Encrypt",
        "kms:GenerateDataKey"
    ],
    "Resource": "arn:aws:iam::$AWS_ACCOUNT_ID:role/$ROLE_NAME"
}
In the next section you will finalize configuring your Connector.
Finalize configuring your Amazon CloudWatch Logs (for AWS WAFv2) Connector
In this section you will verify all of your permissions, test that the connection works, and enable it so that you can dispatch searches to Amazon CloudWatch Logs (for AWS WAFv2) from the Query Federated Search Platform.
-
Back in the Connections page, select the Connector you configured and select Test Connection below the IAM policy snippets, as shown below (FIG. 5). You should receive the following message:
The connection was tested successfully.
FIG. 5 - Enable and Test Connection
-
Ensure that the Connector is still enabled by toggling the Connection Enabled slider (also shown in FIG. 5) to the right-hand position, though, this should not become disabled during the previous steps.
In the event that you have not achieved a successful Test Connection, refer to the Troubleshooting sub-section of Resources, below.
Querying the Amazon CloudWatch Logs (for AWS WAFv2) Connector
Within the Query Search UI, all Platforms (A.K.A Connectors) are enabled by default, to check that Amazon CloudWatch Logs (for AWS WAFv2) is enabled, navigate to the Cloud Infrastructure and Data Lakes section of the Platforms dropdown and ensure that Amazon CloudWatch Logs (for AWS WAFv2) is selected (denoted by a checkbox) before running your searches as shown below (FIG. 6). If you configured multiple Connectors their actual Platform Connection Name will appear in another sub-section.
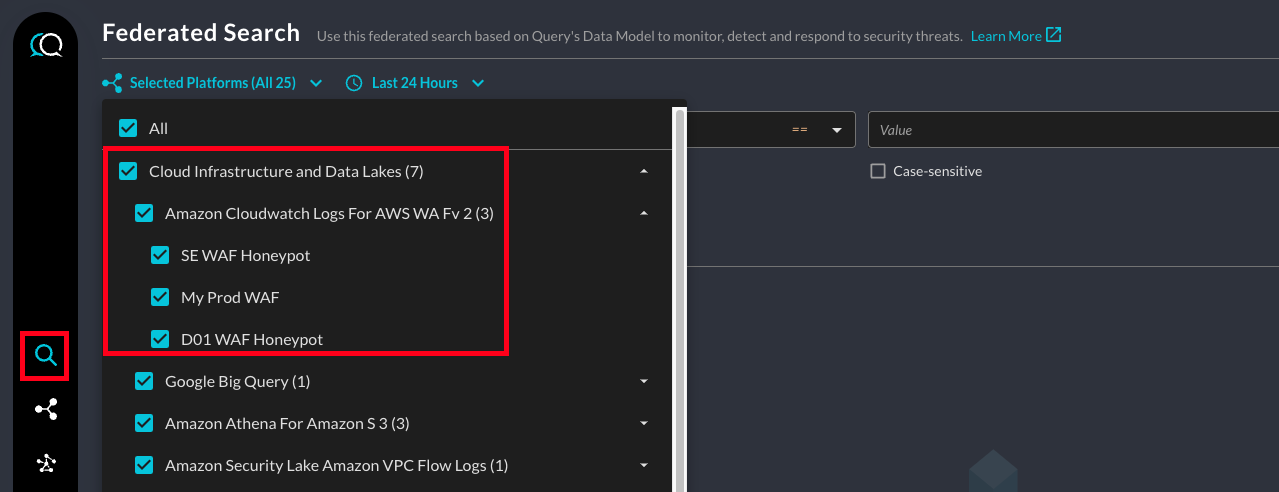
FIG. 6 - Ensure Platform Connectors are selected for search
The following Entities, Events and Objects are supported by Query for those data points. For more information about this terminology, refer to the Normalization and the Query Data Model (QDM) section of the docs or check out our QDM Schema website.
Entities
- IP Address - mapped to
httpRequest.clientIpin the WAF Log - Resource ID - mapped to
httpSourceIdandwebaclIdin the WAF Log.httpSourceIdis an ARN or Canonical ID of a protected WAF resource,webaclIdis the ARN of the WAF. - Hostname - mapped to
httpRequest.headers[].name = Host OR host or Hostname) in the WAF log. This can be resolved to an IP address, a subdomain, a domain, the hostname of an ALB or CloudFront (or other protected resource), the hostname of an EC2 instance, or not be present at all. - coming soon! User Agent - mapped to
httpRequest.headers[].name = User Agent OR User-Agentin the WAF Log
Events
- HTTP Activity
Objects
src_endpointhttp_requesturlcloudtrafficdevice
Resources
Refer to the previous sections' hyperlinks for more information on specific resources, services, tools and concepts. For further help with creating tables and performance tuning, consider some of the resources below.
Troubleshooting Tips
- If you recently changed your permissions / Role in Query, log out and in again and clear your cache if you cannot Save or Test Connection.
- Verify that you were able to create the IAM Policy and Role and that they successfully attached.
- Ensure you added the proper KMS permissions to both your IAM Policy and the KMS Key Policy if you use KMS CMKs to encrypt your Log Groups
- Ensure that the Log Group ARNs in your Policy were not malformed or retained placeholder values
- If you tested the connection right after creating the role, wait a few seconds for the permissions to propagate to your AWS Account
- Ensure that you entered the proper AWS Region for your Connector.
- Ensure that the Role Name you created matches the Role Name in your Connector
- Verify that your Organization, Organizational Unit(s), and/or AWS Account does not have a Service Control Policy (SCP) blocking external principals from
sts:AssumeRoleor other IAM actions related to CloudWatch Logs.
If you have exhausted the above Troubleshooting list, please contact your designated Query Sales Engineer or Customer Success Manager. If you are using a free tenant please contact Query Customer Success via the Support email in the Help section or via Intercom within your tenant.
Updated 8 months ago