Configure Schema (classic)
Learn how to use Query's no-code introspection and data mapping utility
NOTEQuery is currently designing next version of the configure schema feature that will enable faster mapping of source data by introducing pre-built mapping templates, suggested mappings via Query CoPilot, and an updated UI. Reach out to [email protected] if you would like to participate as a design partner.
Background
Within the Query Federated Search platform there are two classifications of Connectors. There are what are called "static schemas" which are pre-built integrations into upstream data sources such as Endpoint Detection & Response (EDR) tools such as SentinelOne Singularity Platform or Crowdstrike Falcon or Identity Providers (IdPs) such as Okta or Azure Entra ID. You cannot modify these types of Connectors as they are purpose-built to cover specific data of interest to support specific jobs to be done by analysts, hunters, and other security professionals.
Next are what is called a "dynamic schema" platform in which the Query Federated Search Connector provides an interface and translation layer into that platforms own query and search capabilities where the schema is, well, dynamic. This can be data within a Splunk Enterprise Security (ES) index or data stored within an Amazon Simple Storage Service (S3) bucket that you have onboarded into AWS Glue Data Catalog. In these cases users must map their data into the Query Data Model to surface specific Events and Objects, as well as specific Entities from which to search and the Connector itself will translate, optimize, plan, execute and return the results.
Overview
Configure Schema is a no-code data mapping workflow service available for any Dynamic Schema platform within the Query Federated Search Platform. Configure Schema allows you to automatically introspect the schema of a target source (e.g., a table, view, index, or otherwise), auto-discover time-based partitioning (or related functionality), preview the source data, and map it into the Query Data Model (QDM). For users without an inherent familiarity of the QDM are guided through the necessary steps to complete the mapping.
To identify the platform connectors with support for Configure Schema, refer to the Dynamic Schema badge given to each of those connectors as shown in the screenshot below (FIG. 1).

FIG. 1 - A Platform Connector with the Dynamic Schema badge
Configure Schema allows you to create a single mapping per target source to either an Event Class (e.g., Process Activity, Security Findings, HTTP Activity, etc.) or an Object (e.g., user, device, network_endpoint). If you have data that can be mapped against different Event Classes or Objects you must create another connector. As of 15 FEB 2024, the auto-discovery and employment of partitions is completely automated and the logic varies platform-to-platform.
For instance, if you onboard an Amazon S3 (via Amazon Athena) connector for data stored in S3 and cataloged by AWS Glue Data Catalog, if you use any Hive-compliant partitions for your table or view (e.g., year, month, day, and/or hour) the Query Federated Search Platform will make use the relevant partition(s) when dispatching a query based on time. Similar behavior for Google BigQuery and Apache Iceberg table formats is also employed, and Query will attempt to maximize utilization of any query performance optimization mechanism available to the specific platform connector.
Additionally, Configure Schema also supports complex data types within source systems such as struct types within AWS Glue, records or json in BigQuery, and similar constructs. As of 15 FEB 2024 Configure Schema does not have support for any array or list types such as AWS Glue arrays or BigQuery records which have nested elements. Limited support is available where there is only a single index element in the index, this differs from platform to platform. These nested data is presented as a dot-notation within the workflow.
Finally, as of 15 FEB 2024 Configure Schema does not yet support available transformers from the legacy JSON schema mapping system such as join, split, b64encode, and similar. This is a future planned feature for mapping.
Limitations & Constraints
This section summarizes known limitations, bugs, and constraints for Configure schema.
- SQL-based dynamic schema platforms (e.g., Amazon Athena, Google BigQuery, Snowflake, etc.) require the usage of the following time-based fields.
- ISO-8061 timestamp
string- e.g., 2024-02-21T09:53:40.406-05:00 - SQL
timestamp(3)- e.g., 2024-01-11 13:57:14.000 - SQL
timestamp(6)- e.g., 2024-02-23 17:47:19.900000 - Epoch seconds
bigint- e.g., 1708527749
- ISO-8061 timestamp
- Mapping to and from
arraytypes (e.g., Python lists) is not supported at this time. - SQL-based dynamic schema platforms (e.g., Amazon Athena, Google BigQuery, Snowflake, etc.) require field names within tables, views, and materialized views to be
snake_case
Getting Started
To get started with Configure Schema you must first provide all required credentials and connection information to your preferred platform connector and be able to successfully test the connection. For more information, refer to the specific Integrations' documentation on the required credential and information requirements. For the purpose of this tutorial, GCP BigQuery is used, however the Configure Schema workflow looks the same for all Dynamic Schema platforms.
If you have not properly configured your credentials and connectivity information, you will be presented with the warning: Your Connection Info must be saved before you can fetch a preview as shown in the screenshot below (FIG. 2).
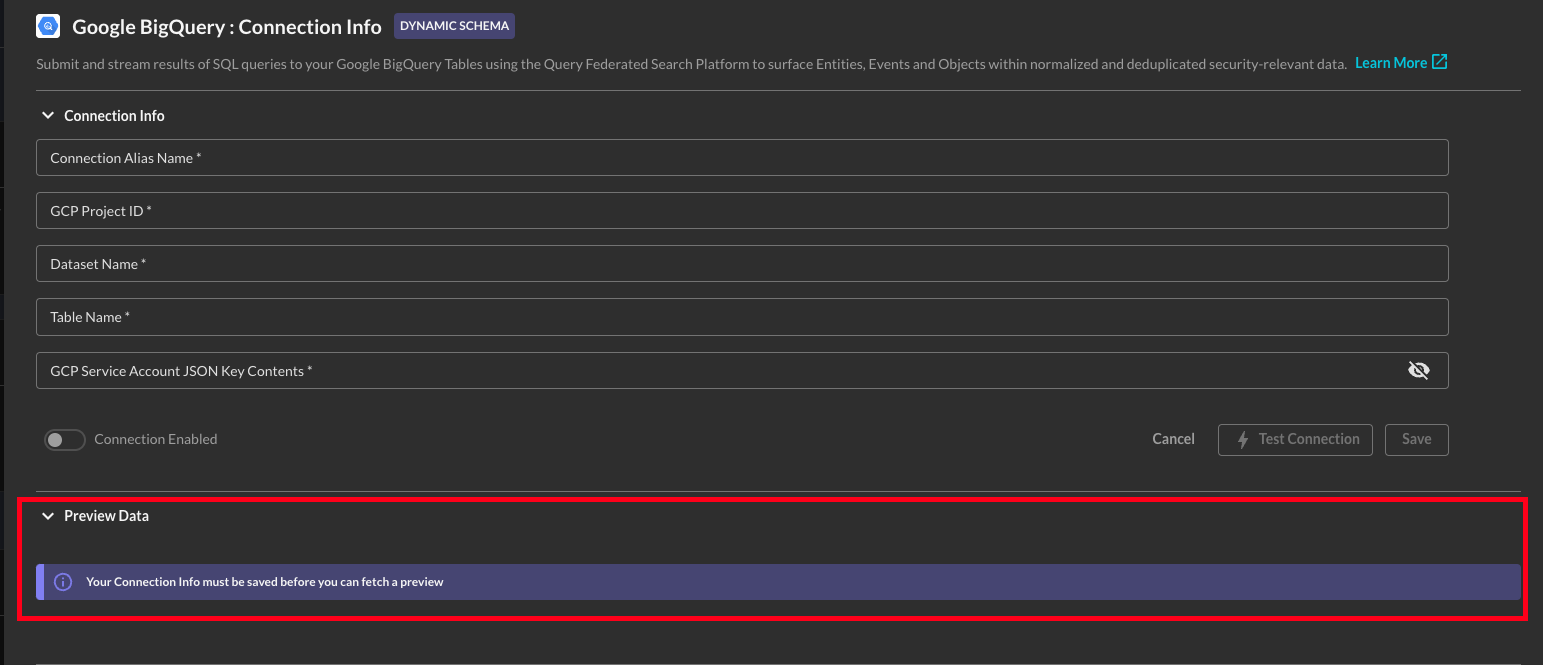
FIG. 2 - Preview Data warning for improperly configure platform connector credentials
Preview Data
The Preview Data pane is where Query performs schema introspection and partition (or similar) information auto-discovery. For your first run you will be presented with a Fetch Sample button as shown below (FIG. 3), select this option and wait momentarily while the introspection and fetching occurs.
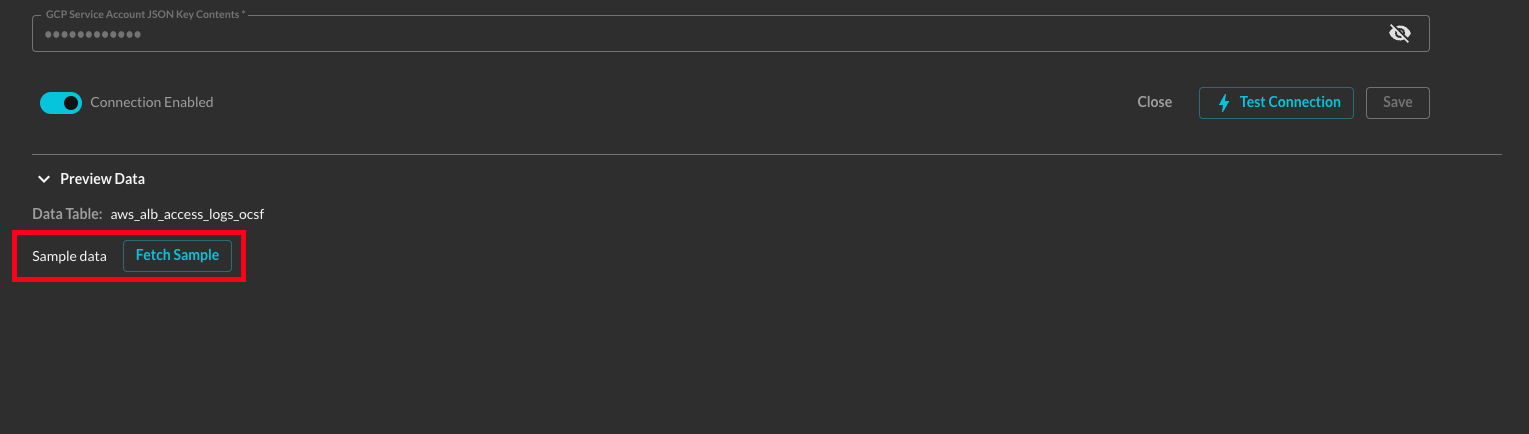
FIG. 3 - Fetch Sample button within the Preview Data pane
After fetching the data, you can view your data in tabular format or in JSON format, if the data is parsable as JSON. You switch between the view with the symbol toggles at the top-right of the Preview Data element, it defaults to tabular as shown below (FIG. 4).
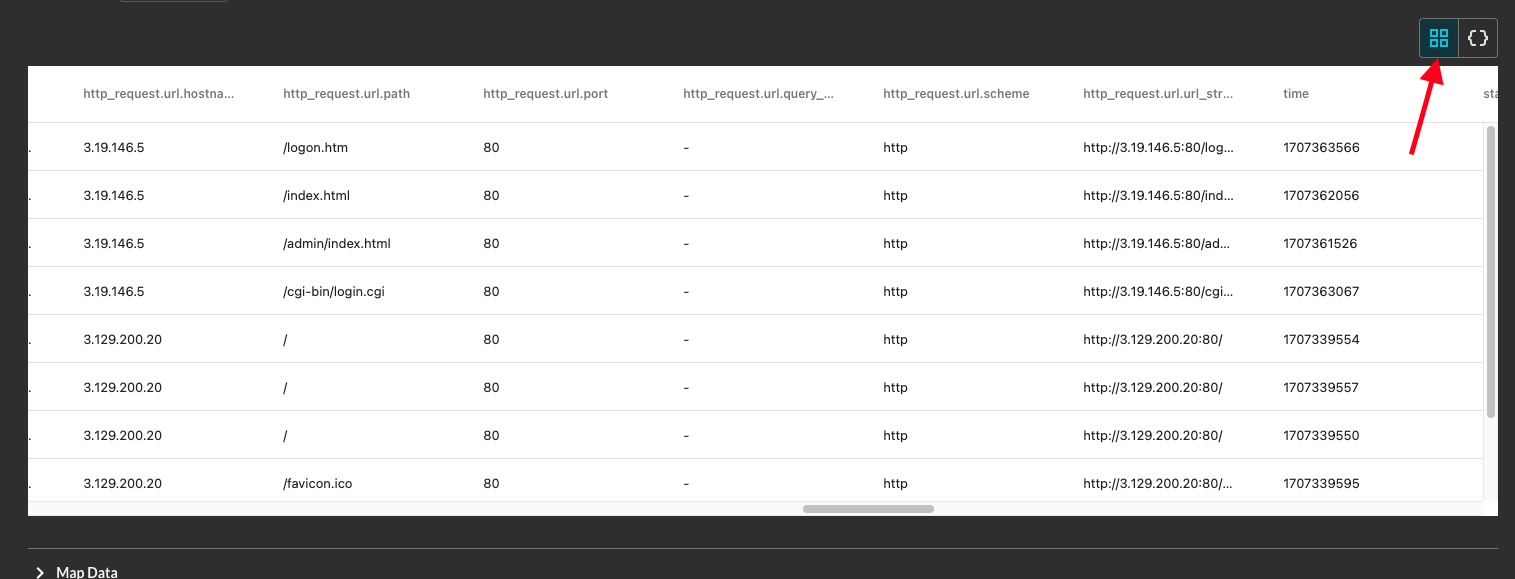
FIG. 4 - Preview Data tabular view
Alternatively, if it is helpful, you may choose to view the data in JSON format as shown below (FIG. 5).
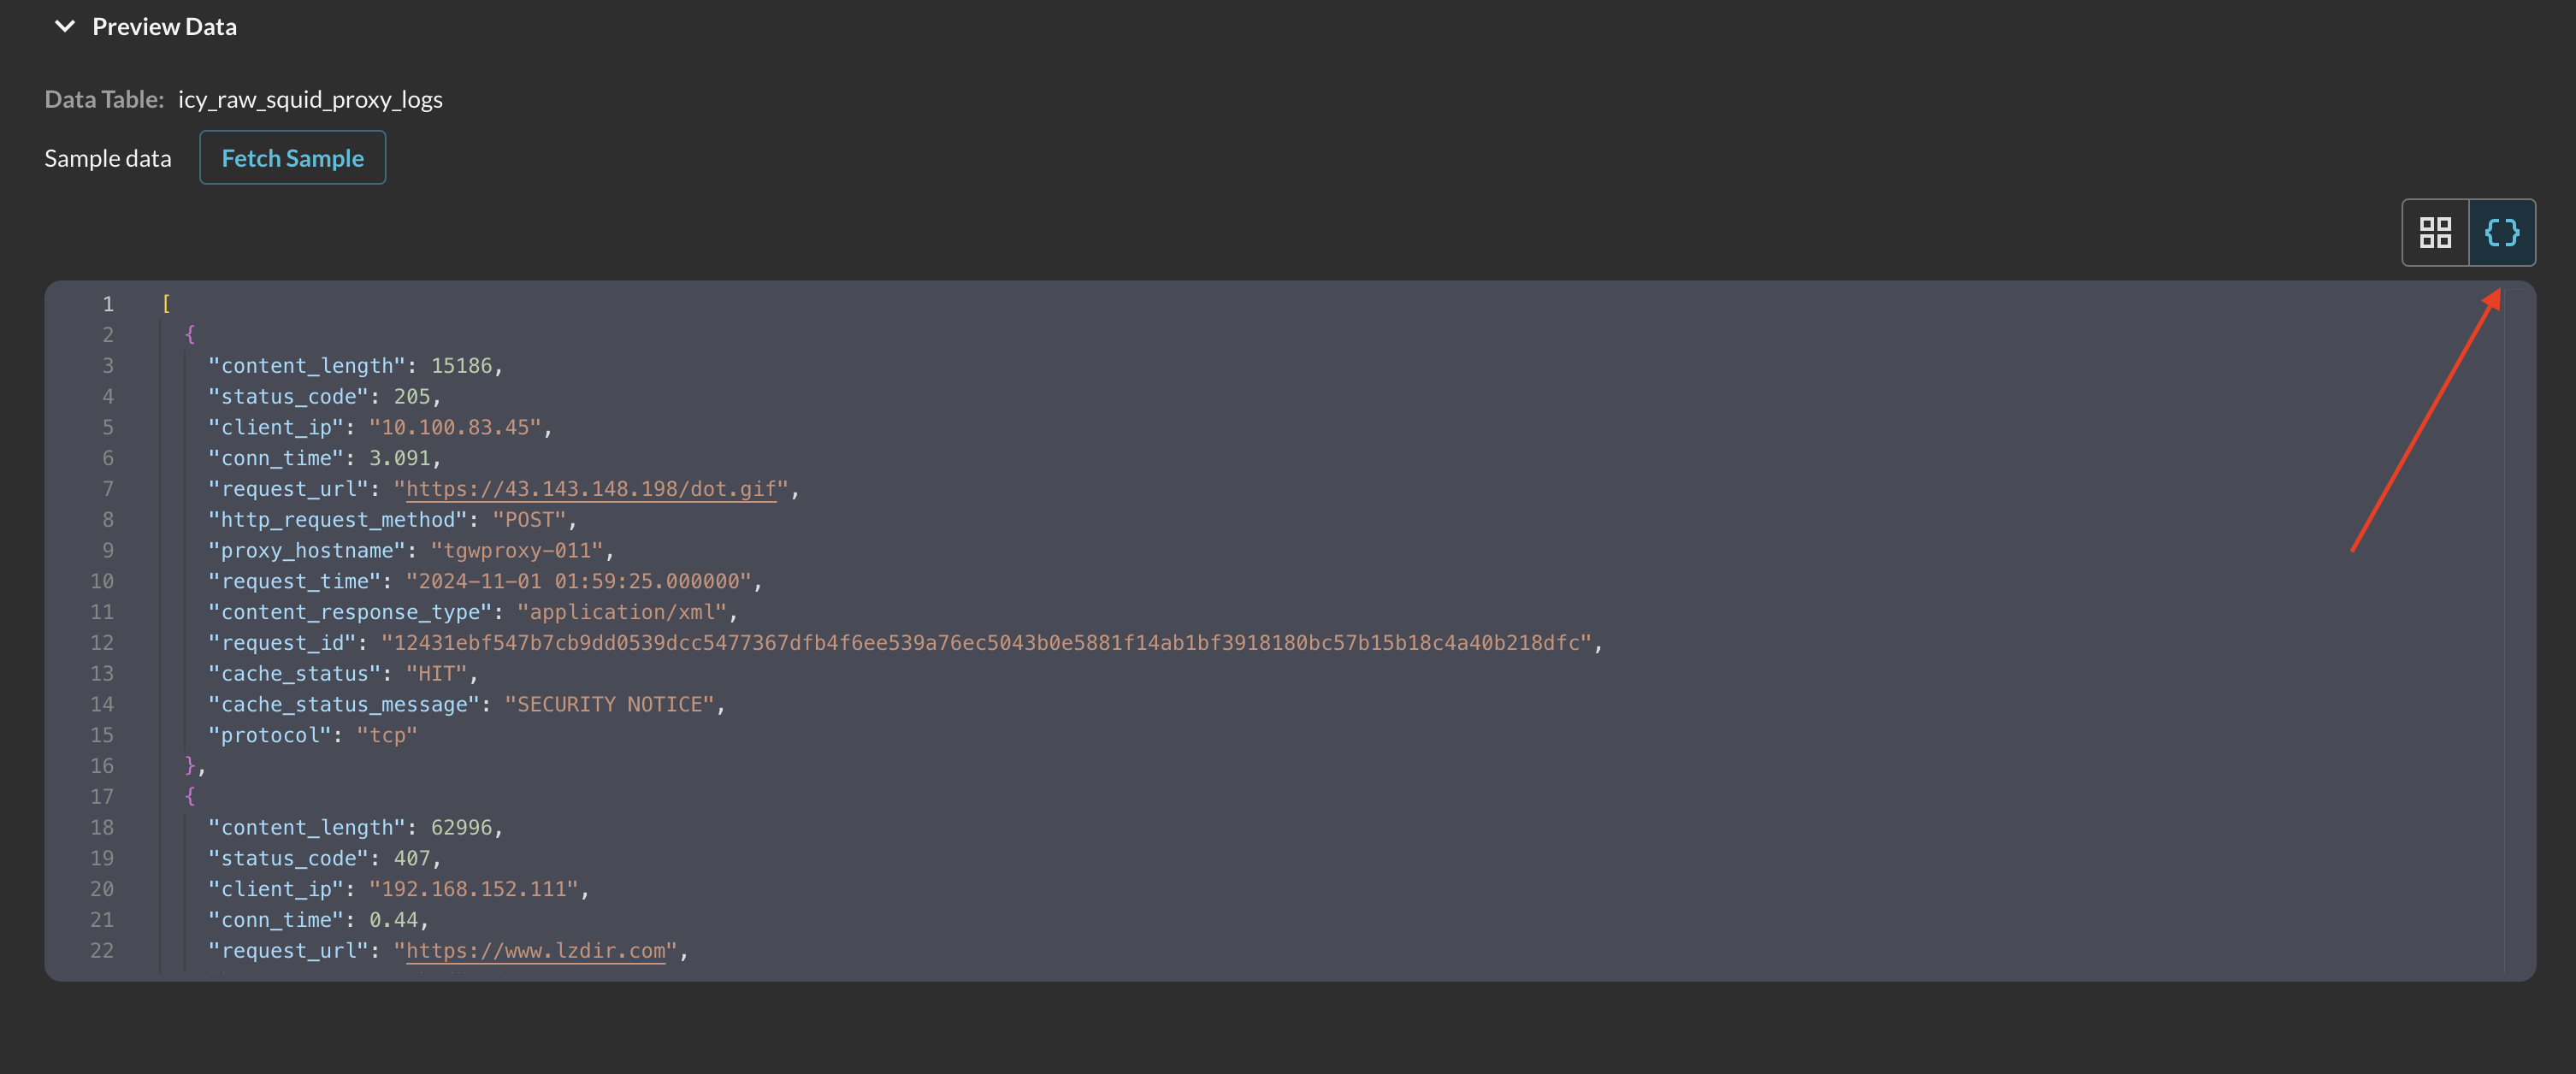
FIG. 5 - Preview Data JSON view
After the sample has been fetched, proceed to the next section, the Map Data pane.
Map Data
The Map Data pane is where the bulk of the mapping workflow occurs. If you did not properly fetch your schema within the Preview Data pane you will be presented with the following warning: Your Connection Info must be saved and you must fetch a preview before you can map data as shown below (FIG. 6).

FIG. 6 - Map Data error
Upon opening the pane for the first time, you will be prompted to choose an Event Class, and a link to the QDM schema website so also provided as shown below (FIG. 7).
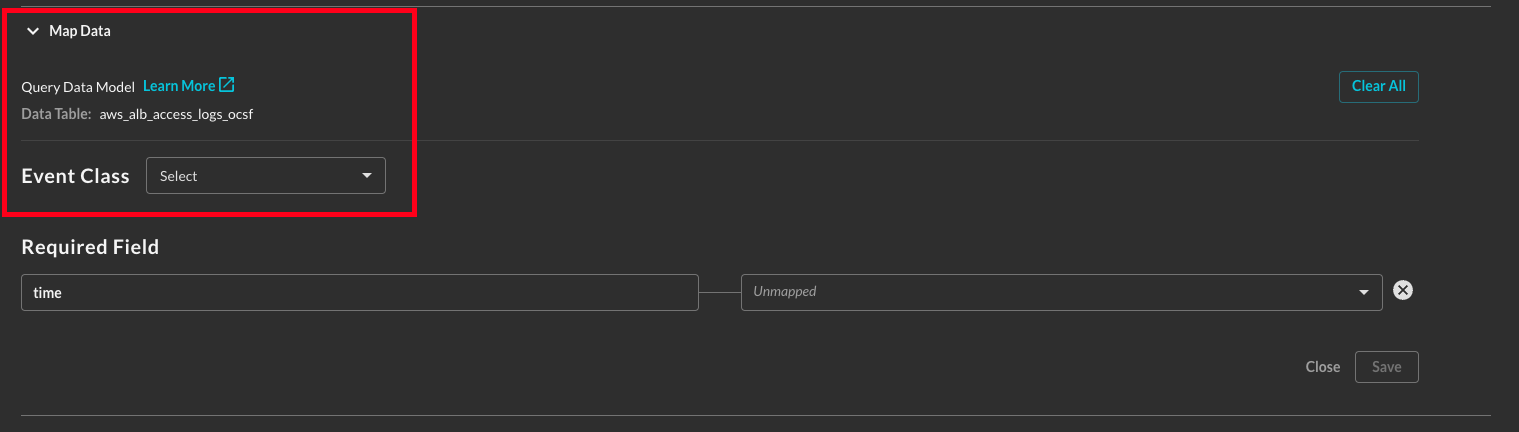
FIG. 7 - Map Data pane before picking an Event Class or Object
You will be able to search from any Event Class or Object (coming soon!) that is marked searchable within the QDM schema website. The glyph iconography for event Event Class is colored to match a specific Category such as green for 2 - Findings or red for 4 - Network Activity. For this example, HTTP Activity will be selected.
Scrolling down you will be presented with the two mandatory sections - Time and Entities - as shown below (FIG. 8).
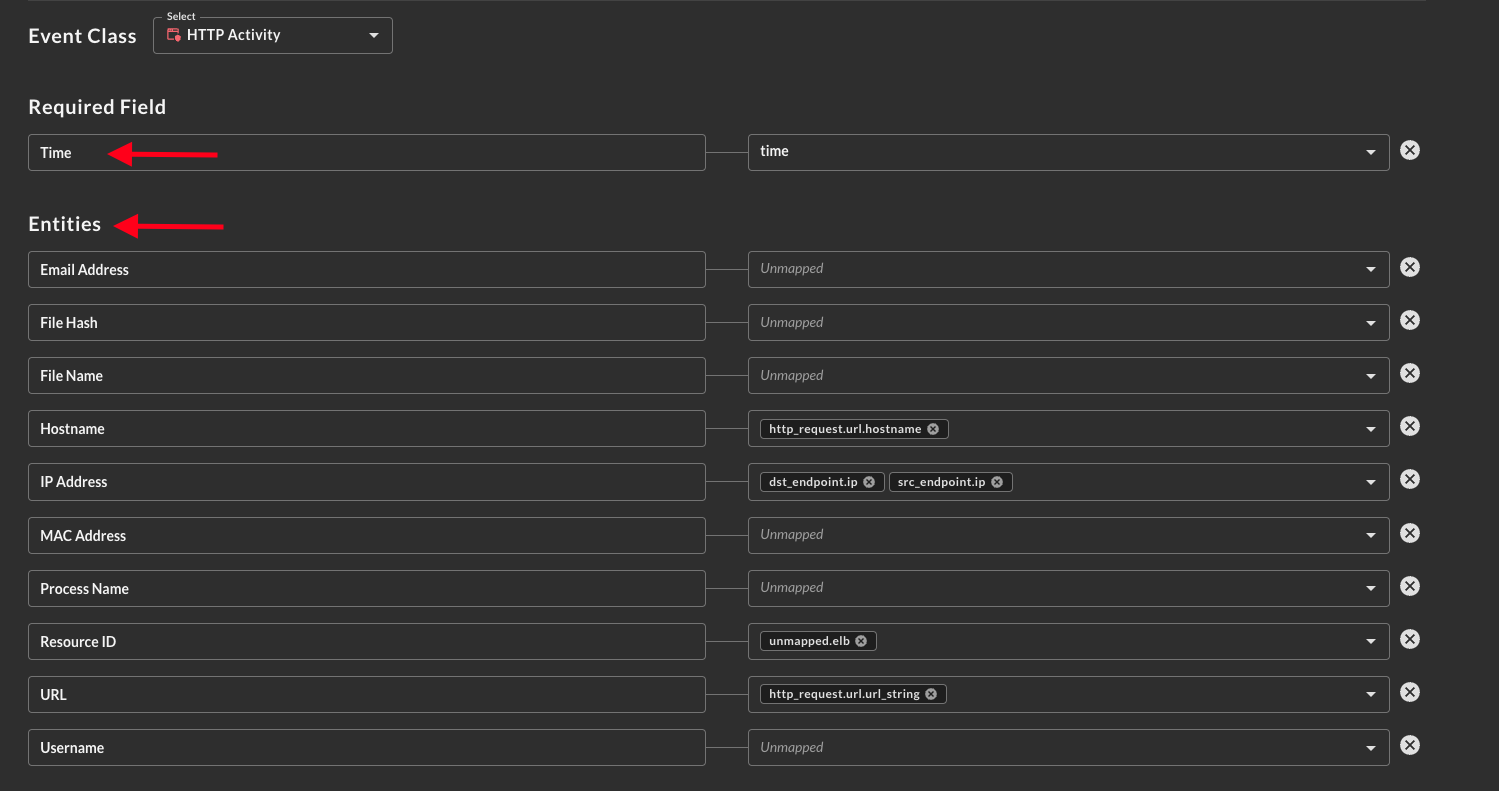
FIG. 8 - Time and Entities mapping within the Map Data pane
Firstly you must select a source column or key for Time, the supported formats are:
- ISO-8061 timestamp
string- e.g., 2024-02-21T09:53:40.406-05:00 - SQL
timestamp(3)- e.g., 2024-01-11 13:57:14.000 - SQL
timestamp(6)- e.g., 2024-02-23 17:47:19.900000 - Epoch seconds
bigint- e.g., 1708527749
For index-based systems such as Splunk or ServiceNow the built-in _time or similar field should be used.
If you fail to select a supported time format for your platform, when searching against the platform connector with Federated Search, you will receive errors regarding this.
Next are Entities, these map to the OCSF observables which represent top-level "points of interest" in the data such as email addresses, IP addresses, or the resource ID (e.g., sensor UUIDs, serial numbers, AWS ARNs, etc.). There is type enforcement performed on well-known entities such as IP Address, MAC Address, and email addresses, but there is greater flexibility on entities such as username, resource ID, and process name.
You can map multiple values into each of the entities, when you perform a search against any of them in Federated Search, the entire record as you have mapped will be returned.
Attributes
The next section are Attributes which contain every element of a given Event Class or Object. The only mandatory value here is record_id which is a deduplication key used by the Query Engine when results are brought back to the UI, API, or Splunk App once queries are done executing. This can be any unique value you wish to deduplicate against - this can be a finding identifier, epochmilliseconds of an agent, a randomly generated uuid, or more. In the future - this value will be set globally and cascade down, however, as of 15 FEB 2024 you need to set it at every level it is relevant.
For instance, you must find the standalone record_id value and set it within Attributes as shown below (FIG. 9).

FIG. 9 - Mapping record_id
Next, for any nested object you map (denoted by dot-notation), you must also populate its record_id, so as process.record_id or device.record_id. This must be the same value you use for record_id. If you do not populate these, these "child records" will not be grafted to the parent result. For example, note the below screenshot (FIG. 10) where the process object is mapped.

FIG. 10 - Mapping a nested object's record_id, such as process.record_id
For all intents and purposes, every other item is completely optional, you do not have to map anything beyond this point. However, if you will be using Federated Joins or rely on the usage of Filters and Pivots within the Query Builder or Results - you should attempt to map as much as you can.
For attributes you can only map a single value to them, however, you can map the same value to multiple attribute names. Most elements are mapped 1:1 without any validation, however, there are some special sections.
For instance, enum-backed values within the QDM/OCSF data model are mapped by providing a field to parse and providing the values in your target source within that column or key to the enums as shown below (FIG. 11). You must enter the VALUE of your specified field/column. These are multi-value selectors to allow you to map multiple values. You must map every potential value from your source data, these will not be automatically mapped for you.
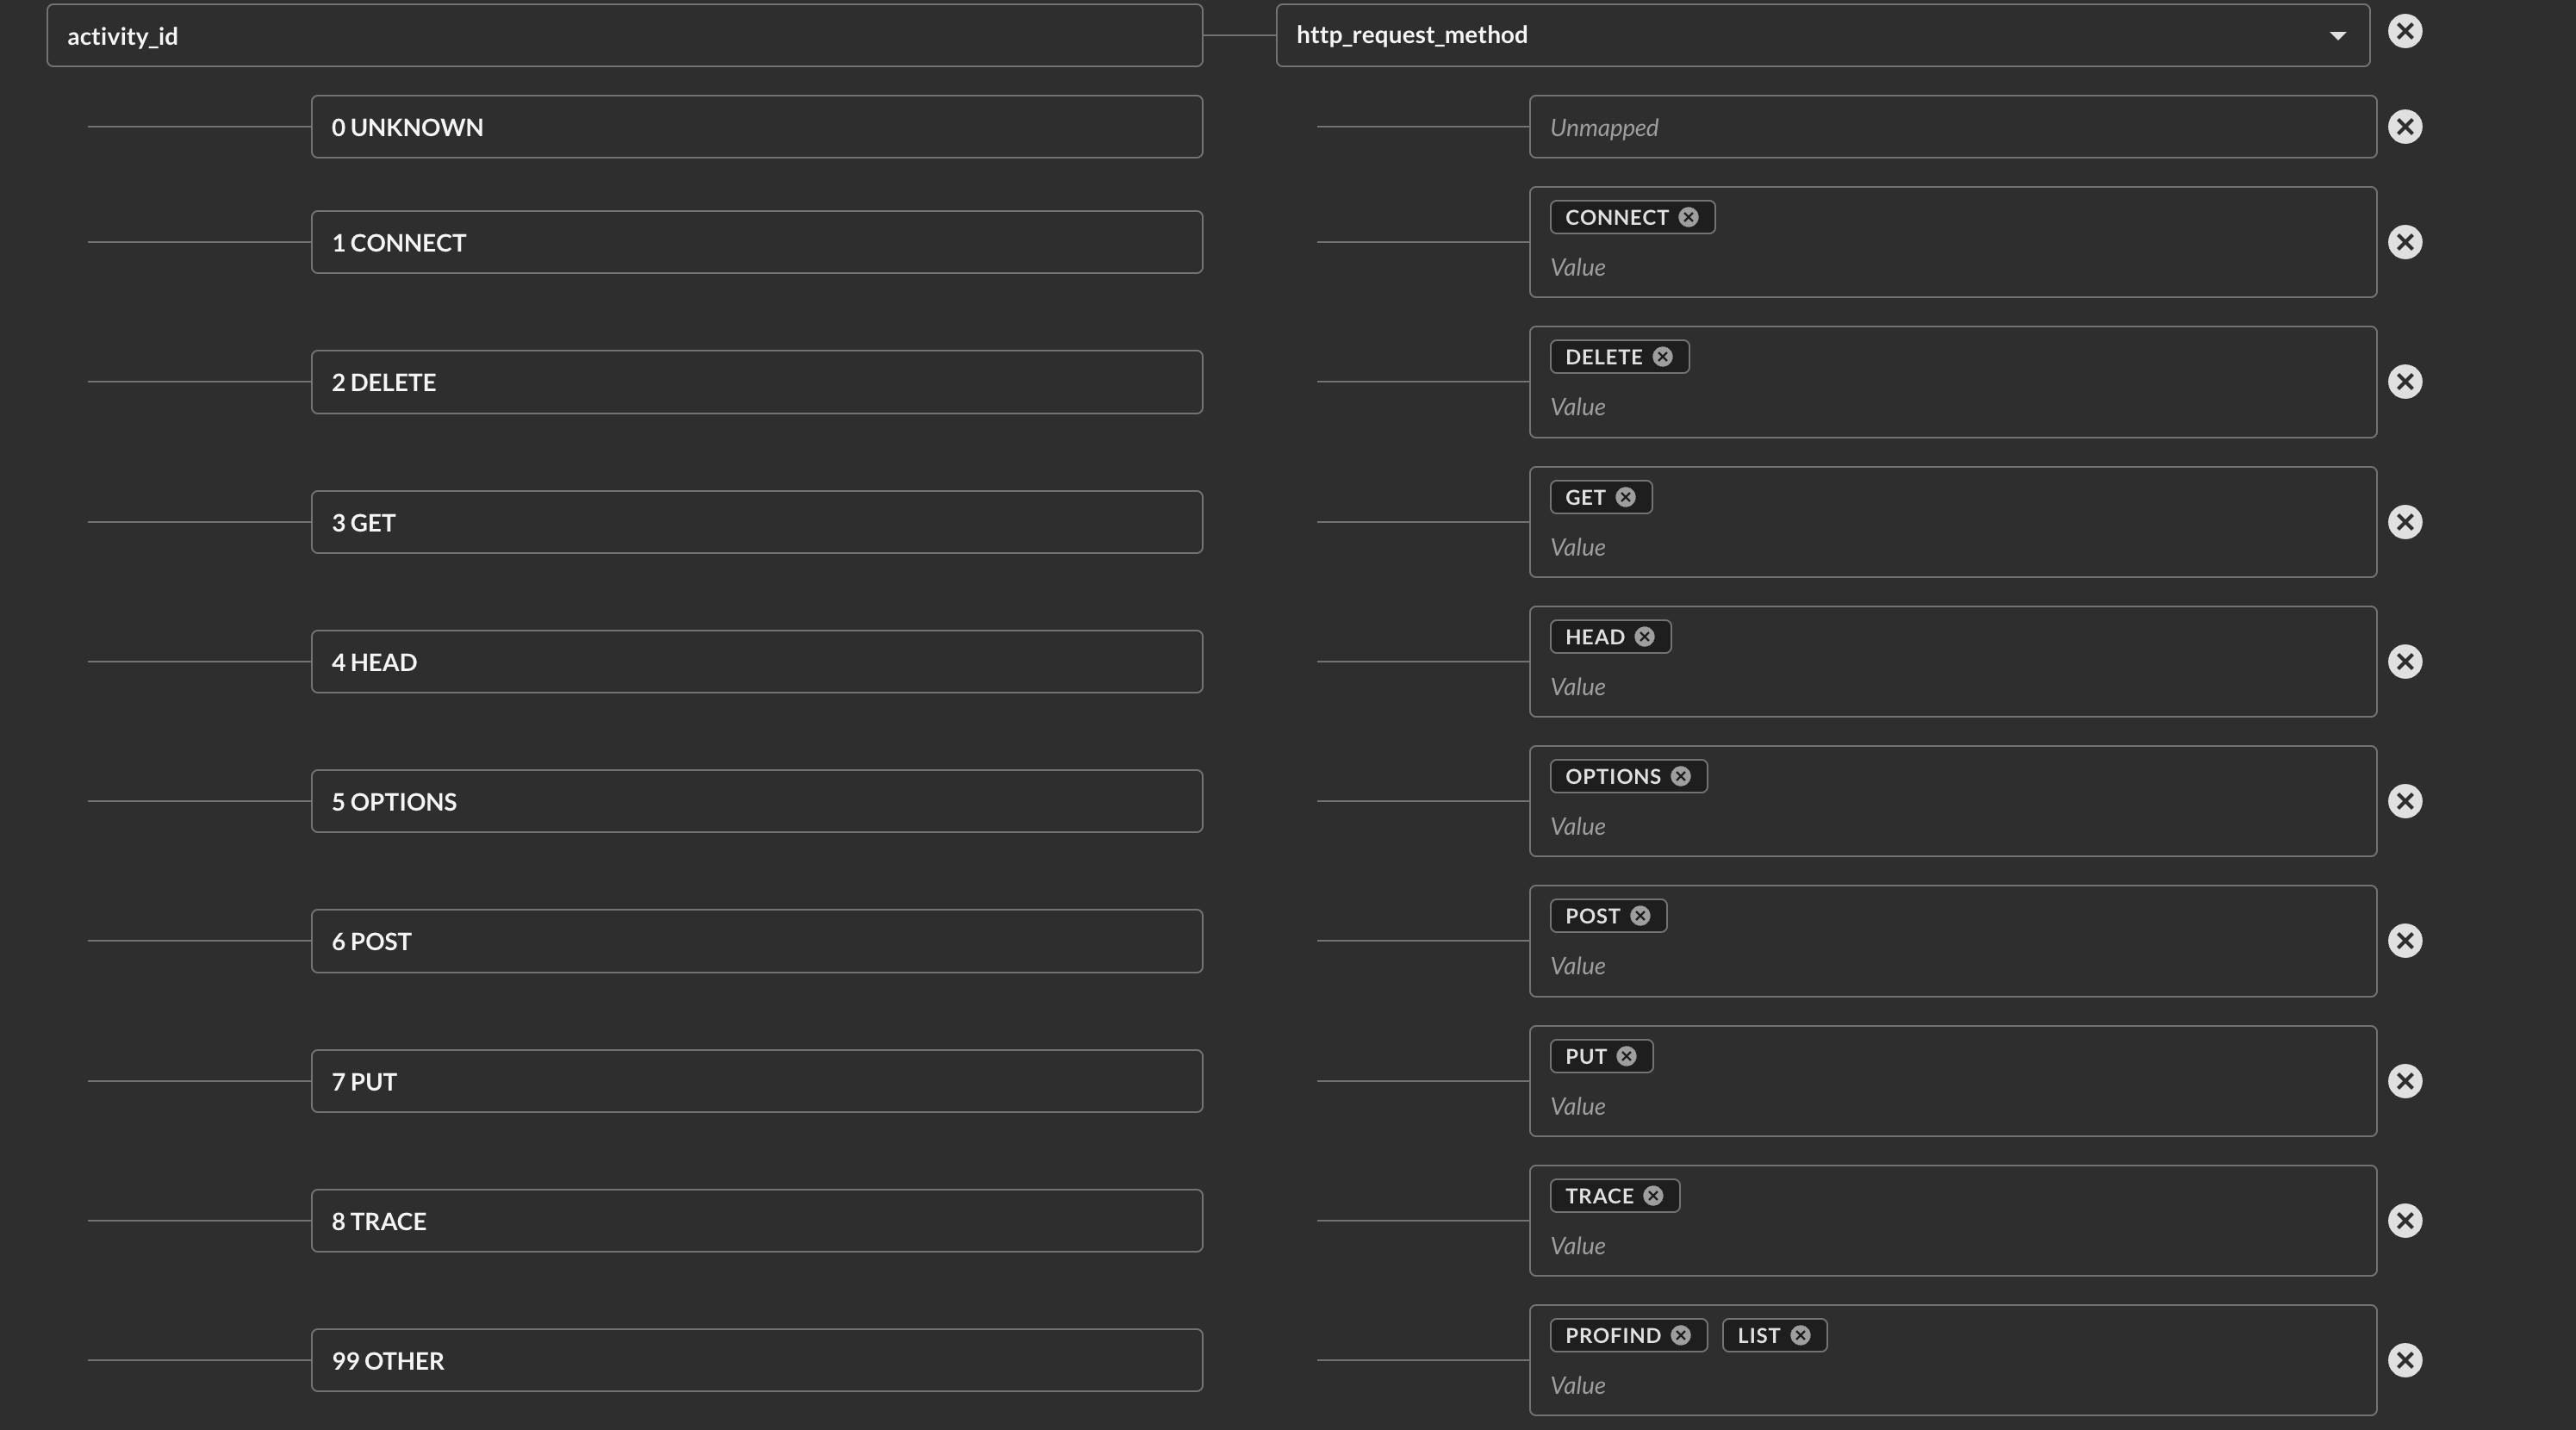
FIG. 11 - Enum-backed mapping in Map Data Attributes
Once complete with your mapping, scroll all the way to the bottom and select Save. If successful, a brief popup will let you know.
You can now proceed back to your Integration documentation or proceed directly to Federated Search to begin making use of your data. Happy Querying!
Viewing Existing or Updating Mappings
If you want to view existing mappings or update the mappings, you must Fetch Schema as you would do when first creating it, this allows any new fields or partitioning data to be made available.
Your existing mappings will be shown in the Preview pane, you can proceed to view these or add to them as needed.
Updated 10 months ago