Amazon Athena (for Amazon S3)
Integrate Query with any data in Amazon S3 via Amazon Athena
TL;DRTo integrate Amazon Athena to query data stored in Amazon S3 with Query:
- Configure Amazon Athena in your AWS Account by creating & specifying a Results bucket or define it within an Athena Workgroup.
- Use AWS Glue Crawlers or Amazon Athena Data Definition Language (DDL) statements to create Tables (or a View!) of your target data.
- Deploy an AWS IAM Role with External ID and permissions to use Amazon S3, Amazon Athena, AWS Glue, and (optionally) AWS Key Management Service APIs.
- Add a connection source per Table you want to integrate into Query using your AWS IAM Role.
- Use the Configure Schema workflow to introspect and map your data into the Query Data Model
- Use Query Search to surface nearly any relevant security data points in your tables to support Incident Response (IR), Investigations, Threat Hunting, Security Audit, and any other relevant security or observability use cases.
Overview
Amazon Athena is a serverless query engine built upon TrinoDB and PrestoSQL that allows users to directly query data inside of Amazon S3 Buckets. Athena allows you to query several data types (Parquet, ORC, JSON, CSV, Avro) and several compression codecs (GZIP, BZIP, Snappy, ZSTD) as long as the data is registered within AWS Glue Data Catalog or created directly within Athena Data Definitional Language (DDL). Likewise, Athena supports traditional Hive/Glue table formats as well as Delta Lake, Apache Iceberg, Apache Hudi Copy-on-Write (CoW)
Query integrates with Athena to provide the following benefits.
- Allows analysts, engineers, Security Operations personnel, and anyone else with a security or observability use case to analyze and search data in Amazon S3 via Amazon Athena without needing to learn any SQL.
- Query utilizes AWS IAM Role-based access with External ID to provide minimum necessary permissions to access Athena, Glue, S3, and (optionally) KMS and LakeFormation APIs. Utilize other Attribute Based Access Control (ABAC) such as the
SourceIPcondition to further lock down access to only the Query Federated Search IP ranges. - Query can access Amazon Athena across different AWS Accounts, Regions as well as entirely different AWS Organizations and even Partitions (e.g.,
aws,aws-gov) depending on your use cases. - Query does not allow ad-hoc raw SQL to be written, preventing expensive or potential insecure queries from being fulfilled.
- Query fully supports all table formats (Delta Lake, Iceberg, Hudi, Hive/Glue), data types, and compression codecs that are otherwise supported by Athena.
- Query supports all time-based Hive-like partitions (e.g.,
my-bucket/source=my_logs/year=2025/month=01/day=21/hour=17, as well as all "hidden" partitions within Iceberg, Hudi, and Delta Lake.
Security teams make use of Athena for security analytics, threat hunting, and searching against their Amazon S3 data lakehouses and data lakes. With Query, security teams can focus on outcomes such as executing incidence response (IR) playbooks, investigation workflows, automation use cases, threat hunting, security audits, compliance use cases, and purple team exercises. This outcome-focus on the "jobs to be done" for security teams is afforded by the fact Query handles writing SQL for you, normalization and standardization of the data points, parallelization of search, and fine-tuning the Athena queries. You tell Query what you want to find in your datasets and we handle the rest.
For instance, you can potentially parallelize search across all of these various datasets stored in Amazon S3 and registered within AWS Glue, and more. From there, you can search for normalized events or Entities (such as IP Addresses, Group Names, Serial Numbers, Resource UIDs, MAC Addresses, etc.) to focus your searching and pivoting across relevant data.
- AWS Transit Gateway Flow Logs
- Crowdstrike Falcon Data Replicator events
- ZScaler ZIA and ZPA Nanolog Streaming Service (NSS) event logs
- Amazon Application Load Balancer access logs
- Cloud Security Posture Management & SaaS Security Posture Management events
The Query normalization functionality is built around the Open Cybersecurity Schema Framework (OCSF) - named the Query Data Model (QDM) - which expresses all search intents with OCSF/QDM concepts such as Entities/Observables used to represent facts and indicators whereas Event Classes represent things that have happened and are normalized against network, application, file system, identity, and 1st party security findings.
Some details on searchesAs of 21 JAN 2025, Query can only map one table/view per Connector. You will need to create multiple Connectors and mappings per table/view/etc you have in your Athena/Glue. Each Connector generates a distinct IAM Role External ID as well, you can create multiple Roles per Connector, or define an array of External IDs in the IAM Role Trust Policy.
Query supports ALL SCALAR data types in Athena (e.g.,
bool,string,integer) as well asMAPandSTRUCTdata types. Support forARRAY, geospatial data, and any other semi-structured data type is no supported at this time.Query automatically orders your results by your selected timestamp column using
ORDER BY time_col DESCand cannot be overridden. However, you can resort these results in the UI grid. See the Best Practices Section for information on supported timestamps.Query utilizes
UNLOADwith the SQL statement to send the result set to your Athena Results S3 bucket as Snappy-compressed Parquet and streams & normalizes with Polars. As long as the Query does not timeout, we will automatically delete these files for you. We no longer use paginated Boto3 calls to the Athena APIs.
Best Practices
To get the most out the Query Federated Search Connector for Amazon S3, there are some general guidelines that you can follow which are best on AWS-advertised best practices for Athena/Glue. The more efficiently you can WRITE data, the more efficiently that Query can READ the data via Athena.
- Always use binary columnar files, Apache Parquet is preferred. Your query performance will suffer using CSV, JSON, XML, or otherwise. Query uses
UNLOADto transform the result set into Parquet before direct query and normalization with Polars, however, using inefficient formats increases Query times. - Data should be written as flat as possible, and if nested fields are used, define them with your Crawler or DDL as
structdata types instead of usingmaporarray. - Always use read-efficient compression such as Snappy or ZSTD.
- Implement Hive-compatible partitioning to your data with time-based partitions such as
year=2025/month=10/day=31/hour=11. Partition Projection is NOT supported!- Consider using dynamic partitioning with Apache Iceberg.
- Compact your files to 128-256MB using the Rust Compactor or other mechanisms to combat the "small file problem" which will greatly degrade query performance. For instance, when writing data to S3 from Cribl, you can increase the file open time to 5+ minutes, reduce the open files to 10-20, and set the target at 256MB to force lower amounts of total files by adding as many logs into them as possible.
- Consider using Views, Create Table As Select (CTAS), or using Amazon EMR, AWS Glue, or
INSERT INTOto transform your data into the Apache Iceberg open table format to apply changes to your data nesting structures, timestamps, or otherwise. - Ensure that whatever column you use to normalize into OCSF's
timefield matches the following characteristics in the table below. Best effort will be performed to convertTIMESTAMP(6)toTIMESTAMP(3)for usage with theUNLOADstatement. Using any other format than a nativeTIMESTAMP(3)will result in longer times to fetch data and query data as certain time conversion functions in the Athena SQL engine will need to be utilized, as well as a discovery mechanism for time translation on our backend.
| Time Format | Data Type | Example |
|---|---|---|
| SQL Timestamp(3) | string or datetime | 2024-01-11 13:57:14.000 |
ISO-8061 (with or without T) | string | 2024-02-21T09:53:40.406-05:00 |
| Unix seconds/Epoch seconds | bigint or string | 1708527749 |
Prerequisites
To connect an Amazon Athena (for Amazon S3) Connector with Query Federated Search you'll need basic connectivity parameters such as the name of the S3 bucket that contains your data, the S3 bucket used for Athena results, the database and table (or view, materialized view) name(s) of your data, your AWS account ID and Region.
-
To retrieve your Account ID and Region, navigate to the top-right of the AWS Console and copy your Region ID from the Region dropdown (e.g.,
United States (Ohio)isus-east-2) and copy your Account ID by selecting your username dropdown and copy the value for Account ID. -
To retrieve your database and table (or view/materialized view) names navigate to the AWS Glue Console --> select Tables underneath the Data Catalog submenu on the left-hand navigation pane, and copy the value(s) from the Name and Database columns, as shown below (FIG. 1).
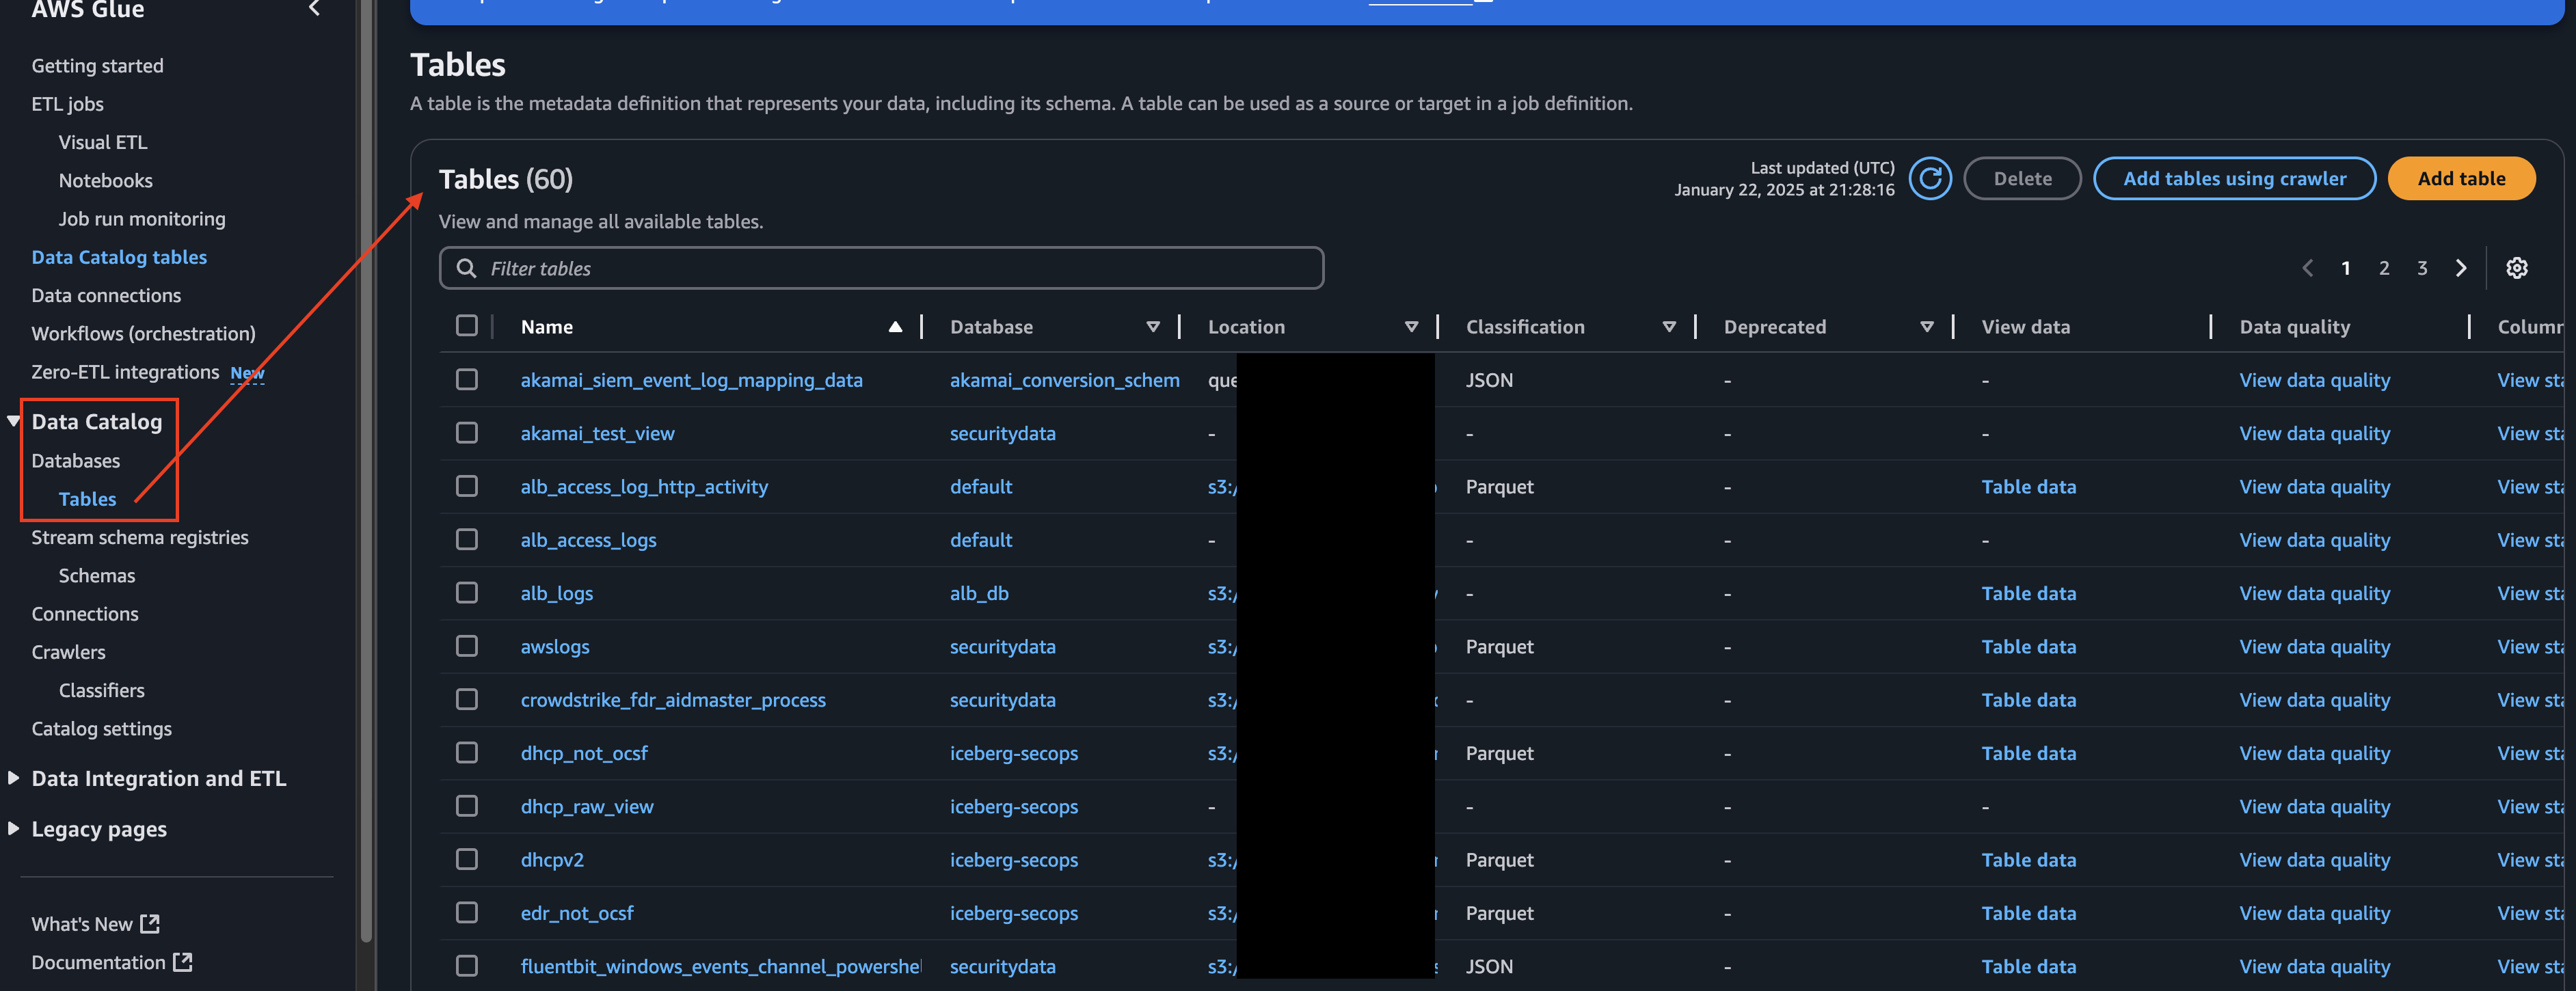
FIG. 1 - Locating your Glue tables and databases from the AWS Glue console
-
To retrieve the name of your S3 bucket, either copy the value from the Location column from the console in Step 2, or in the case of a view or materialized view, locate the table(s) that the data is created from and retrieve the Location for them.
-
To retrieve the name of your Athena Results Bucket, navigate to the Amazon Athena Console --> Query Editor --> Settings tab and copy the value for Query result location as shown below (FIG. 2). If this is not setup, refer to the Specify a query result location section of the Amazon Athena User Guide.
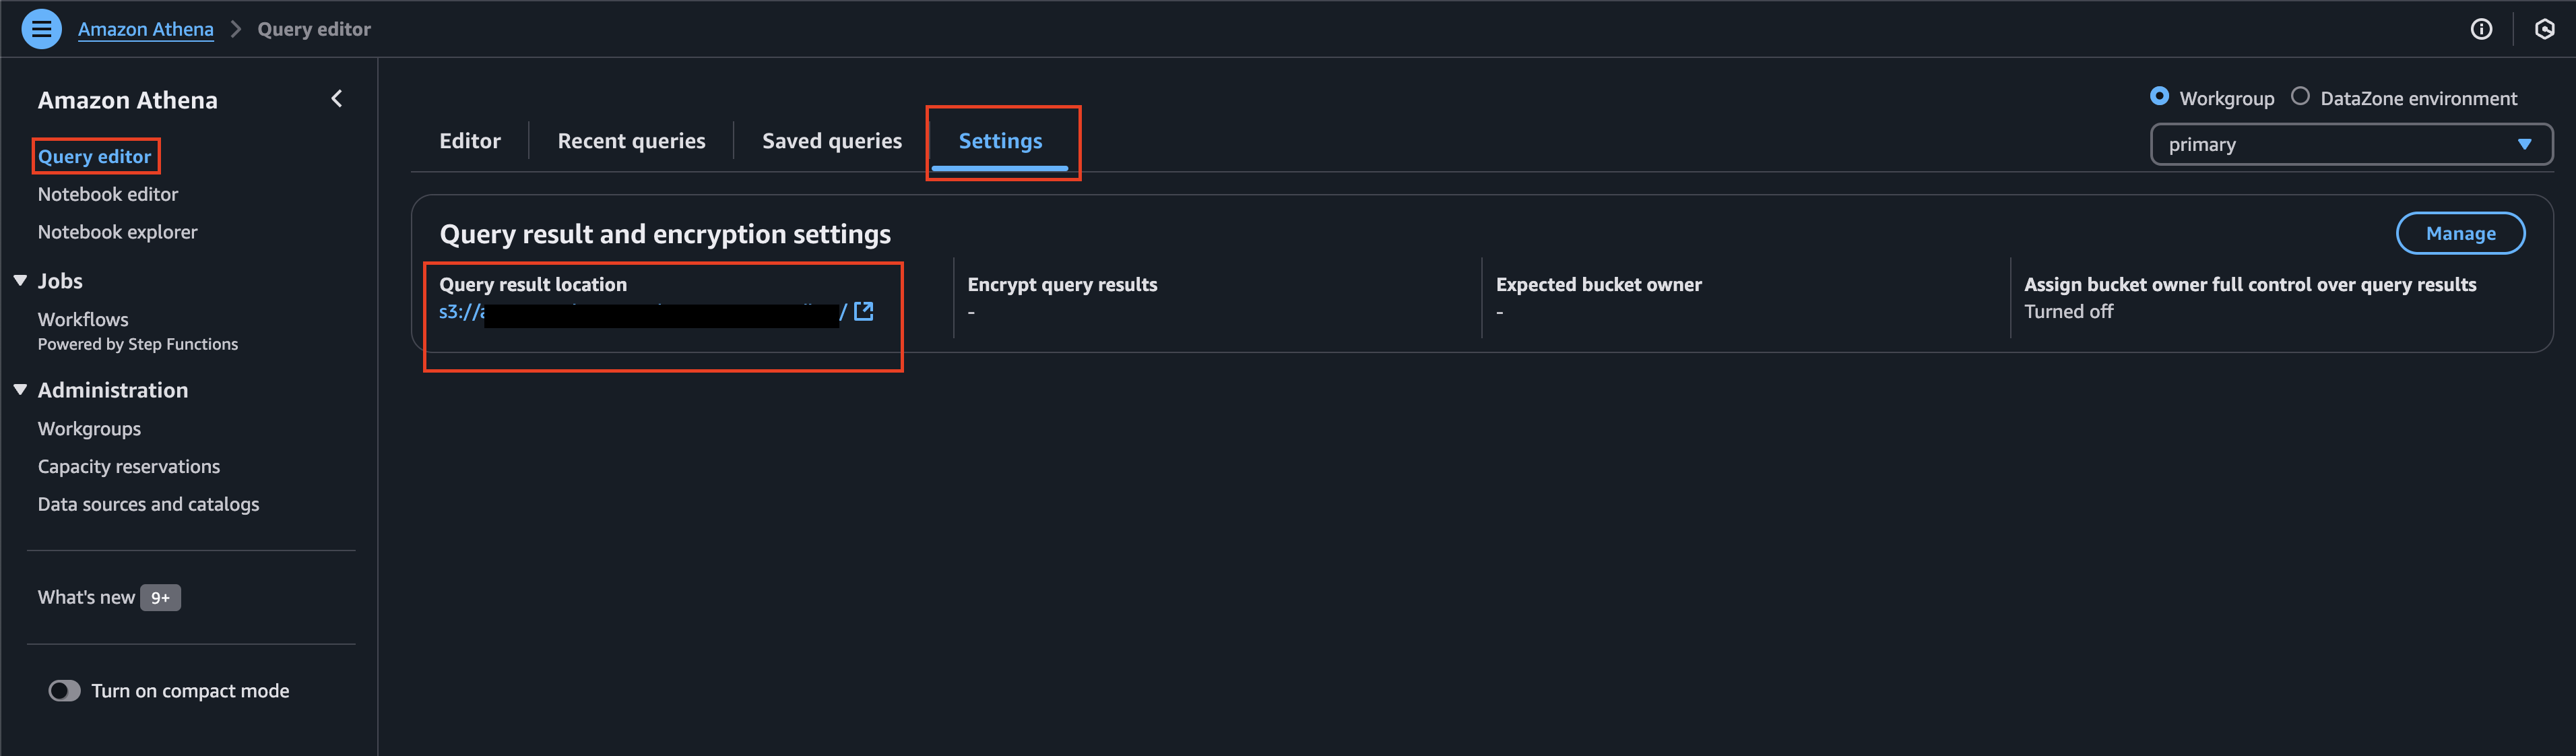
FIG. 2 - Retrieve the Amazon Athena results S3 bucket from the Amazon Athena console
-
Create a new AWS IAM Role to use with Query Federated Search, or locate an existing one. When you pre-configure your Amazon Athena Connector the External ID, Trust Policy, and Identity Policy will be generated for you, so you can attach a temporary Trust Policy to this Role.
-
(OPTIONAL STEP) If you use an Amazon KMS CMK to encrypt your Amazon S3 Bucket, update the Key Policy to grant KMS decrypt and data key generation permissions to the IAM Role created in step 5. For more information see the Allows key users to use the CMK section of the AWS Key Management Service Developer Guide.
-
(OPTIONAL STEP) If you use a different Amazon KMS CMK from Step 6 for your Amazon Athena Results bucket, you must provide the Workgroup name from the Settings tab in Step 4. Additionally, you must also update the Key Policy to grant KMS decrypt and data key generation permissions to the IAM Role created in step 5. For more information see the Allows key users to use the CMK section of the AWS Key Management Service Developer Guide.
-
To retrieve your External ID, Identity Policy, and Trust Policy for your IAM Role that you created in Step 2, navigate to the Setting up an Amazon Athena Connector section and complete up to Step 4.
-
Update your IAM Role with the External ID, Identity Policy, and Trust Policy provided by the Connector.
Configure an Amazon Athena Connector
Use the following steps to create a new Query Federated Search Connector for Amazon Athena (for Amazon S3).
-
Navigate to the Connectors page, select Add Connector, and selectAmazon Athena (for Amazon S3) from the
Data Lakes and Data Warehousescategory as shown below (FIG. 3). You can also search for Amazon Athena (for Amazon S3) using the search bar in the Add Connector page.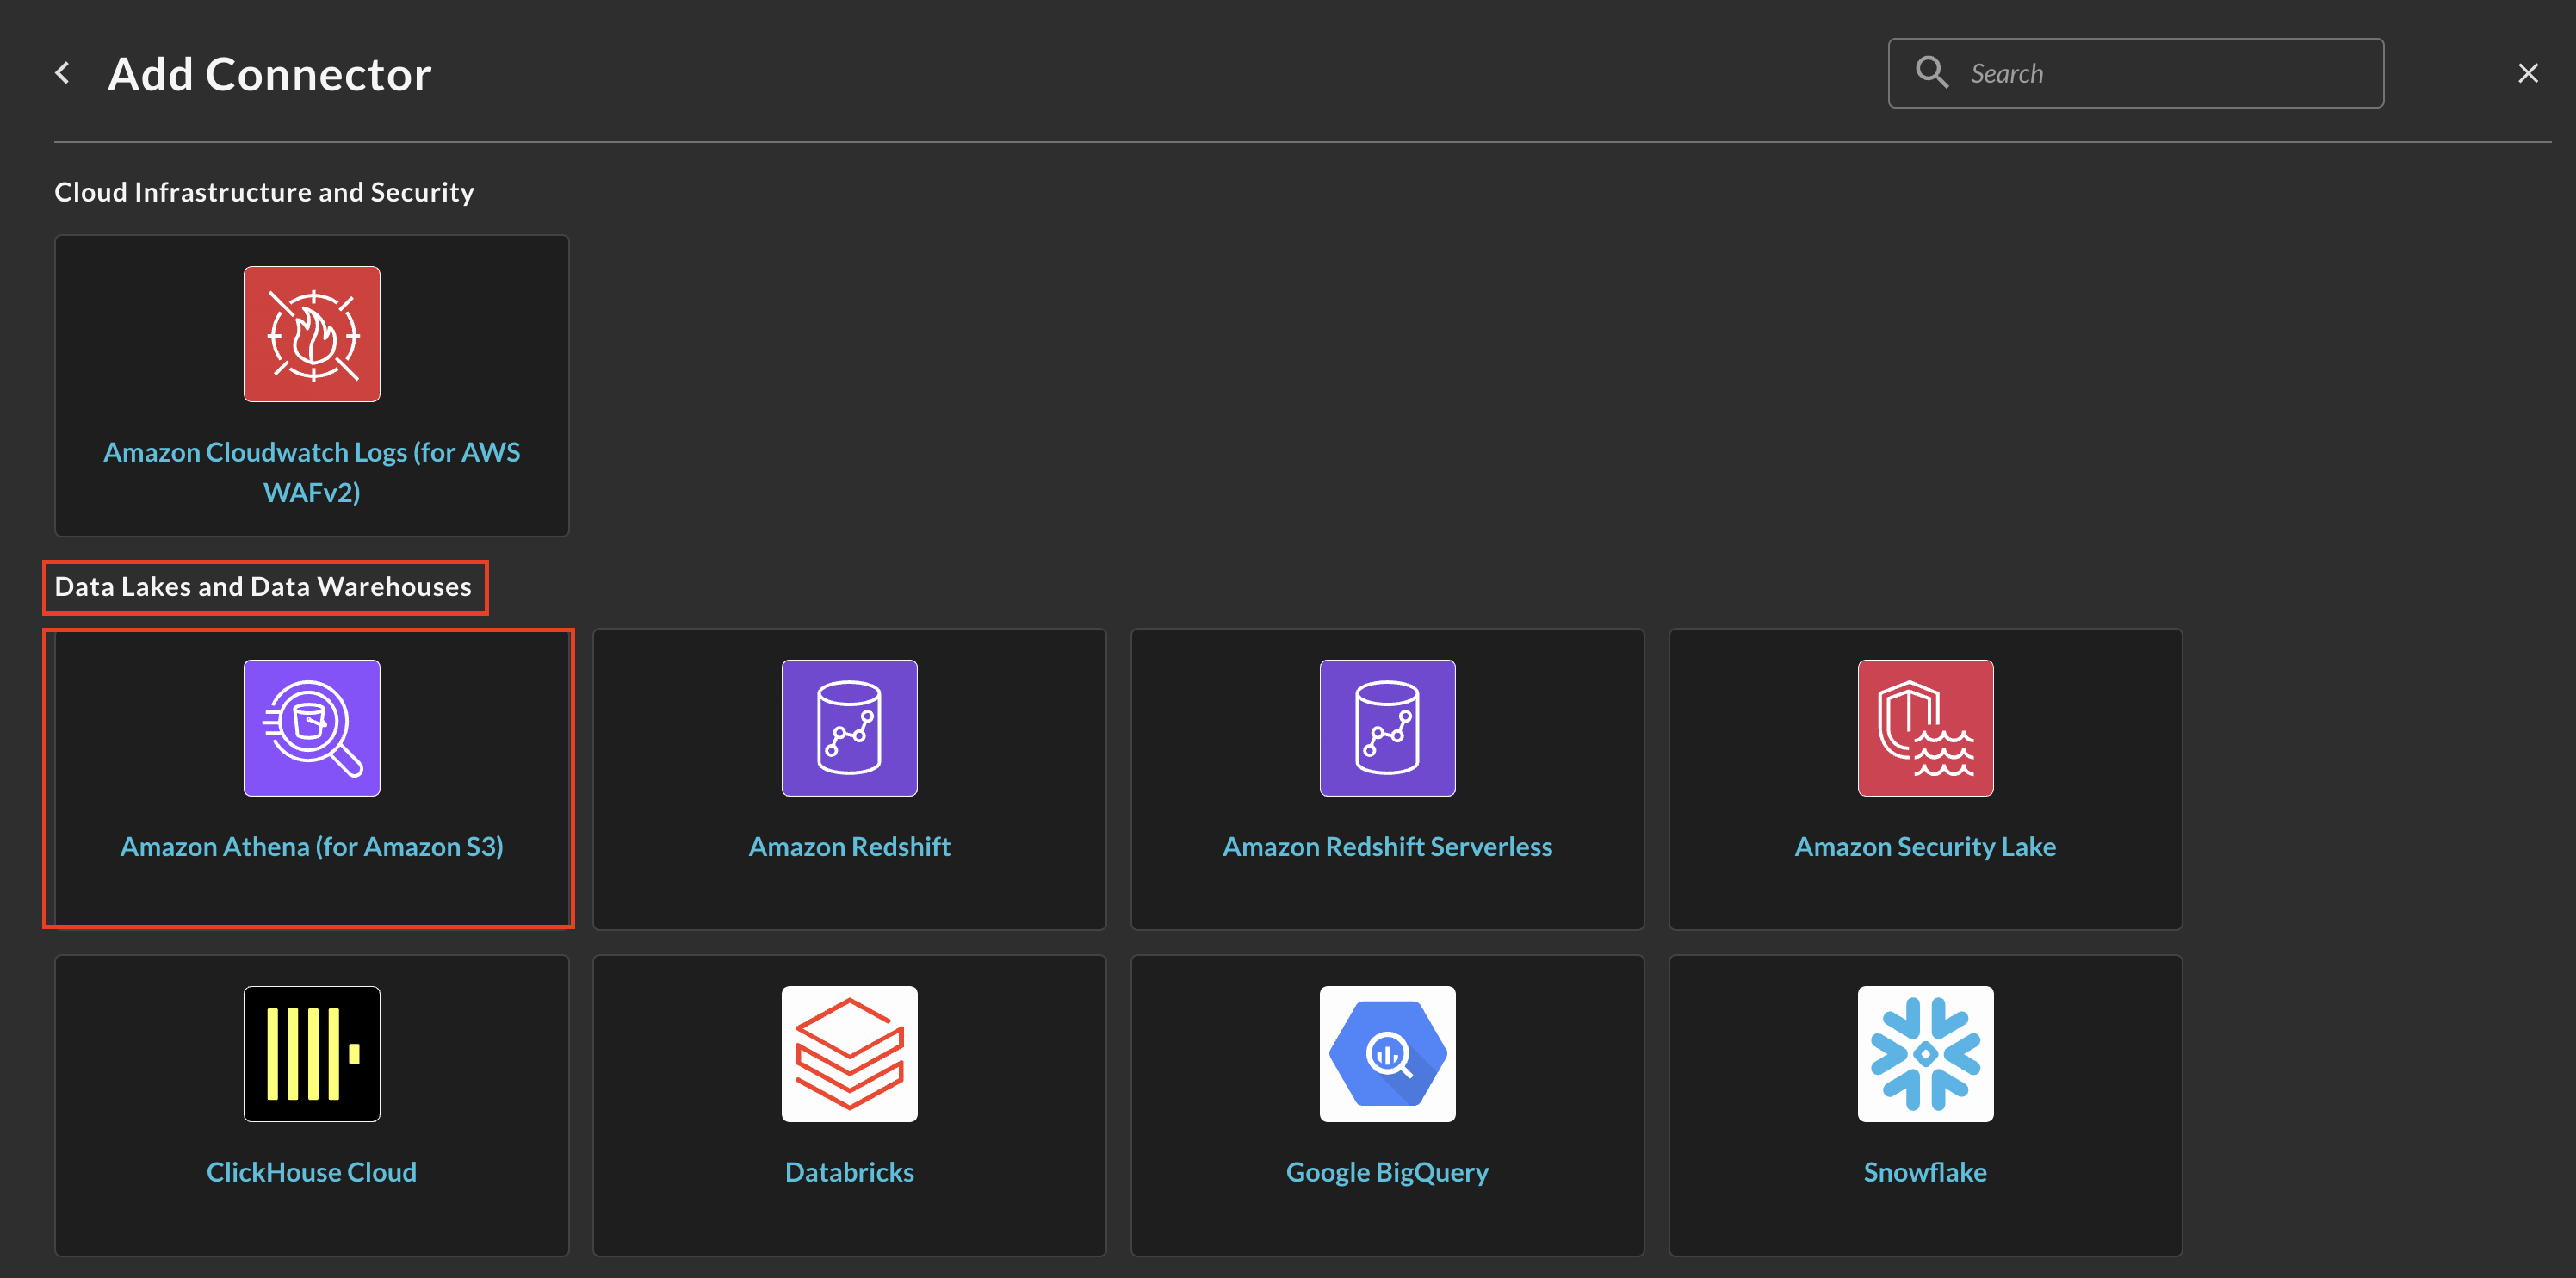
FIG. 3 - Locating the Amazon Athena (for Amazon S3) Connector
-
In the Configure Connector tab, add the following detail as shown below (FIG. 4):
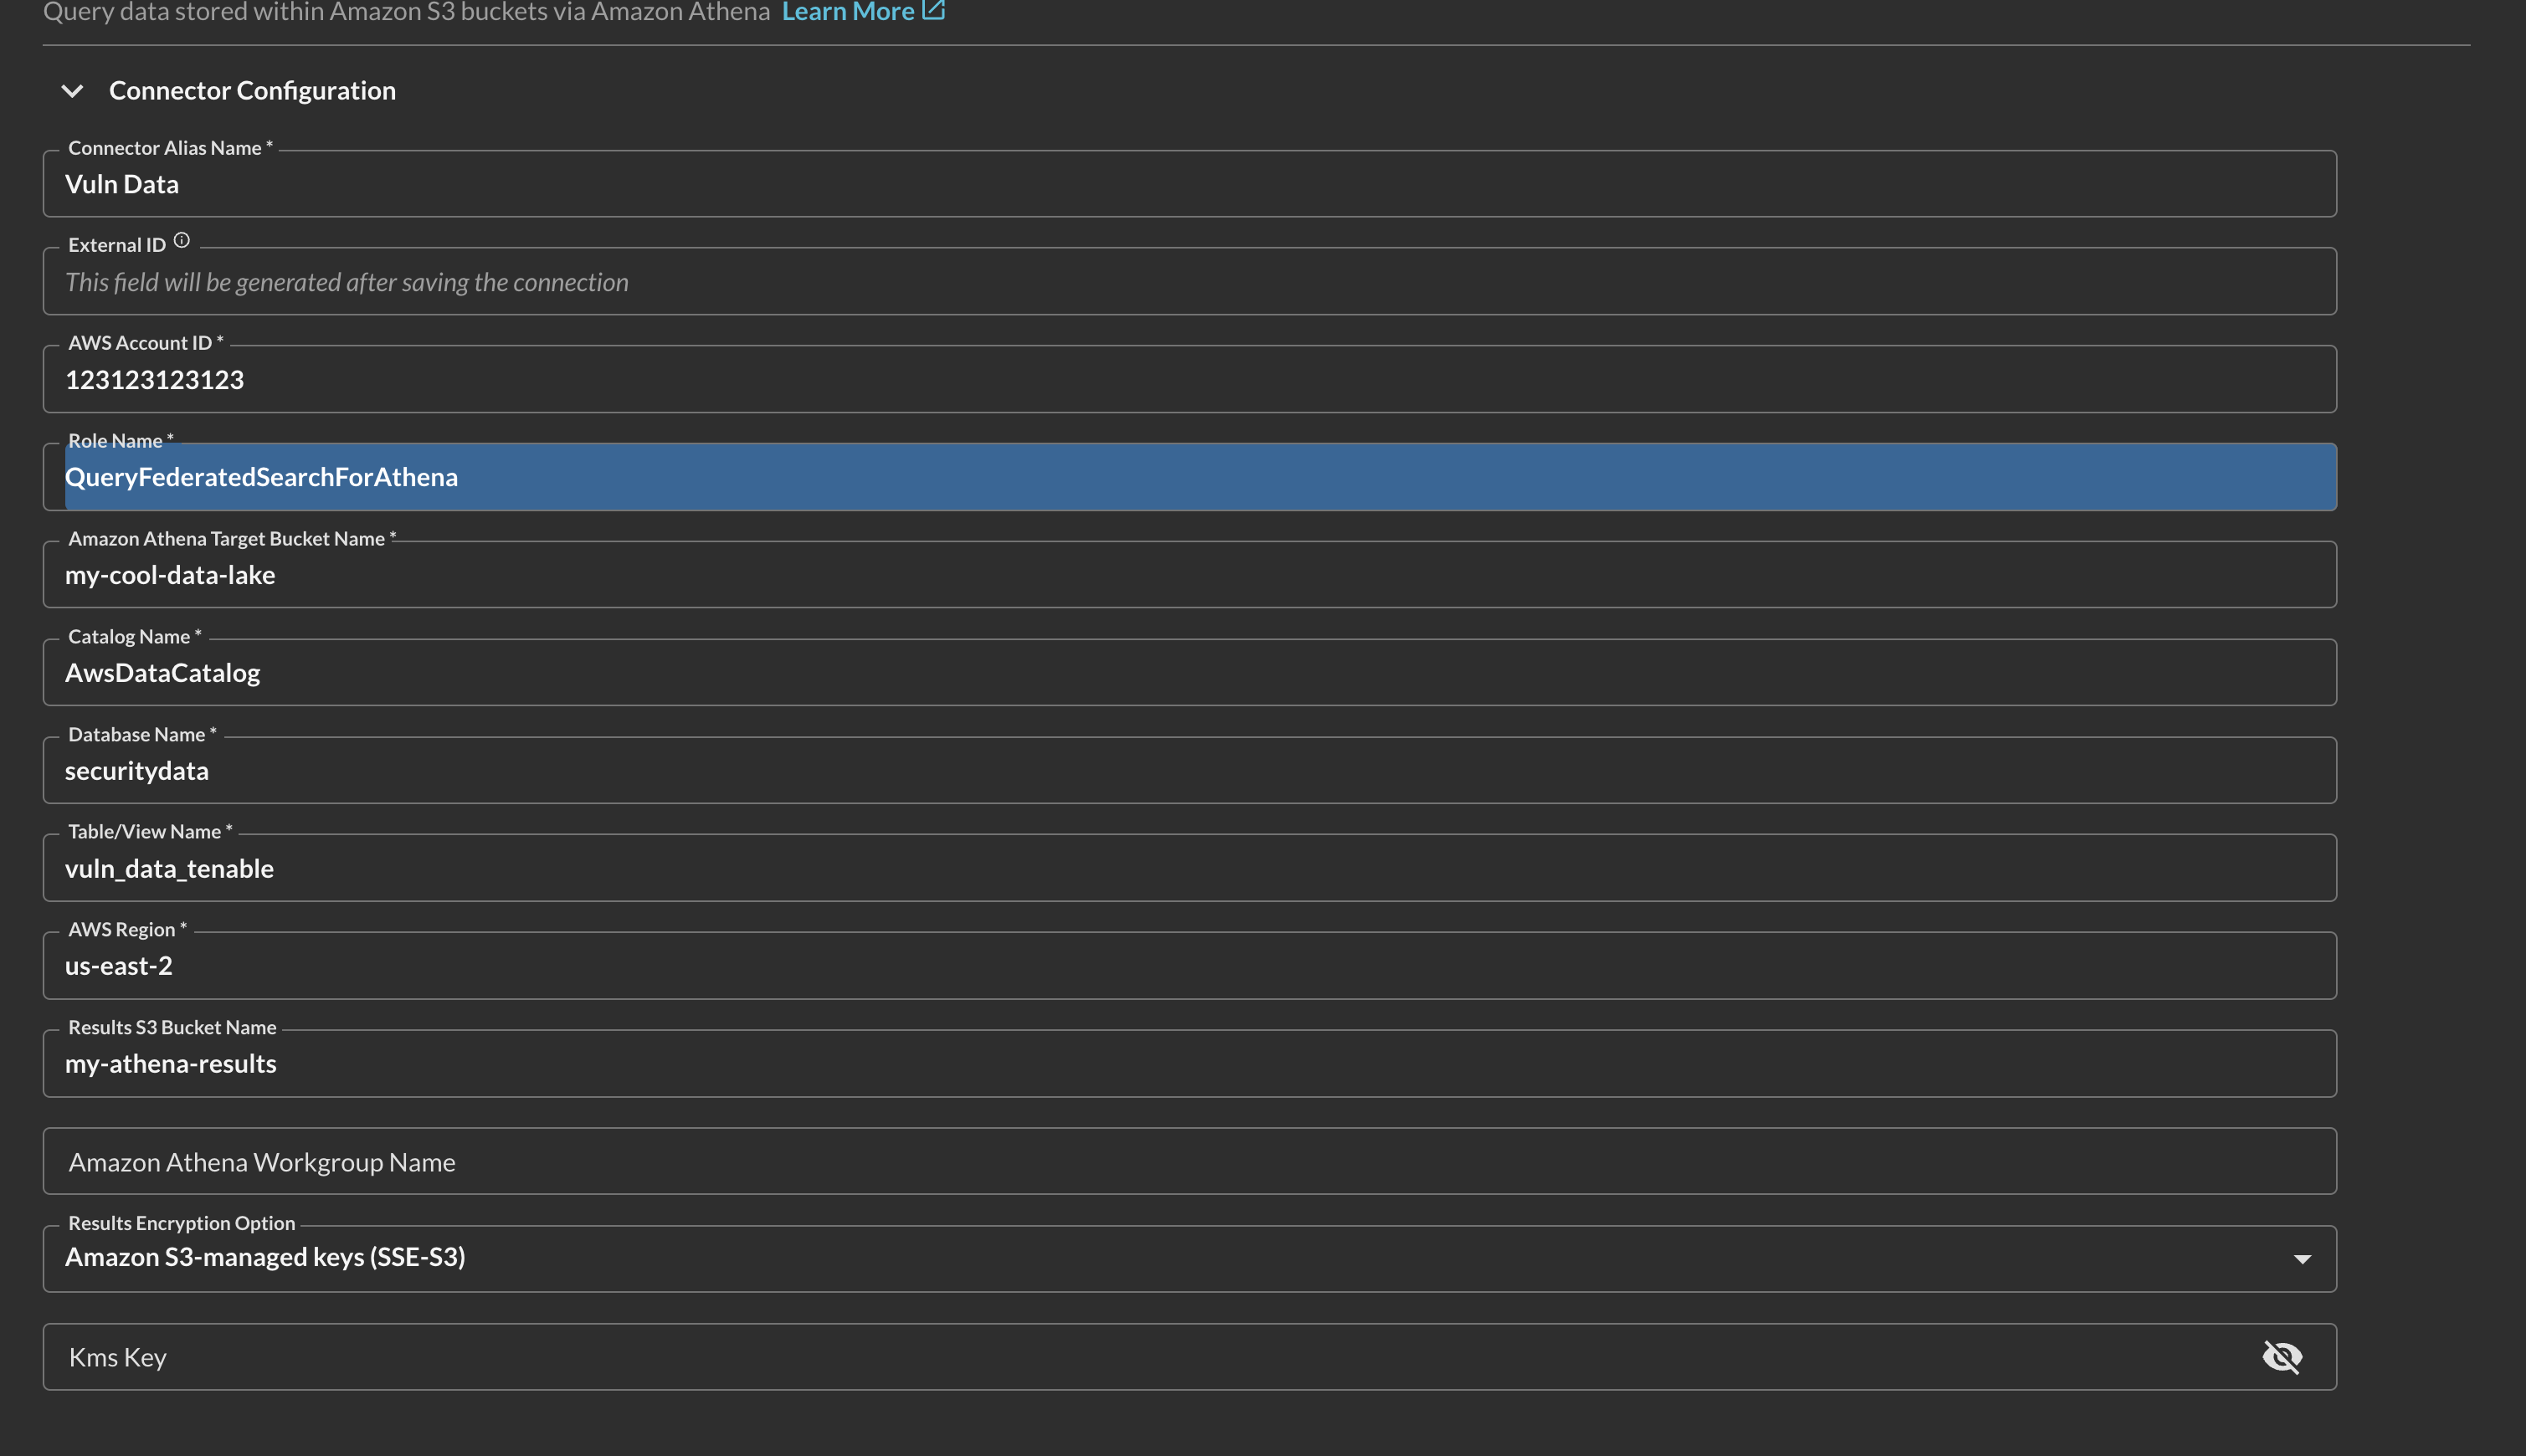
FIG. 4 - Specifying parameters for the Amazon Athena (for Amazon S3) connector
- Connector Alias Name: The human-readable name you want to give to this connector, you can reference table names or intended use cases or domain areas.
- External ID: This will be autogenerated after you Save the Connector. You will use this value for the IAM Role you created Step 5 of the Prerequisites section.
- AWS Account ID: Your AWS Account ID, copied in Step 1 of the Prerequisites section.
- Role Name: Your AWS IAM Role you prepositioned or identified for usage with Query Federated Search, copied in Step 5 of the Prerequisites section.
- Amazon Athena Target Bucket Name: The S3 bucket that contains the raw data referenced by AWS Glue, copied in Step 3 of the Prerequisites section.
- Catalog Name: Keep the
AwsDataCatalogvalue unless you are a legacy AWS Glue customer, in that case change the value toDefault. - Database Name: The name of the database that contains your target table or view, copied in Step 2 of the Prerequisites section.
- Table/View Name: The name of the table that contains the metadata of the data you want to search with Athena, copied in Step 2 of the Prerequisites section.
- AWS Region: The AWS Region where your bucket and Amazon Athena are located in, copied in Step 1 of the Prerequisites section.
- Results S3 Bucket Name: The name of the bucket that stores your Amazon S3 results, do not supply this value if you utilize an entry for Amazon Athena Workgroup Name , copied in Step 4 of the Prerequisites section.
- Amazon Athena Workgroup Name: (OPTIONAL VALUE) The Athena Workgroup name which specifies the Results Bucket and KMS Key used for Athena. Only supply this value if you plan on changing encryption options and/or the Results S3 Bucket Name. This value is referenced in Step 7 of the Prerequisites section.
- Results Encryption Option: (OPTIONAL VALUE) Specifies the type of Server Side Encryption used for you Results. Change the default value only if you use a KMS CMK or SSE-C for your Results bucket.
- KMS Key: (OPTIONAL VALUE) The Key ID or Key ARN of your KMS CMK used for your Athena Results Bucket.
-
Select Save to save and activate the Connector. Return to the Prerequisites to finish setting up your AWS IAM Role and Policy if you have no already.
-
Select Test Connection from the bottom-right of the connection pane to ensure that your AWS IAM Role is properly setup with the correct External ID and Permissions. This also checks for optional KMS CMK and LakeFormation permissions that are missing. Finally this check ensures that your database and table (or view) option exists and that Query can successfully return a single results from it.
-
Finally, proceed to the Preview Data section to begin the Configure Schema process. Refer to the hyperlink to learn how to use the Configure Schema no-code workflow, it is HIGHLY recommended for first time users.
You will now see Amazon Athena (for Amazon S3) added as an available Connector within the Query Search and Query Summary Insights UI.
Querying the Amazon Athena (for Amazon S3) Connector
Within the Query Search UI, all Connectors are enabled by default. To check that your specified Connector(s) for INTEGRATION are enabled, navigate to the Data Lakes and Data Warehouses section of the Selected Connectors dropdown and ensure that your specified Amazon Athena (for Amazon S3) Connector(s) are are selected (denoted by a checkbox) before running your searches as shown below (FIG. 5).
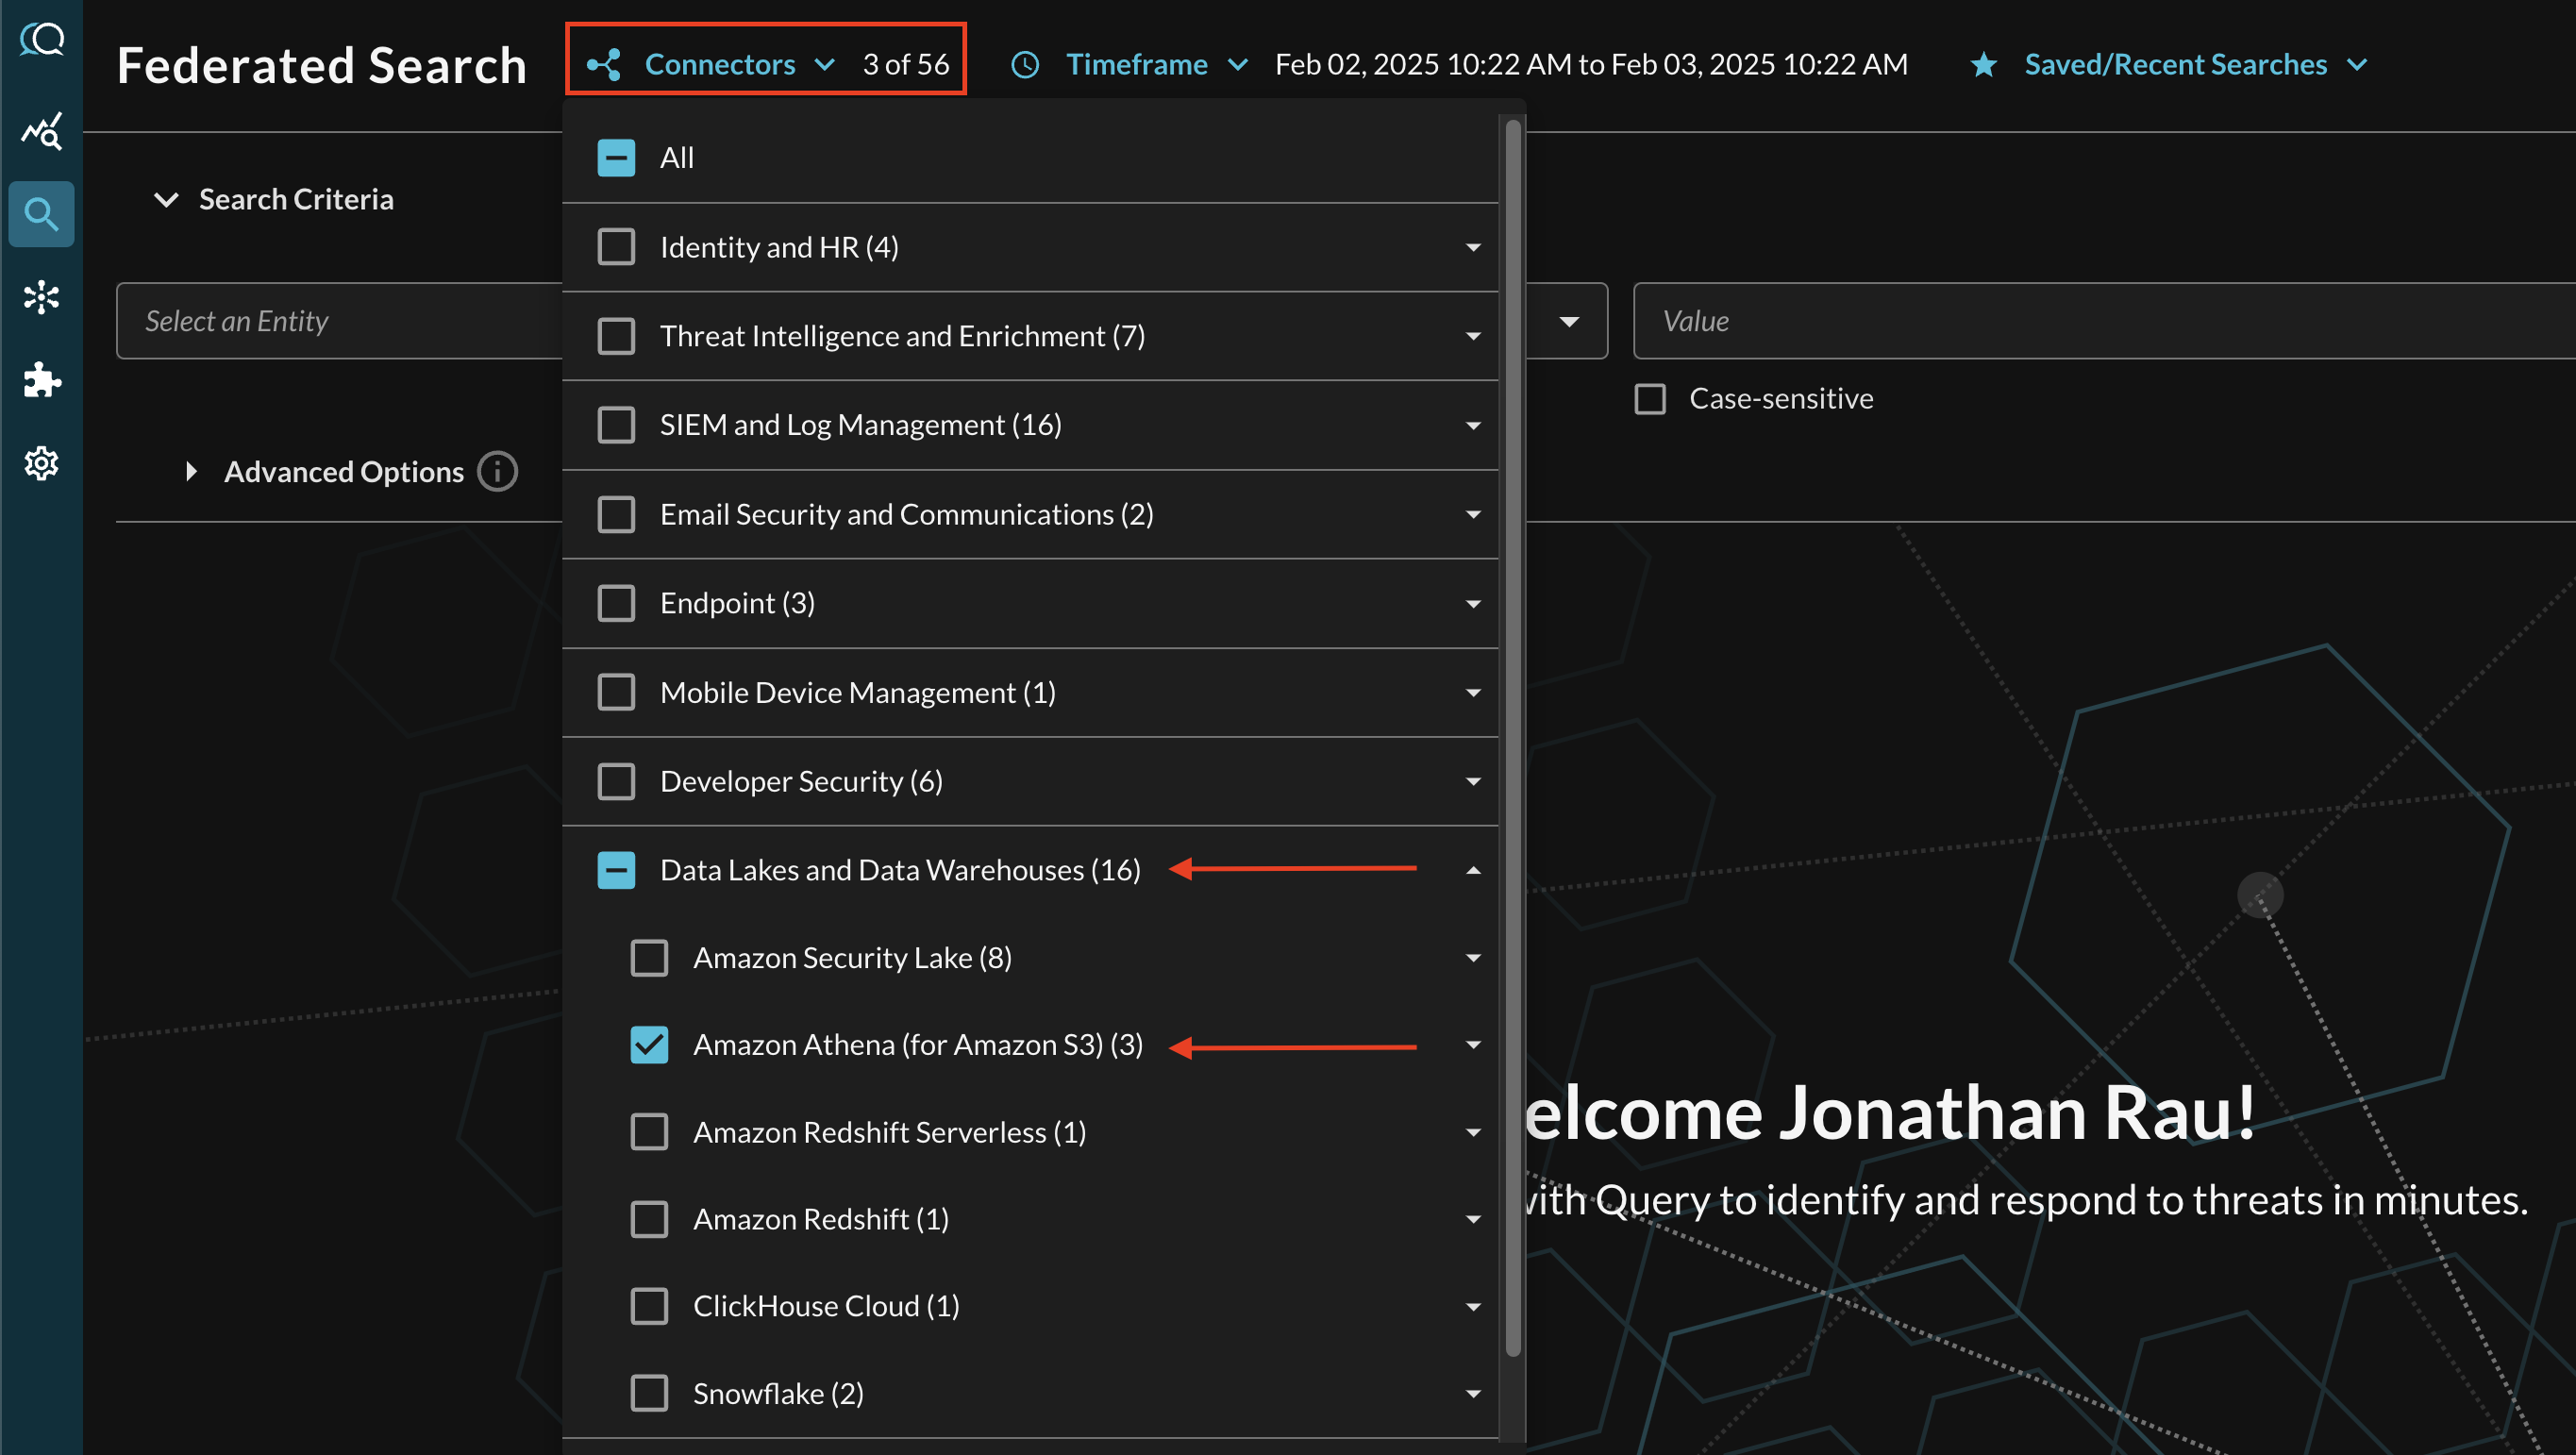
FIG. 5 - Selecting Amazon Athena (for Amazon S3) Connectors
The Entities (Observables) and Events you will be able to search determine on how you mapped your data in Configure Schema against a given Amazon Athena table/view. For more information about the QDM/OCSF schema itself refer to the About the Query Data Model section of the Query docs, you can also view the Categories, Events, and Objects themselves.
Example Amazon Athena Connector tgw_flow_logs Mapping
tgw_flow_logs MappingThe following mapping is based on the tgw_flow_logs table you can create from AWS Transit Gateway flow logs, as detailed in our blog here. This is a good spot to start with using Configure Schema to provide a full mapping of source data into the Query Data Model. For information on the log field meanings see the docs here.
- Event Class: Select Network Activity from the dropdown.
- Event Time: Select the
startfield, this isBIGINTtyped with Epoch-seconds but it can be converted by the Athena Connector, this is used to add time boxes to your queries. - Entities: These are multi-selection fields that correspond to all scalar OCSF Observables (see the
Type IDsection of the table. They are used for quicker lookups and broader searches in Query Federated Search.- Account ID:
account_id,tgw_src_vpc_account_id, andtgw_dst_vpc_account_id. For same-account TGW deployments, you do not need to map both of these to Account ID as it'll create duplicates. Theaccount_idis in reference to the account which contains the logs - such as a centralized logging account (if used). - IP Address:
srcaddranddstaddr. - Port:
srcportanddstport. - Resource UID: There are several pairs of Resource UIDs in the form of GUIDs for various AWS resources.
tgw_id: the GUID of the actual Transit Gateway the traffic traverses.tgw_attachment_id: the GUID of the Transit Gateway attachment - such as to another VPC, or Direct Connect Gateway - that the traffic traversed.tgw_src_vpc_idandtgw_dst_vpc_id: The VPC IDstgw_src_subnet_idandtgw_dst_subnet_id: The Subnet IDs, you can optionally use the Subnet Entity.tgw_src_eniandtgw_dst_eni: The Elastic Network Interface (ENI) IDs, these underpin specific EC2 instances, Lambda functions in a VPC, RDS clusters, etc.
- Subnet: THIS IS OPTIONAL! The Entity is meant for CIDRs (e.g.,
192.168.1.0/16) however you can also removetgw_src_subnet_idandtgw_dst_subnet_idfrom Resource UID and map them here.
- Account ID:
- Attributes: These are the individual key-value pairs that make up the OCSF/QDM schema, you do not need to actually map any of these if you do not wish to. The following IS NOT an exhaustive list, it will populate most important elements to display in the Results and Summary Insights visualizations.
activity_id: Chooselog_statusand map the following enums to constant values. All Transit Gateway logs are simply TCP/UDP traffic, the status only pertains to the log delivery consistency.- 6 TRAFFIC:
OK,SKIPDATA, andNODATA
- 6 TRAFFIC:
end_time:endmessage:log_status, you can also change this to any other value,messagewill always appear as a default column in Results and Summary Insights. Your analysts may find other values interesting such astgw_idordstaddr.severity_id: Chooselog_statusand map the following enums to constant values. Transit Gateway logs don't have much in the way of severity, and require additional data for investigations- 1 INFORMATIONAL:
OK,SKIPDATA, andNODATA
- 1 INFORMATIONAL:
start_time:startstatus_id: Chooselog_statusand map the following enums to constant values. Thelog_statusofSKIPDATAdenotes that there was issue with collecting the logs, whereasOKis regular flows andNODATApertains to non-observable traffic in the TGW such as AWS traffic over DHCP, ARP, or from the VPC Router.- 1 SUCCESS:
OKandNODATA - 2 FAILURE:
SKIPDATA
- 1 SUCCESS:
connection_info.direction_id: Chooseflow_directionand map the following enums to constant values.- 1 INBOUND:
ingress - 2 OUTBOUND:
egress
- 1 INBOUND:
connection_info.protocol_num:protocolconnection_info.tcp_flags:tcp_flagsdevice.desc:resource_typedevice.uid:tgw_iddevice.uid_alt:tgw_attachment_iddst_endpoint.interface_uid:tgw_dst_eni
dst_endpoint.ip:dstaddrdst_endpoint.port:dstportdst_endpoint.subnet_uid:tgw_dst_subnet_iddst_endpoint.svc_name:pkt_dst_aws_serviceis the corresponding AWS Service name to a particular IP range such as API_GATEWAY or ROUTE53_RESOLVER. Not every single service is enumerated.dst_endpoint.vpc_uid:tgw_dst_vpc_iddst_endpoint.zone:tgw_dst_az_idsrc_endpoint.interface_uid:tgw_src_enisrc_endpoint.ip:srcaddrsrc_endpoint.port:srcportsrc_endpoint.subnet_uid:tgw_src_subnet_idsrc_endpoint.svc_name:pkt_src_aws_servicesrc_endpoint.vpc_uid:tgw_src_vpc_idsrc_endpoint.zone:tgw_src_az_idtraffic.bytes:bytestraffic.packets:traffic
Entity-based Search
To conduct an Entity-based search, ensure that all of the data points you will be searching for are mapped within the Configure Schema wizard as demonstrated in the previous section.
In the Federated Search console, select the search dropdown, ensure the Entities radio button is selected and search for your desired Entity as shown below (FIG. 6). For instance, you can search for IP addresses or User Agents from Amazon ALB access logs or specific users and devices from ZScaler ZIA logs via NSS, these Entities can be further correlated against other different Query Connectors.
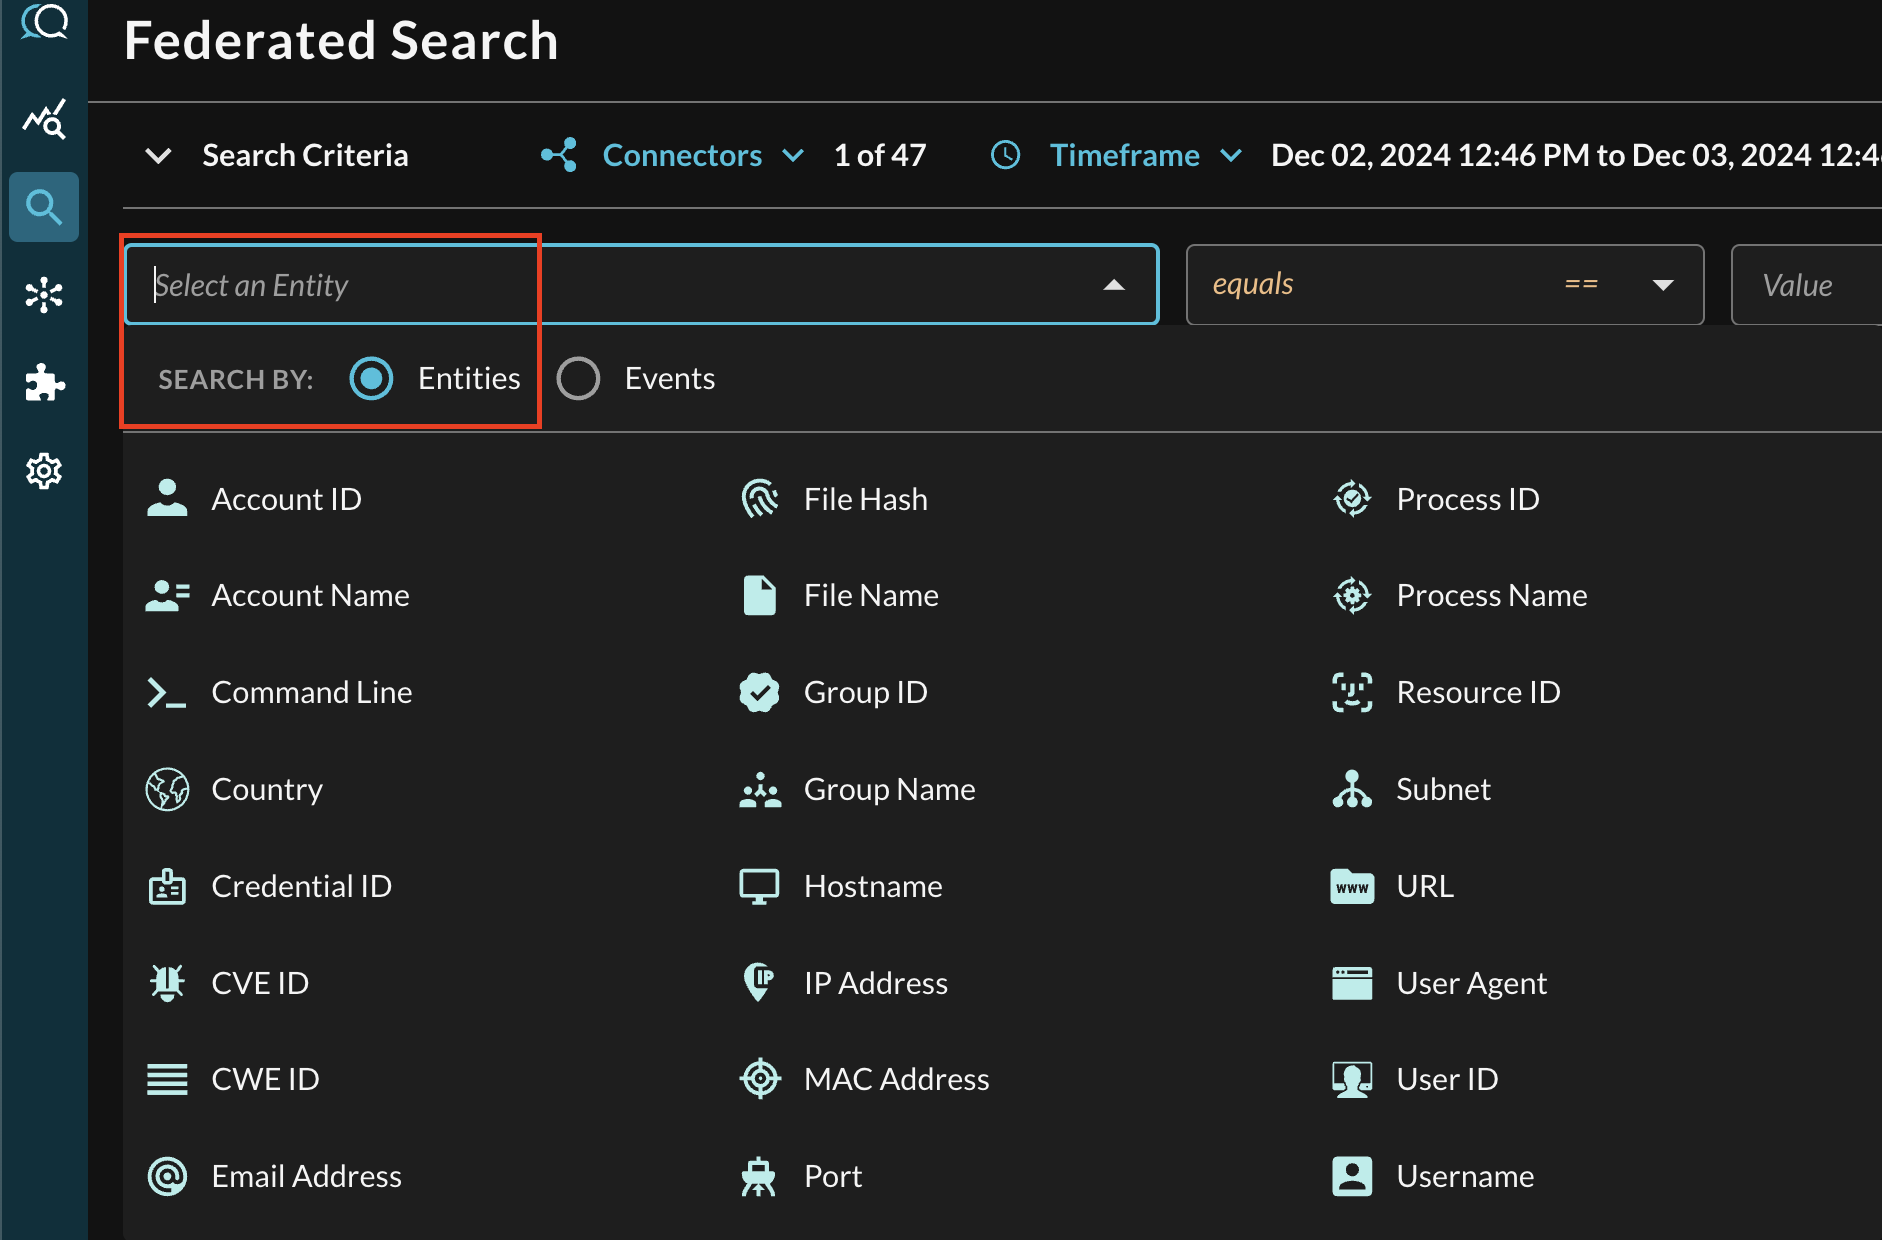
FIG. 6 - Entity-based searching with Query Federated Search
After selecting an Entity, most allow you to specify an Operator. This allows you to perform simple equality searches or to perform more generalized searches using Contains, Starts With, or Ends With Operators. These are all mapped to their appropriate SQL operators within the Athena SQL syntax using equality operators as well as the regexp_like() operator.
When you search for multiple values that may be present across different Connectors, the Query Federated Search query planner inspects the Configure Schema metadata to ensure searches are sent to the appropriate Connectors, this operates more as a collated window function within Query and not as an expensive SQL join.
Additionally, you can specify case-sensitivity for the entire search criteria. An example of a multi-value CVE search that uses the equals operator and toggled case-sensitivity is shown below (FIG. 7).
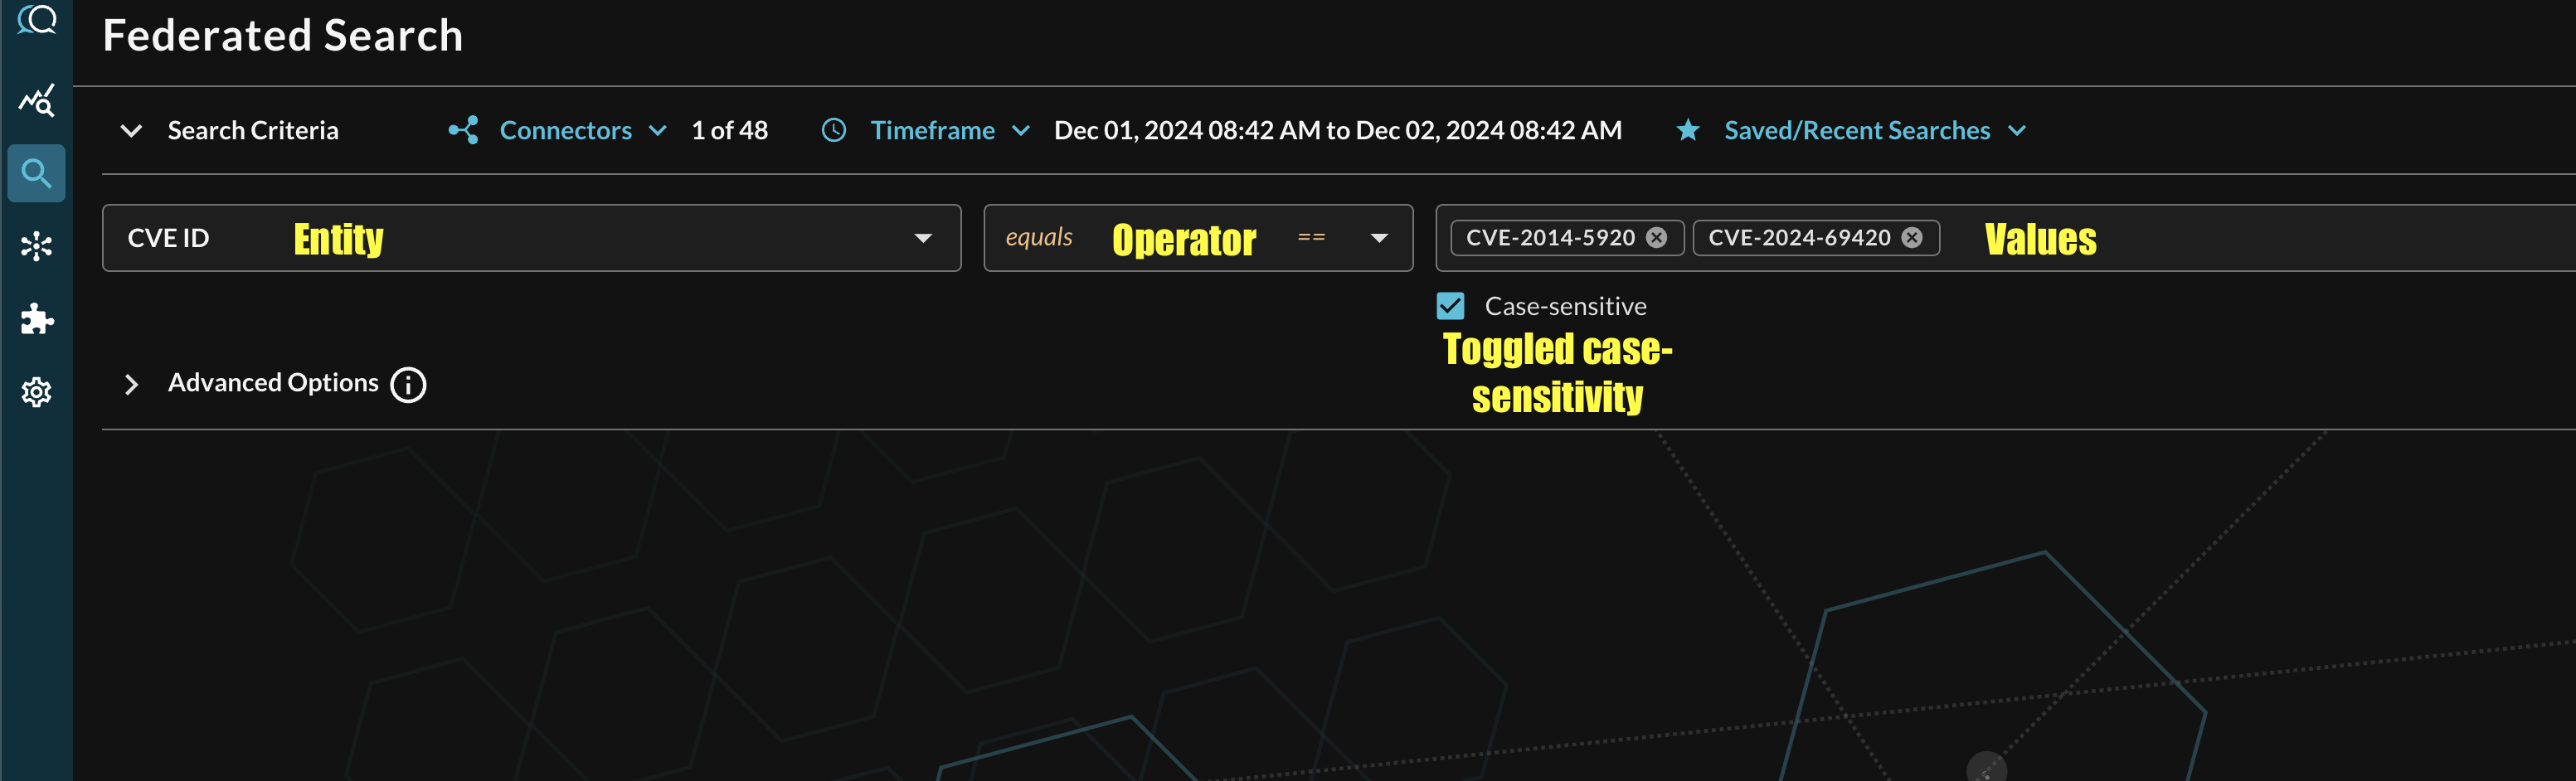
FIG. 7 - Orientation for Entity-based search in Query Federated Search
Event-based Search
To conduct an Event-based search, ensure that all of the data points you will be searching for are mapped within the Configure Schema wizard as demonstrated in the mapping section. Within the Federated Search console, only mapped Events per the Select Connectors are populated, unlike Entities which has every potential value shown in the list.
Resources
Refer to the previous sections' hyperlinks for more information on specific resources, services, tools and concepts. For further help with creating tables and performance tuning, consider some of the resources below.
- Defining crawlers in AWS Glue
- CREATE TABLE
- SQL reference for Athena
- Working with views
- Performance tuning in Athena
- Top 10 Performance Tuning Tips for Amazon Athena
Troubleshooting Tips
- If you recently changed your permissions / Role in Query, log out and in again and clear your cache if you cannot Save or Test Connection.
- Verify that you were able to create the IAM Policy and Role and that they successfully attached.
- Ensure that Amazon Athena (for Amazon S3) does not have reported Issues and that there is data in your AWS Glue Tables from Athena.
- Ensure that your Amazon Athena, Amazon S3, AWS KMS and Amazon Athena (for Amazon S3) resources are all deployed in the same Region - despite Amazon S3 being a "global" resource - Athena and Athena do not respect this.
- Ensure that you entered the proper AWS Region for your Connector.
- Ensure that the Role Name you created matches the Role Name in your Connector
- Ensure that the AWS Account ID you entered in your Connector matches the AWS Account you have deployed Amazon Athena (for Amazon S3) to, the Query Federated Search Platform does not use Subscriber Access.
- Ensure that other details such as the Glue Database, Glue Table, and the Amazon Athena (for Amazon S3) S3 Bucket or Amazon Athena Results S3 Bucket names are correct and are aligned to the data source you're attempting to create.
- Verify that you gave the correct IAM Role Lake Formation
SELECTandDESCRIBEpermissions to the correct Database(s), Table(s) and/or Views if you are using Lake Formation for your Athena deployments. - Verify that you are not using an AWS KMS CMK for either your Amazon Athena (for Amazon S3) S3 Bucket or Amazon Athena Results S3 Buckets, if you are, refer back to the previous sections to update your AWS IAM Policy and your KMS Key Policies.
- Verify that your Organization, Organizational Unit(s), and/or AWS Account does not have a Service Control Policy (SCP) blocking external principals from
sts:AssumeRoleor other IAM actions related to Athena, Glue, and/or S3.
If you have exhausted the above Troubleshooting list, please contact your designated Query Sales Engineer or Customer Success Manager. If you are using a free tenant please contact Query Customer Success via the Support email in the Help section or via Intercom within your tenant.
Updated 8 months ago