MISP (Malware Information Sharing Project)
Integrate Query with MISP to retrieve nearly any IOC and its associated metadata using the restSearch API with results normalized into OCSF
Overview
MISP - or the Malware Information Sharing Project - is the most popular open source Threat Intelligence Platform (TIP) in the market today. As the name suggests, it started its life as a malware analysis and Digital Forensics/Incident Response (DFIR) project, but has grown significantly since and is used by organizations of all sizes to create intelligence products, analytics, or just to store and disseminate information and Indicators of Compromise (IOCs).
The core concept of MISP is sharing of information, it has a hierarchical structure of how information is grouped, all described within the MISP Data Models. MISP defines “Objects” which are not too unlike Query Data Model (QDM, based on the Open Cybersecurity Schema Framework) Objects – they’re essentially Nouns: people, places, things, subjects – and every Object has a top-level Category as well as a Type. The Category is threat & open source intelligence specific: Network Activity, Payload Delivery, Persistence Mechanism and the Types are not OOP data types per se but organizational identifiers: boolean, campaign-id, cc-number, ip-dst. They’re almost like OCSF Attributes in a way.
The Query Connector for MISP connects with MISP servers to search Attributes within their Events. Events are sourced from analysts internal to a company as well as external who curate Feeds – these are collections of Events -- which contain information about IOCs, behaviors, threat groups, campaigns and more. MISP provides a powerful search mechanism the restSearch API where we can retrieve specific IOCs that correspond to our Entities and surface the results normalized to the OSINT Inventory Info Event Class.
Prerequisites
All you need to connect to your MISP installation is to have a publicly reachable URL and an API Key. If your MISP instance is behind a DMZ you will need to setup a reverse proxy and disable SSL verification and provide that as a URL. If you use IP Allowlisting for your MISP instance, please reach out to the Query Customer Success team at [email protected] to get a list of Query outbound IP addresses.
The following steps walks you through retrieving the External URL of your MISP instance and setting up an API Key.
-
Login to your MISP instance and using the upper navigation bar navigate to Administration -> Server Settings & Maintenance as shown below (FIG. 1).
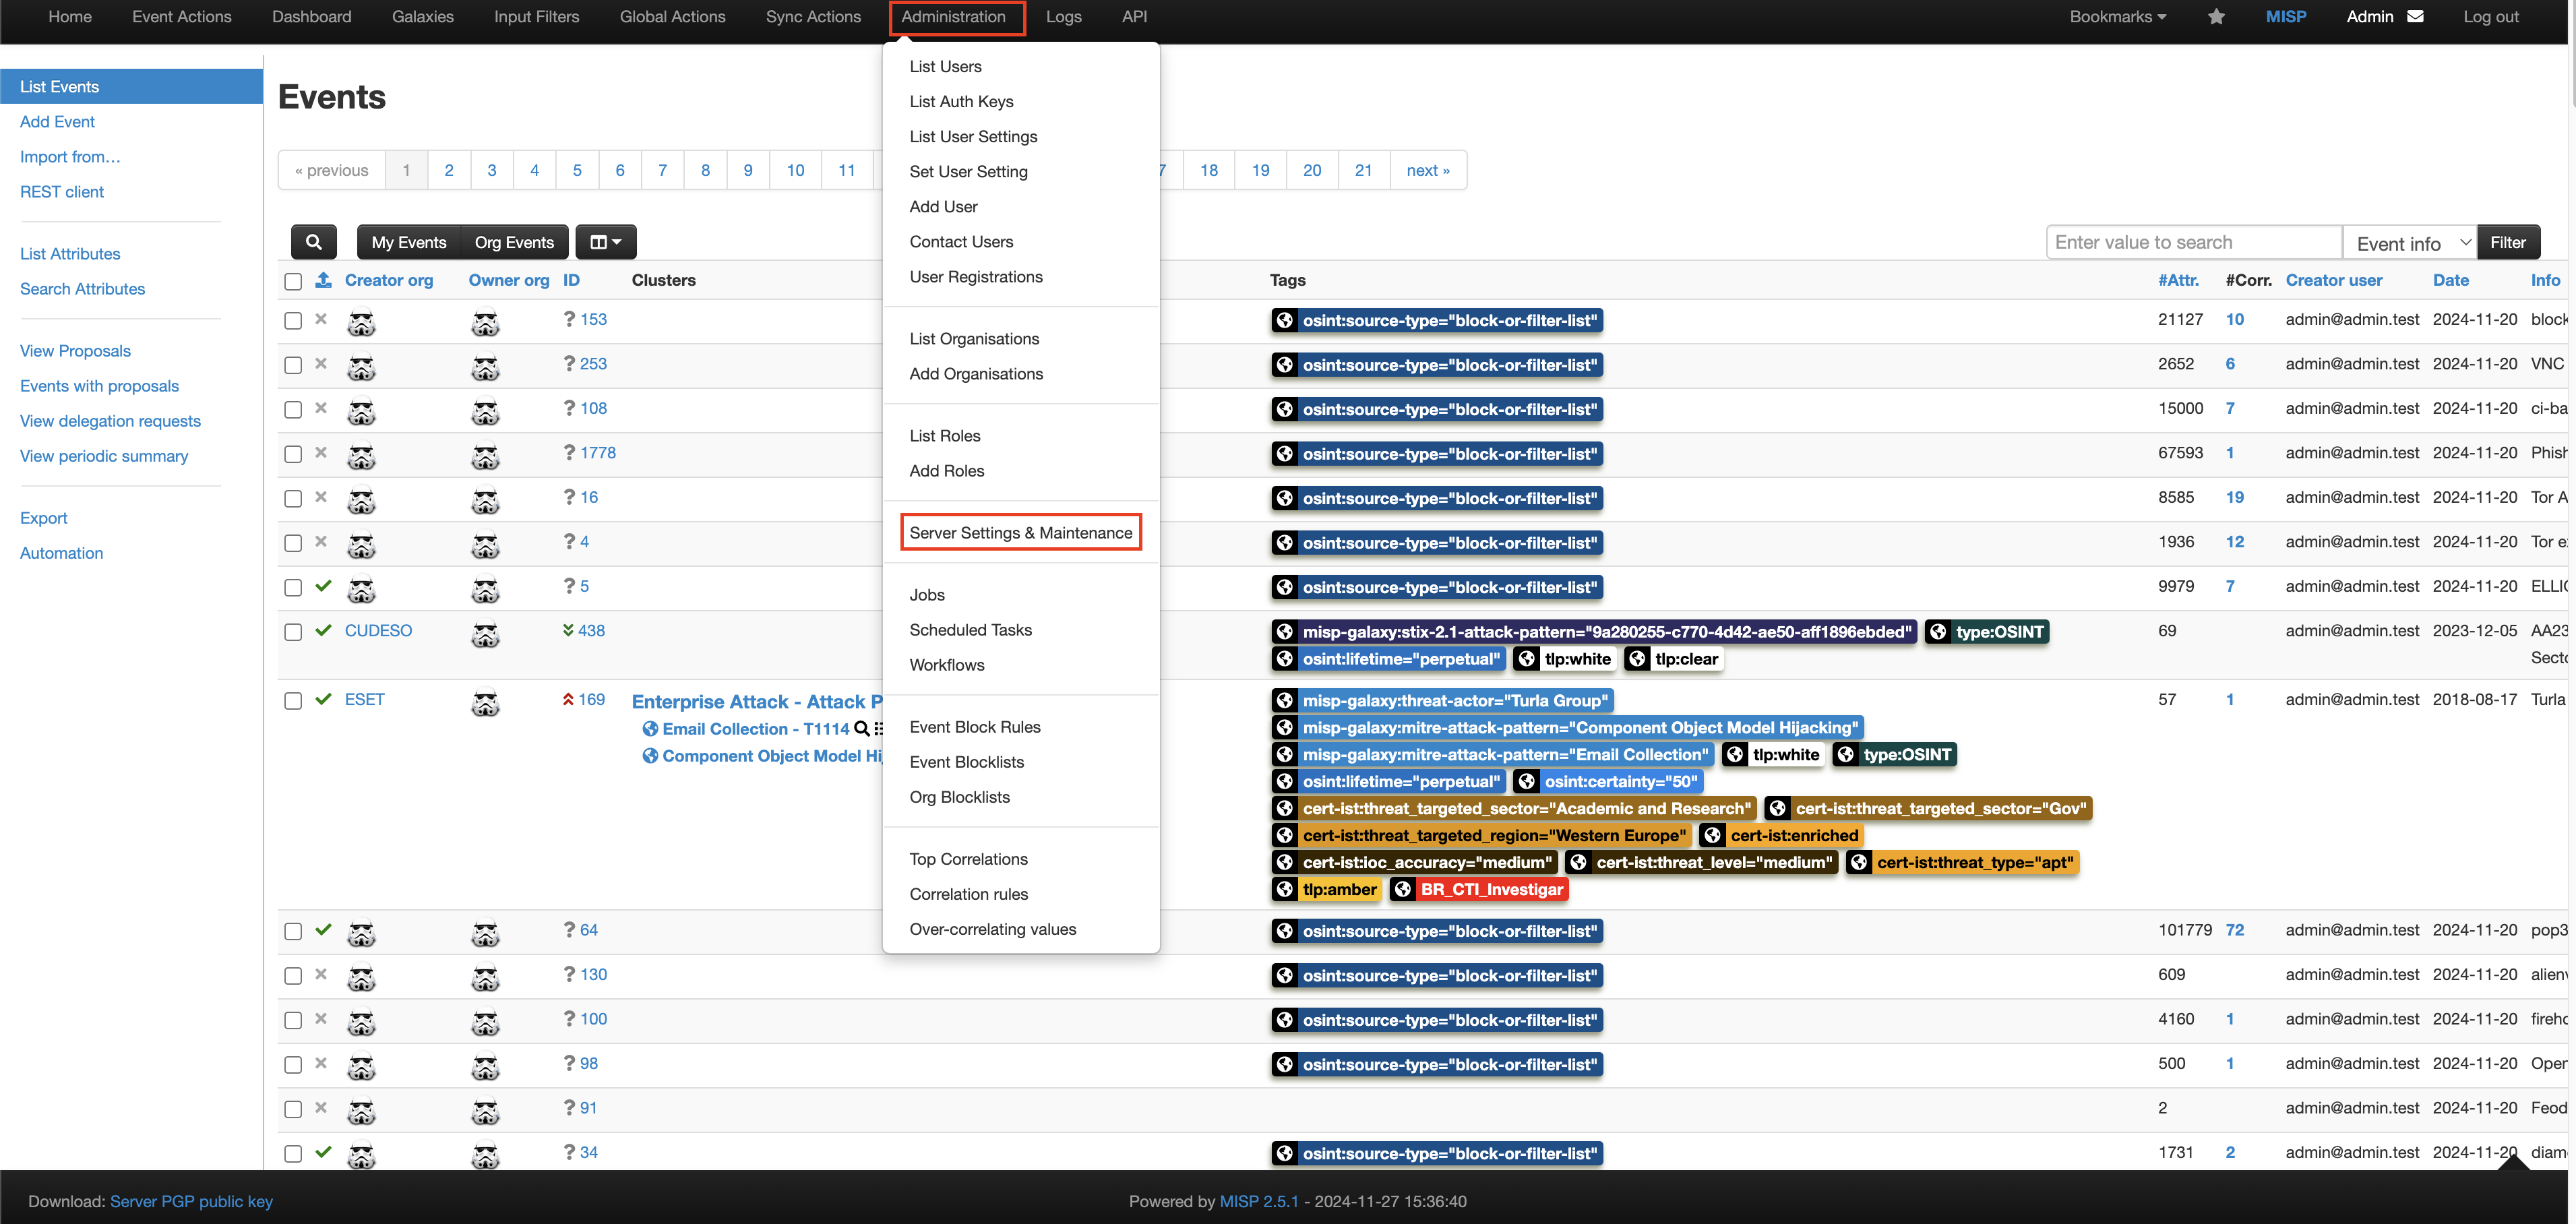
FIG. 1 - Navigating to the Server Settings & Maintenance section in the MISP console
-
Select the MISP tab and retrieve the Value of the
MISP.external_baseurlSetting as shown below (FIG. 2). This External URL must be internet-reachable or you must use a reverse proxy.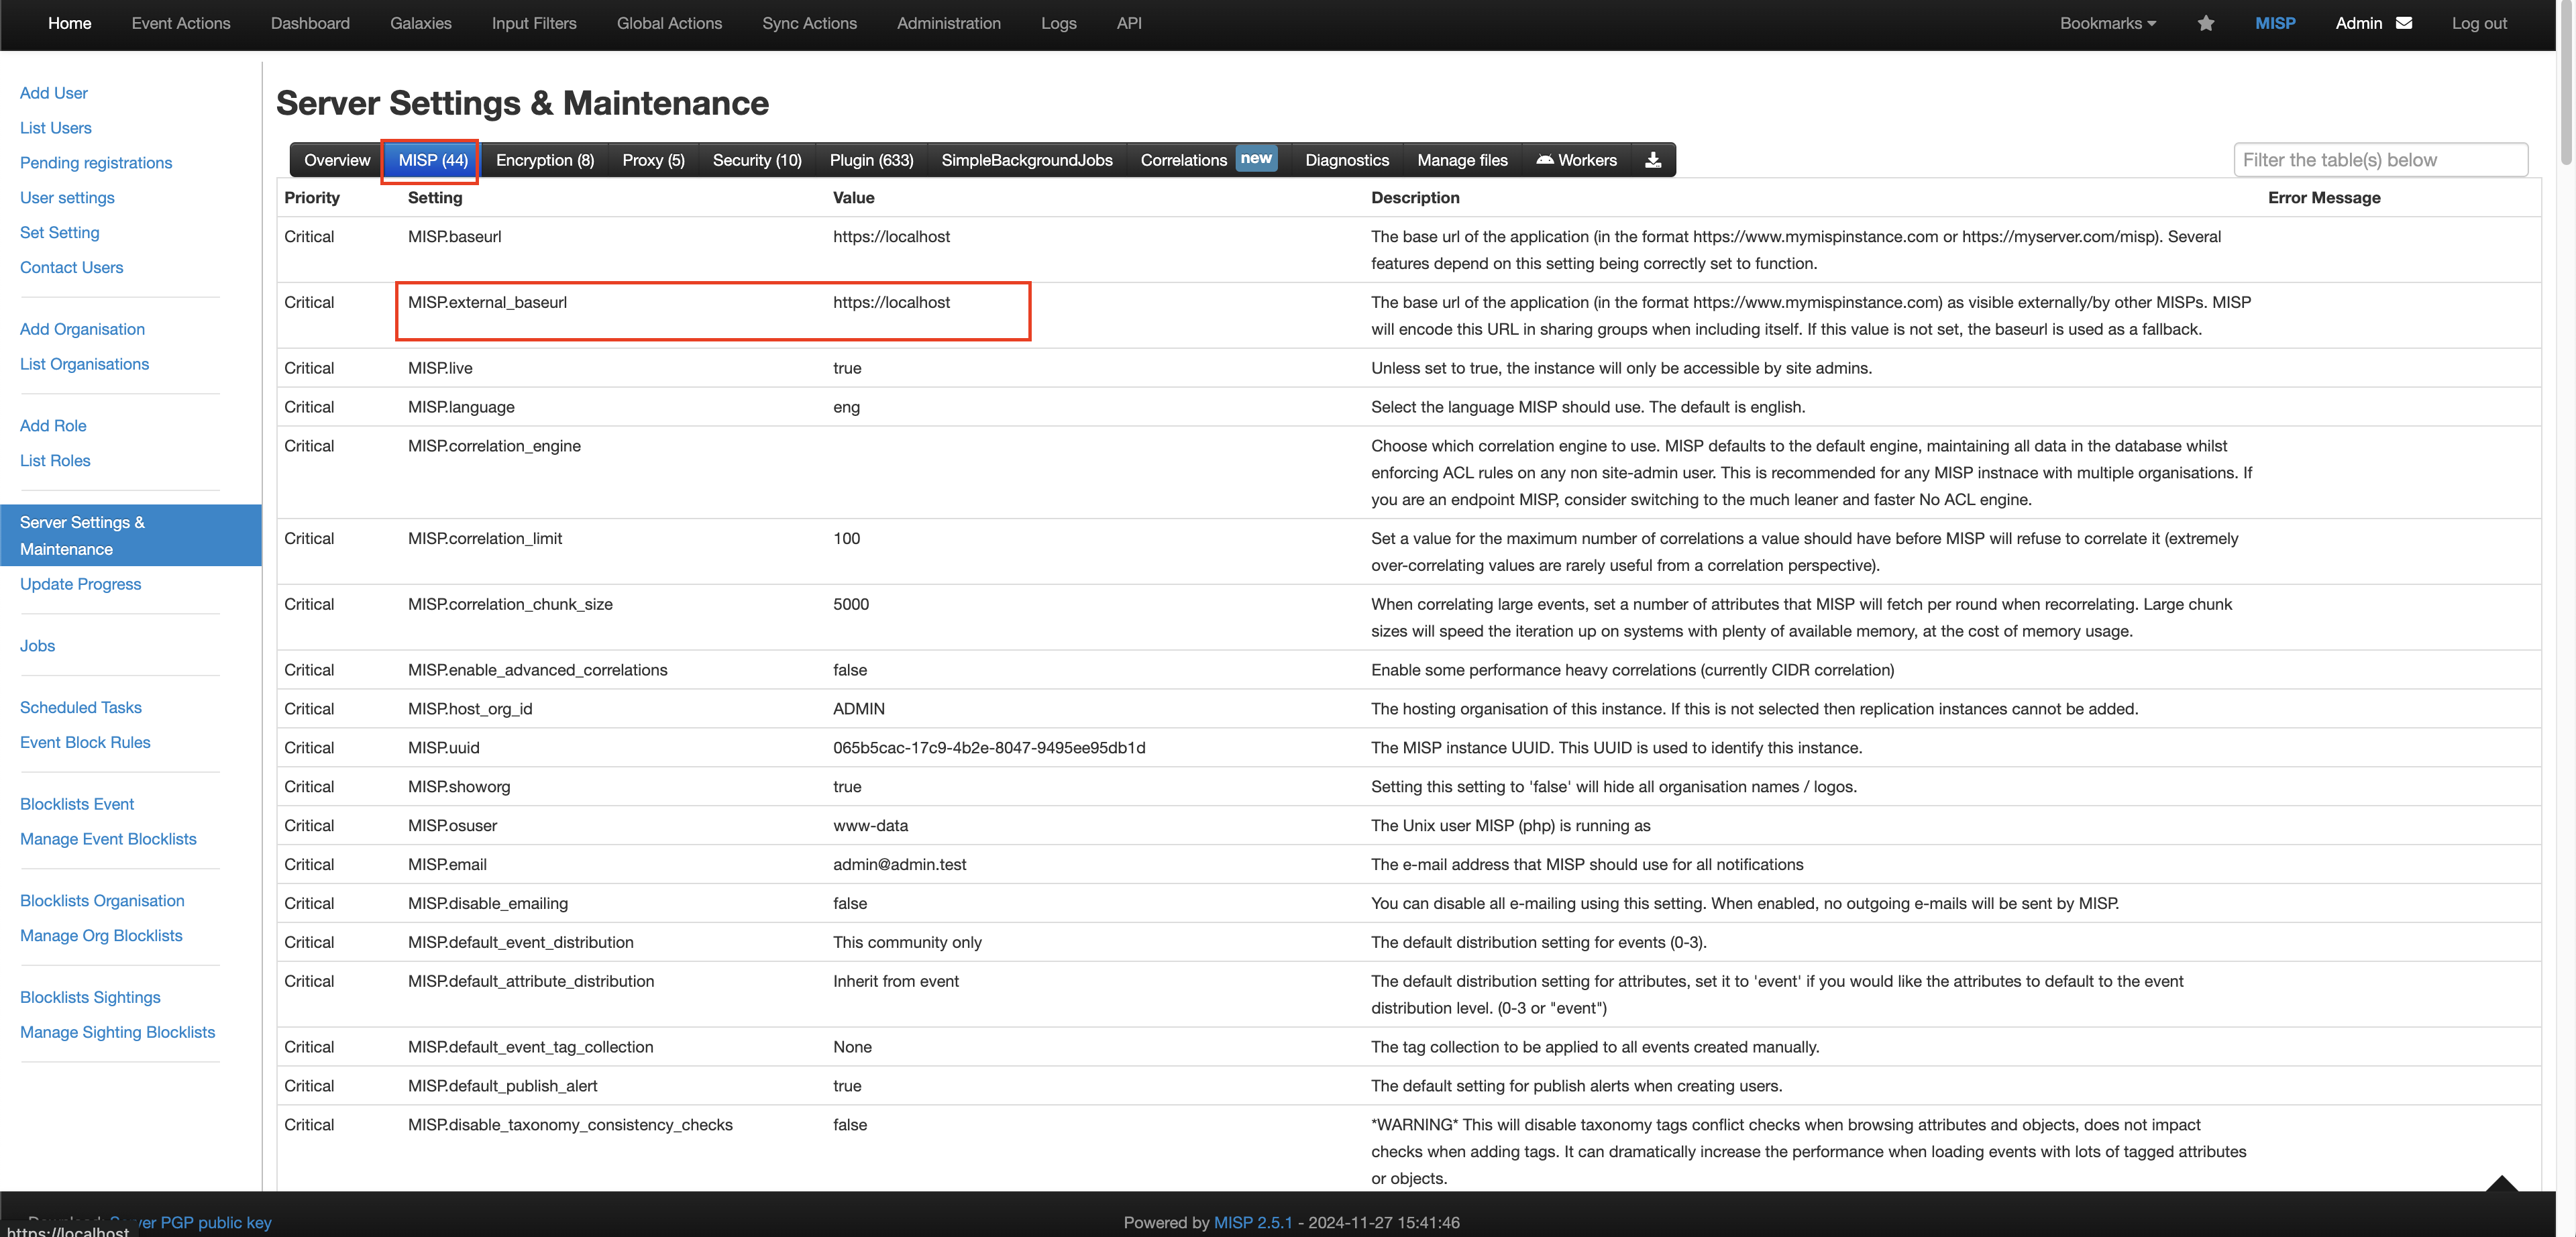
FIG. 2 - Retrieve the External URL of a MISP Instance
-
To generate a new API Key (Auth Key) navigate to Admin -> List Auth Keys. Once there select Add authentication key as shown below (FIG. 3).
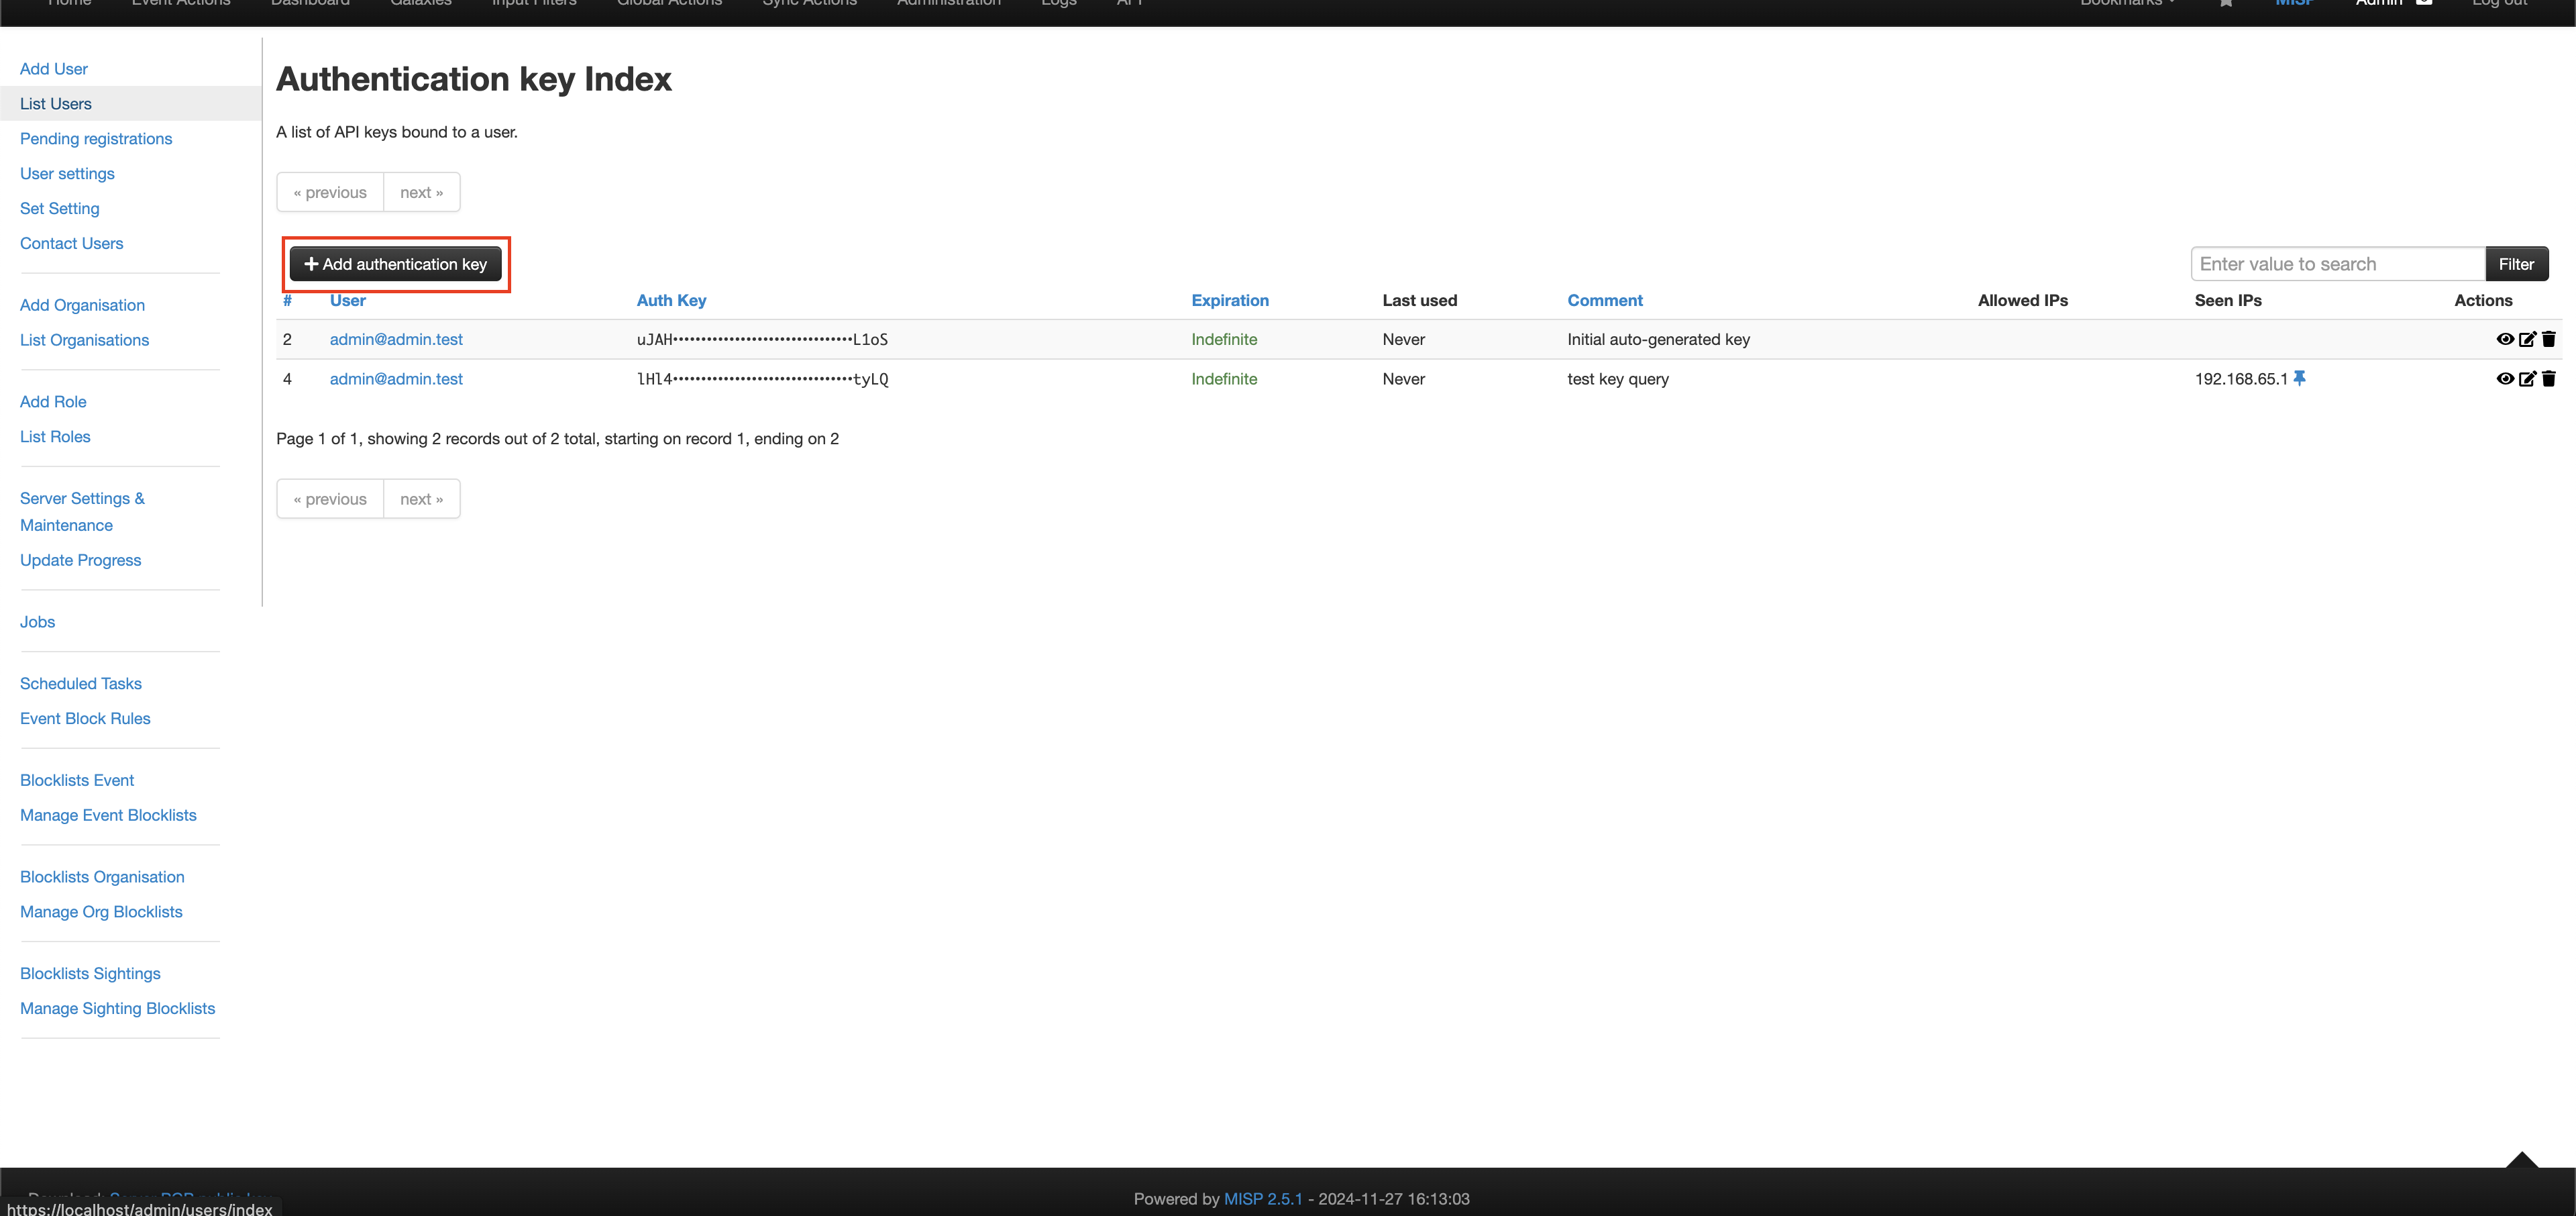
FIG. 3 - Adding a new Auth Key in MISP
-
If desired, add a Comment, Allowed IPs, and an Expiration and select Submit as shown below (FIG. 4). Once complete, you will be prompted to copy the auth key.
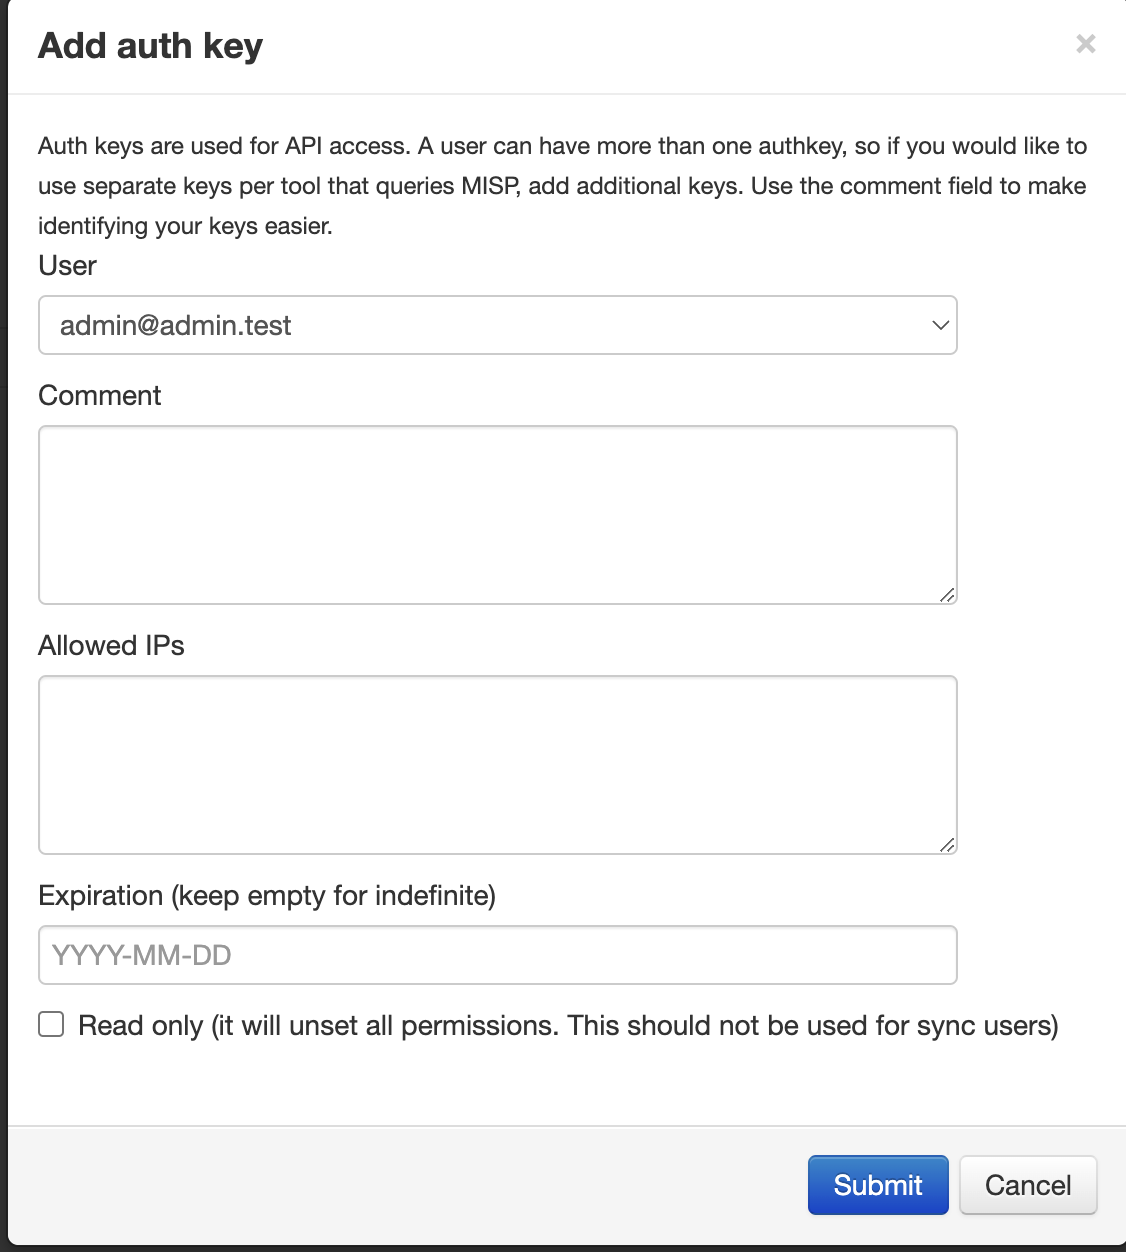
FIG. 4 - Configuring the Auth Key parameters in MISP
Proceed to the next section to learn how to configure the Query Federated Search Connector for MISP.
On NHI securityNHI - or, Non-Human Identities - such as your MISP Auth Key is extremely sensitive. Query securely stores the Client Secret in a dedicated AWS Secrets Manager Secret per Connector per Tenant.
Every Secret is stored as securely as each other with minimum necessary permissions that only allows the specific piece of serverless infrastructure to retrieve the secret, it is never cached or persisted outside of the Secret.
Setting up the MISP Connector
Use the following steps to create a new Query Federated Search Connector for MISP.
-
Navigate to the Connectors page, select Add Connector, and selectMISP from the
Threat Intelligence and Enrichmentcategory as shown below (FIG. 5). You can also search for MISP using the search bar in the Add Connector page.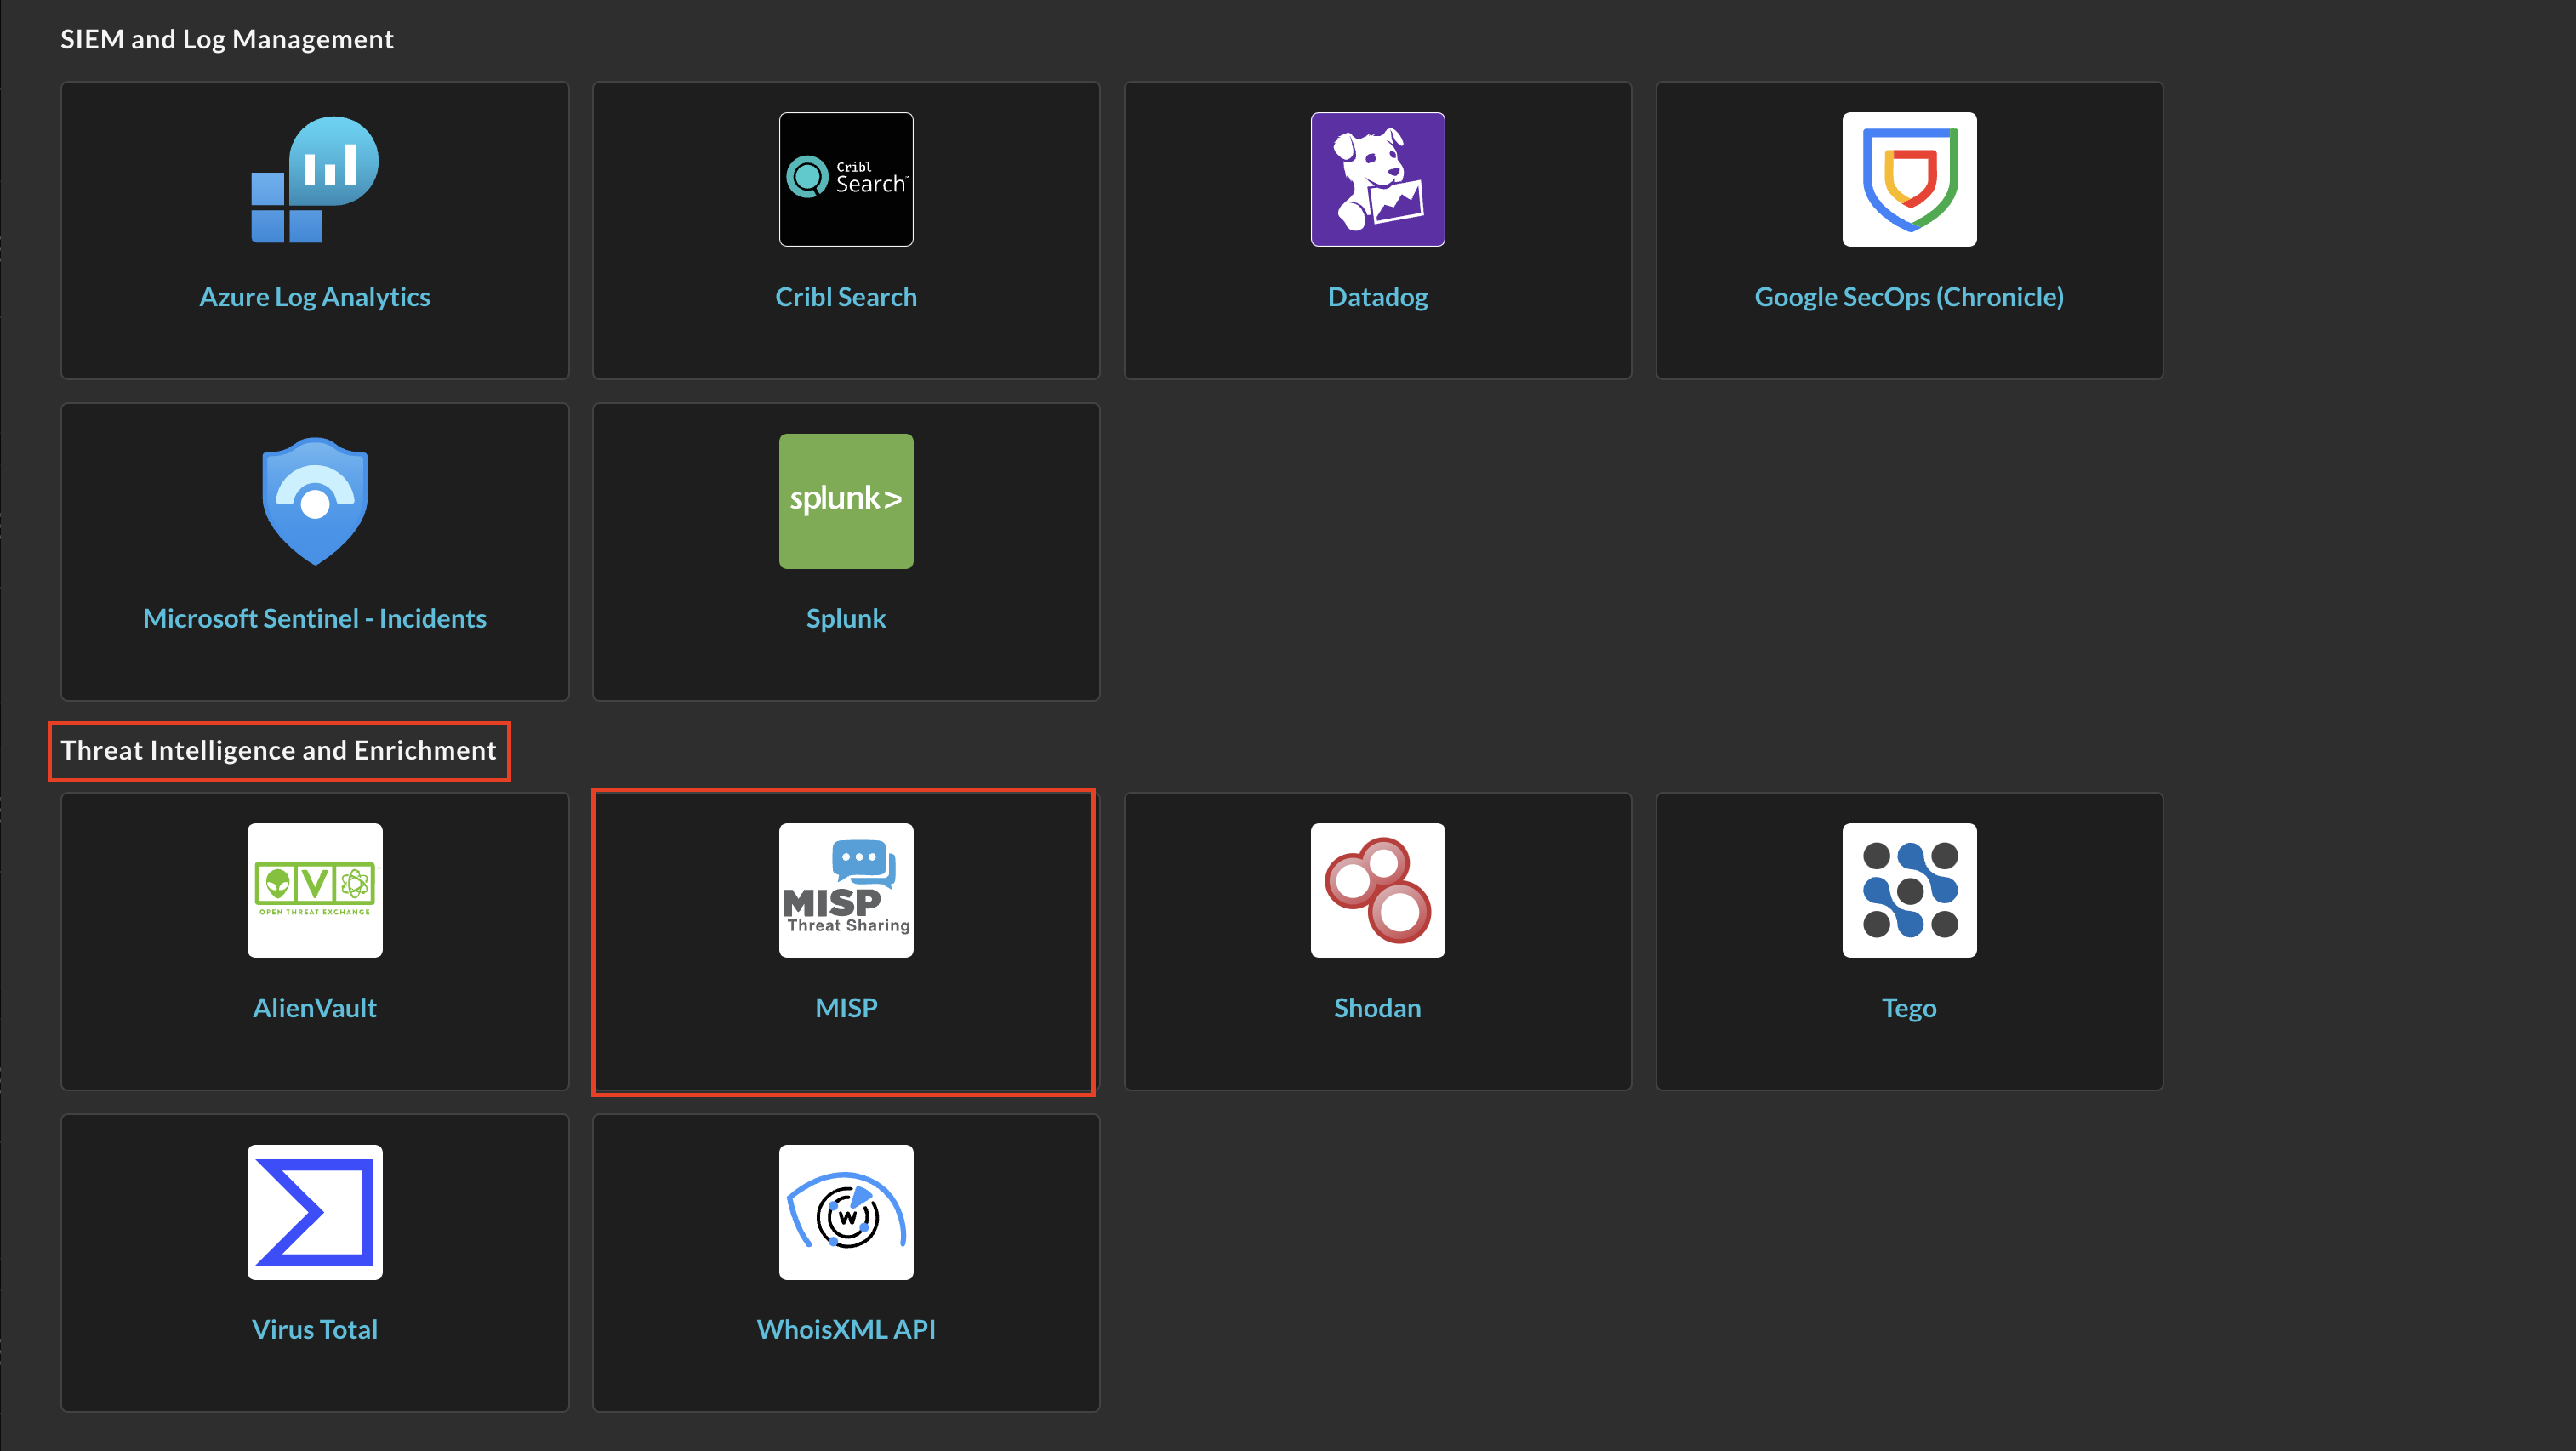
FIG. 5 - Locating the MISP Connector in Query Connectors
-
In the Configure Connector tab, add the following detail as shown below (FIG. 6):
-
Connector Alias Name: The human-readable name you want to give to this connector, you can specify a specific MISP server, or if your an MDR/MSSP you can denote different MISP servers by customer tenants.
-
API Key: Your MISP API Key (Auth Key), copied in Step 4 of the Prerequisites section.
-
MISP Instance URL: The External URL of your MISP server or the URL of your reverse proxy, copied in Step 2 of the Prerequisites section.
-
MISP Types: A comma-separated list of MISP Types that you only want to ever retrieve from the Connector, for instance
ip-dst,vulnerability,weakness, etc.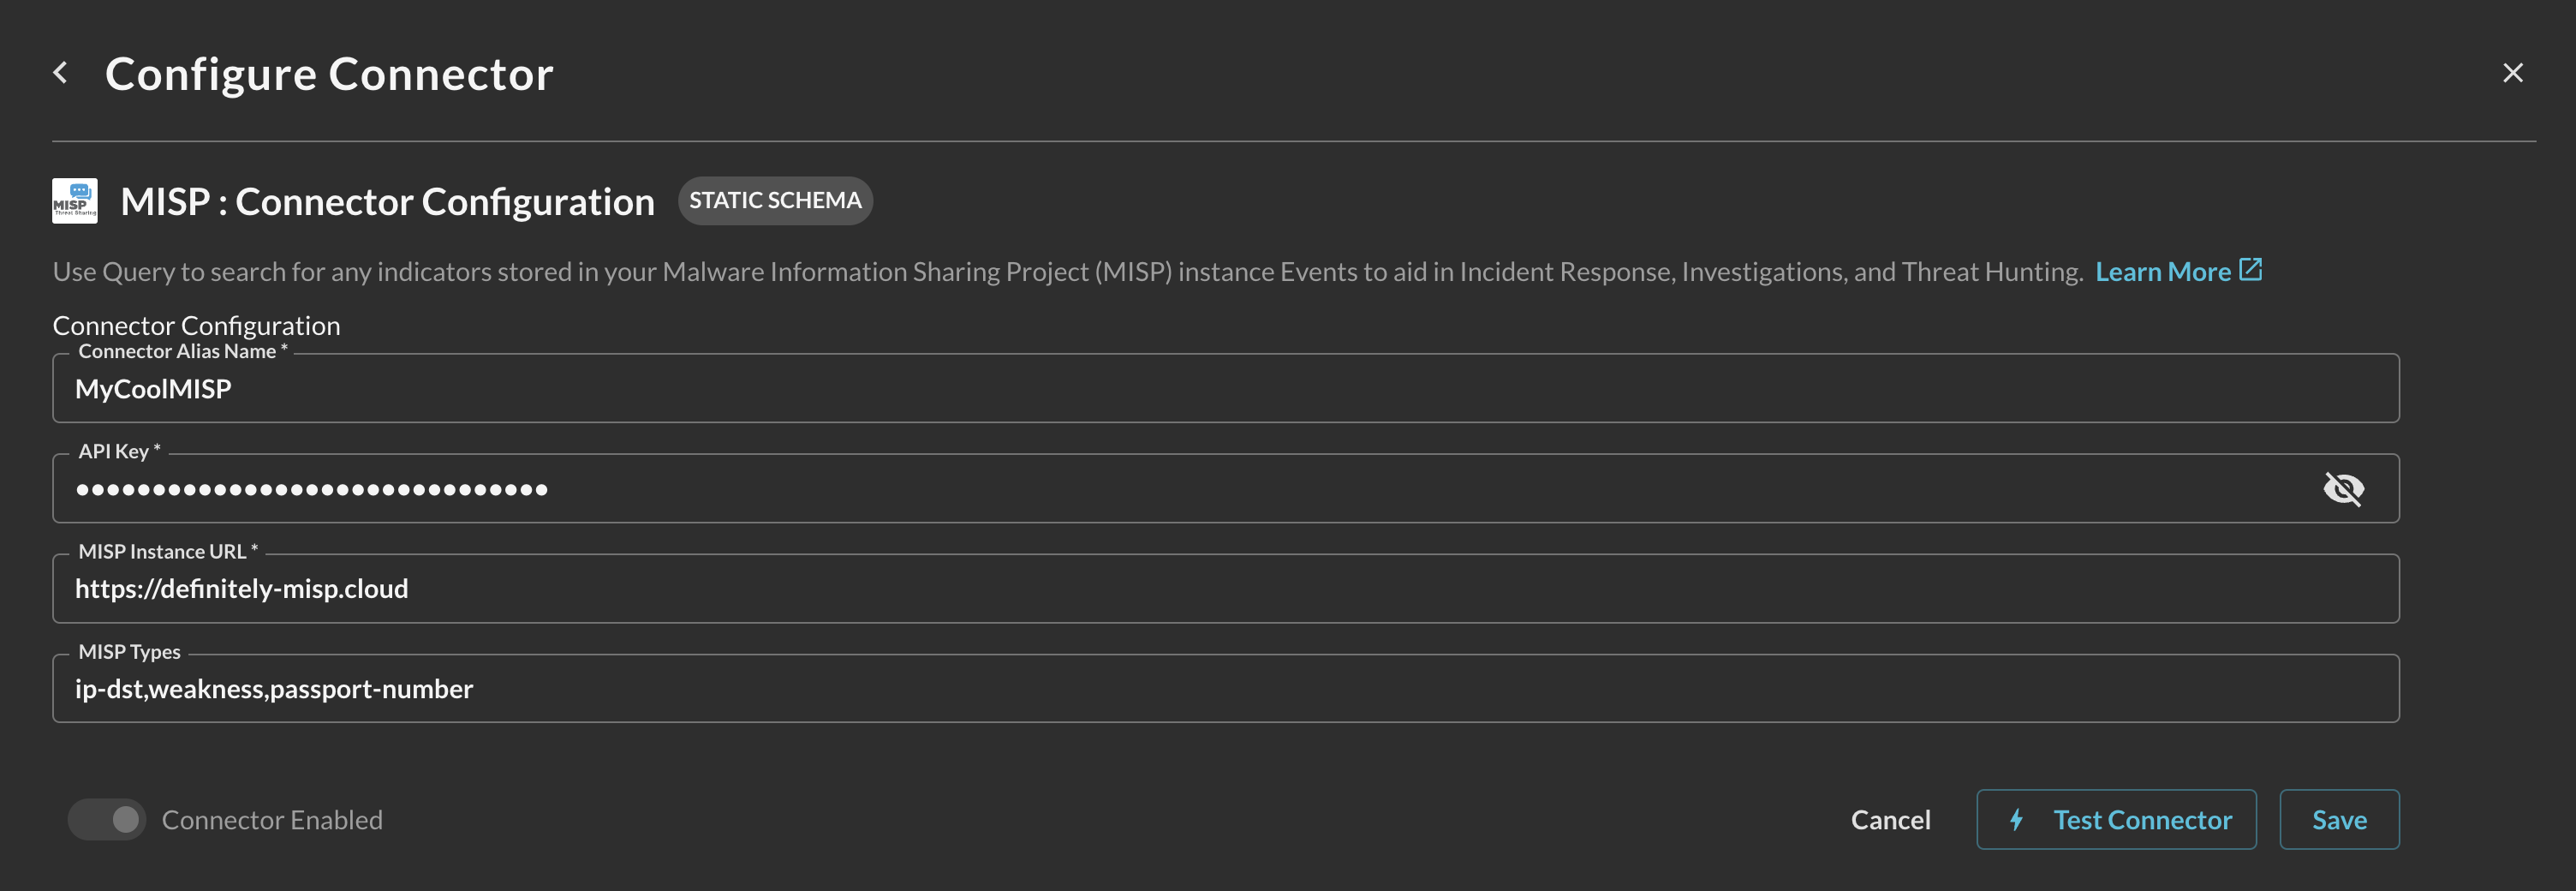
FIG. 6 - A fully populated MISP connector
-
-
Select Test Connection from the bottom-right of the connection pane to ensure that your URL and API Key (Auth Key) are valid, and that Query can successfully dispatch a search against your instance.
-
Select Save to save and activate the Connector.
You will now see MISP added as an available Connector within the Query Search and Query Summary Insights UI.
Querying the MISP Connector
Within the Query Search UI, all Connectors are enabled by default. To check that your specified Connector(s) for MISP are enabled, navigate to the Threat Intelligence and Enrichment section of the Selected Connectors dropdown and ensure that your specified MISP Connector(s) are are selected (denoted by a checkbox) before running your searches as shown below (FIG. 7).
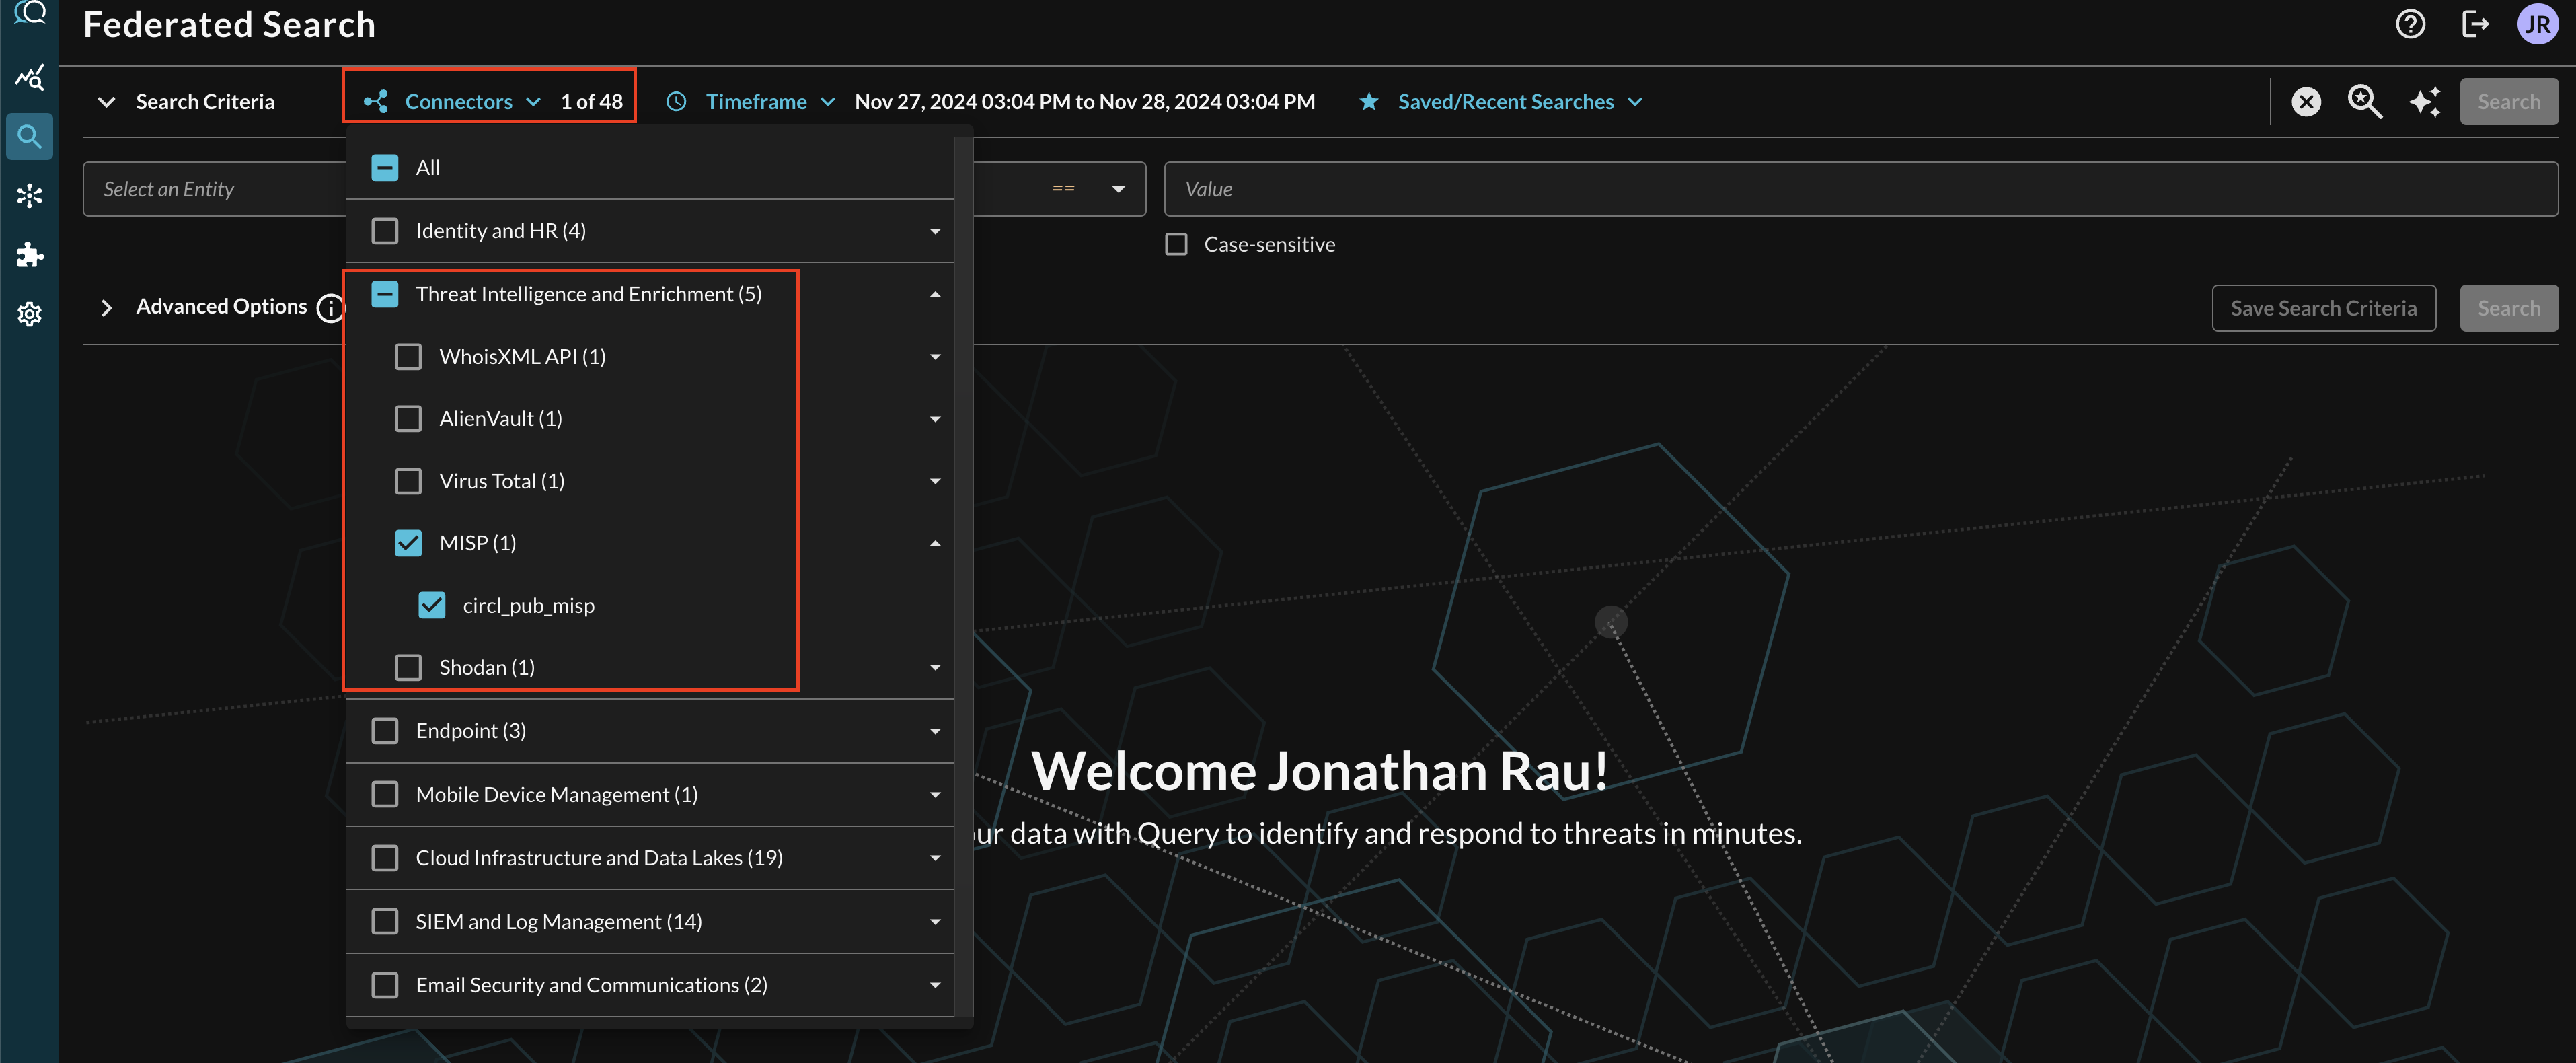
FIG. 7 - Selecting MISP from the Query Connectors picker menu
You will be able to search for nearly every supported Query Entities (Observables) and the OSINT Inventory Info Event Class. To learn more about searching with the MISP Connector, refer to the subsections below.
Entity-based Search
To conduct an Entity-based search, toggle the Select an Entity dropdown menu in the Federated Search console and ensure the Entities radio button is selected (this is the default option) as shown below (FIG. 8). The typeahead menu searches from the beginning of the Entity, so typing "U", will bring Username, User Agent, and User ID to the top of the list for instance.
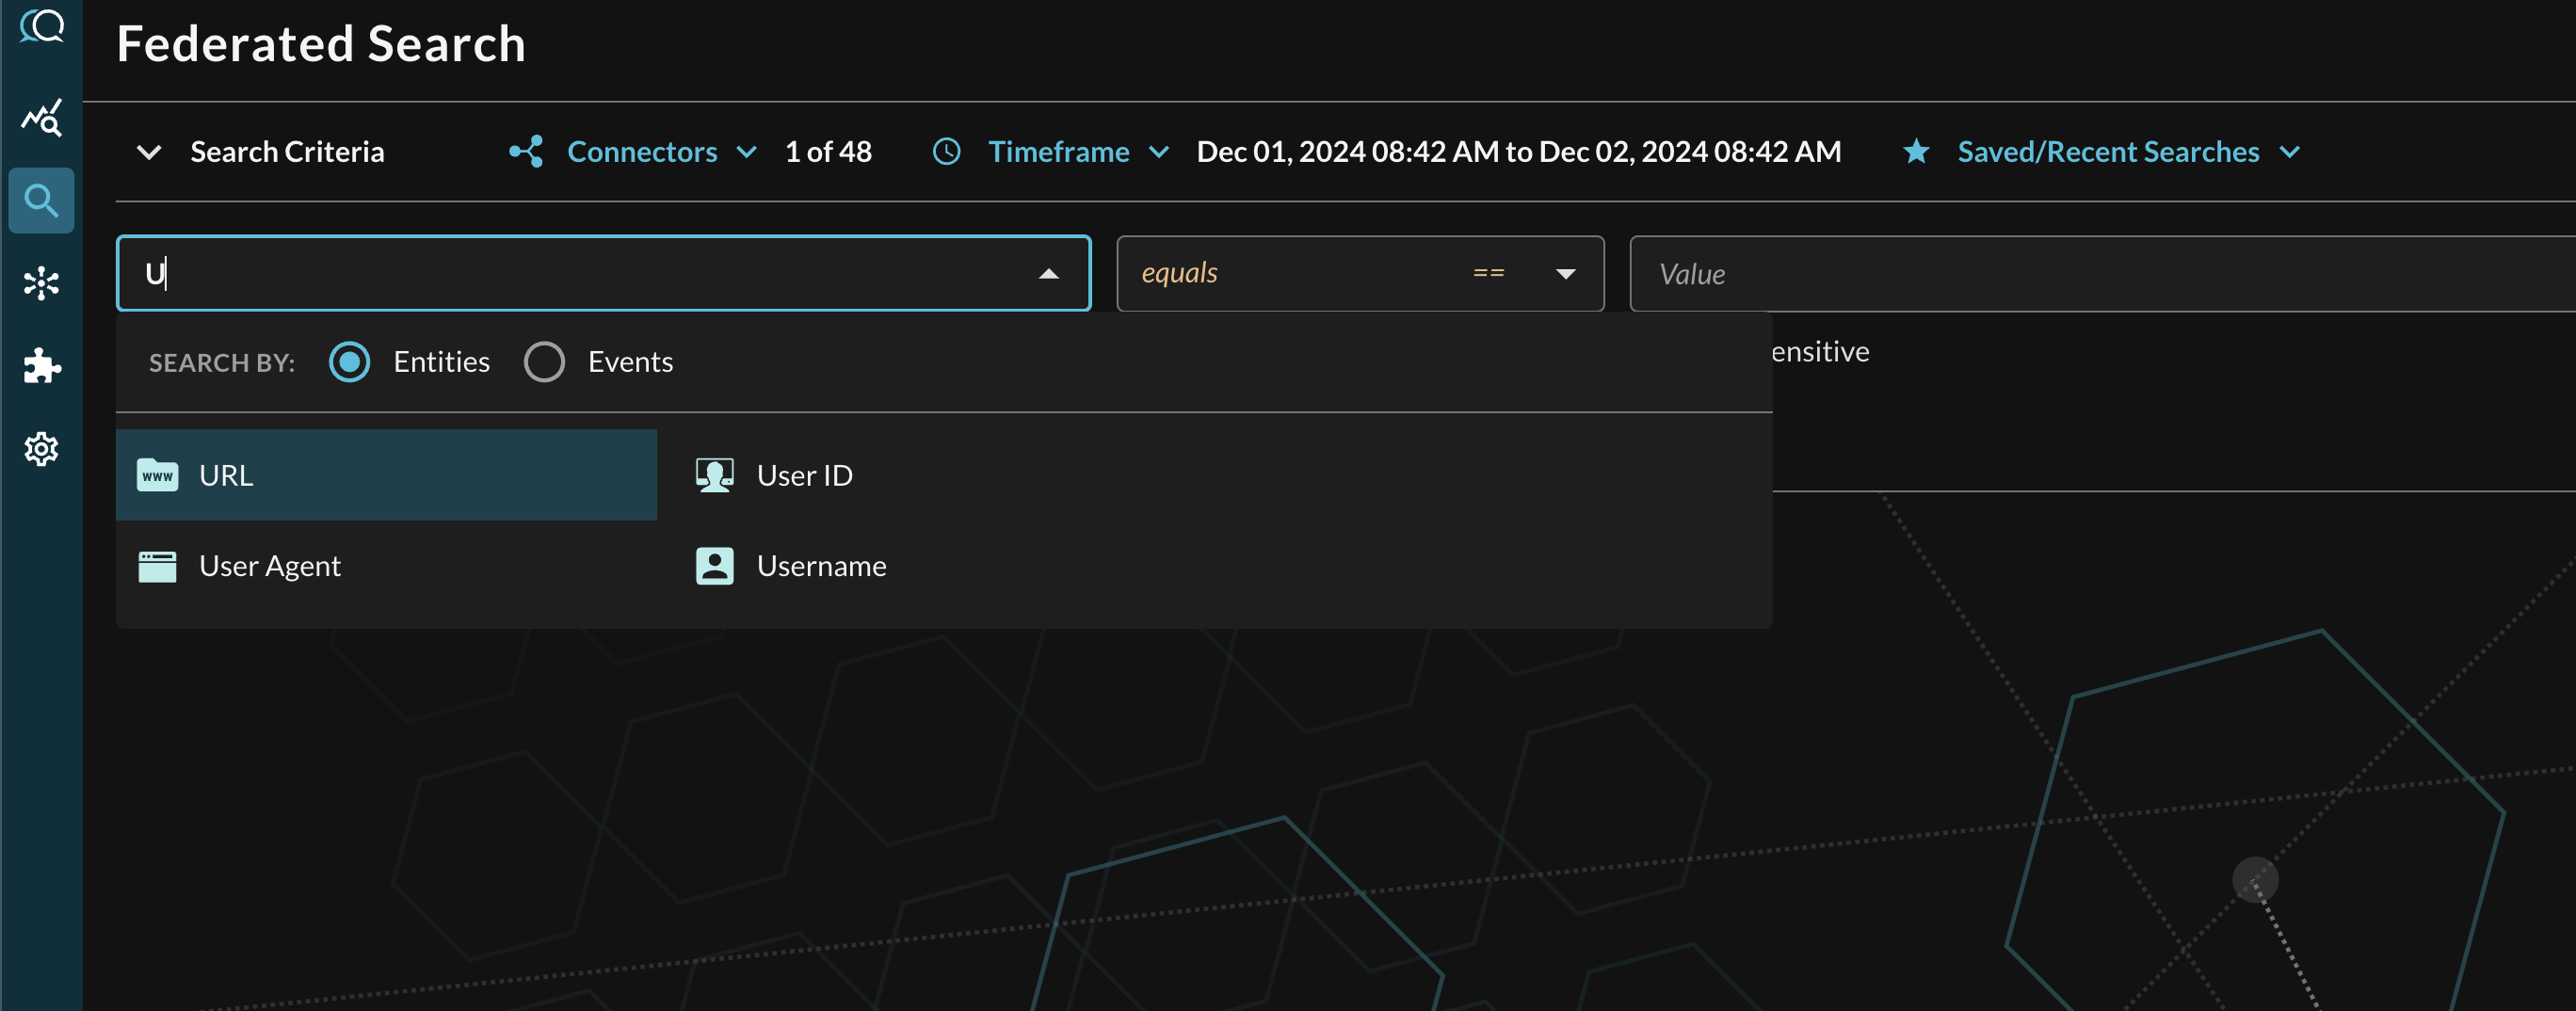
FIG. 8 - Entity-based searching with Query Federated Search
The MISP Connector is a static schema Connector which means that all normalization and search translation is completely defined by the Query team. When you search against a specific Entity, it is mapped against possible MISP Types, such as the File Hash search supporting several dozen MISP Types such as sha256, md5, filename|sha1, ja3-fingerprint-md5, ssdeep, and several others.
Since Entity searches are broadly applicable searches, you will get different types of Results across different Connectors. While the MISP Connector will return normalized MISP Event details in the OSINT Inventory Info Event Class, but you may return results from several other Connectors. For instance, searching for an IP Address will return all metadata and commentary from MISP such as the specific tags, the name of the Event, and any additional commentary about the attack path, tradecraft, threat group, or otherwise. That same search may match to various network logs in Amazon Security Lake, matching IPs in Alerts or Detections in Crowdstrike, or can even match against IP addresses in Entra ID or Okta authentication logs.
After selecting an Entity, most allow you to specify an Operator. This allows you to perform simple equality searches or to perform more generalized searches using contains, starts with, or ends with Operators. These operators, however, are not able to be natively implemented.
Multiple values can be searched at the same time which are automatically OR'ed and parallelized where possible as different search requests. Additionally, case sensitivity can be toggled for the entire search result as well, this is required for certain Entities such as CVE, CWE, and certain User Agents as the restSearch API method in MISP searches case-sensitive values. An example of a multi-value "CVE equals" search with case-sensitivity is shown below (FIG. 9).

FIG. 9 - Orientation for Entity-based search in Query Federated Search
Event-based Search
Event-based searches allow you to broadly search across the entirety of results from a downstream API, or, search for very specific results based on filters. In the case of the MISP Connector, the only supported Event Class is OSINT Inventory Info which contains the normalized data from the attributes of a matching MISP Event that contains the indicator(s) you search for.
To conduct an Event-based search in the Federated Search console, select the search dropdown, ensure the Events radio button is selected and search for the OSINT Inventory Info Event Class in the Discovery Category as shown below (FIG. 10).

FIG. 10 - Search for OSINT Inventory Info events with Query Federated Search
Searching from the Event will pull a sample (up to 1000) of all matching events per Connectors that are mapped to it. For more specific filtering within an Event, you can choose one or more conditions to refine a search. Selecting the plus-sign (+) dropdown next to the Event menu allows you to choose from any specific OCSF/QDM attribute in the event.
For instance, when searching within the OSINT Inventory Info Event Class, you can search for a specific Indicator regardless of the MISP Type (or QDM Entity) by filtering for OSINT --> Indicator as shown below (FIG. 11). You can also search for specific Indicators that map against a specific Indicator Type, with Other being for anything without an explicitly mapped OSINT Indicator Type. Note that the OSINT Indicator Type is not the same as a QDM Entity and are far more specific.

FIG. 11 - Filtering for specific Attributes within an Event Class Search
When adding two or more Conditions, you can further change the behavior by specifying ANY or ALL quantifiers over the filters for greater levels of specificity or more narrow-but-generalized searches, respectively, as shown below (FIG. 12). For instance you can search for specific Indicators as well as specific Indicator Types to only get back certain OSINT records.
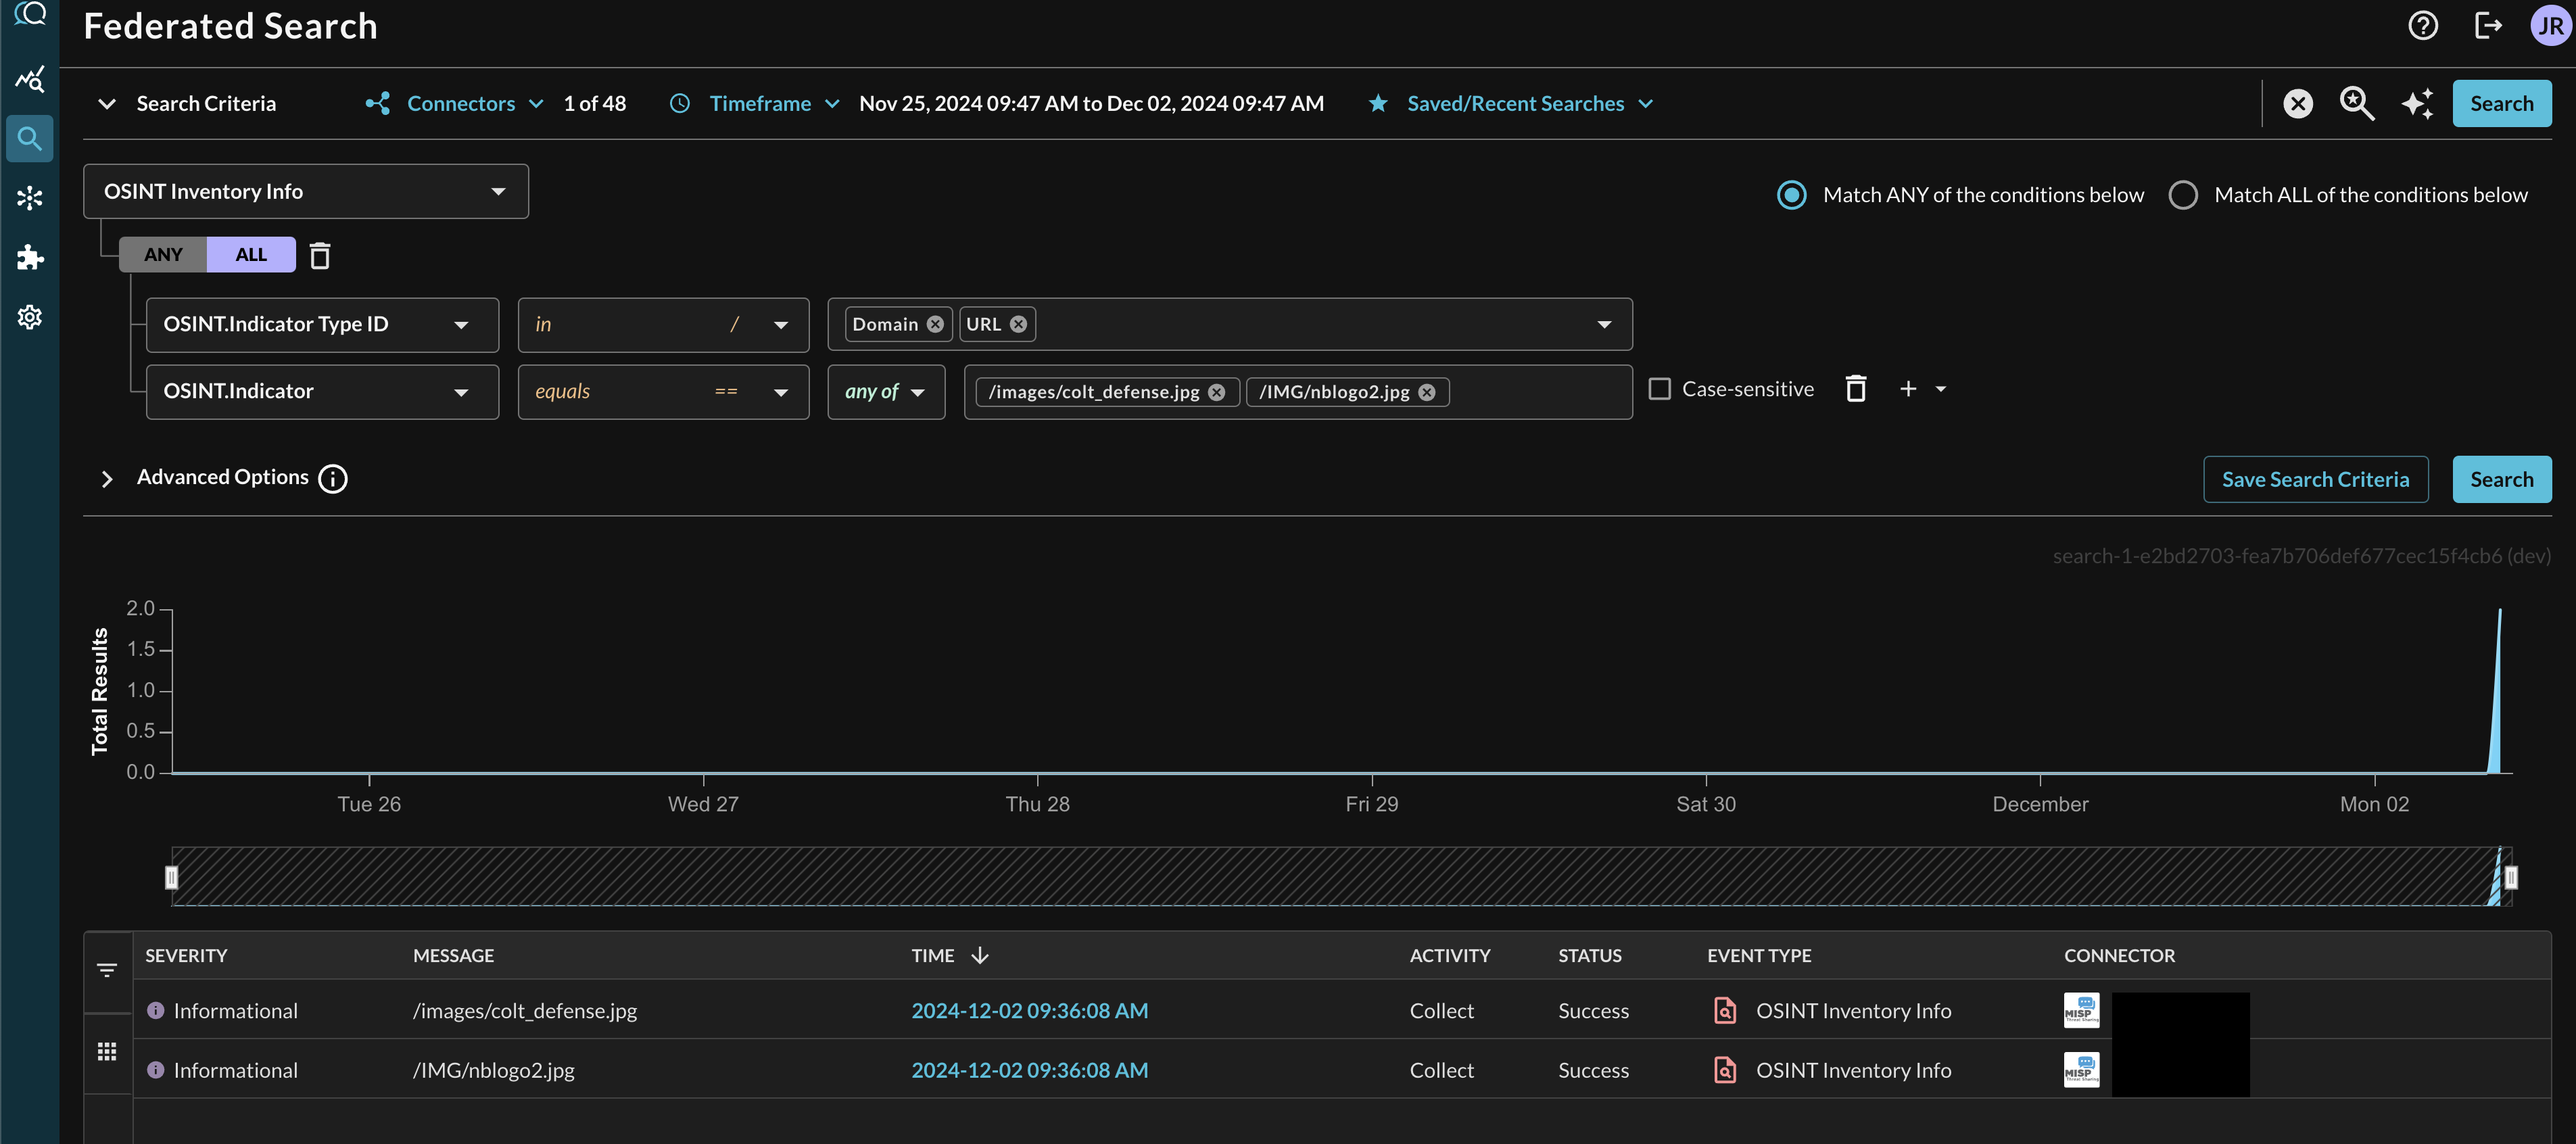
FIG. 12 - Selecting multiple conditional filters
Resources
Troubleshooting Steps
- Ensure that your External URL is internet reachable.
- Ensure that your Auth Key is not expired or Read-only.
- If you use a Reverse Proxy, ensure that the Proxy settings in MISP are configured properly.
- If you provided optional MISP Types to your connector, ensure that they are legitimate MISP types and that you have Events providing them.
- The
restSearchAPI is case-sensitive - ensure you toggle the case-sensitivity options for certain Indicators such as CVEs, CWEs, and certain User Agents if you did not get an expected result.
If you have exhausted the above Troubleshooting list, please contact your designated Query Sales Engineer or Customer Success Manager. If you are using a free tenant, please contact Query Customer Success via the Support email in the Help section, or via Intercom within your tenant.
Updated 3 months ago