Azure Blob Destination
Write data the right way into Azure Blob Containers/ADLSv2, powered by Query Security Data Pipelines.
Overview
Azure Blob - more specifically Azure Storage Account Blob Containers - is Microsoft Azure's cloud object storage service. Azure Blob offers both a "basic" configuration as well as the Azure Data Lake Service V2 (ADLSv2) configuration that utilizes Hierarchal Namespaces (HNS) for partition data. Azure Blob is also a popular storage engine to back security data lakes and security data lakehouses onto in combination with query engines such as Azure Data Explorer or used as an intermediary storage between ClickHouse, Databricks, and/or Snowflake.
The Azure Blob Destination for Query Security Data Pipelines writes data the right way pertaining to the aforementioned usage. The data is written in the following ways to aid in schema registration and performant reads:
- All data is written into OCSF-formatted Apache Parquet, partitioned on the
timefield by year, month, day, and hour. The file names are seeded by a 16 digit UUID and the datetime to avoid object overwrites. - Data is compressed with Snappy compression that offers the best decompression speed for querying the data.
- Data is written into Hive-like partitions (e.g.,
your_container_name/source=your_connector_name/event=detection_finding/year=2025/month=08/day=21/hour=17/) which is easily discovered by Azure Data Explorer and other metadata catalogs and query engines. The performance will only be used in HNS-enabled Blob Containers.
To support writing the data, Query uses Entra ID App Registrations with Client Secrets that are provided with appropriate Azure IAM Roles assigned to the service principal associated with the App Registration. To audit the behavior, use Azure Audit logs or Entra ID audit events and search for your App Registration.
Information on thesourcepartitionThe ensure that there will not be any issues with downstream query engines, your Connector Name (the Source) is converted into a lowercase string that only contains underscores.
All special characters except whitespace, periods (
.), and hyphens (-) are stripped. Whitespace, periods, and hyphens are replaced by underscores (_). Finally, the entire string is lowercased.For example,
My-Data.Source@2024will be converted intomydata_source2024.
Prerequisites
You will need to have Domain Administrator rights in your Tenant, as well as Owner permissions in your Subscription where you Azure Storage Account is located to carry out the following steps.
-
Create an Entra ID App Registration with the following steps.
-
Create a Client Secret with the following steps. Ensure you copy the Secret Value after creation!.
-
Copy your Tenant ID and the App (Client) ID, as you'll need them for configuring the Destination.
-
In the Azure Console navigate to Subscriptions -> Your Subscription Name -> Access control (IAM) and then select + Add at the top left and choose Add role assignment, as shown below (FIG. 1).
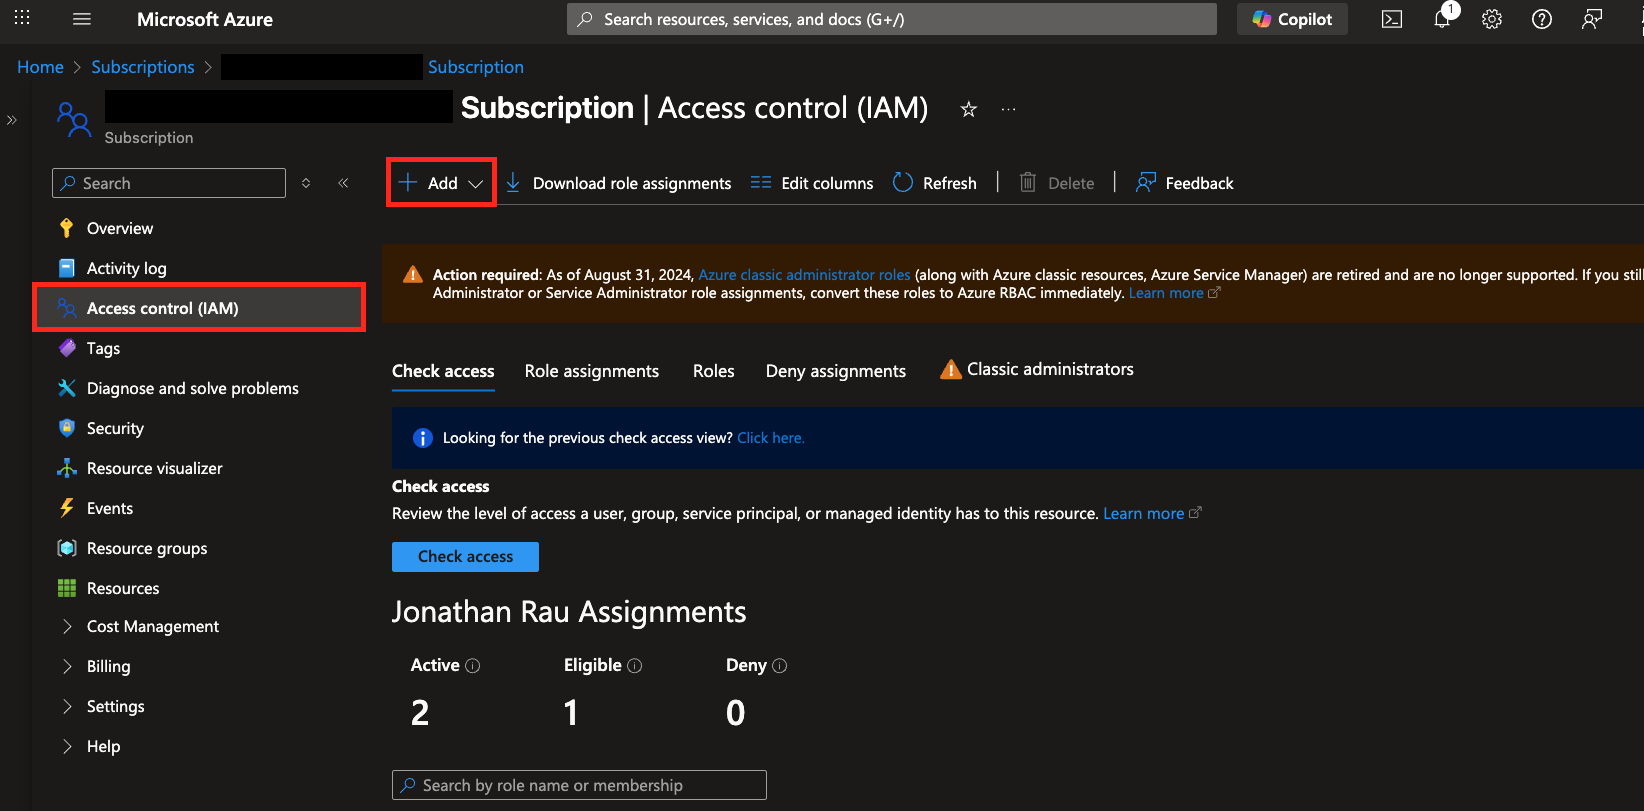
FIG. 1 - Navigating to Access Control (IAM) for your Azure Subscription
-
Search for and select both
Storage Account ContributorandStorage Blob Data ContributorRoles and select Next. In the Members tab, select User, group, or service principal in the Assign access to section and choose + Select members to search for your App Registration. Choose your Application and hit Select as shown below (FIG. 2). When done, select Next.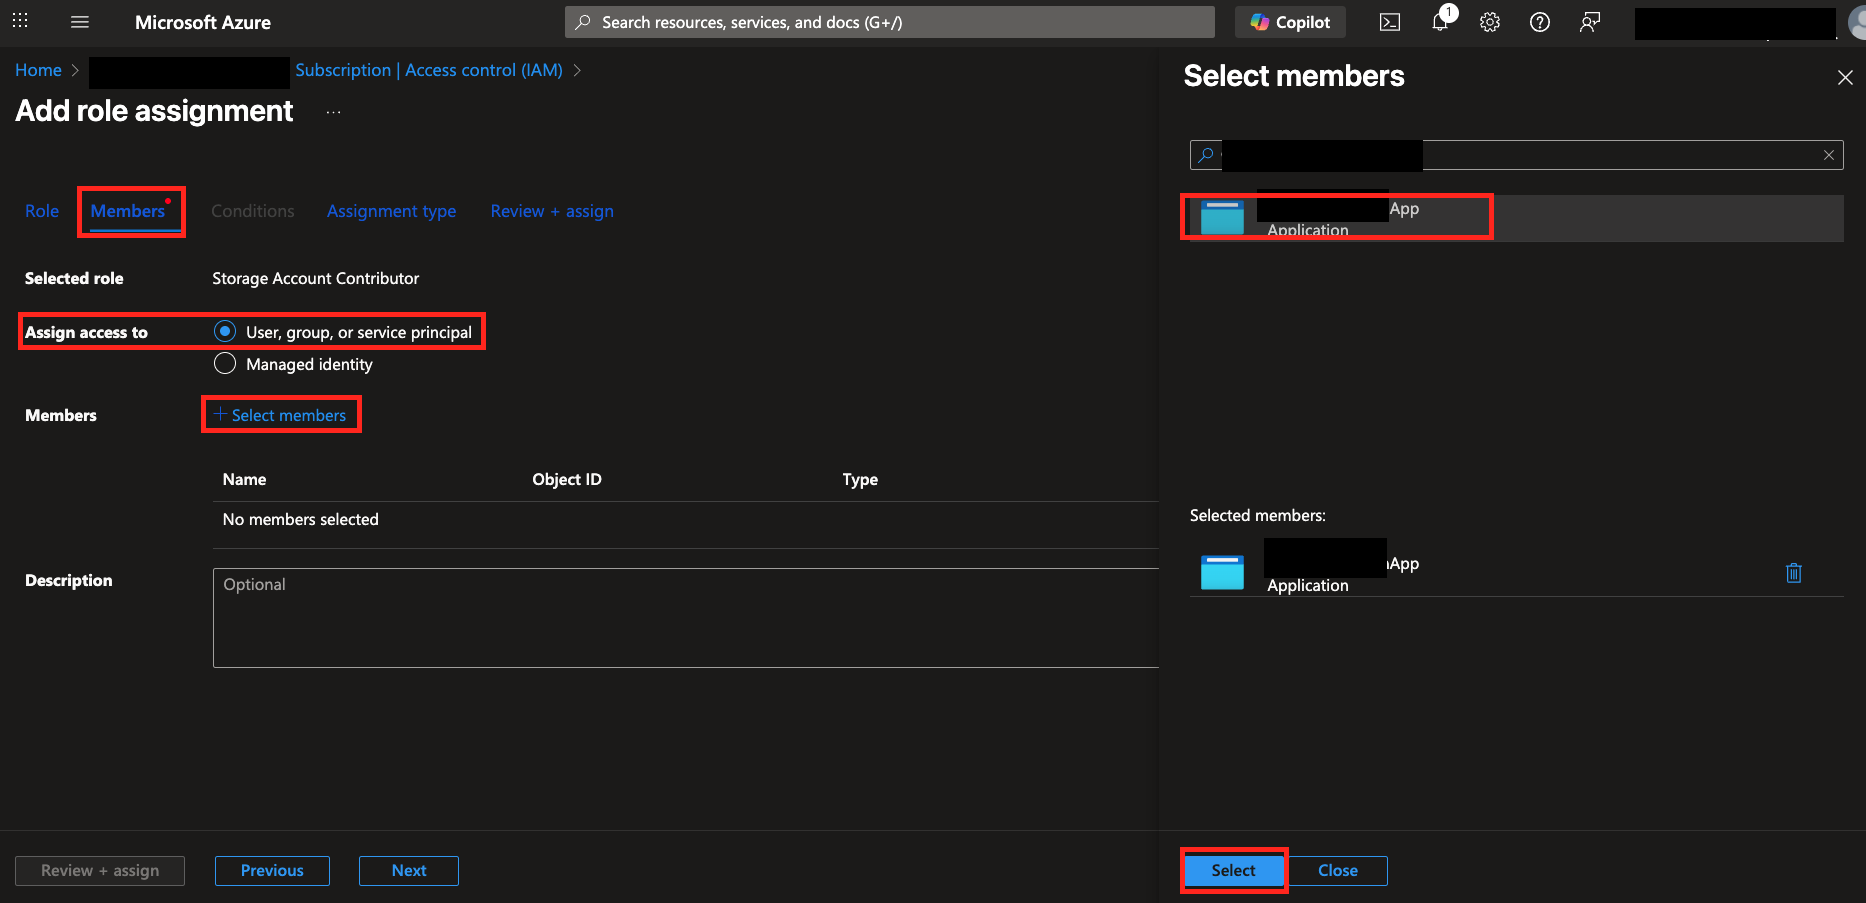
FIG. 2 - Adding your Entra ID Application as a member for the Roles
-
In the Assignment type screen determine whether you'll assign this permanently or temporarily, or if you want to configure an Entra ID PIM Policy. Finally Review and assign and finish out.
-
In the Azure Console navigate to Storage Center and in the left-hand navigation pane toggle Object storage -> Storage accounts (Blobs) and select the Resources tab at the upper-left center of the screen, as shown below (FIG. 3).
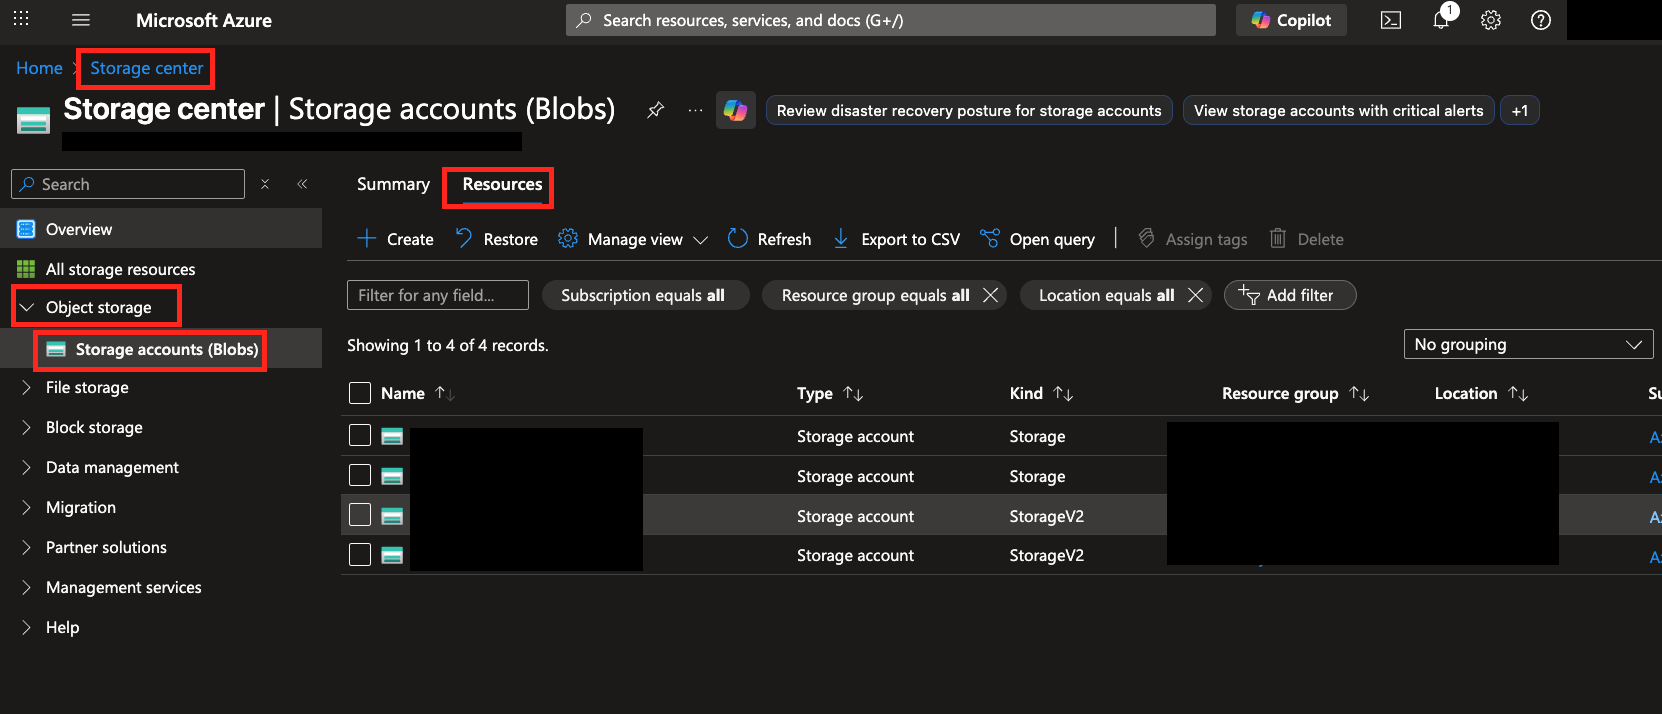
FIG. 3 - Finding your Azure Storage account in the Azure Console
-
Select the name of your Storage account (copy it for later), on the left-hand navigation pane toggle Data storage -> Containers an either copy an existing Container or create one by selecting + Add container. Copy the name of this Container when you're finished.
Configure an Azure Blob Destination
If you already have an existing Destination, skip to Step 4.
-
Navigate to the Pipelines feature in the Query Console and select + New Pipeline form the top of the page, as shown below (FIG. 4).
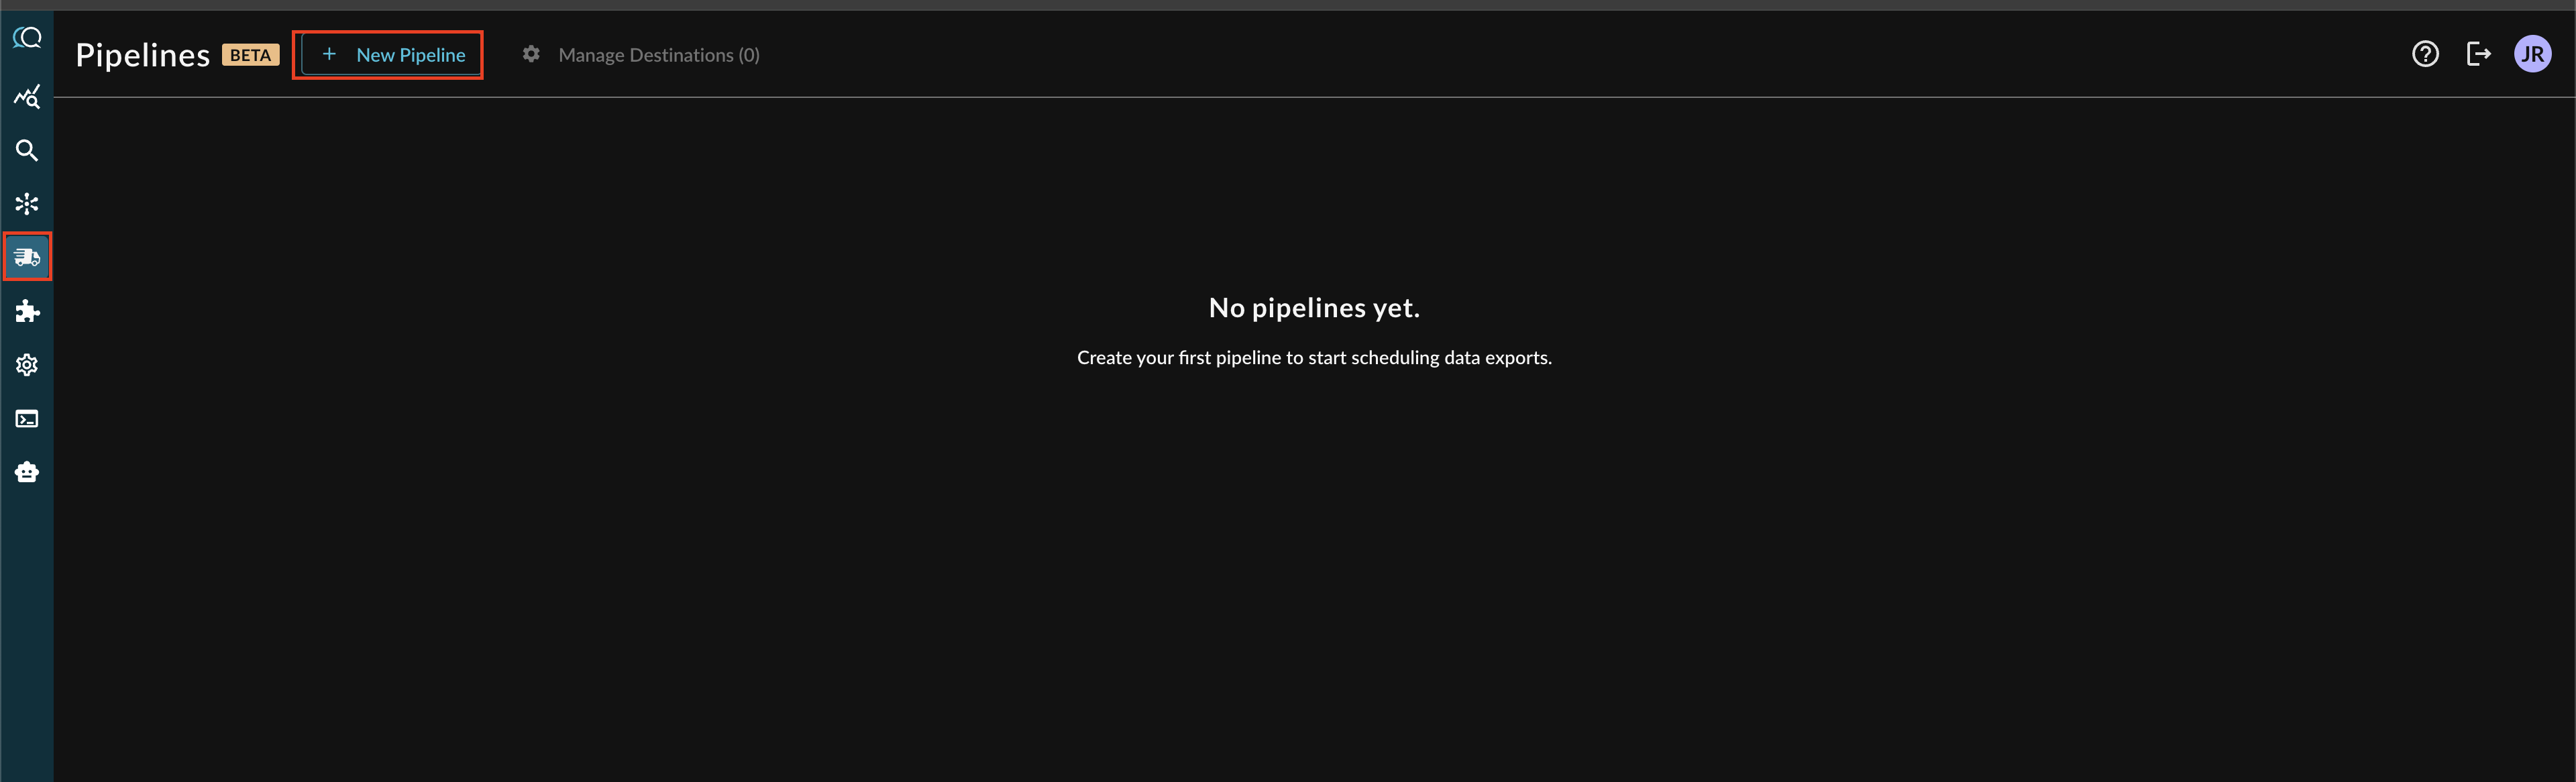
FIG. 4 - Adding a new Pipeline
Note: If you already have an existing Destination, this toggle will read Manage Destinations (n) instead, as shown below. You can directly add a new Destination from the Destination Manager, as shown below (FIG. 5).

FIG. 5 - Manage Destinations highlighted for existing Destinations
-
Before configuring your pipeline, if a destination does not exist, select Create New Destination within the Pipeline creation interface as shown below (FIG 6).
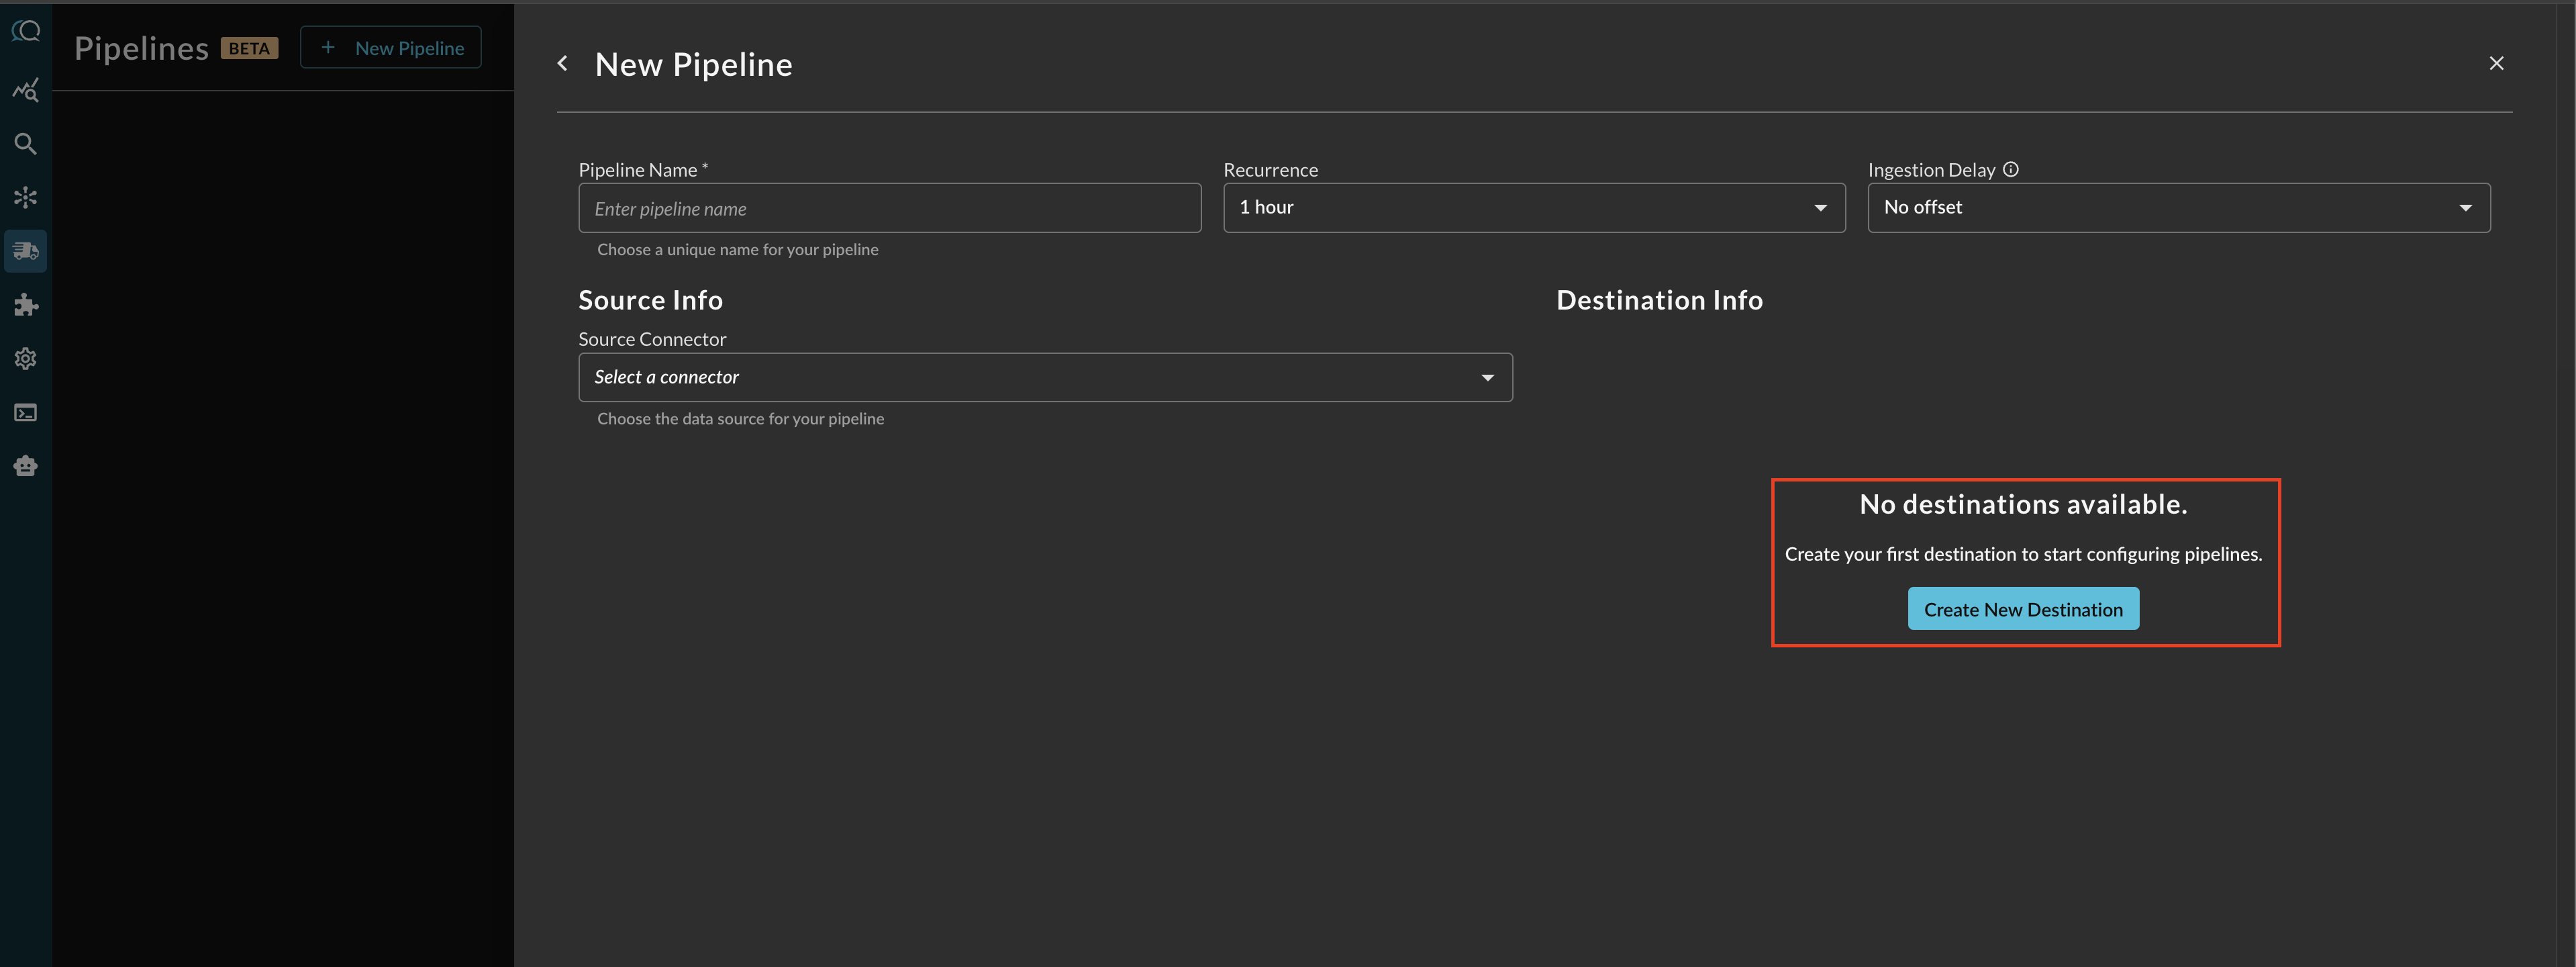
FIG. 6 - Creating a new Destination from the Pipeline configuration screen
-
Provide a Destination Name, you can reuse these destinations across multiple pipelines. From Platform select
Azure Storage, and provide the following parameters as shown below (FIG. 7). Once completed, select Create.-
Account Name: The Azure Storage Account name, identified in Step 7 of the Prerequisites.
-
Container Name: The Container in your Storage Account to store the logs, identified in Step 8 of the Prerequisites.
-
Client ID: The Client ID (Application ID) of your Azure Application.
-
Client Secret: The Secret Value for your App Registration client secret, created in Step of the Prerequisites.
-
Tenant ID: The Tenant ID (Directory ID) where your Azure Subscription and App Registration is created in.
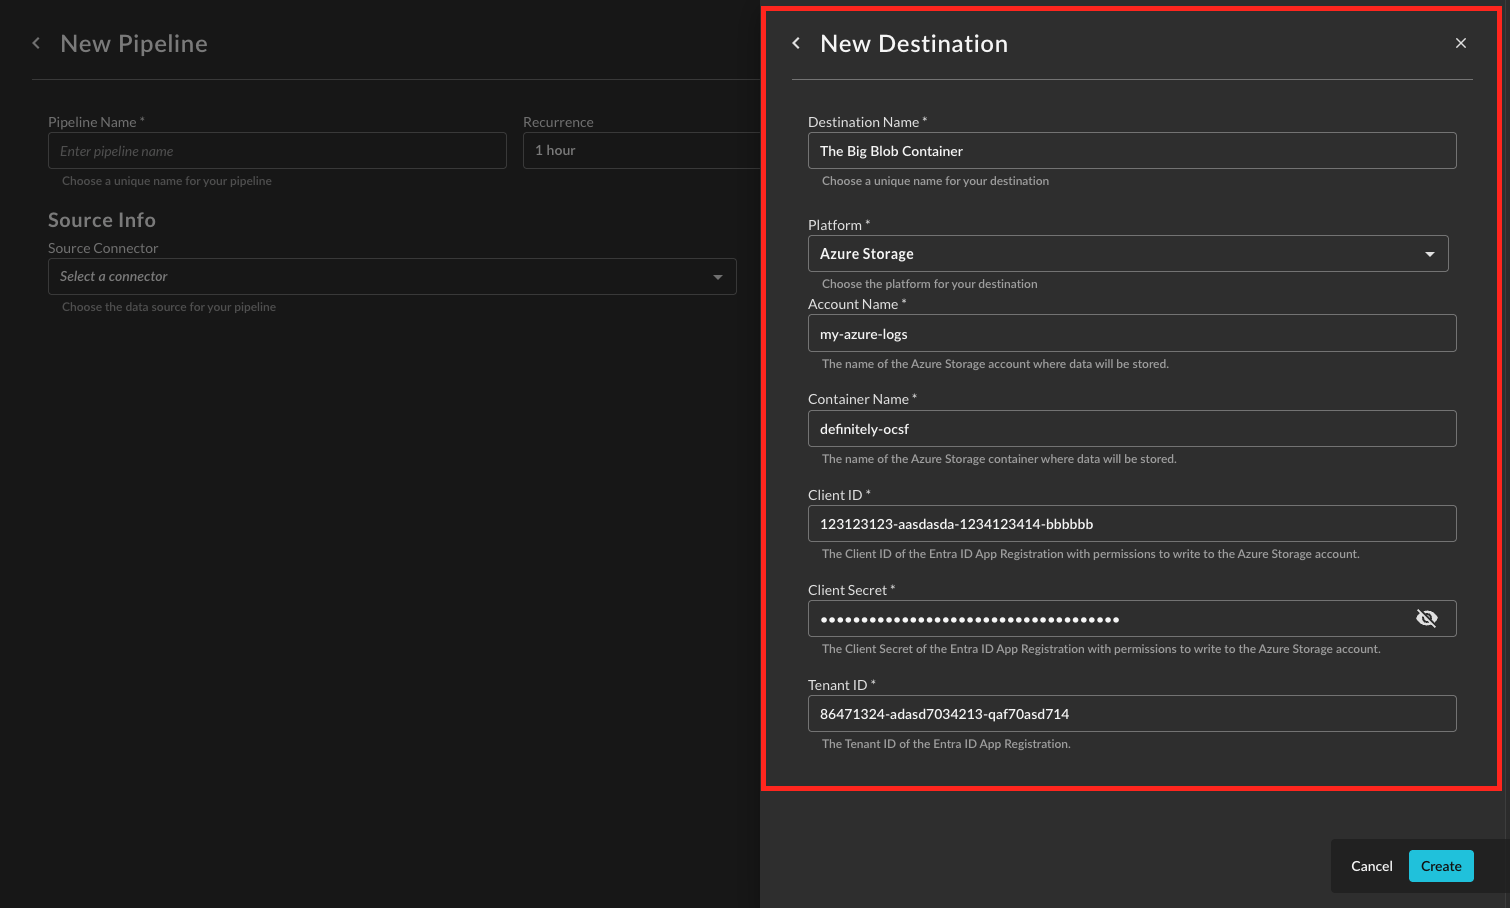
FIG. 7 - Providing parameters for the Azure Storage Destination
-
-
After creating the Destination, you will now have a dropdown menu to select the new Destination for your Pipeline.
Operationalizing Azure Blob Destinations
Once your data is flowing into Azure Blob Storage via Query Security Data Pipelines, you can create external tables in Azure Data Explorer (ADX) to query this data directly. ADX external tables allow you to query data stored in external locations like Azure Blob Storage without ingesting it into ADX, leveraging the performant nature of Kusto Query Language (KQL) for analysis.
Creating Tables in Azure Data Explorer
To create an external table in ADX that points to your Azure Blob Container, you'll need to define the table schema and provide connection details. The data written by Query Security Data Pipelines is in OCSF-formatted Apache Parquet and uses Hive-like partitioning, which ADX can easily discover.
Note, Query supports a Connector for Azure Data Explorer, allowing you to search several tables and materialized views in parallel from the Query Security Data Mesh using Federated Search.
Prerequisites for ADX External Tables:
- An Azure Data Explorer cluster and database.
- Permissions to create external tables in the ADX database.
- The ADX cluster's managed identity (or a service principal) needs
Storage Blob Data Readerrole on the Azure Storage Account where your data resides. Alternatively, a Shared Access Signature (SAS) token for the container can be used.
KQL Example to Create an External Table:
Below is an example of a KQL command to create an external table. You'll need to adjust the blob_container_uri, storage_account_name, container_name, and the table schema to match your specific setup and the OCSF schema of your data.
.create-or-alter external table <TableName> (
    `time`: datetime,
    `source`: string,
    `event_type`: string,
    // Add other OCSF fields as per your data schema
    `field1`: string,
    `field2`: int,
    `field3`: dynamic
)
kind=parquet
dataformat=parquet
(
    h@'https://<storage_account_name>.blob.core.windows.net/<container_name>;<sas_token_or_managed_identity_credentials>'
)
with
(
    partitioning = (
        `source`:string,
        `event_type`:string,
        `year`:datetime,
        `month`:datetime,
        `day`:datetime,
        `hour`:datetime
    ),
    fileExtension = ".parquet",
    hive=true
)
Explanation of the KQL command:
.create-or-alter external table <TableName>: Defines a new external table or alters an existing one. Replace<TableName>with your desired table name (e.g.,SecurityLogs).( ... ): This section defines the schema of your external table, mapping to the fields within your OCSF Parquet files. Remember to includetime,source,event_type,year,month,day, andhouras they are used for partitioning. You will need to add all other relevant OCSF fields present in your Parquet data.kind=parquet,dataformat=parquet: Specifies that the external data source contains Parquet files.( h@'...' ): This is the storage connection string.- Replace
<storage_account_name>with your Azure Storage Account name. - Replace
<container_name>with the name of your blob container. - For authentication,
<sas_token_or_managed_identity_credentials>should be replaced with either a valid SAS token for the container (including read and list permissions) or, preferably, configure a managed identity for your ADX cluster and grant itStorage Blob Data Readeraccess to your storage account.
- Replace
partitioning = ( ... ): This crucial section tells ADX how your data is partitioned. It directly reflects the Hive-like partitioning structure (e.g.,source=your_connector_name/event=detection_finding/year=2025/month=08/day=21/hour=17/) described in the "Overview" section. ADX will automatically discover the data based on these partitions.fileExtension = ".parquet": Specifies the file extension of your data files.hive=true: Enables Hive-style partitioning discovery, allowing ADX to automatically infer the partition values from the folder structure.
After creating the external table, you can query it just like any other table in Azure Data Explorer, enabling powerful analytics on your security data lake.
Updated 10 months ago