Microsoft Sentinel (Azure Sentinel)
Integrate with Microsoft Sentinel to retrieve Incidents generated by Analytics Rules and Defender XDR
TL;DRTo integrate Microsoft Sentinel with Query:
- Register an App Registration with a Client Secret.
- Grant the App Registration Service Principal the
Microsoft Sentinel ReaderIAM Role in your Azure Subscription.- Onboard your Microsoft Sentinel deployment to the Query Federated Search Platform.
- Use Query Search to provide decision support for Incident Response, Investigations, Threat Hunting, Red Team targeting operations, and/or Continuous Compliance Monitoring use cases.
Overview
Microsoft Sentinel (formerly known as Azure Sentinel) is a Microsoft Azure-based cloud native Security Information & Event Management (SIEM) platform with that collects data across Azure, Microsoft 365, and 3rd-party data sources. Security Operations Centers (SOCs) use Sentinel to collect, manage detections, investigations, and response all within a single platform.
Underpinning Microsoft Sentinel is an Azure Log Analytics Workspace (LAW) which is a time-series wide-column NoSQL-like logging service within the Azure Monitor ecosystem. Each workspace contains multiple tables organized into separated columns with multiple rows, defined by a set schema of columns that contains structured and semi-structured logging and event data. Logs and other data can be read from these tables using the Kusto Query Language (KQL) to perform detailed analyses or simple searches, and anything in between.
Microsoft Sentinel has several Data Connectors which are a collection of specific integrations and their Analytics Rules which are pre-packaged Detection (and Response) playbooks that contain KQL pre-written against these tables. When a match is found, an Alert is created, and Sentinel can smartly organize similar Alerts into an Incident. From the Incident, assignees are added and other notations are added, and Response playbooks can be invoked.
Query integrates with Microsoft Sentinel with a 1:1 Connector with Microsoft Sentinel Incidents. Whenever incidents are created by Microsoft Defender XDR or Microsoft Sentinel, Query can search for them by Assignee or specific title, severity, or other normalized attributes. Each Incident is normalized to the Open Cyber Security Format (OCSF) data model's Incident Finding class. Assignees can be searched by their User Principal Name (UPN) or email address (which are typically the same). Alternatively, any normalized data point within the Incident Finding itself - such as Severity, Impact, Status, Activity, and otherwise - can also be used as a search parameter.
Additionally, Query integrates directly with Azure Log Analytics Workspaces, if you want access to raw logging provided by Connectors in your Microsoft Sentinel refer to the Azure Log Analytics driver documentation.
Prerequisites
At the bare minimum, Query requires Microsoft Sentinel SIEM to be deployed with all supporting services and resources. Additionally, you require at least one Data Connector to be operating in a healthy state and for Analytics Rules to create Incidents to receive the full benefit of the Connector. For more information refer to the Enable Microsoft Sentinel and initial features and content section of the Microsoft Sentinel documentation.
Additionally, you must have Global Administrator permissions for your Entra ID tenant and Owner permissions for your Azure Subscription to be able to create an App Registration, generate Client Credentials, and grant the App Registration Service Principal proper roles in your Subscription to integrate with and Sentinel incidents.
Create an Application Registration & Grant Azure Roles
-
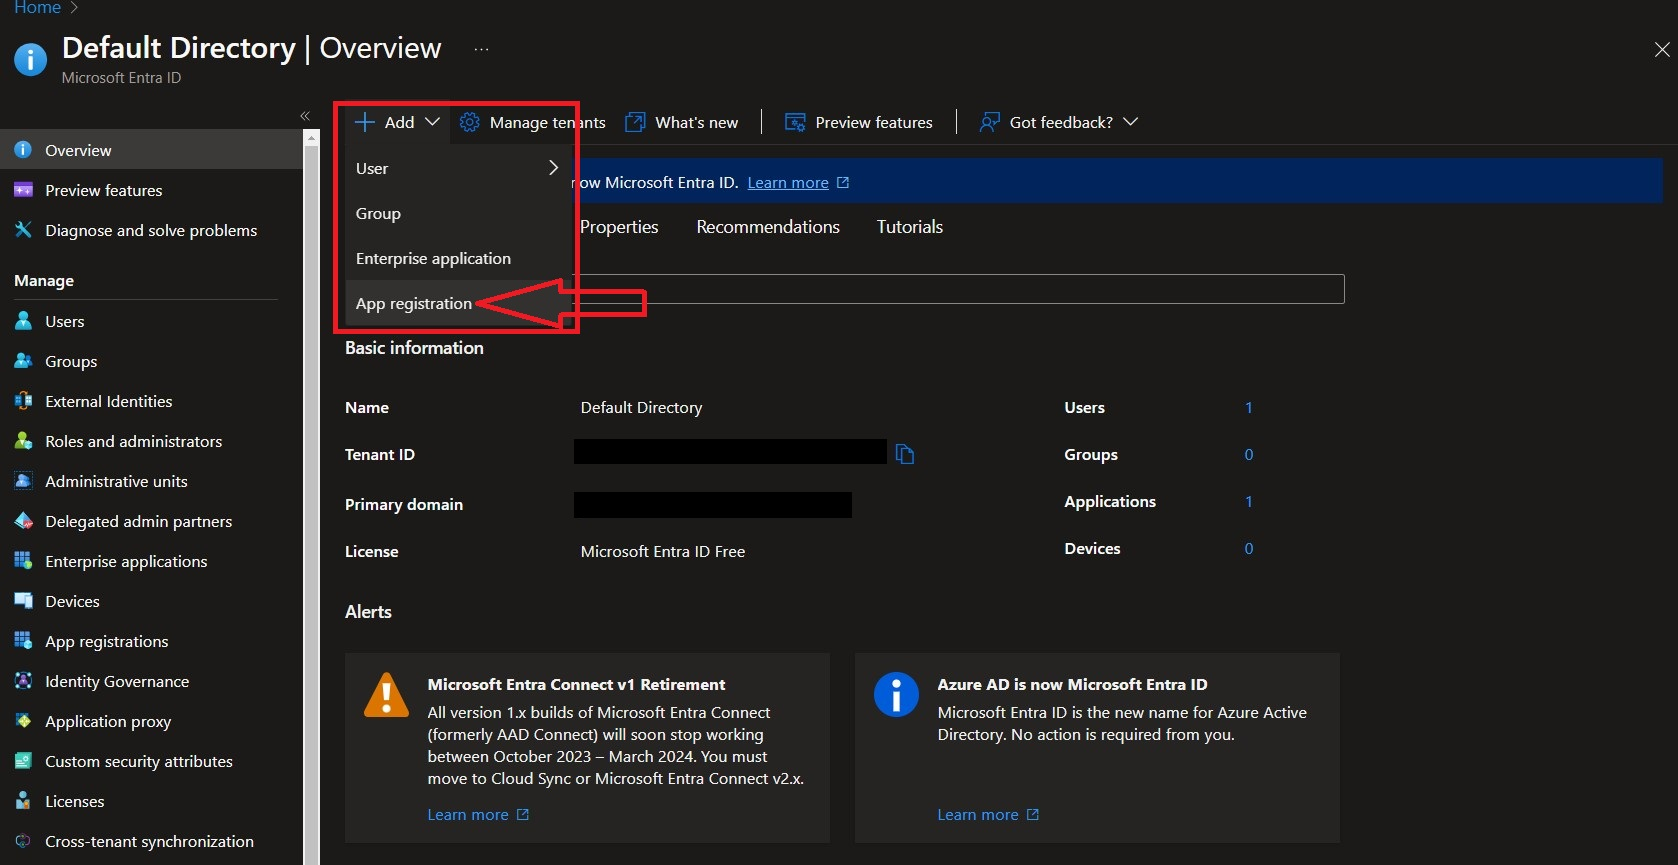
In the Microsoft Azure portal navigate to Microsoft Entra ID -> Add -> App Registration as shown below.
-
Populate a Name for the application, leave the Supported account types option as the default (
Accounts in this organizational directory only (Default Directory only - Single tenant)) then select Register as shown below.
-
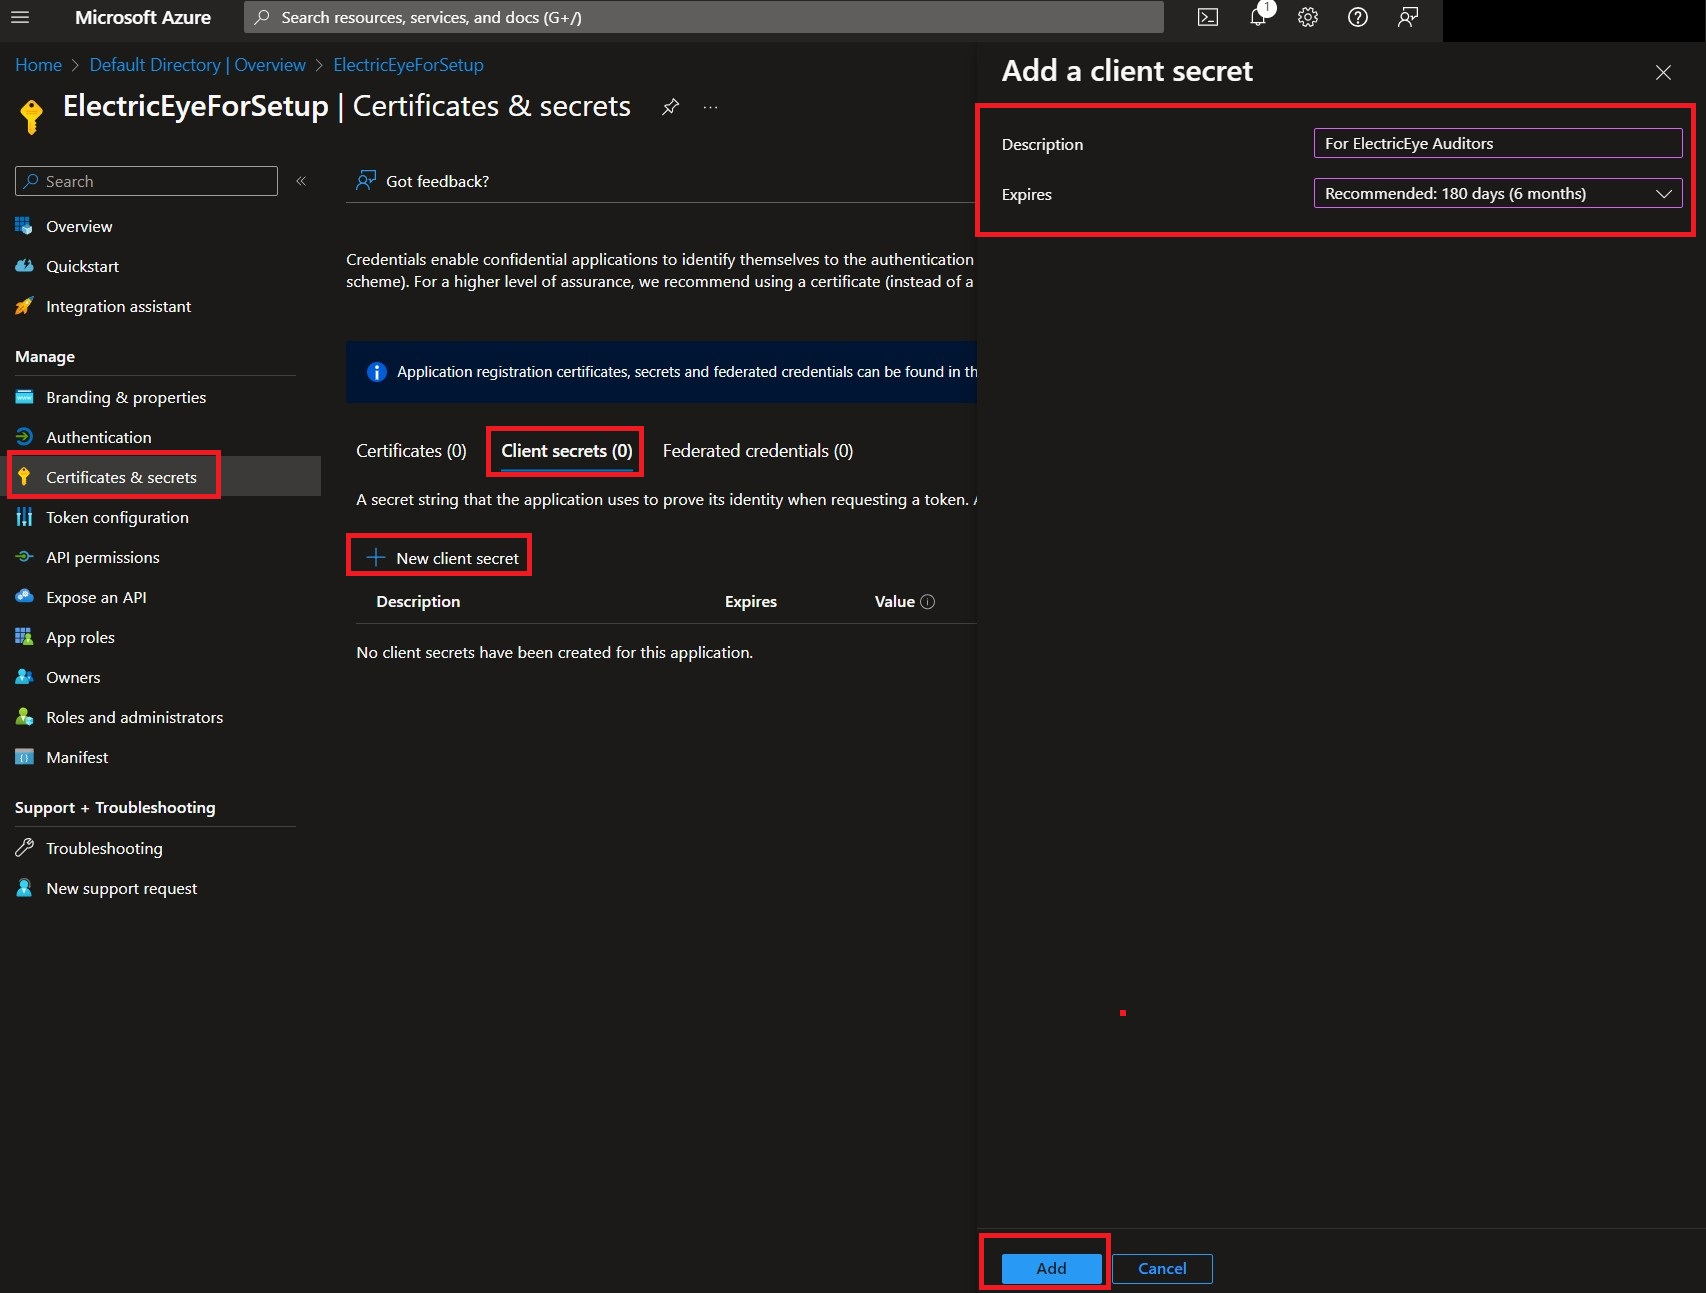
By default you will be taken to the Overview screen of your new application. Navigate to Certificates & Secrets -> Client Secrets -> New client secret. Enter a Description, choose an Expires date from the selector, and finally choose Add as shown below.
-
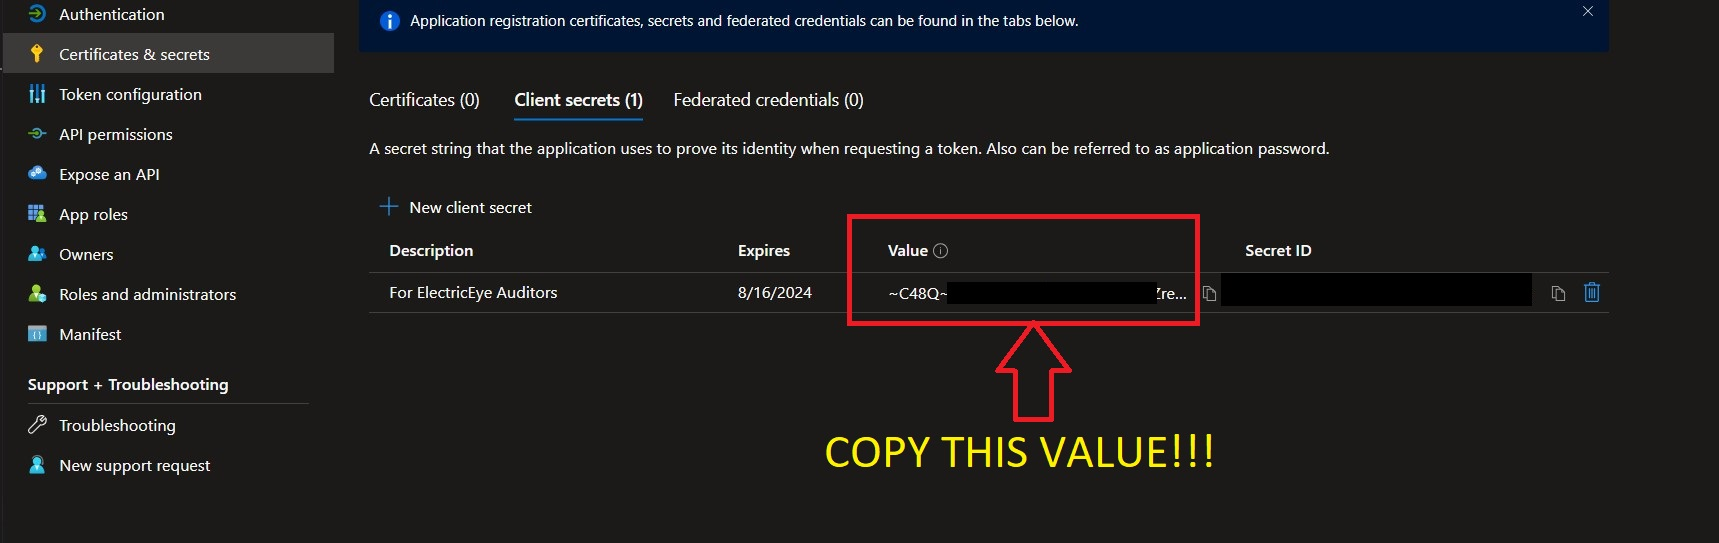
WARNING! Before navigating away copy the Value entry and save it somewhere secure, this is the Client Secret Value required to perform authentication into your Azure Subscriptions. If you did not copy it, no big deal, just delete the Client Secret and create another - but remember to copy the Value that time.
-
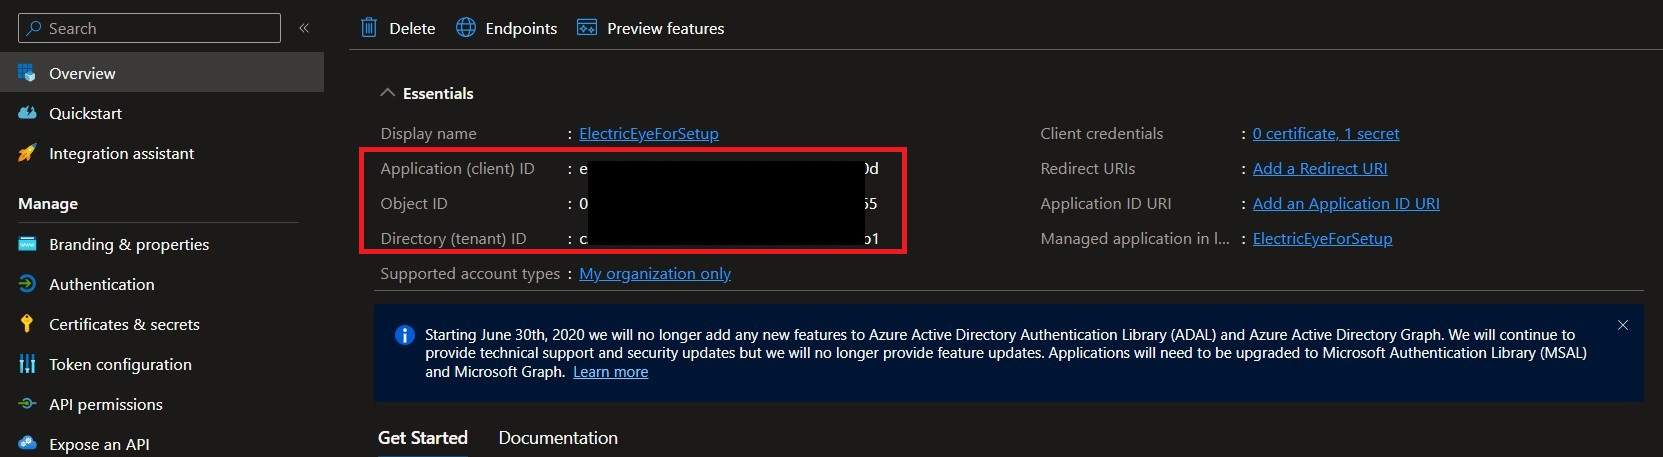
Navigate to the Overview screen and copy the values for the Application (client) ID and Directory (tenant ID) as shown below. The App ID and Tenant ID are also required to perform authentication into your Azure subscription.
-
In the Microsoft Azure portal navigate to Subscriptions -> choose a Subscription where Microsoft Sentinel is deployed -> Access control (IAM) -> Add role assignment as shown below.
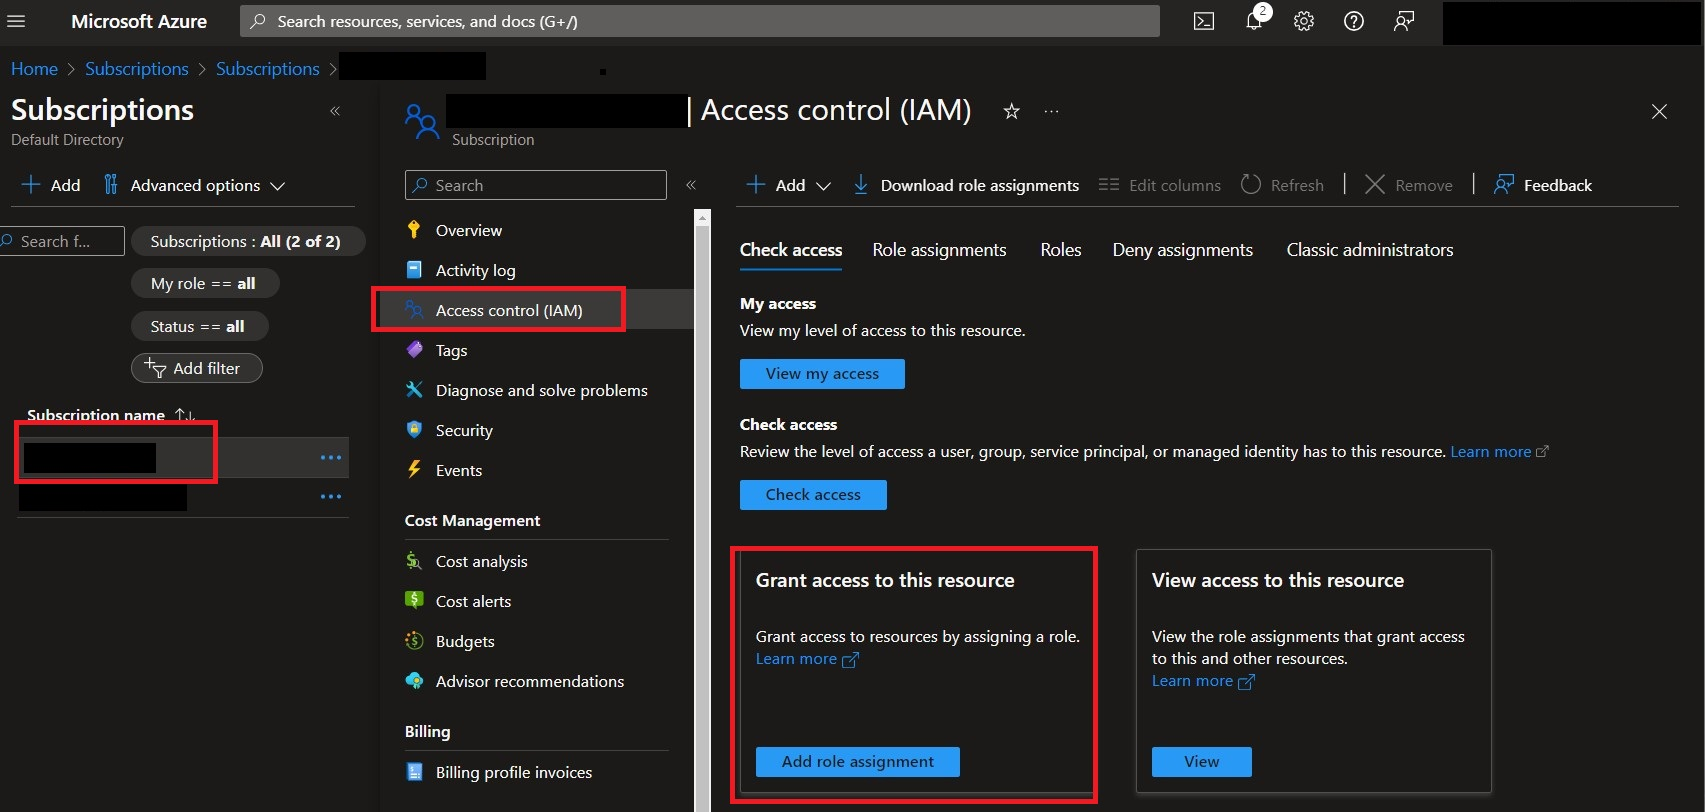
-
Add both the
Microsoft Sentinel Readerpermission from Job function roles, you can only choose one at a time so you will need to repeat this step. Once you have selected the Role, select Next as shown below.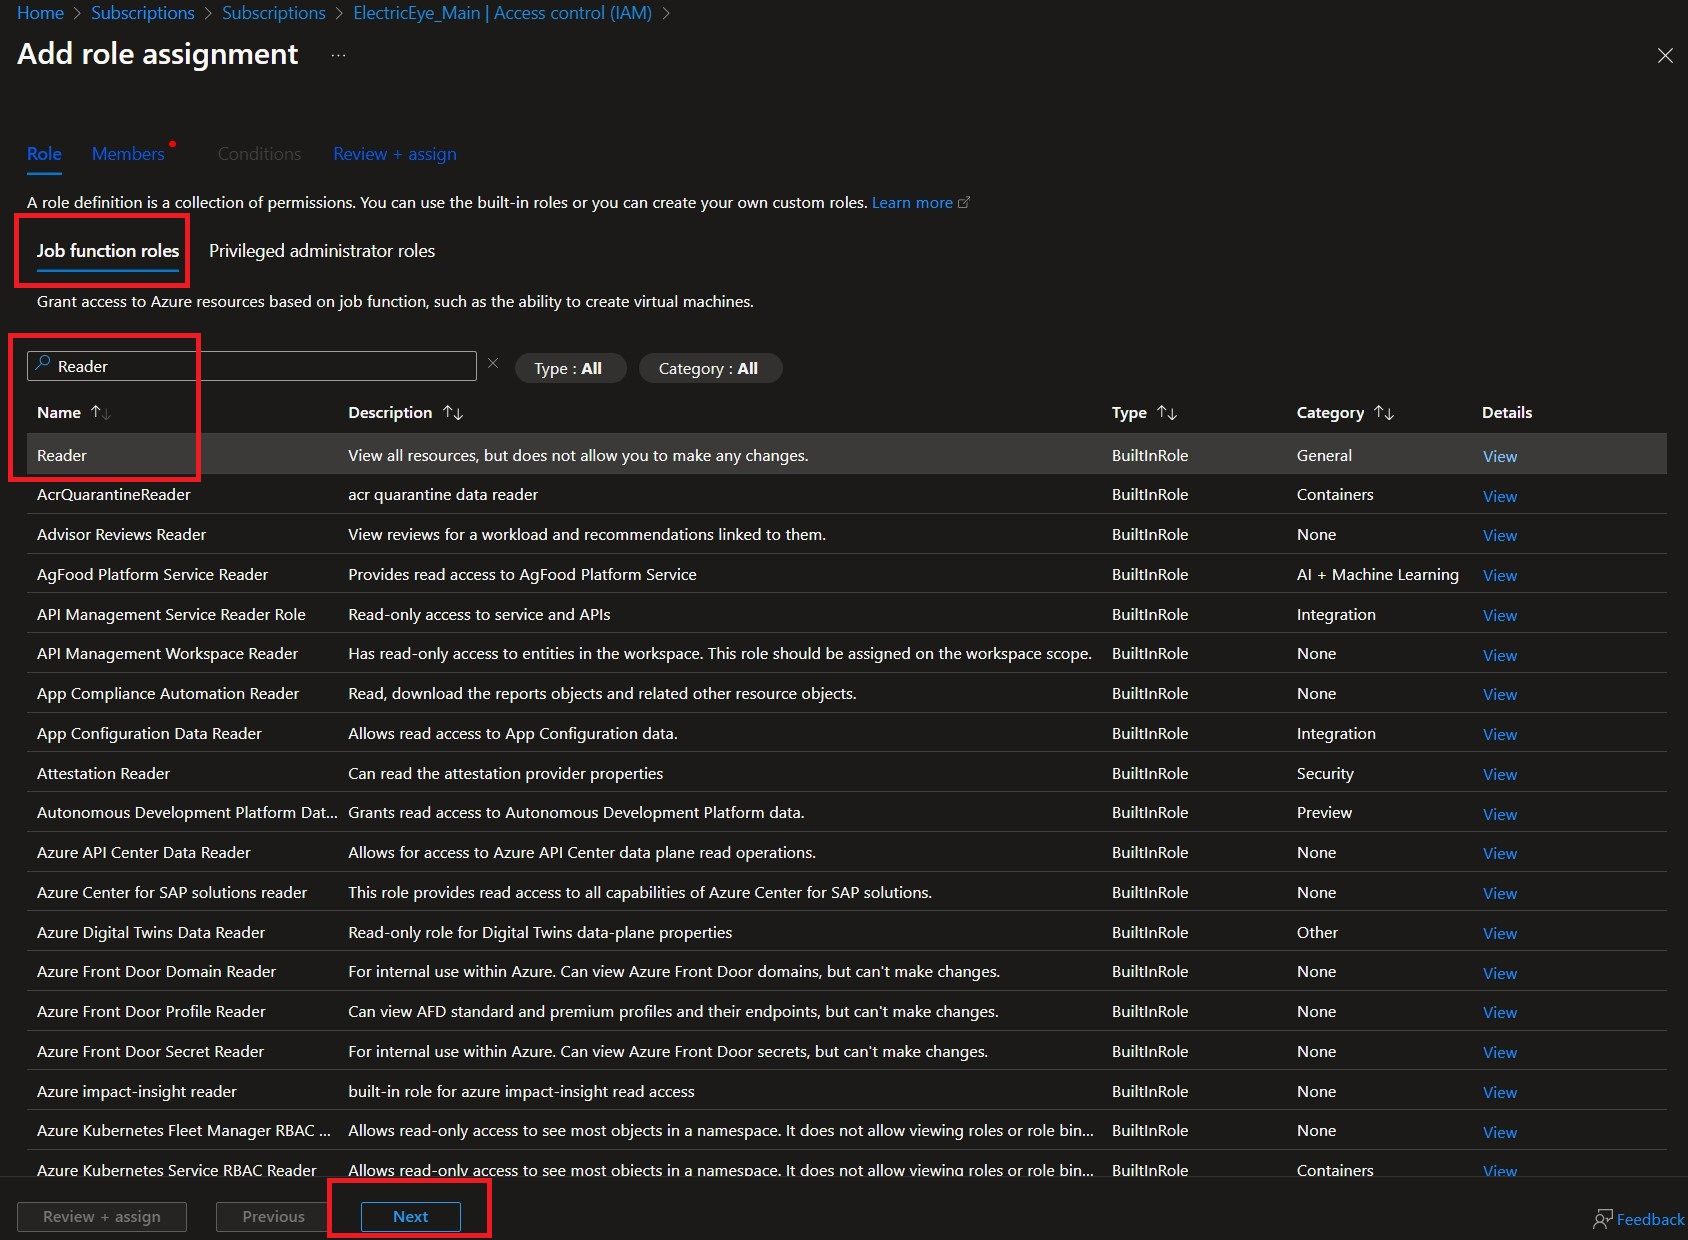
-
In the following screen, ensure
User, group, or service principalis highlighted for Assign access to and select Select members. In the pop-up window type the name of the application from Step 2, toggle the checkbox, choose Select as shown below. Then choose Review + assign (twice!) to proceed.
Before moving to the next section, copy the Tenant ID, App (Client) ID, and the App Secret Value as these are required for the Query Connectors to configure access.
Retrieve Log Analytics Workspace and Resource Group information
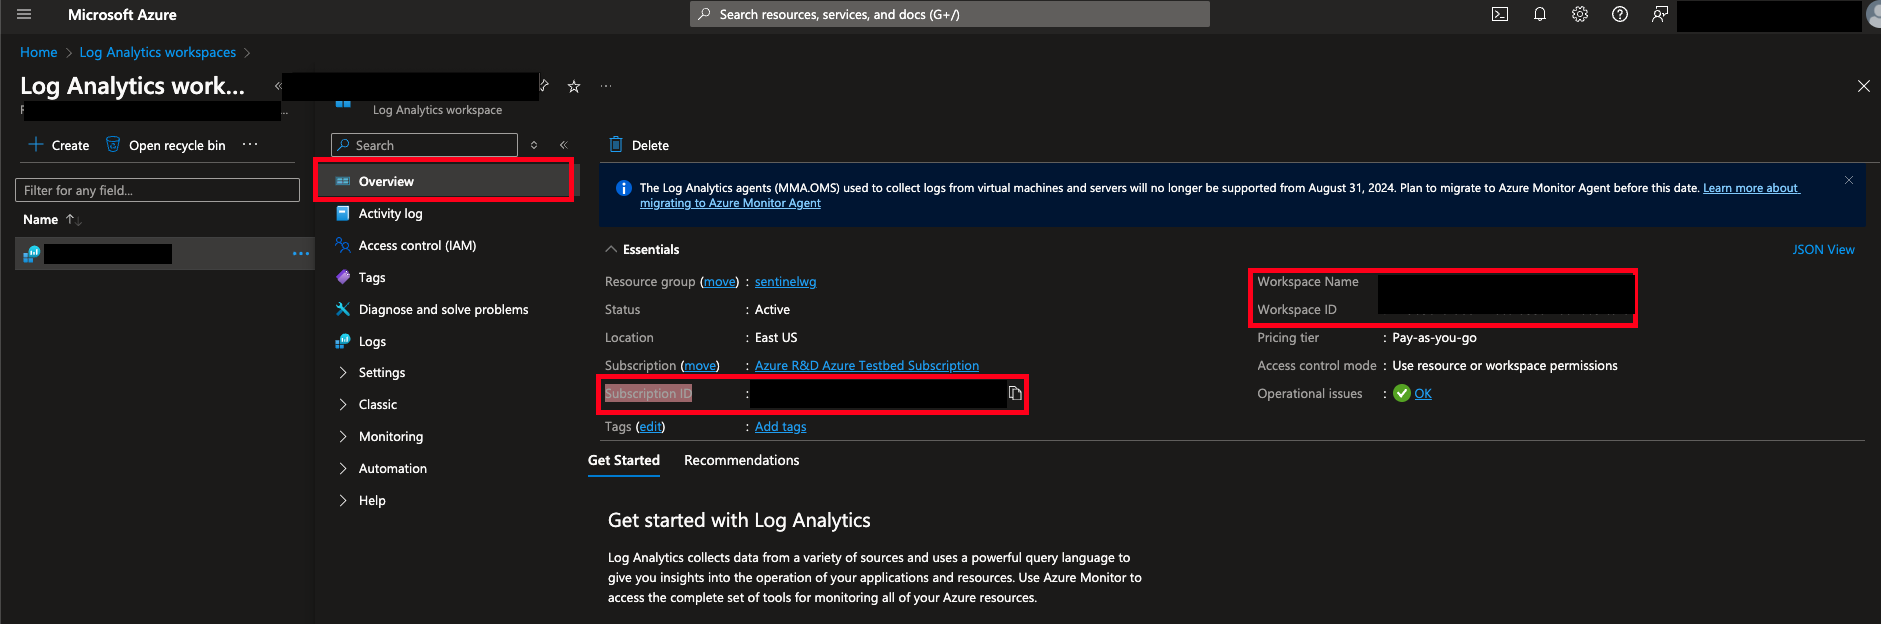
In addition to the App Registration information, you will need to retrieve the ID and Name of the Azure Log Analytics Workspace associated with your Microsoft Sentinel deployment. In addition, you will also need to the copy the name of the Resource Group that the Log Analytics Workspace was created in.
-
Navigate to the Microsoft Azure portal -> Log Analytics workspaces -> your Microsoft Sentinel's Workspace name -> Overview
-
Copy the values of Subscription ID, Workspace Name, and Workspace ID as shown below.
-
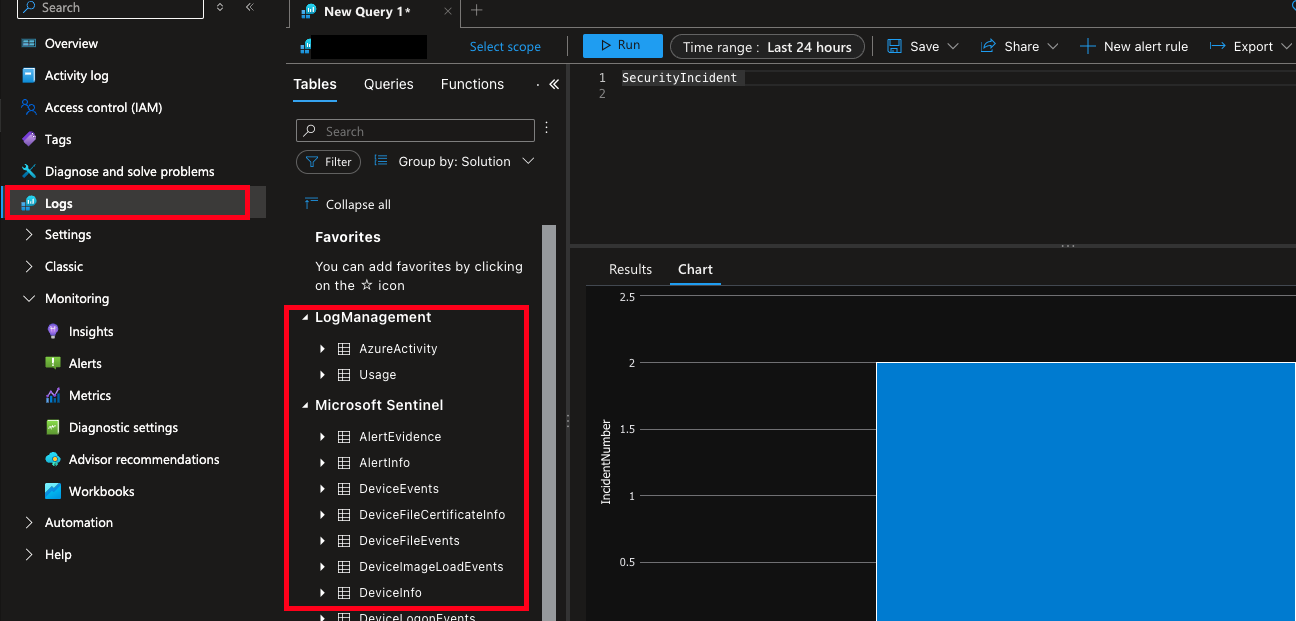
To retrieve table names, navigate to Logs and expand the various headers as shown below. These should correspond to active Microsoft Sentinel Connectors as well as any individual tables you have created within LAWs.
In this section you learned how to create a new App Registration, grant it Azure Subscription IAM roles, and retrieve Azure LAW attributes. In the next section you will learn how to configure the Microsoft Sentinel Incidents Connector
Configure the Microsoft Sentinel - Incidents Connector
The Microsoft Sentinel - Incidents Connector uses the Microsoft Azure REST API Incidents - List method to retrieve all Incidents (or Incidents for a given Incident assignee) from Sentinel. Assignees can be searched by their User Principal Name (UPN) or email address (which are typically the same).
These Incidents are created manually, created from Sentinel Analytics Rules, or imported from Microsoft Defender 365 or Microsoft Defender XDR products in your M365 subscription.
Use the following steps to create a new Query Federated Search Connector for Microsoft Sentinel - Incidents.
-
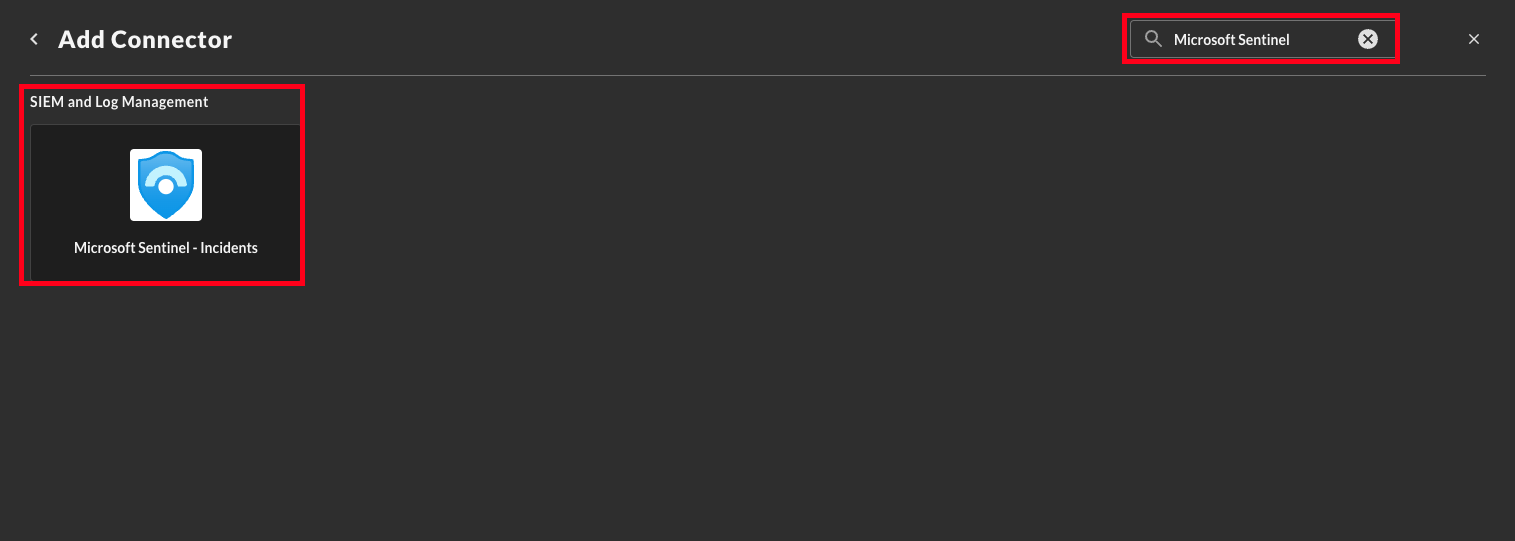
Navigate to the Connections page, select Add Connections, and selectMicrosoft Sentinel - Incidents from the SIEM and Log Management category as shown below. Alternatively you can use the search bar to find the Connector.
-
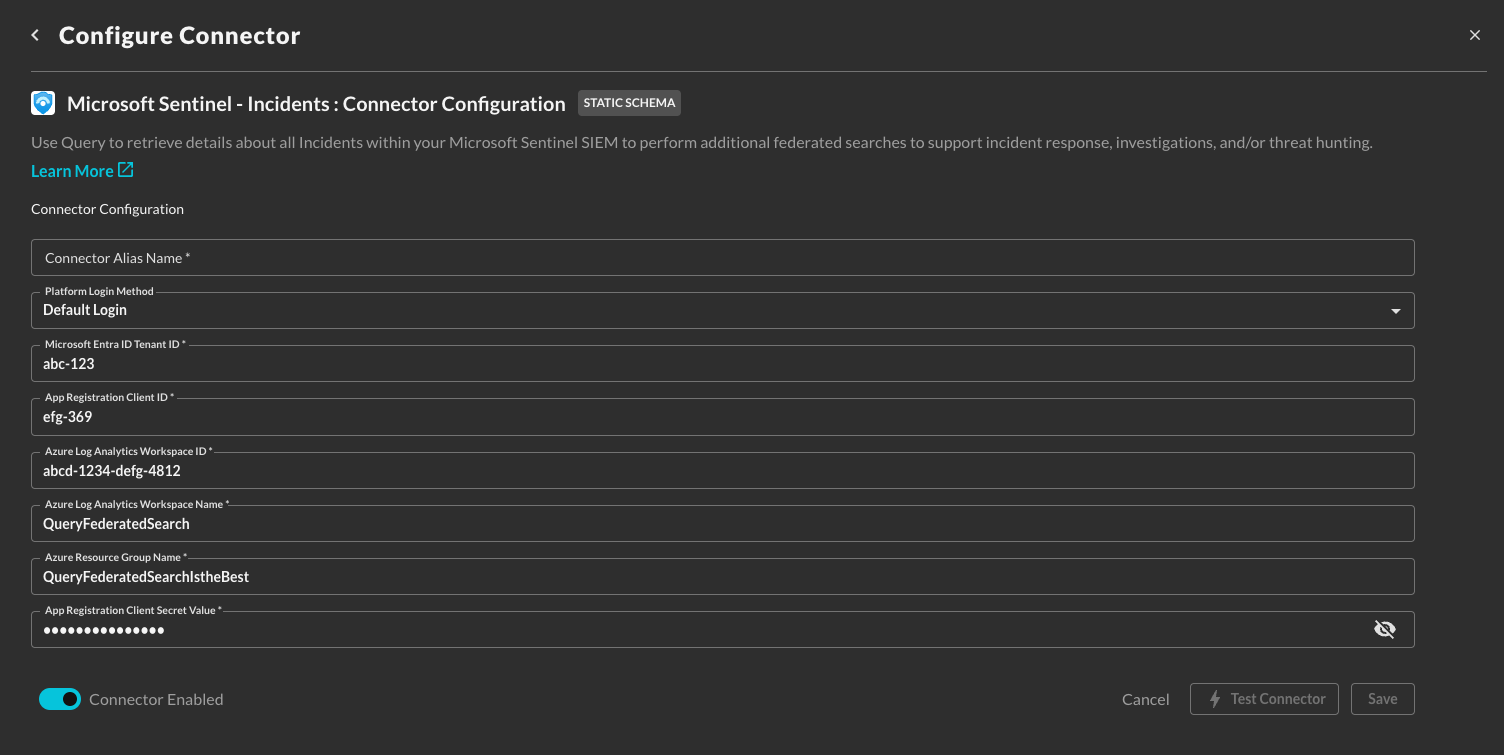
In the Configure Connector tab, add the following detail as shown below:
-
Connector Alias Name: The human-readable name you want to give to this connector, you can name it whatever you want, but you can use this to differentiate multiple Sentinel deployments across various Azure Subscriptions.
-
Platform Login Method: Leave the default value:
Default Login. -
Microsoft Entra ID Tenant ID : The Tenant ID (also known as the Directory ID) for the Microsoft Entra ID tenant associated with your Azure Subscription.
-
App Registration Client ID : The Client ID (also know as the Application ID) for the Entra ID App Registration you created in the Prerequisites section.
-
Azure Log Analytics Workspace ID : The ID of your Azure Log Analytics Workspace associated with your Microsoft Sentinel deployment.
-
Azure Log Analytics Workspace Name : The name of your Azure Log Analytics Workspace associated with your Microsoft Sentinel deployment.
-
Azure Resource Group Name : The name of the Azure Resource Group you deployed your Azure Log Analytics Workspace into.
-
App Registration Client Secret Value : The Client Secret Value for the credentials you created for your App Registration.
-
-
Select Test Connection from the bottom-right of the pane to ensure that your credentials and information was entered correctly, you have the right permissions, you specified the correct Workspace, and that Query can use the credentials to connect to Sentinel and retrieve your Incidents. If there is something wrong, error flags will appear below. You can further request assistance by utilizing the Intercom functionality in the Query app.
-
Finally, after a successfully test, select Save to finalize and enable the Connector.
You will now see Microsoft Sentinel - Incidents as an available Platform within the Query Search and Query Summary Insights UI, the "platform" term is synonymous with Connector.
Querying the Microsoft Sentinel Connector
After you have onboarded the Microsoft Sentinel Connector, you are ready to begin searching! Within the Query Federated Search and Query Summary Insights UI, all Platforms are enabled by default.
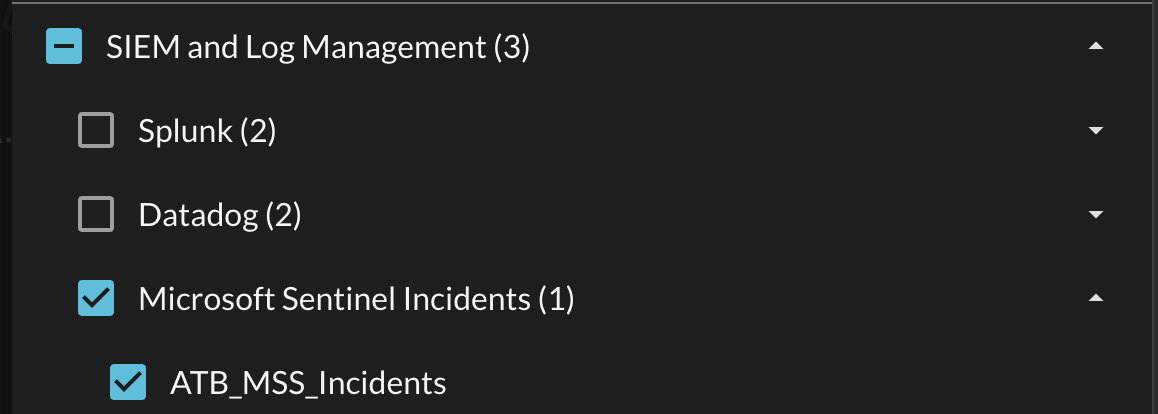
To either ensure your Microsoft Sentinel Connector is enabled, or to only query it specifically, navigate to the SIEM and Log Management section of the Selected Platforms dropdown menu and ensure the checkbox is (de)selected to match your desired search criteria, as shown below.
As of 15 MAY 2024, the following Entities, Events, and Objects are supported by Query for the Microsoft Sentinel - Incidents Connector.
Entities
- Email Address: Locates Incidents by owner's email address. This maps to
assignee.email_addrin OCSF and comes fromowner.emailin the Sentinel Incident. - User Name: Locates Incidents by owner's User Principal Name - this is typically the same as the Email Address. This maps to
assignee.namein OCSF and comes fromowner.userPrincipalNamein the Sentinel Incident.
Events
- Incident Finding: Several OCSF normalized values can be searched from the Incident Finding:
- Severity
- Impact
- Confidence
- Activity
- Status
- Type
Objects
- Assignee (User): This maps from
incident_finding.assignee- contains the UPN and Email. - Finding_Info: This is an array of Alerts from the Incident that contains their names, descriptions, and IDs.
Resources
For more information to help with troubleshooting or general information about Microsoft Sentinel and its related services, refer to the links below.
Updated 9 months ago