Microsoft Graph API - Security
Integrate Query with the Microsoft Graph Security API to retrieve all Alerts details from every Defender SKU!
TL;DRTo integrate the Microsoft Graph API - Security Connector with Query:
- Create an App Registration (Enterprise Application) with Client Credentials and
SecurityAlert.Read.AllApplication Permission.- Setup the Microsoft Graph - Security Connector for your Tenant ID, Client ID, and Client Secret Value.
- Use Query Search to parallelize searches and surface details about All Defender SKU Alerts for incident response (IR), threat hunting, investigations, and other security and observability use cases.
Overview
The Microsoft Graph API allows users to consume several dozens of types of metadata and data from their Microsoft M365 and Entra ID deployments, such as Users, Emails, and in the case of this Connector: Security data. While certain tools such as Microsoft Defender for Cloud Apps (MDCA), formerly known as Microsoft Cloud Access Security (MCAS), or Microsoft Defender for Endpoint - the Security API within the Microsoft Graph API allows users to retrieve Alert data for every single Defender SKU in their M365 and Azure environments. Whether you are using Microsoft Defender for Office (MDO) for email security, MDE for Endpoint Detection & Response, or Microsoft Defender for IOT to secure your IOT/ICS devices, all of the Alerts data is floated up to the Microsoft Graph Security API.
Using Query Federated Search, you can retrieve all of these Alerts and their metadata such as alerting identifiers, specific evidence types, ownership data, as well as alert disposition and status. If you need to retrieve Incident data, and your are a Defender XDR customer or sync your Defender SKUs with Microsoft Sentinel, consider using our Microsoft Sentinel (formerly known as Azure Sentinel) Connector in addition to this Connector.
All federated searches have their searches and results expressed in the terms of the Query Data Model (QDM), which is based on the Open Cybersecurity Schema Framework (OCSF). Each API source is normalized into a specific QDM/OCSF Event Class to standardize and normalize the data for increased situational awareness, ease of aggregation of filtering, and easy pivoting.
| API Name | Endpoint Name | QDM/OCSF Event Class | Entities/Observables |
|---|---|---|---|
| Security | List Alerts V2 | Detection Finding | Account Name Account UID IP Address Hostname/Domain MAC Address Geolocation (Country) User UID Username Email Address User Aggent Resource UID |
Query Federated Search greatly simplifies how you can consume data from the Microsoft Graph Security API by providing full results normalization and search translation. Additionally, on top of proper implementation of all multi-conditional $filter OData values supported by the List Alerts V2 Endpoint, Query Federated Search emulates all of the supported Entities filters listed above to greatly expand your capabilities with interact with Alert data.
For instance, native $filter options do not support searchingevidence data, this means that attempting to search for a specific Account Name, IP Address, Geolocation mapping, or Container name or Device ID is not possible. This requires you to implement your own ETL and post-processing pipelines and playbooks, respectively, using Query Federated Search alleviates this burden. Not only do you gain a single pane of glass for consuming Alerts but you can quickly pivot one Alert to another, or correlate and collate against our other Microsoft and Azure Connectors, as well as Connectors for other vendors and data points such as Threat Intelligence or IT Service Management tools.
Some details on searchesQuery will use proper
$filterparameters that are available, all others are emulated, this requires us to fully paginate and stream the results and post-hoc filter on the result set. If you have 1000s or 10s of 1000s of Alerts, consider further filtering in addition to specific IOCs or assets you are looking for. For instance, searching for Detection Findings events with a specific Severity, Status, Last Modified date, and then filtering for the specific Registry Values, Country Codes, IP Addresses, Domains, or otherwise will greatly improve query performance.This Connector does not implement searching for Incidents. Use our Microsoft Sentinel Connector to retrieve Incidents.
Prerequisites
To make use of this Connector, you should have some M365 licensing for Microsoft 365 Defender - be it M365 E5, Defender for Office P2, Defender for Endpoint, Defender XDR, or otherwise - to retrieve the findings. The List Alerts V2 API [provides alerts](Microsoft Entra ID Protection Microsoft 365 Defender Microsoft Defender for Cloud Apps Microsoft Defender for Endpoint Microsoft Defender for Identity Microsoft Defender for Office 365 Microsoft Purview Data Loss Prevention Microsoft Purview Insider Risk Management) from these products:
- Microsoft Entra ID Protection
- Microsoft 365 Defender
- Microsoft Defender for Cloud Apps
- Microsoft Defender for Endpoint
- Microsoft Defender for Identity
- Microsoft Defender for Office 365
- Microsoft Purview Data Loss Prevention
- Microsoft Purview Insider Risk Management
You will require Administrator permissions to be able to create an App Registration (Enterprise Application), add Permissions, and provide Admin Consent as you require the Application Context for the API Permissions.
To connect a Microsoft Graph API - Security Connector with Query Federated Search you'll need to execute the following steps.
-
Login to your Microsoft Azure subscription where your Tenant is hosted and navigate to Microsoft Entra ID. On the left-hand navigation pane, select App registrations as shown below (FIG. 1).
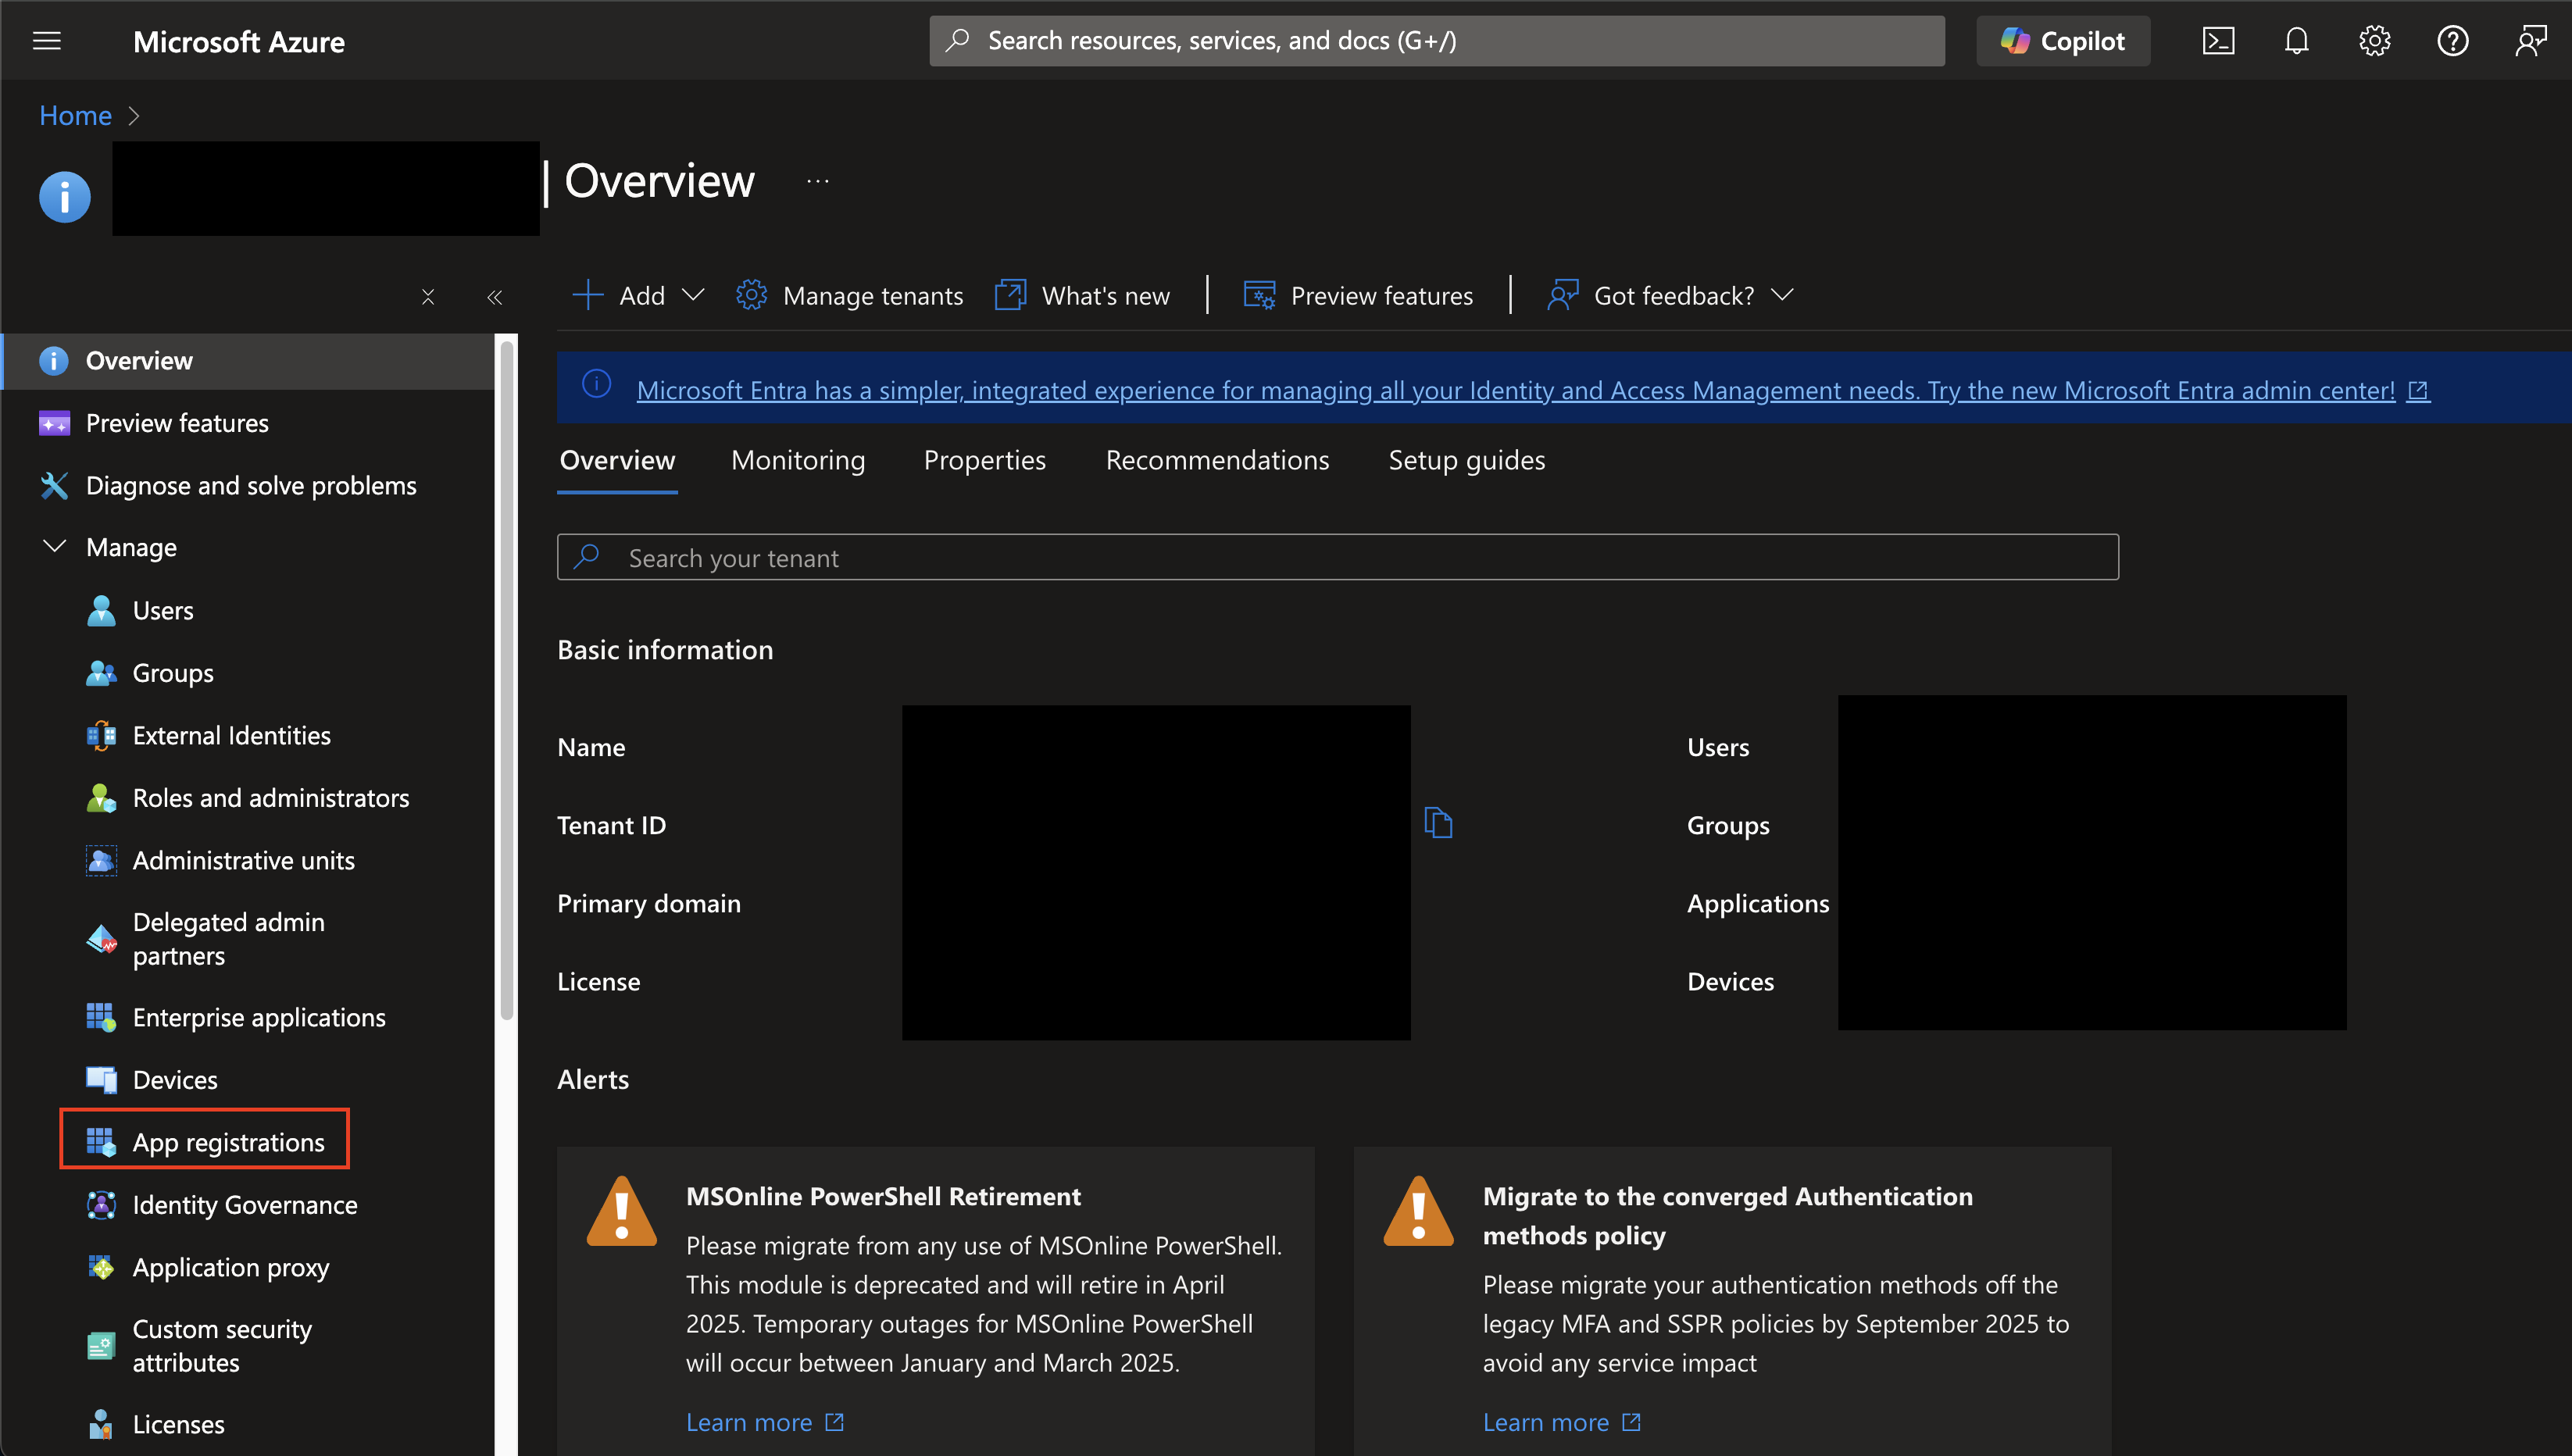
FIG. 1 - Navigating to App registrations in Entra ID
-
At the navigation tab on the top of the page select + New registration. Enter a Name (such as
QueryFederatedSearchForMicrosoftGraphSecurity) and select the appropriate Supported account types for your tenancy and select Register at the bottom-left as shown below.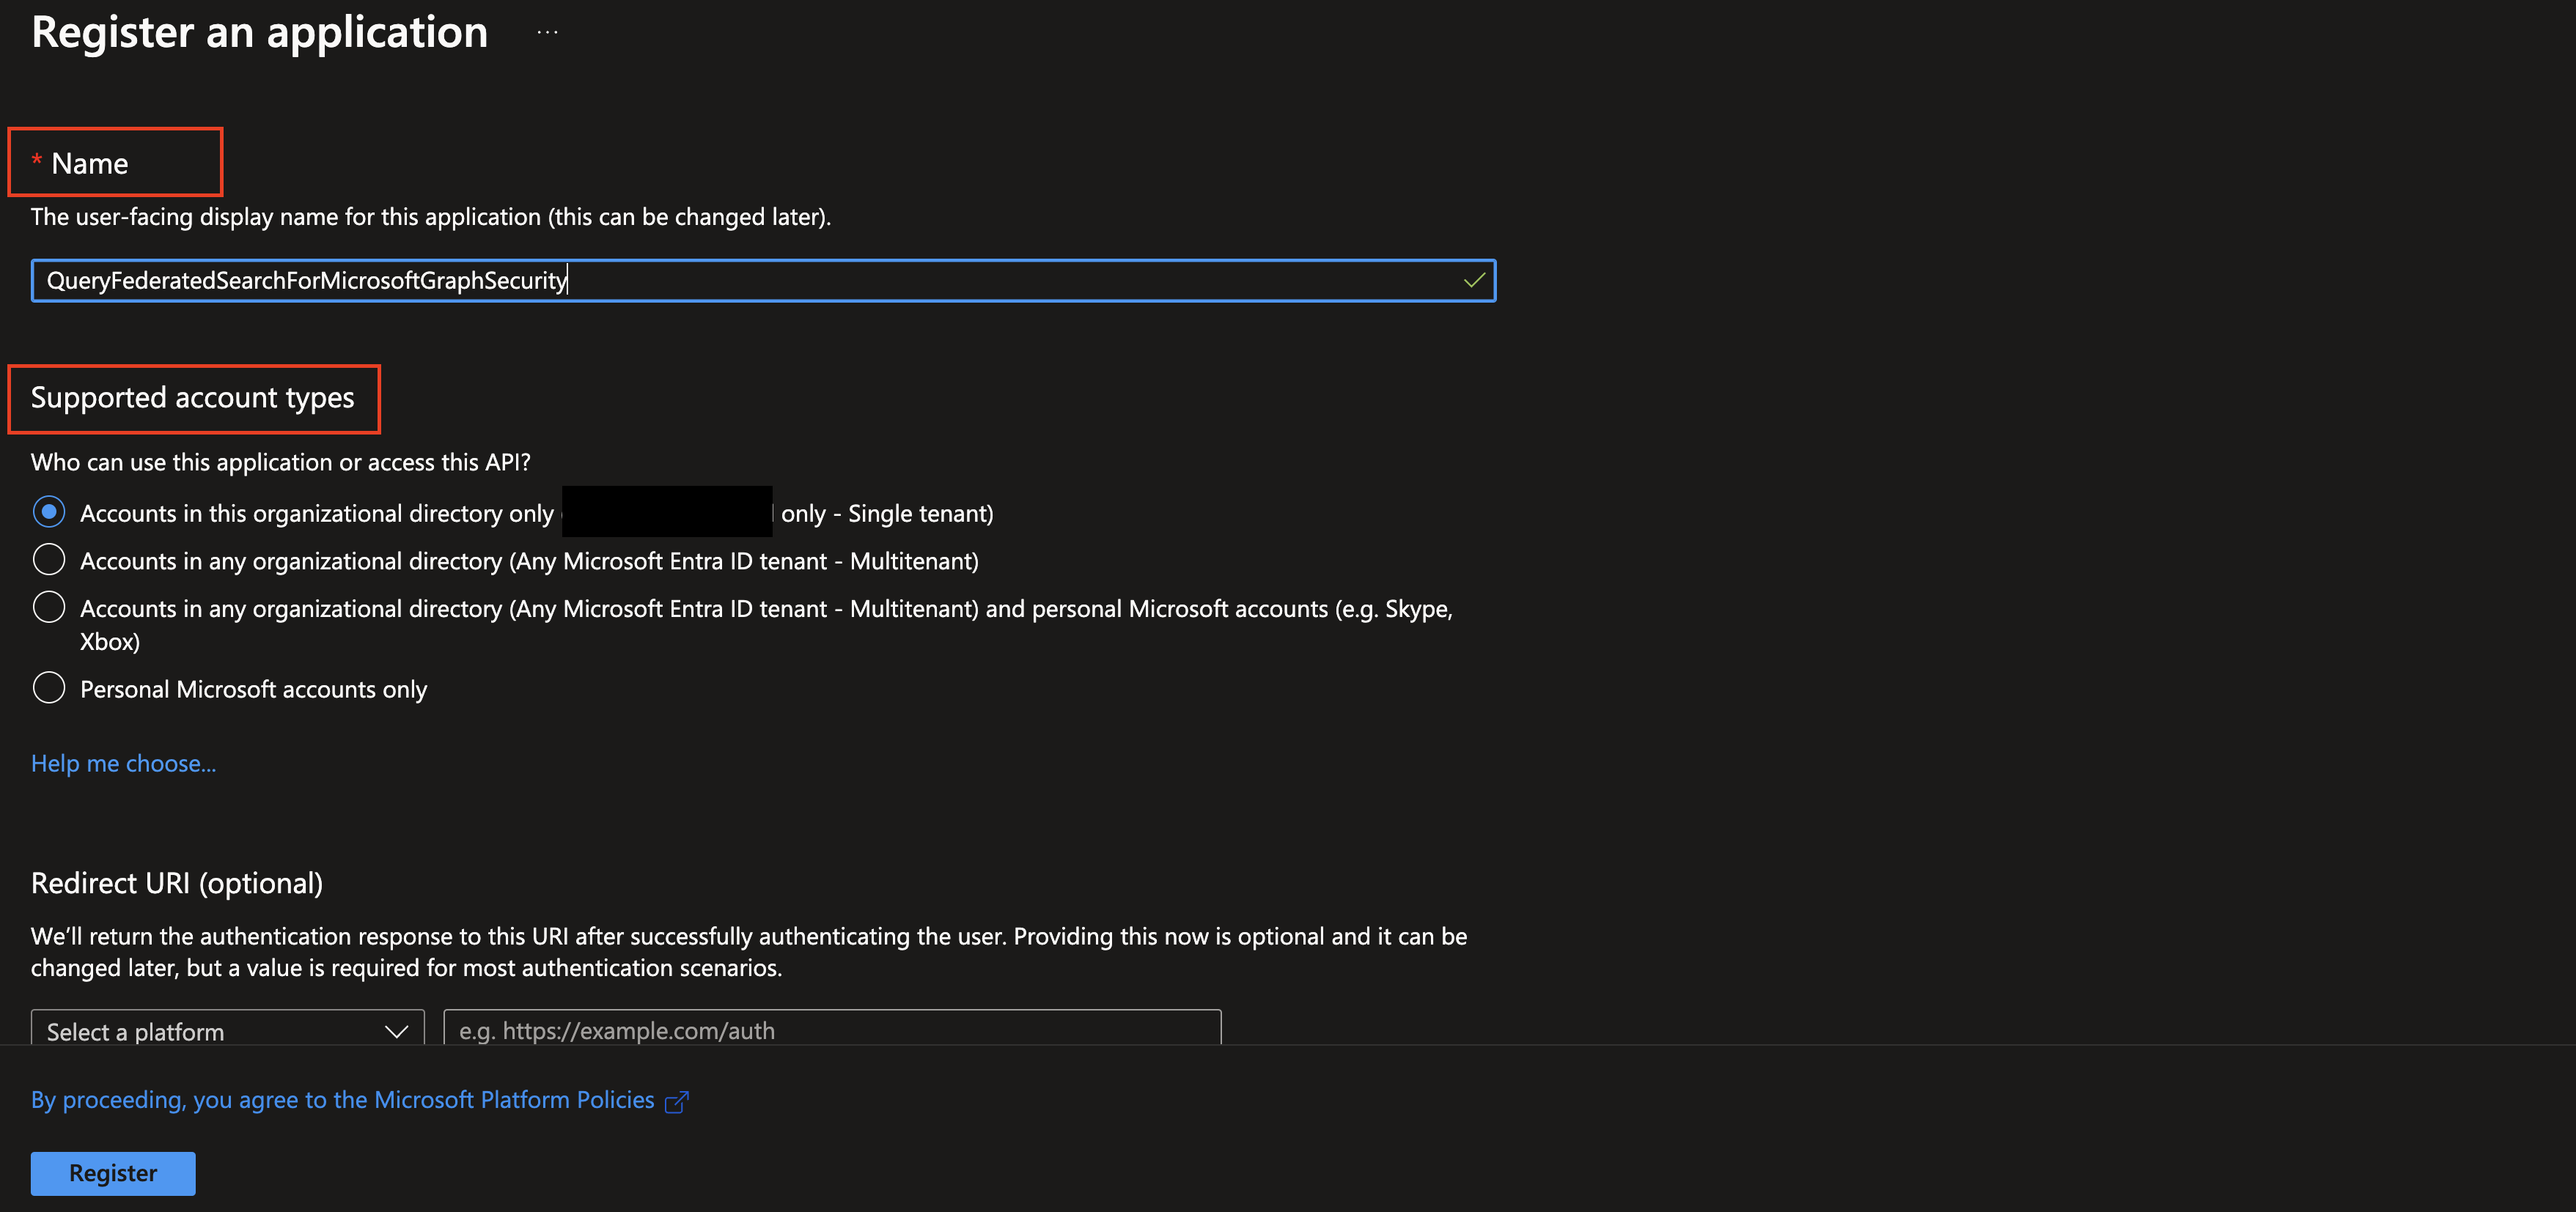
FIG. 2 - Naming and selecting the supported account types for an App registration
-
You will (should) be automatically redirected to the App registration's overview screen. Copy the value for Application (client) ID and Directory (tenant) ID as you will require them to create your Connector, as shown below (FIG. 3).
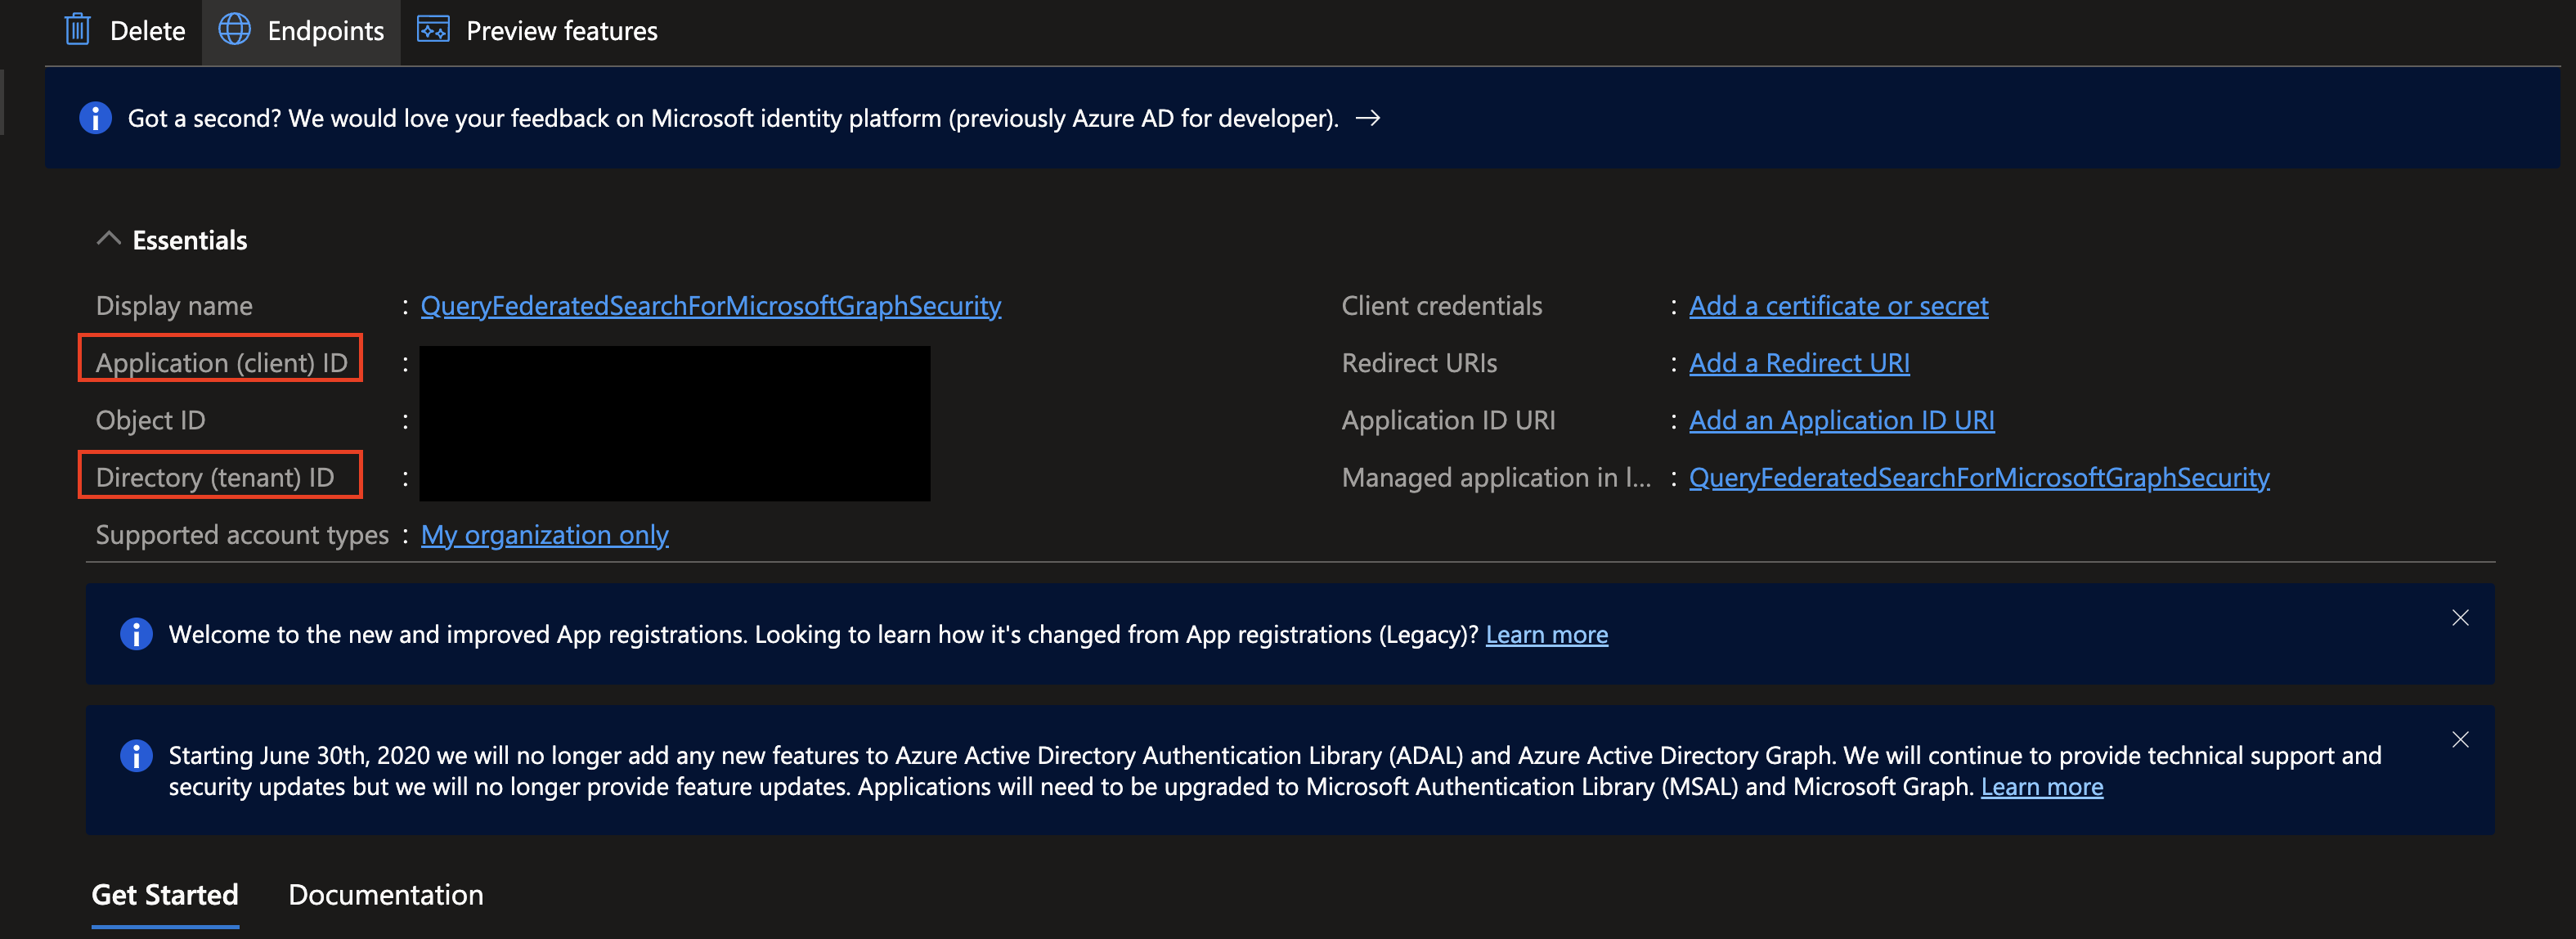
FIG. 3 - Copying the client ID and tenant ID from the App registration
-
In the left-hand navigation pane, select API permissions. Once at the API permissions screen, select + Add a permission under the
Configure permissionsheader at the center of the screen, as shown below (FIG. 4).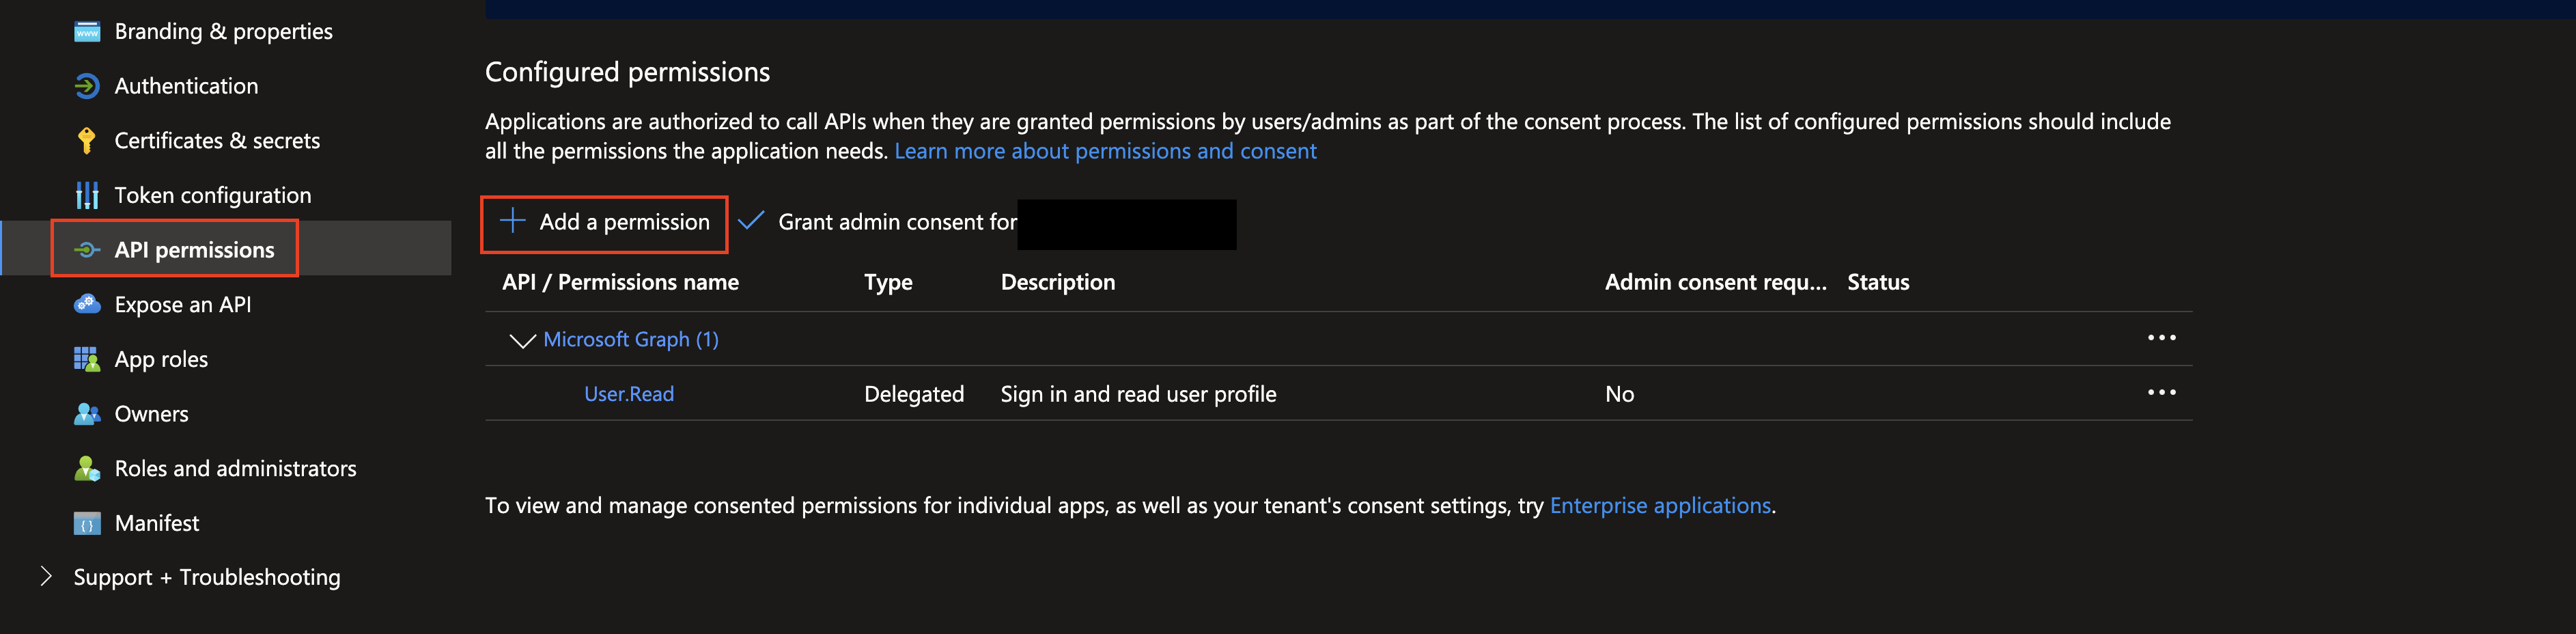
FIG. 4 - Adding permissions to an App registration
-
Select Microsoft Graph from the APIs, choose Application permissions, enter
SecurityAlert.Read.Allin search bar, toggle the checkbox next to the permission to select it, and select Add permissions at the bottom of the pane as shown below (FIG. 5).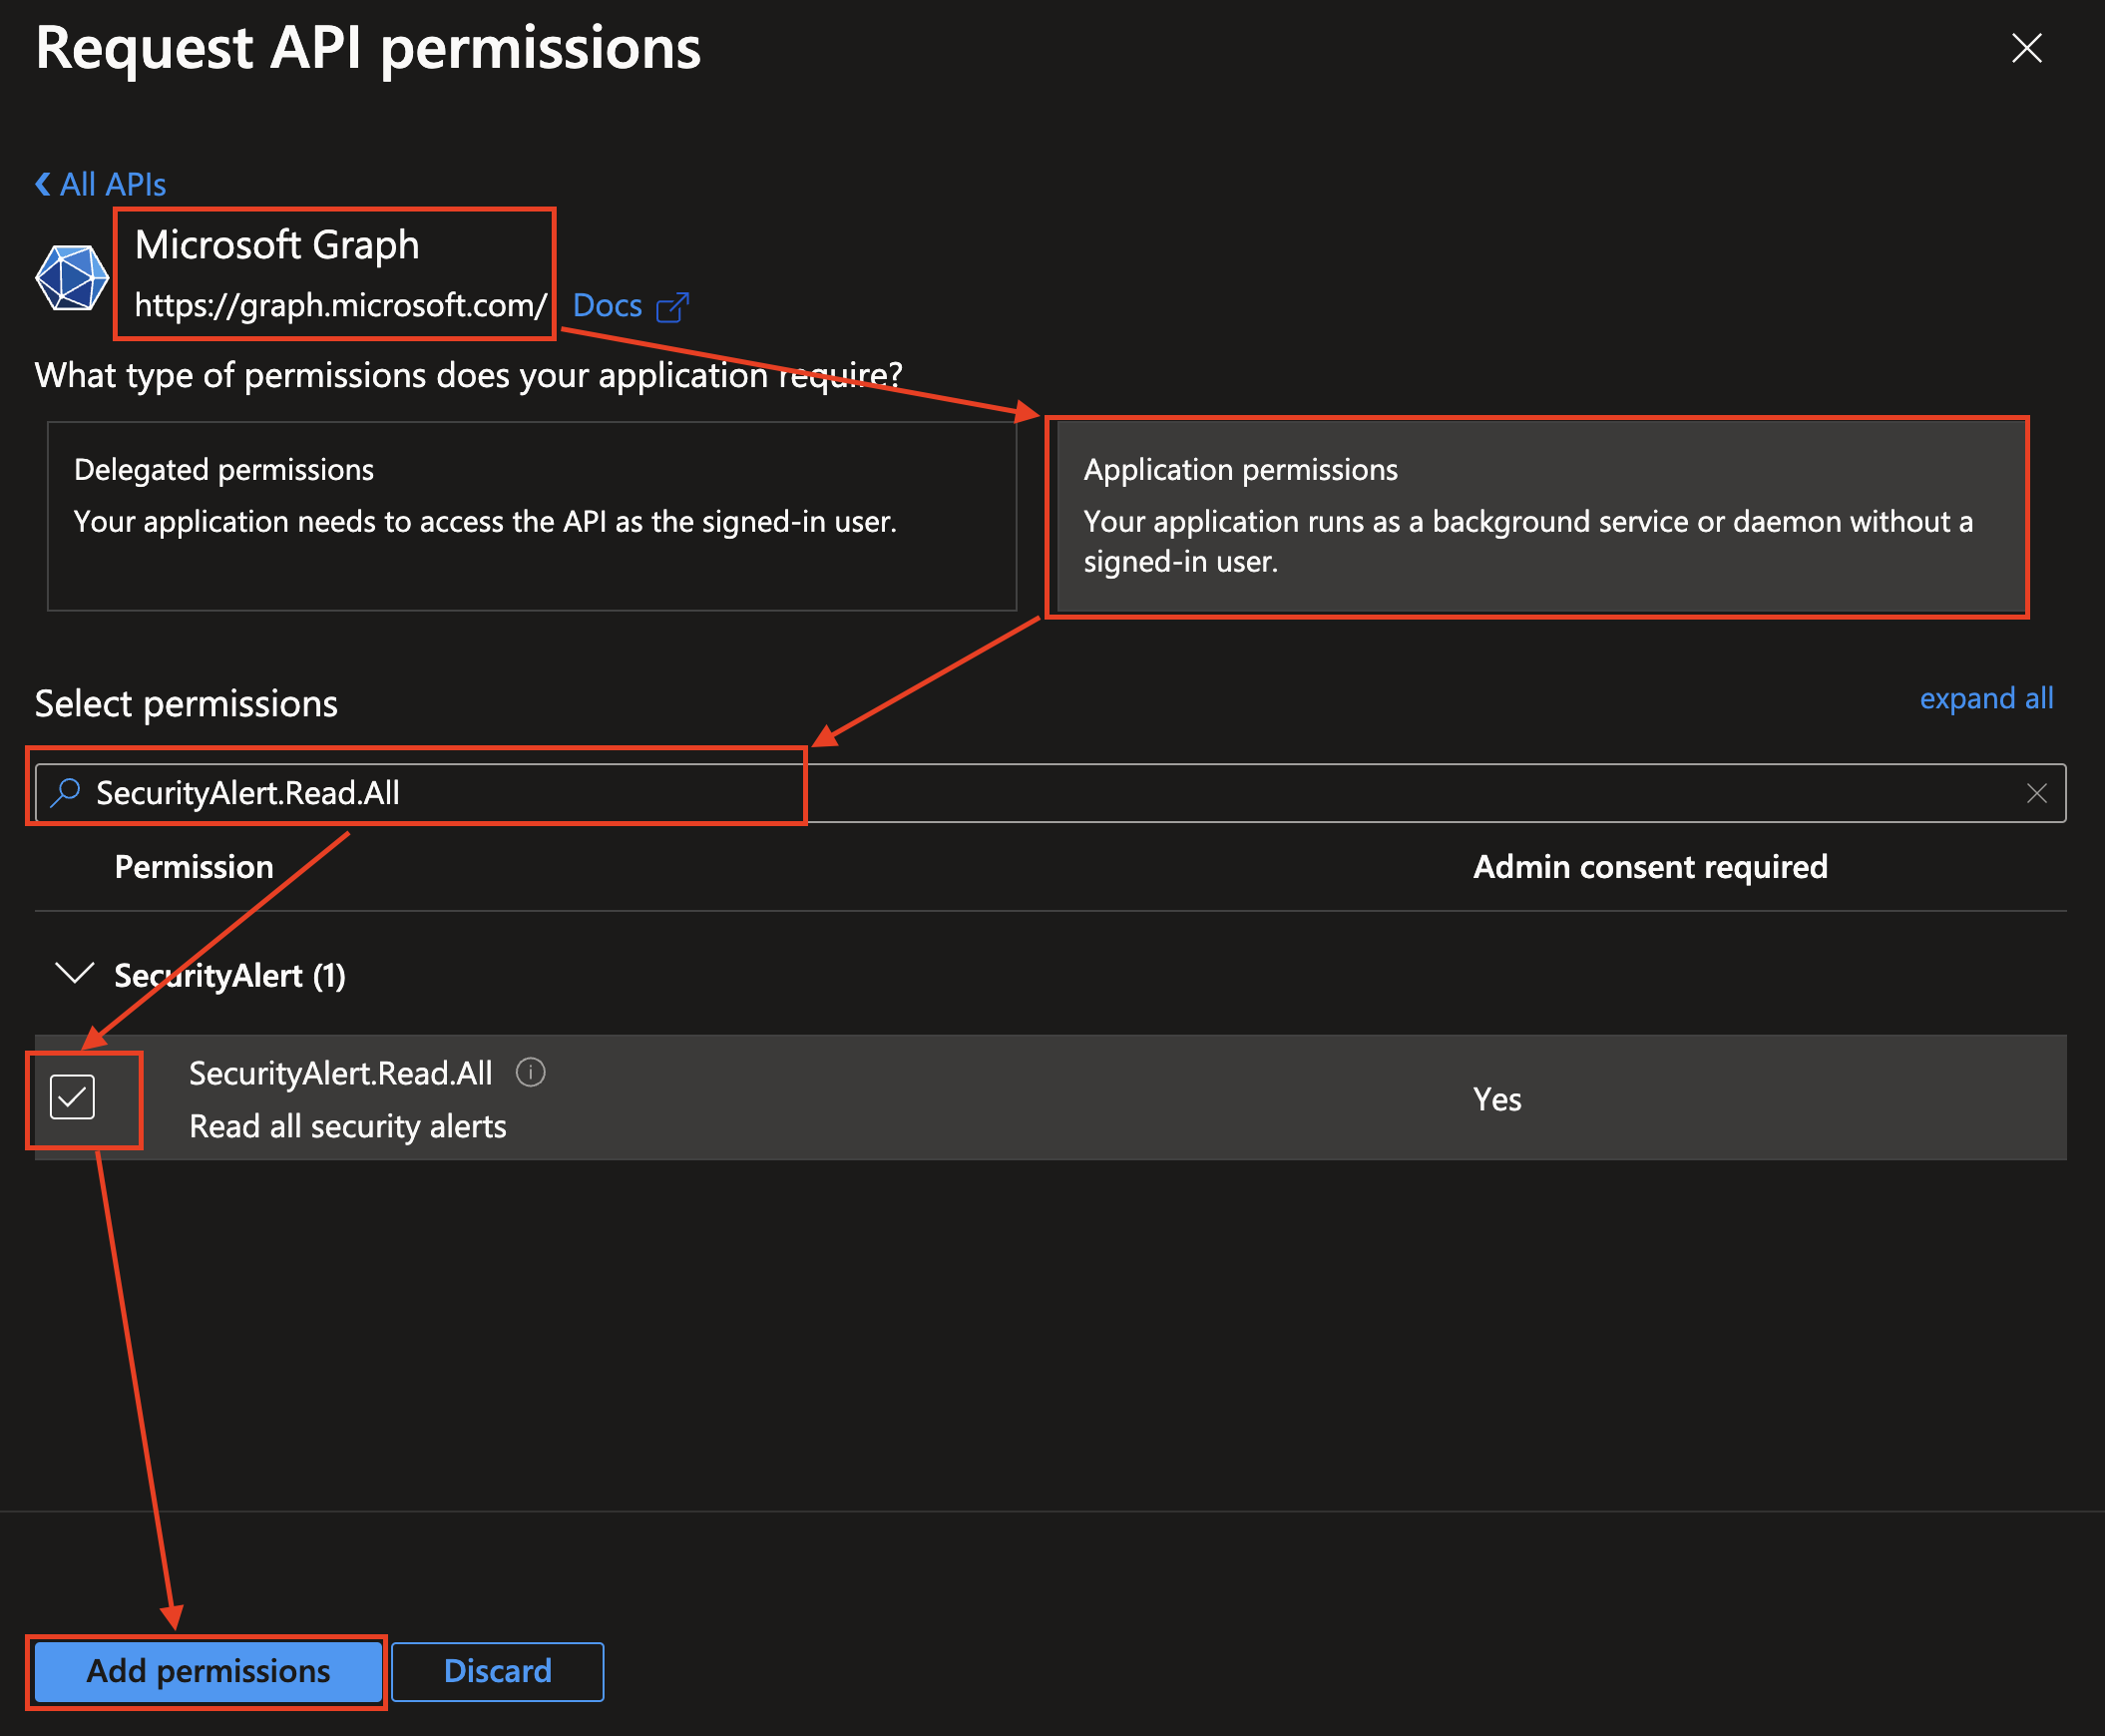
FIG. 5 - Adding the
SecurityAlert.Read.Allpermission to your App Registration -
Select Grant admin consent for {your_tenant_name} and from the
Grant admin consent confirmationpop-up select Yes as shown below (FIG. 6) to add domain-wide consent for your Application Permissions.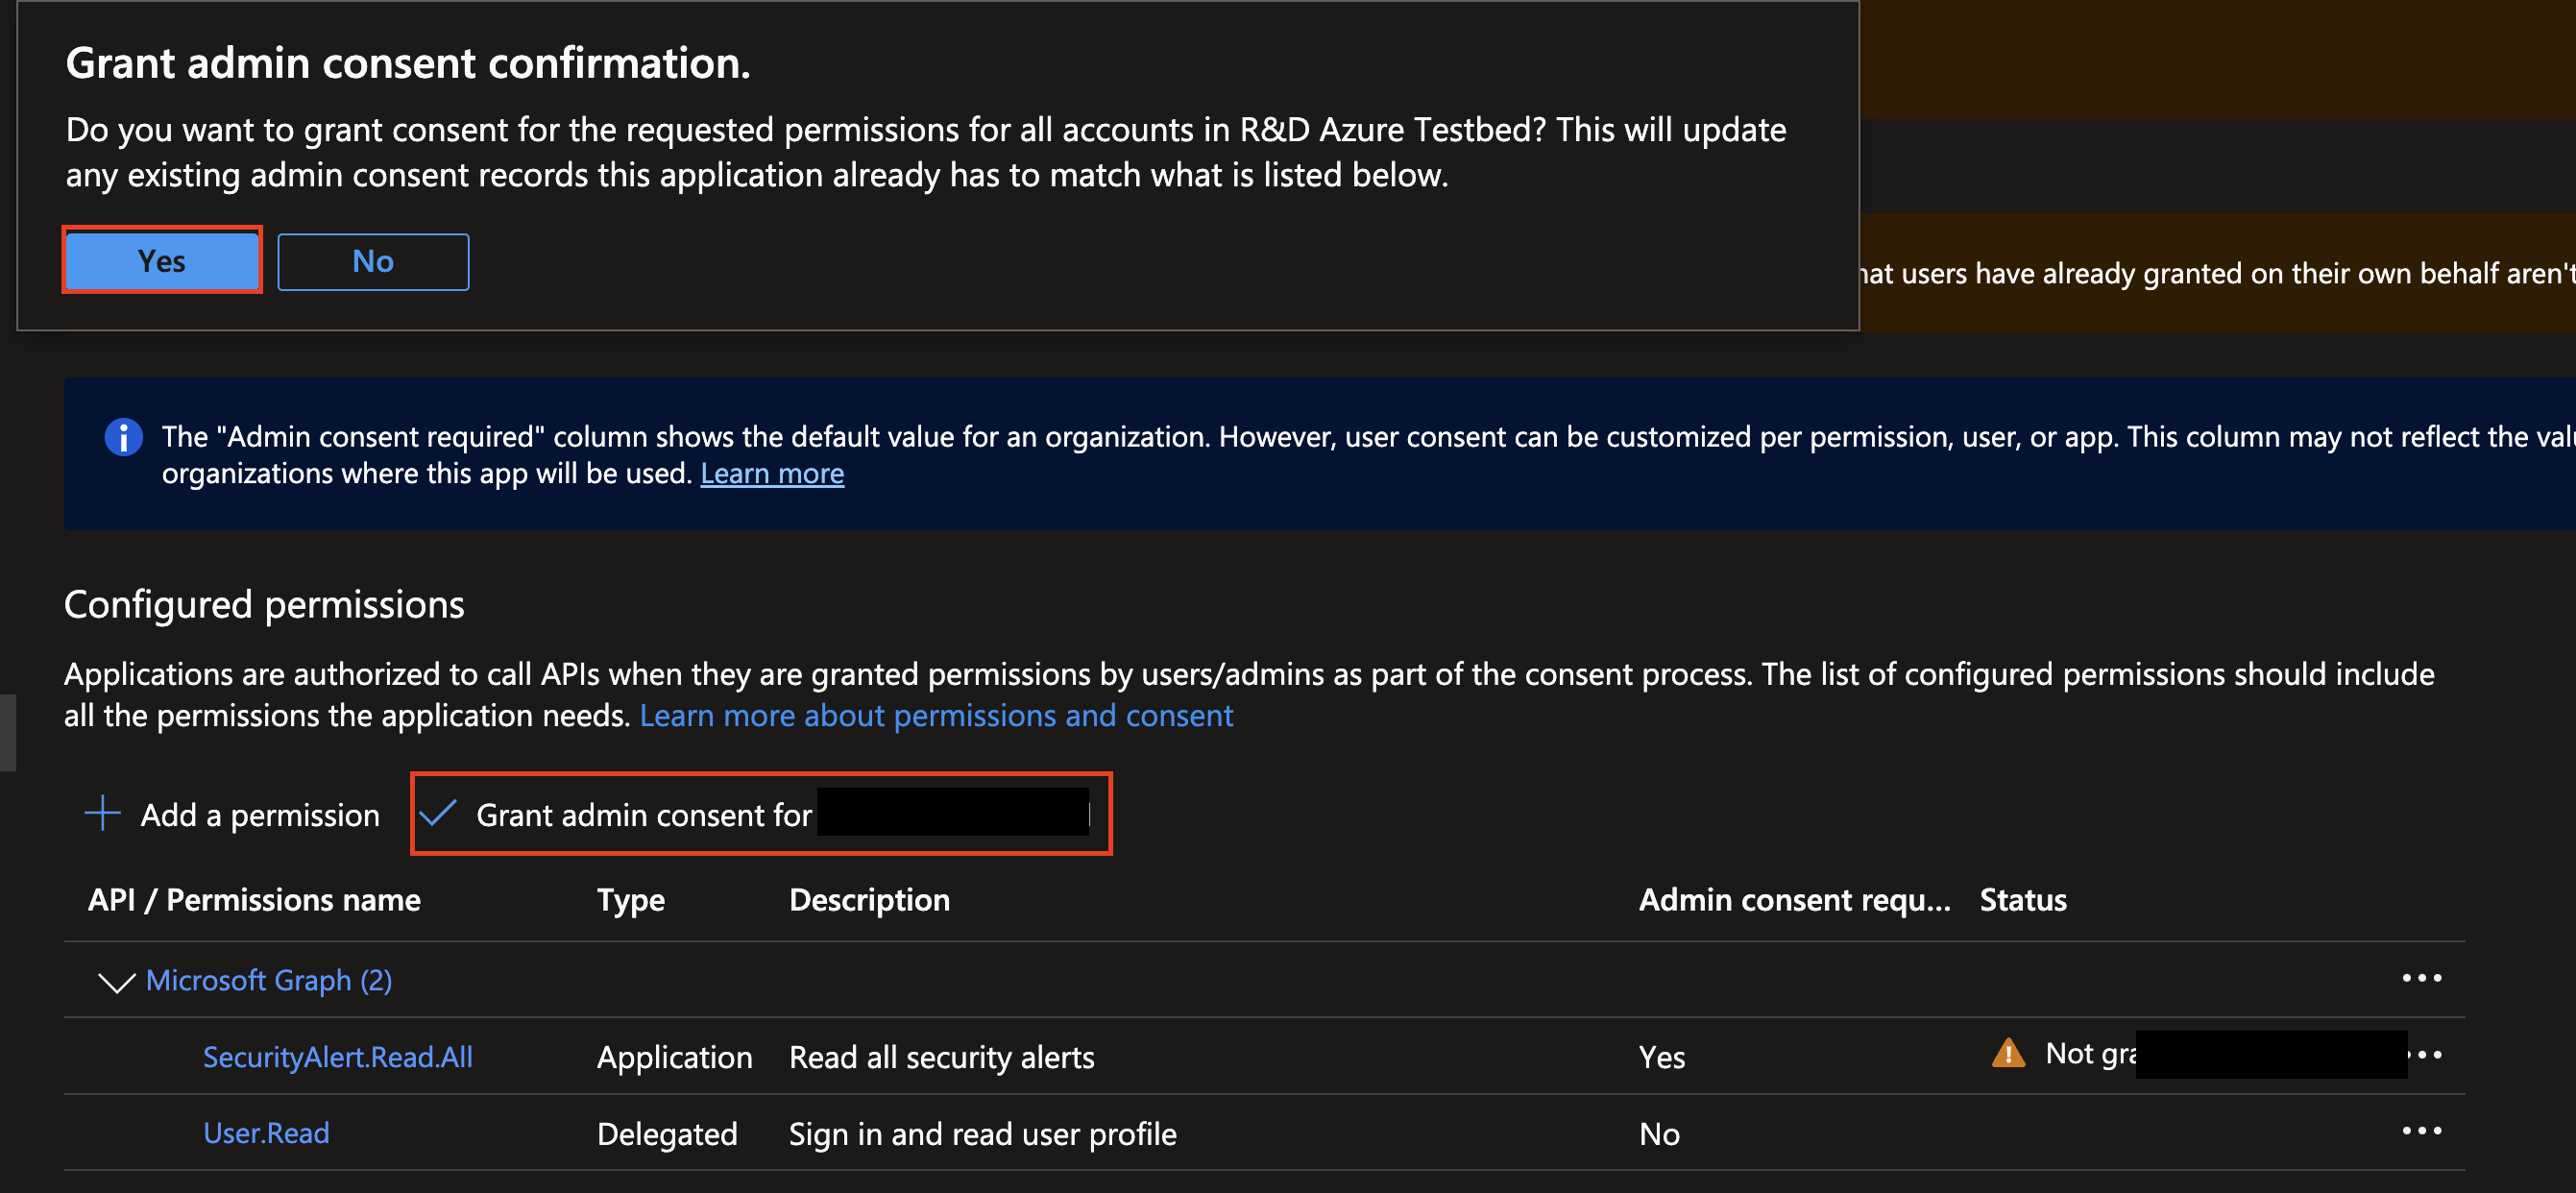
FIG. 6 - Granting admin consent for your App registration
-
In the left-hand navigation pane select Certificates & secrets, choose the Client secrets tab, and select + New client secret as shown below (FIG. 7).
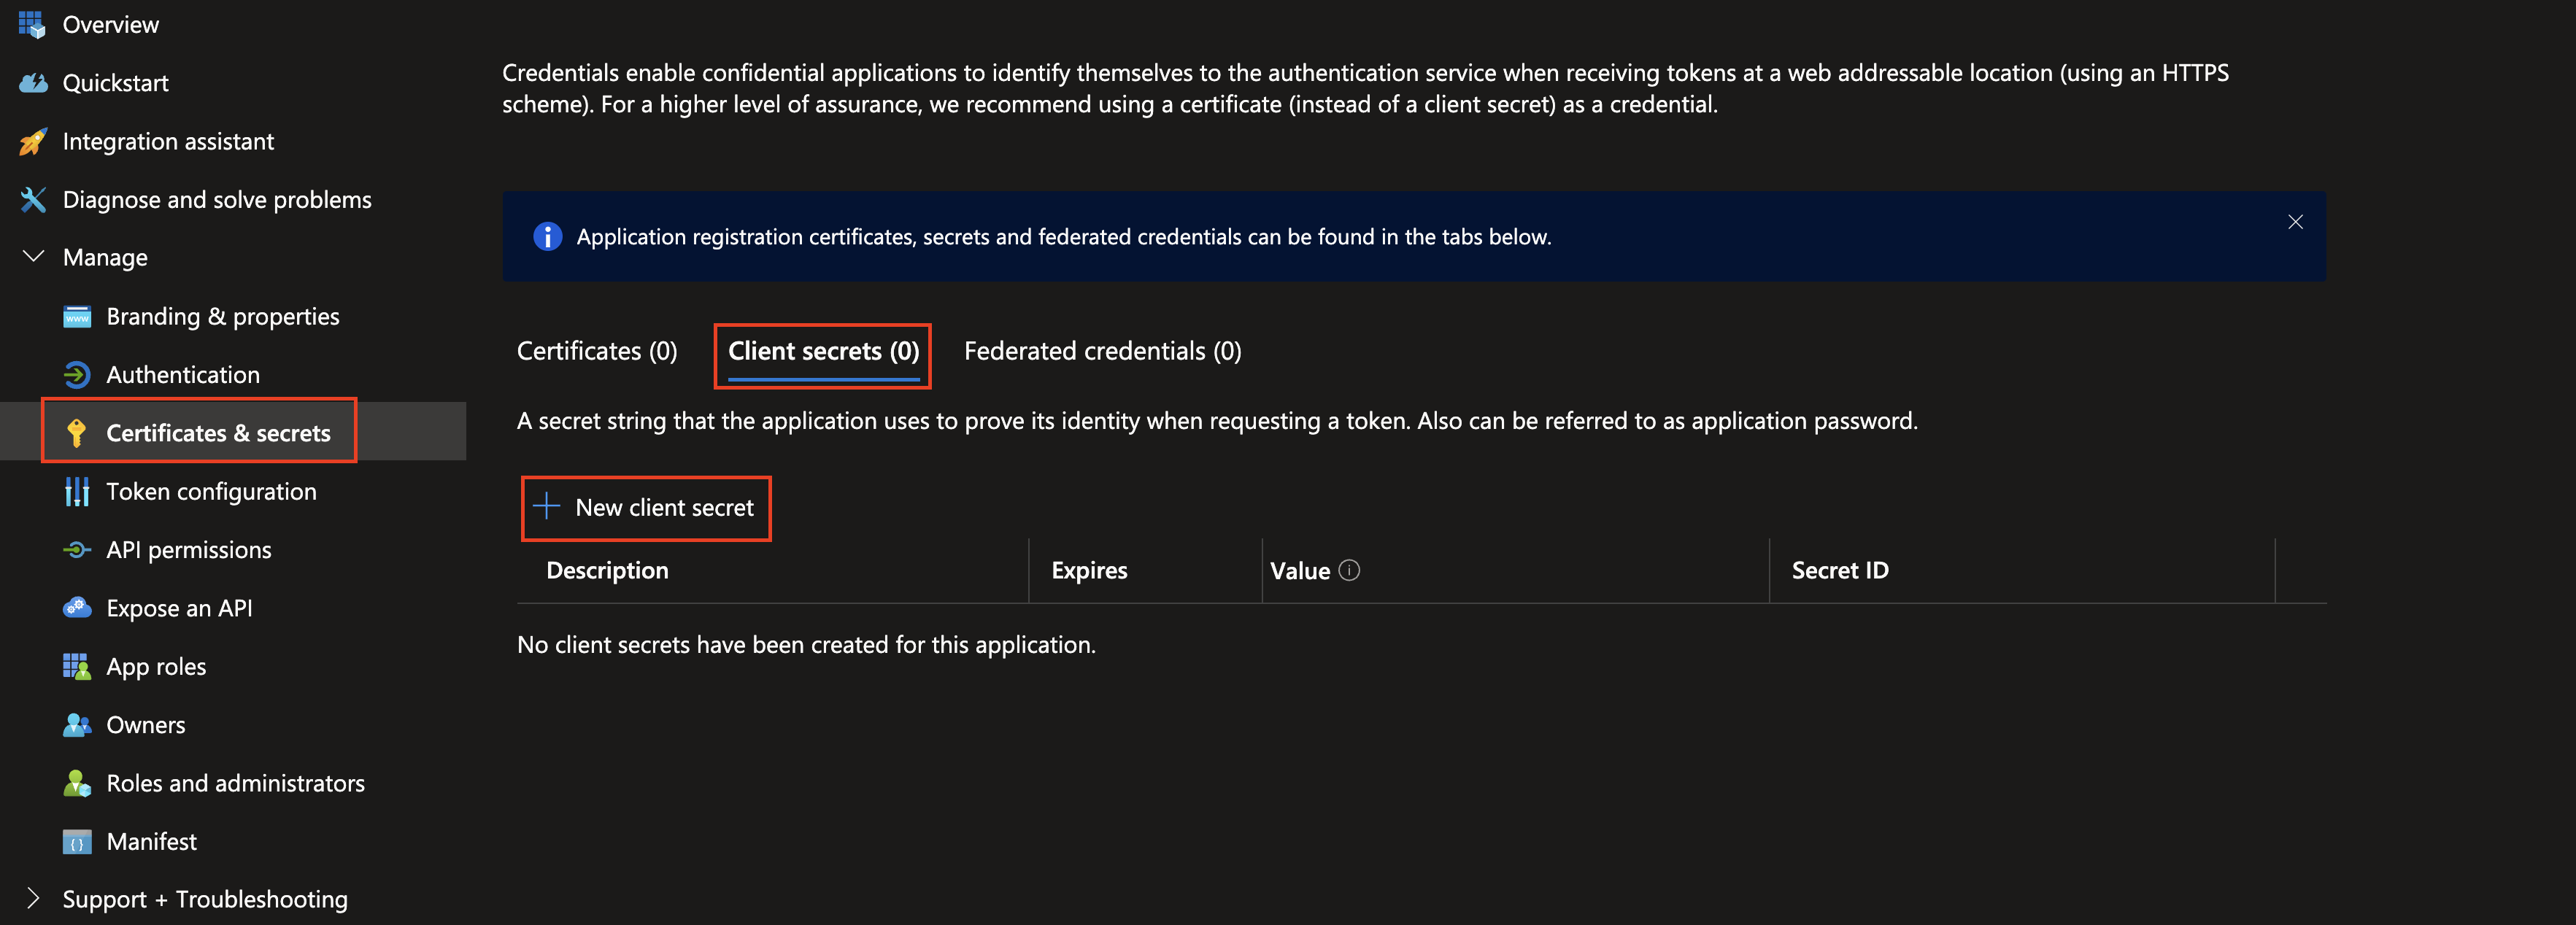
FIG. 7 - Creating a new client secret for your App registration
-
Provide a Description and select an appropriate Expires data (up to 2 year) and select Add from the
Add a client secretpane as shown below (FIG. 8).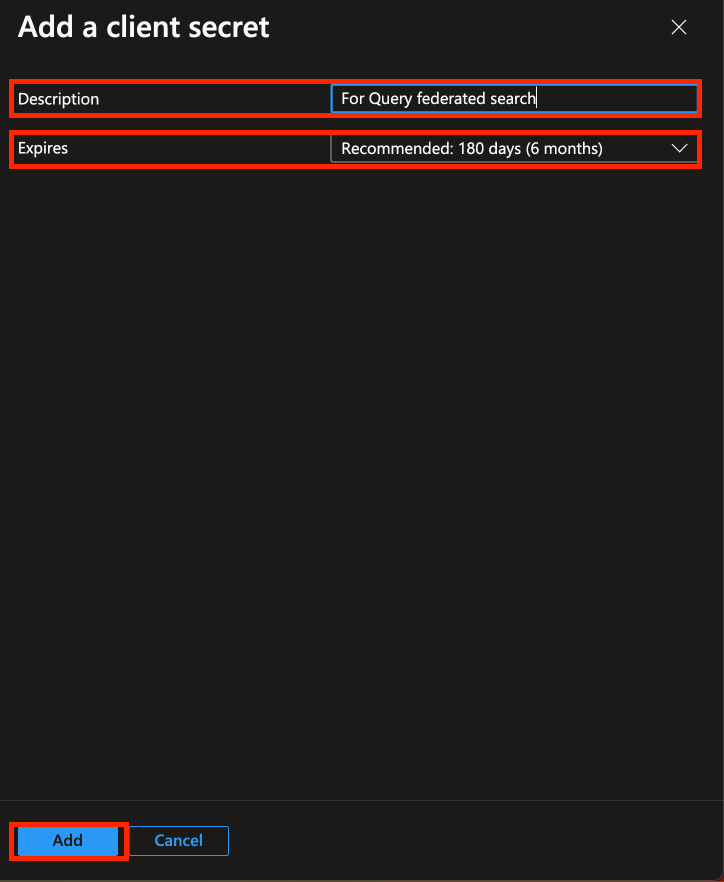
FIG. 8 - Adding a description and expiration date to your client secret
-
After creating your Secret, copy the value underneath the Value column, do not copy the value for Secret ID. Immediately vault these credentials and save them for configuring your Connector in the next section.

To learn how to configure a Microsoft Graph API - Security Connector, proceed to the next section.
On NHI securityNHI - or, Non-Human Identities - such as your Enterprise Application (App Registration) client secrets are extremely sensitive. Query securely stores the Client Secret in a dedicated AWS Secrets Manager Secret per Connector per Tenant.
While this requires you to configure Connectors per Microsoft Graph - Security Connector and continue to enter in your credentials, every copy is stored as securely as each other with minimum necessary permissions that only allows the specific piece of serverless infrastructure to retrieve the secret, it is never cached or persisted outside of the Secret.
Setting up the Microsoft Graph API - Security Connector
Use the following steps to create a new Query Federated Search Connector for Microsoft Graph API - Security.
-
Navigate to the Connectors page, select Add Connector, and selectMicrosoft Graph API - Security from the
Cloud Infrastructure and Securitycategory as shown below (FIG. 10). You can also search for Microsoft Graph API - Security using the search bar in the Add Connector page.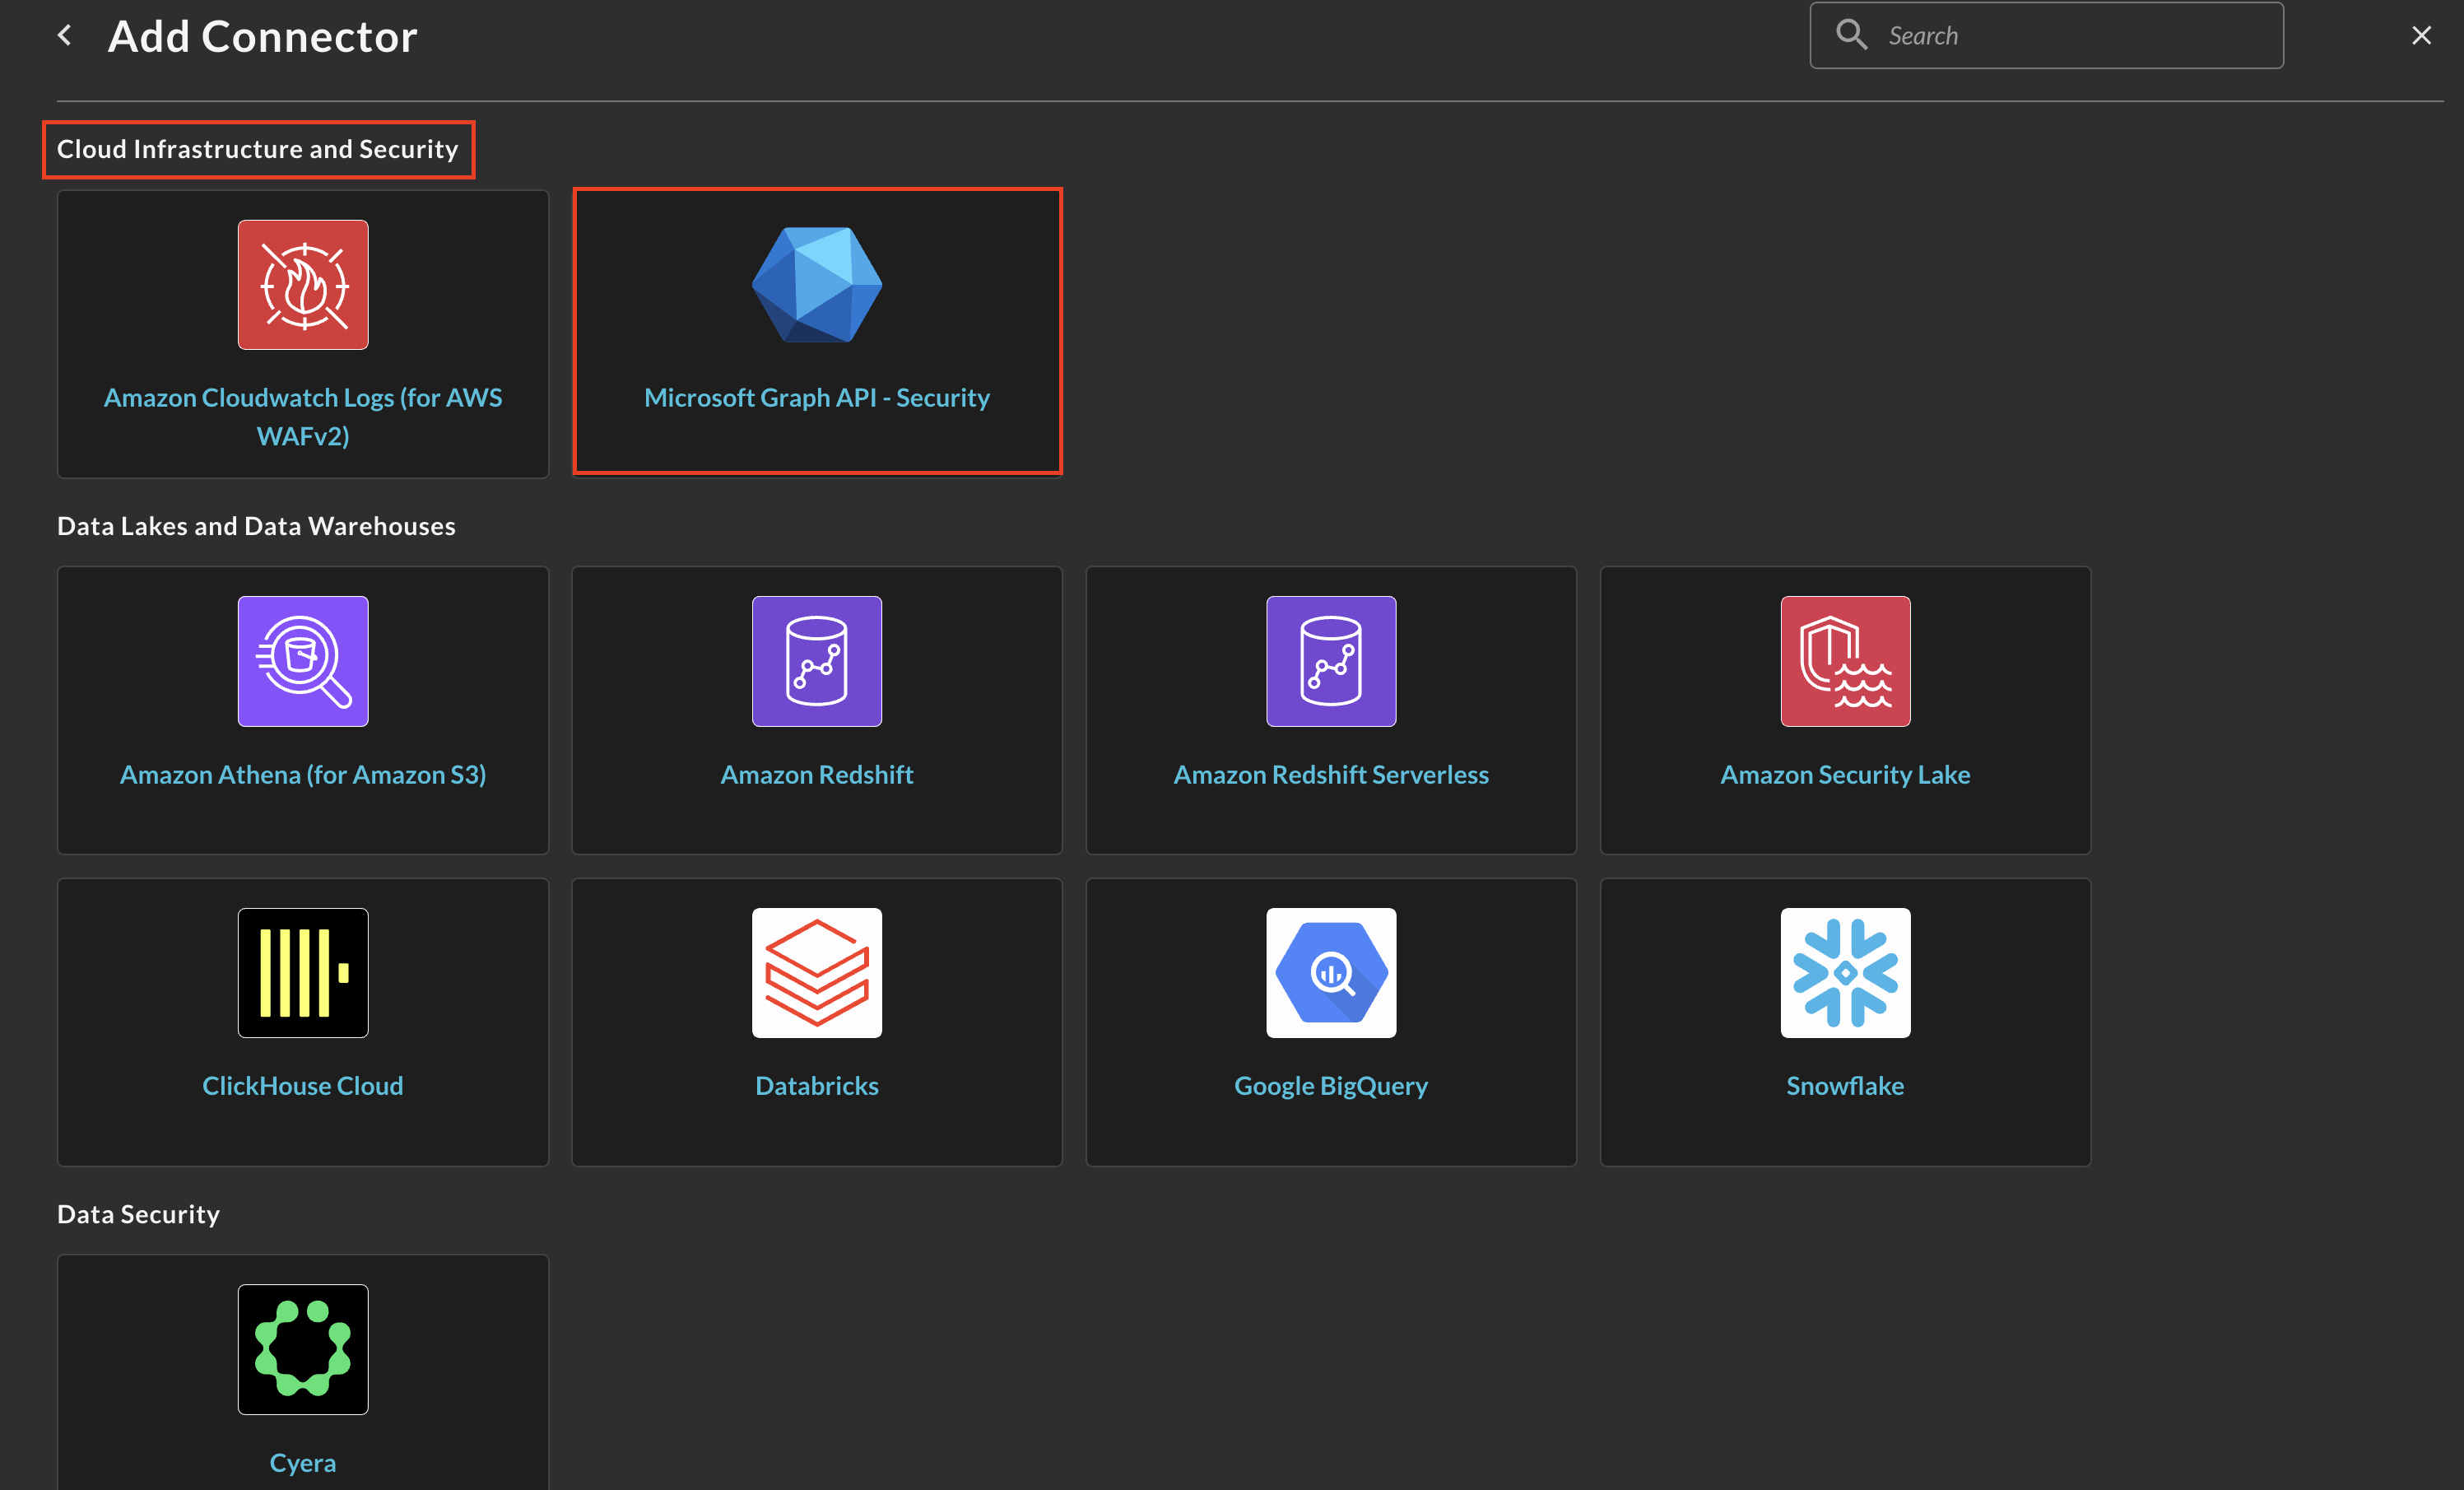
FIG. 10 - Locating the Microsoft Graph API - Security Connector
-
In the Configure Connector tab, add the following detail as shown below (FIG. 11):
-
Connector Alias Name: The human-readable name you want to give to this connector, you can use this to disambiguate across different Tenants if you are utilizing Query Federated Search on behalf of a MSSP/MDR/mSOC.
-
Default Login: Leave the default value:
Default Login. -
Microsoft Entra ID Tenant ID: Your tenant (directory) ID of your App registration, copied in Step 3 of the Prerequisites section.
-
Microsoft Entra ID Tenant ID: Your client (application) ID of your App registration, copied in Step 3 of the Prerequisites section.
-
Microsoft Entra ID Client Secret: The client secret of your App registration, copied in Step 9 of the Prerequisites section.
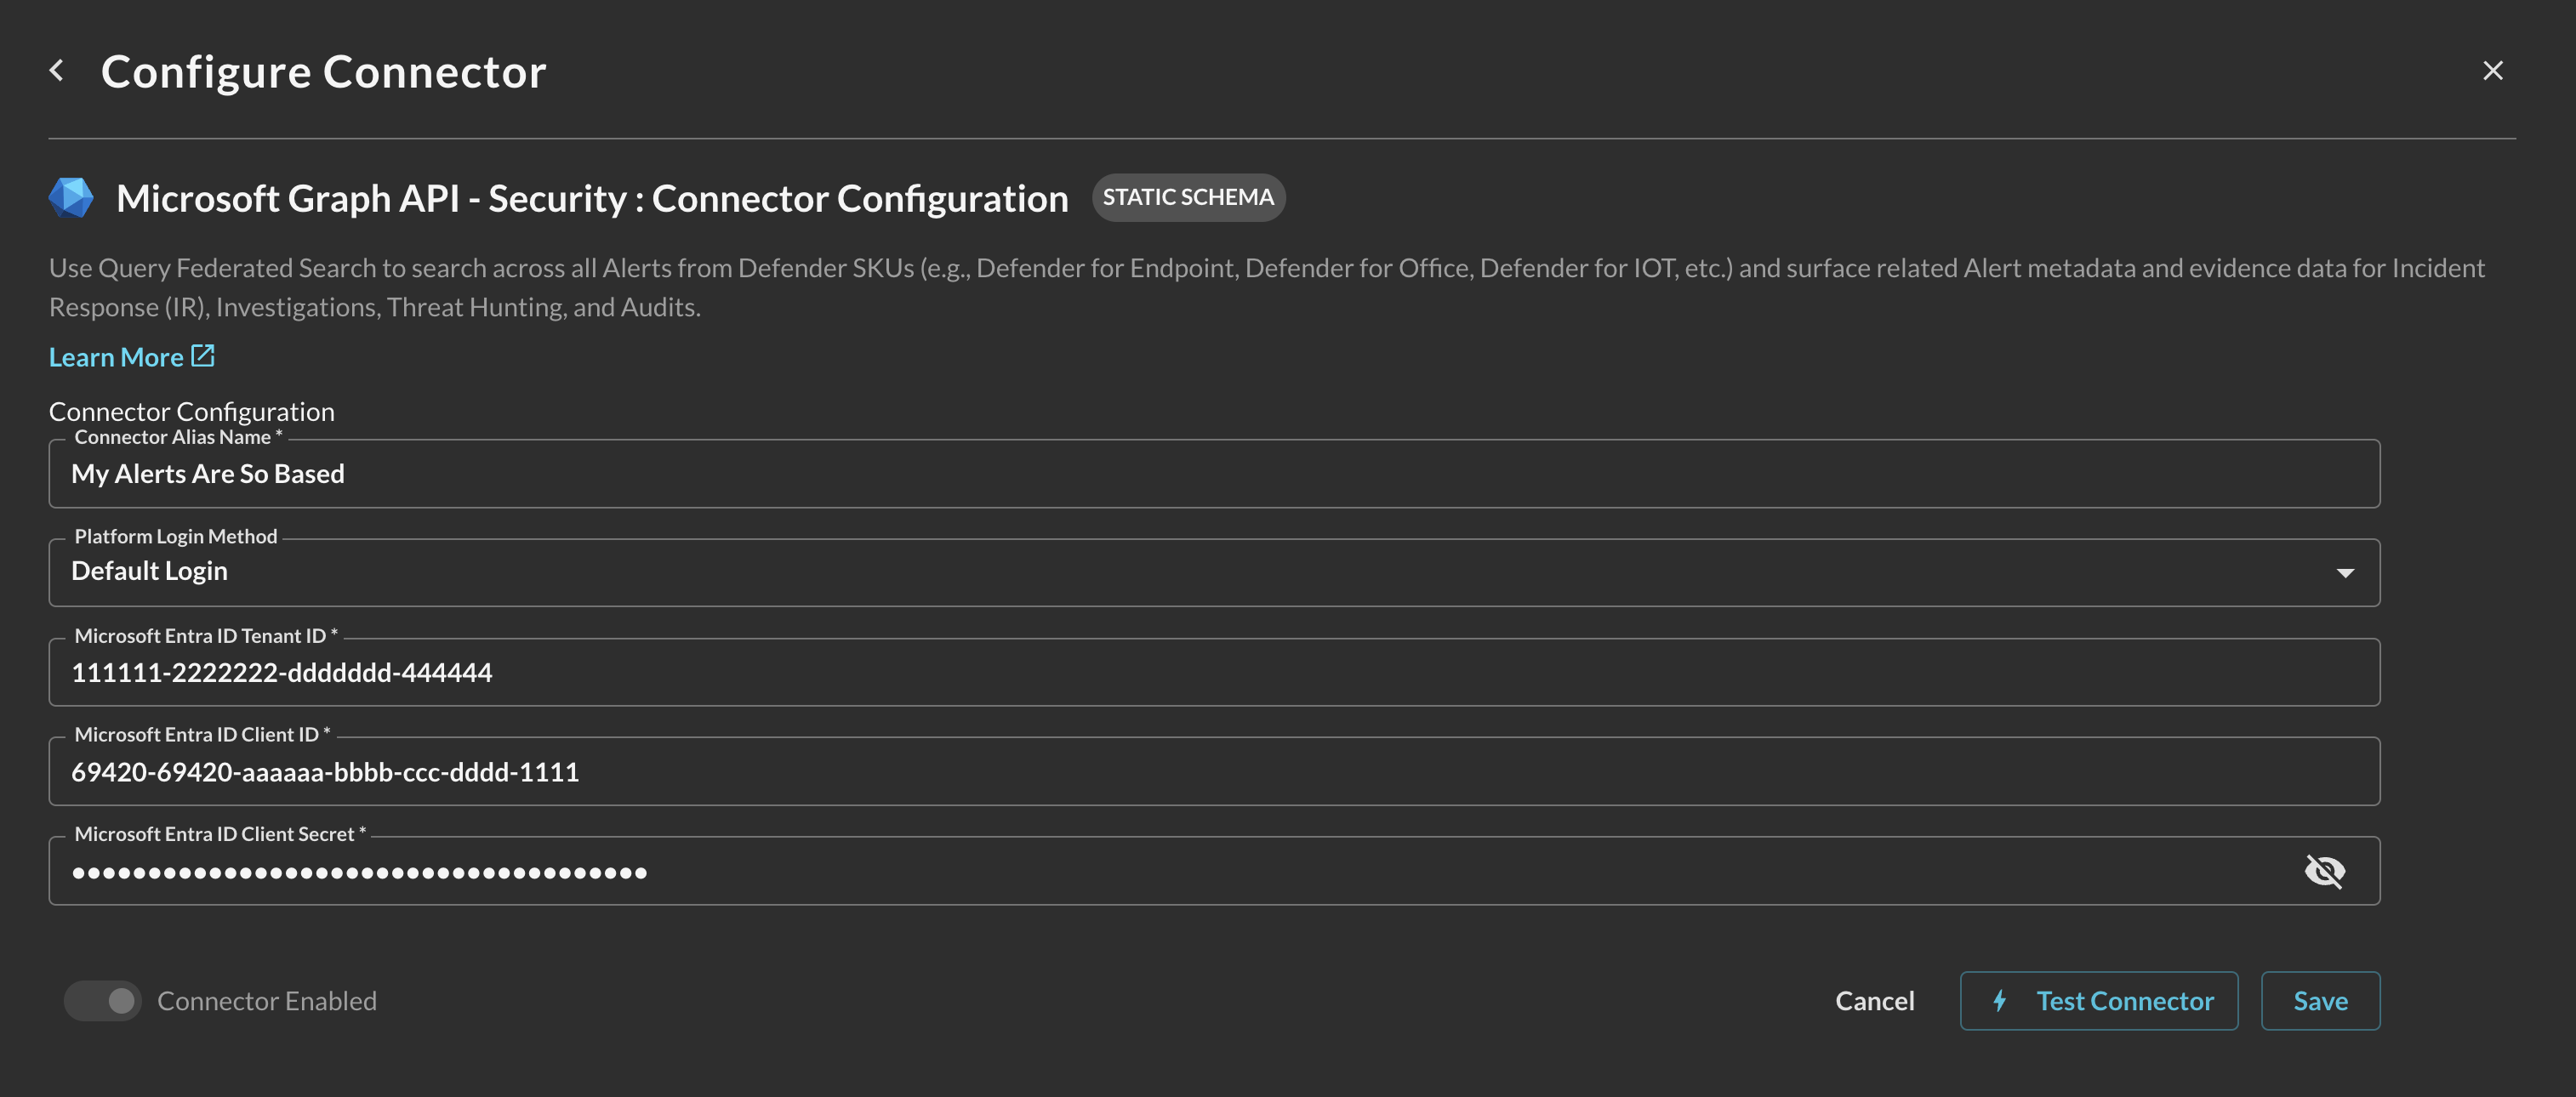
FIG. 11 - Configuring parameters for the Microsoft Graph API - Security Connector
-
-
Select Save to save and activate the Connector.
-
Select Test Connection from the bottom-right of the connection pane to ensure that your App registration credentials are correct, that you have the correct permissions, and have granted admin consent.
You will now see Microsoft Graph API - Security added as an available Connector within the Query Search and Query Summary Insights UI.
Querying Microsoft Graph API - Security Connectors
Within the Query Search UI, all Connectors are enabled by default. To check that your specified Connector(s) for INTEGRATION are enabled, navigate to the Cloud Infrastructure and Security section of the Selected Connectors dropdown and ensure that your specified Microsoft Graph - Security Connector(s) are are selected (denoted by a checkbox) before running your searches as shown below (FIG. 12).
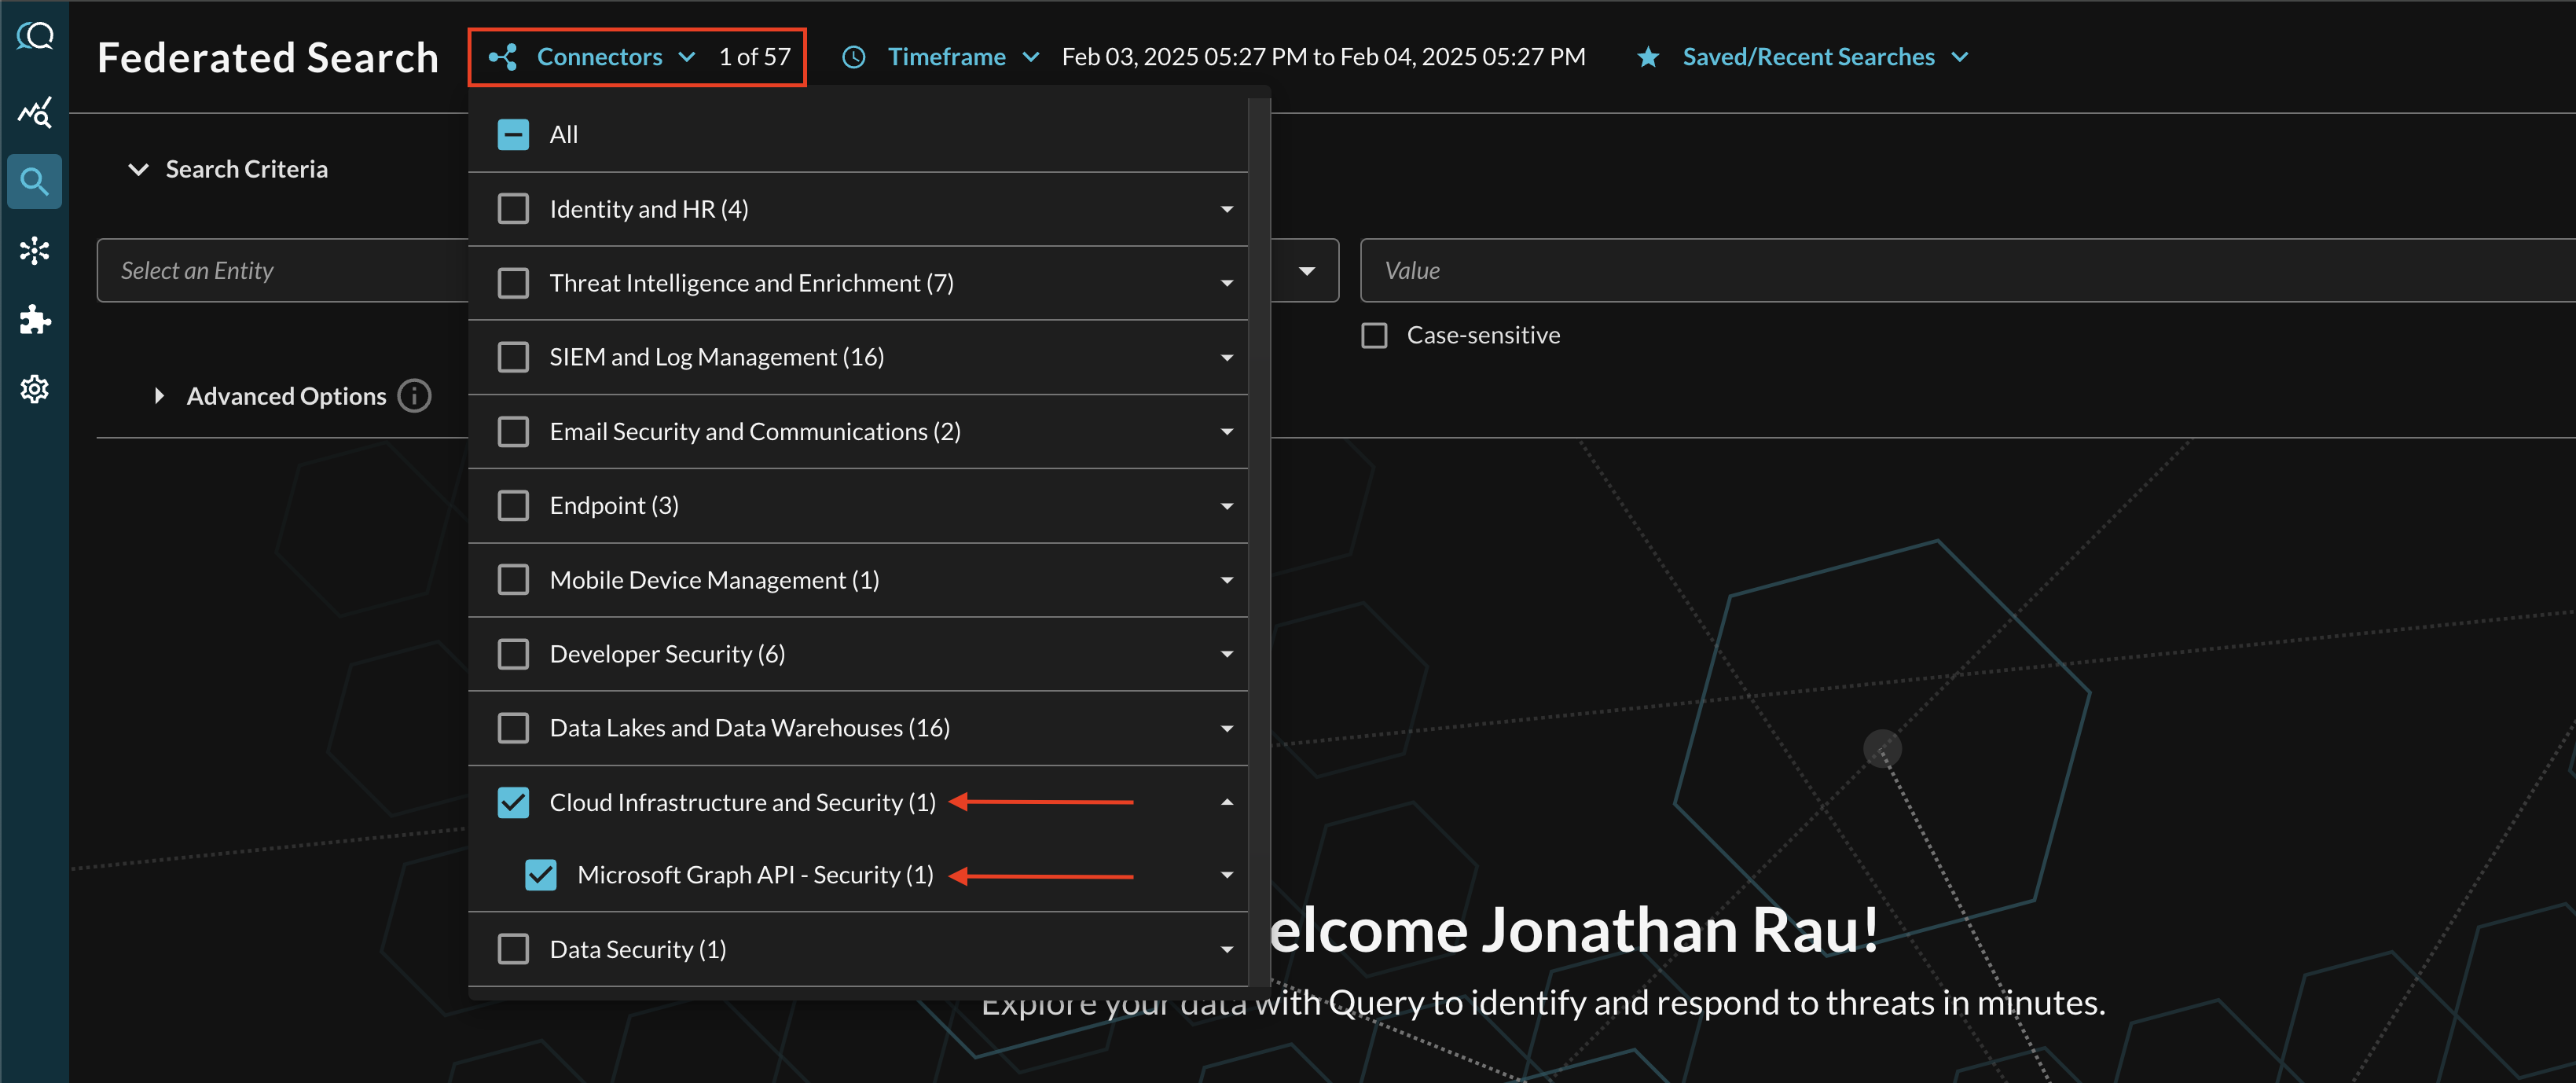
FIG. 12 - Selecting Microsoft Graph API - Security Connectors
Entity-based Search
The Microsoft Graph API - Security Connector is a static schema Connector which means that all normalization and search translation is completely defined by the Query team. Refer back to the Introduction section and refer to the table to learn which Entities map against which Microsoft Graph - Security Connector. details here...
In the Federated Search console, select the search dropdown, ensure the Entities radio button is selected and search for your desired Entity as shown below (FIG. 13). For instance, you can search for nearly any pertinent evidence values such as Device IDs using Resource UID or User Principal Names (UPNs) using Email Address, these can be further correlated against other different Query Connectors.
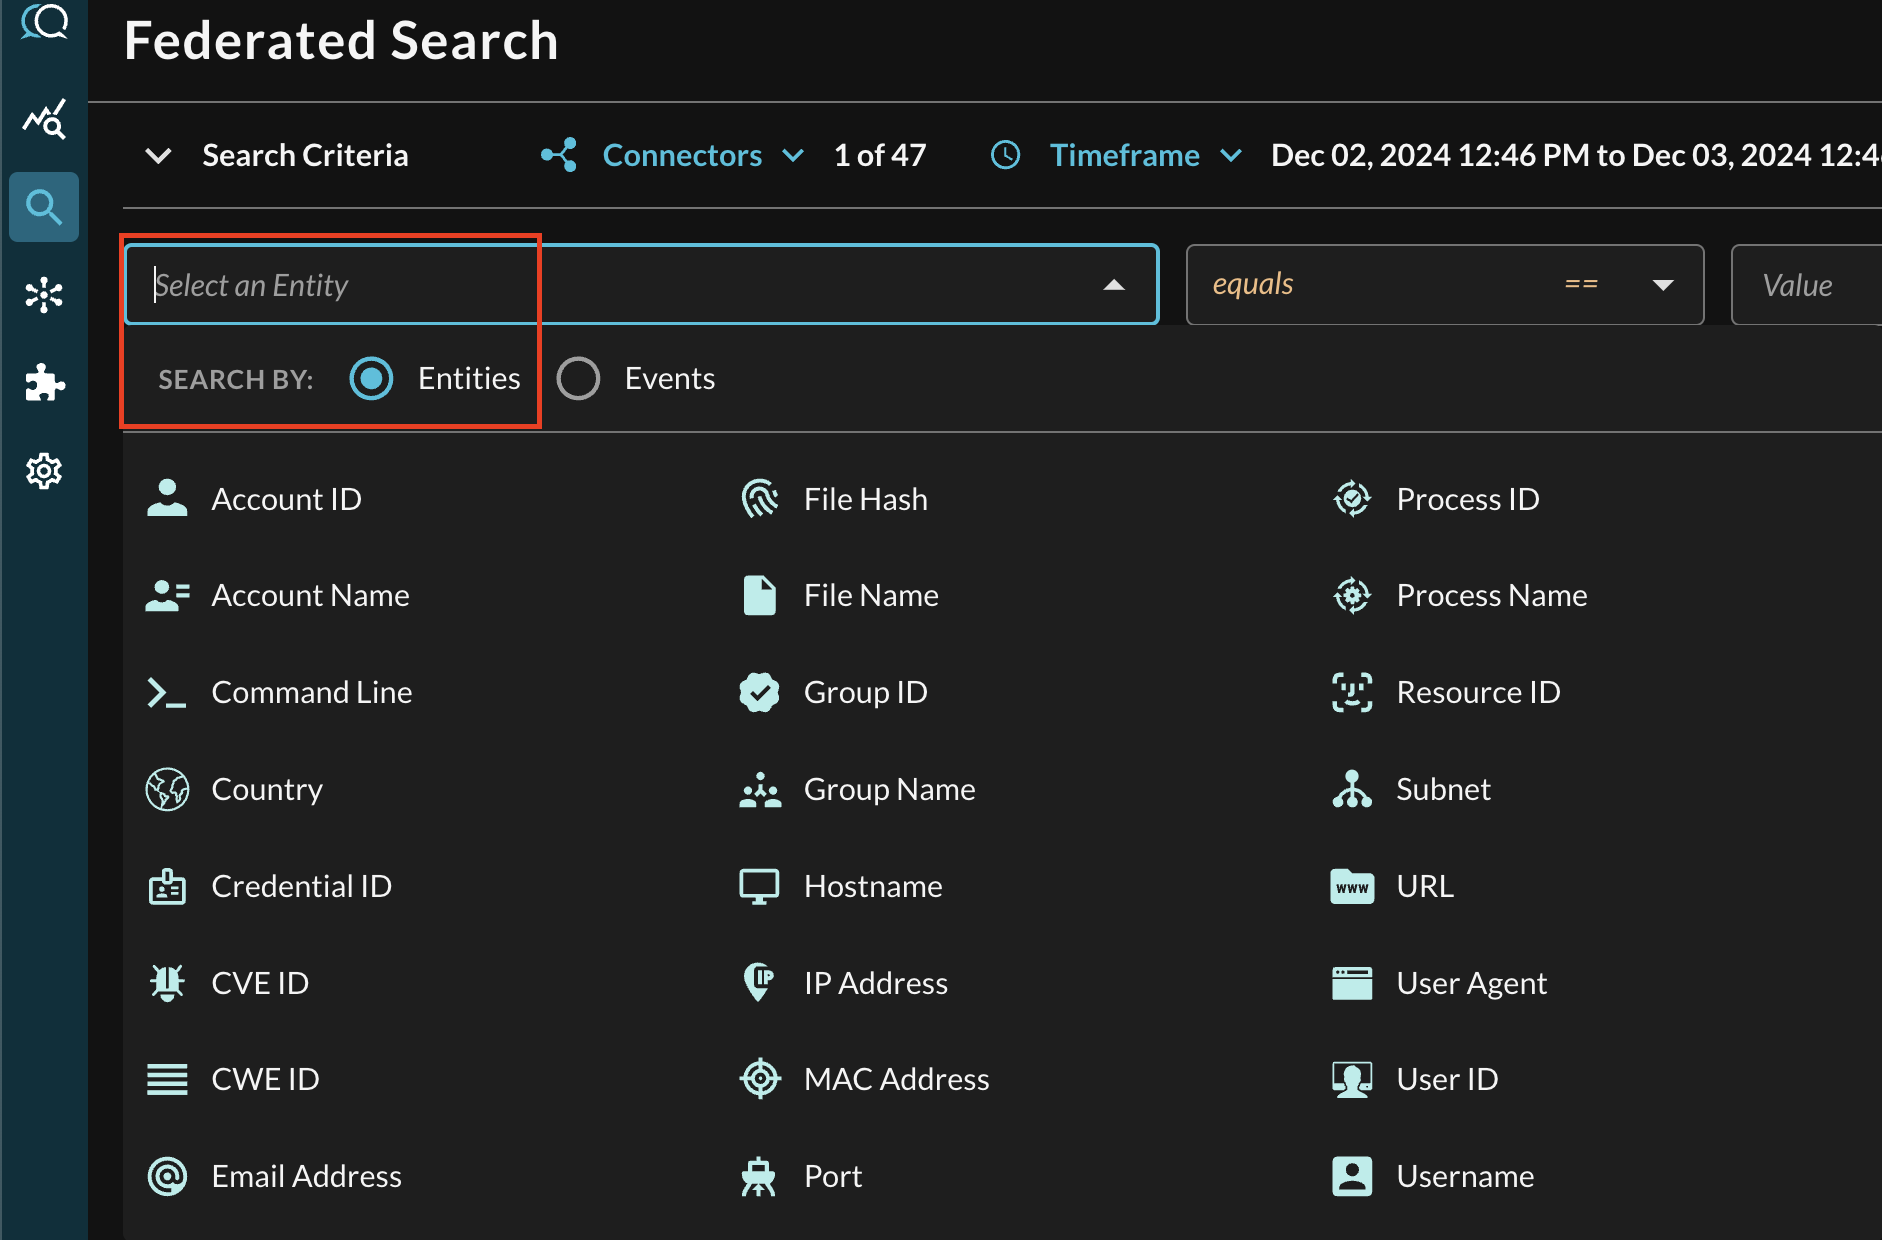
FIG. 13 - Entity-based searching with Query Federated Search
After selecting an Entity, most allow you to specify an Operator. This allows you to perform simple equality searches or to perform more generalized searches using Contains, Starts With, or Ends With Operators. The only operators that are supported by the Microsoft Graph - Security Connector are Equality operators or native $filter parameters.
All emulated filters, the evidence value specific filters that Query can support, support all operators such as Contains, Starts With, and Ends With. You can search across Account Name or Username for instances of system or specific admin or superuser accounts in your environment, or use the Ends With operator to search for Email Addresses implicating a specific domain name. Additionally, you can specify case-sensitivity for the entire search criteria - whether it is an emulated filter or a native $filter option against non-enumerations.
When you search for multiple values that may be present across different Connectors, the Query Federated Search query planner inspects the Configure Schema metadata to ensure searches are sent to the appropriate Connectors, this operates more as a collated window function within Query and not as an expensive SQL join.
The value search bar allows you to enter multiple values that can be mixed with the same operator. Multi-value searches are automatically OR'ed together - this happens natively when possible, otherwise, the OR operator is emulated by Query. For an example of how this works, a multi-value contains search against partial Account Names is shown below (FIG. 14).
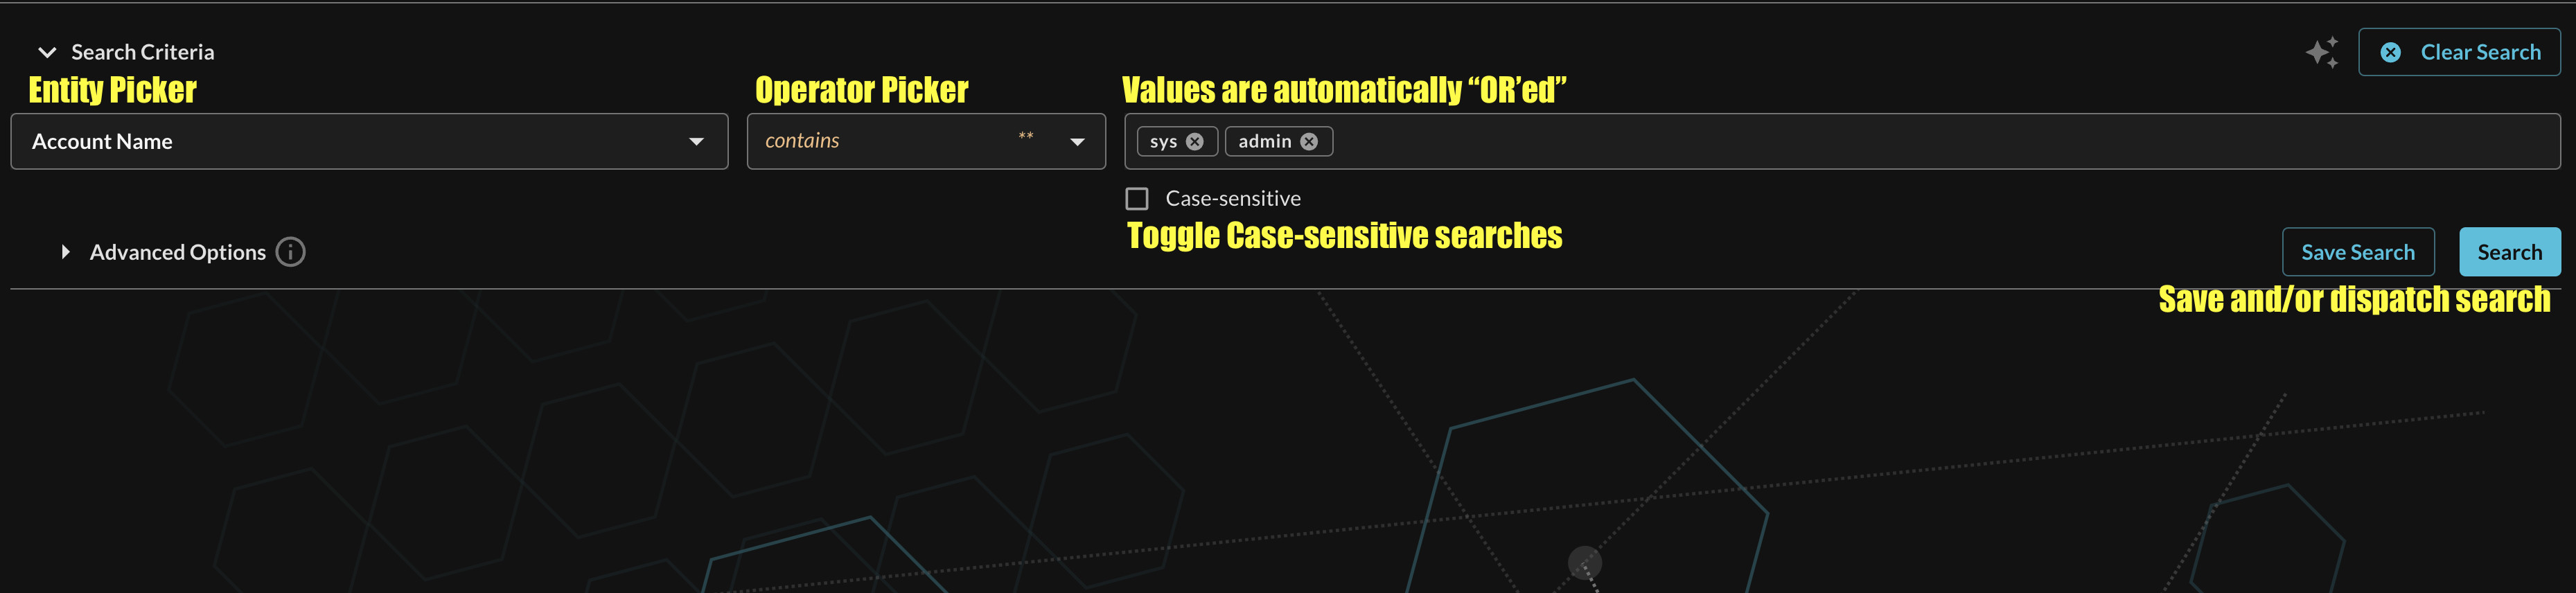
FIG. 14 - Multi-value Entity searches
Event-based Search
Event-based searches allow you to broadly search across the entirety of results from a downstream API, or, search for very specific results based on filters. Refer back to the Introduction section and refer to the table to learn which Events map to the Microsoft Graph API - Security Connector. However, in this case, it is only Detection Finding events which normalize the alerting information, assignees, associated time ranges, source URL metadata, as well as normalizes all of the Alert evidence into the OCSF/QDM evidences Object.
In the Federated Search console, select the search dropdown, ensure the Events radio button is selected and search for your desired Event as shown below (FIG. 15). For instance, you can search for all Detection Findings events which can be further collated and correlated against other Query Connectors that normalize alerts, incidents, findings, or events against Detection Finding. For instance, AWS Security Hub events from GuardDuty and Macie, CrowdStrike Falcon Alerts and Detections, and your own custom Dynamic Schema Connectors (such as Azure Log Analytics, Splunk, or Snowflake) all normalize against Detection Finding.
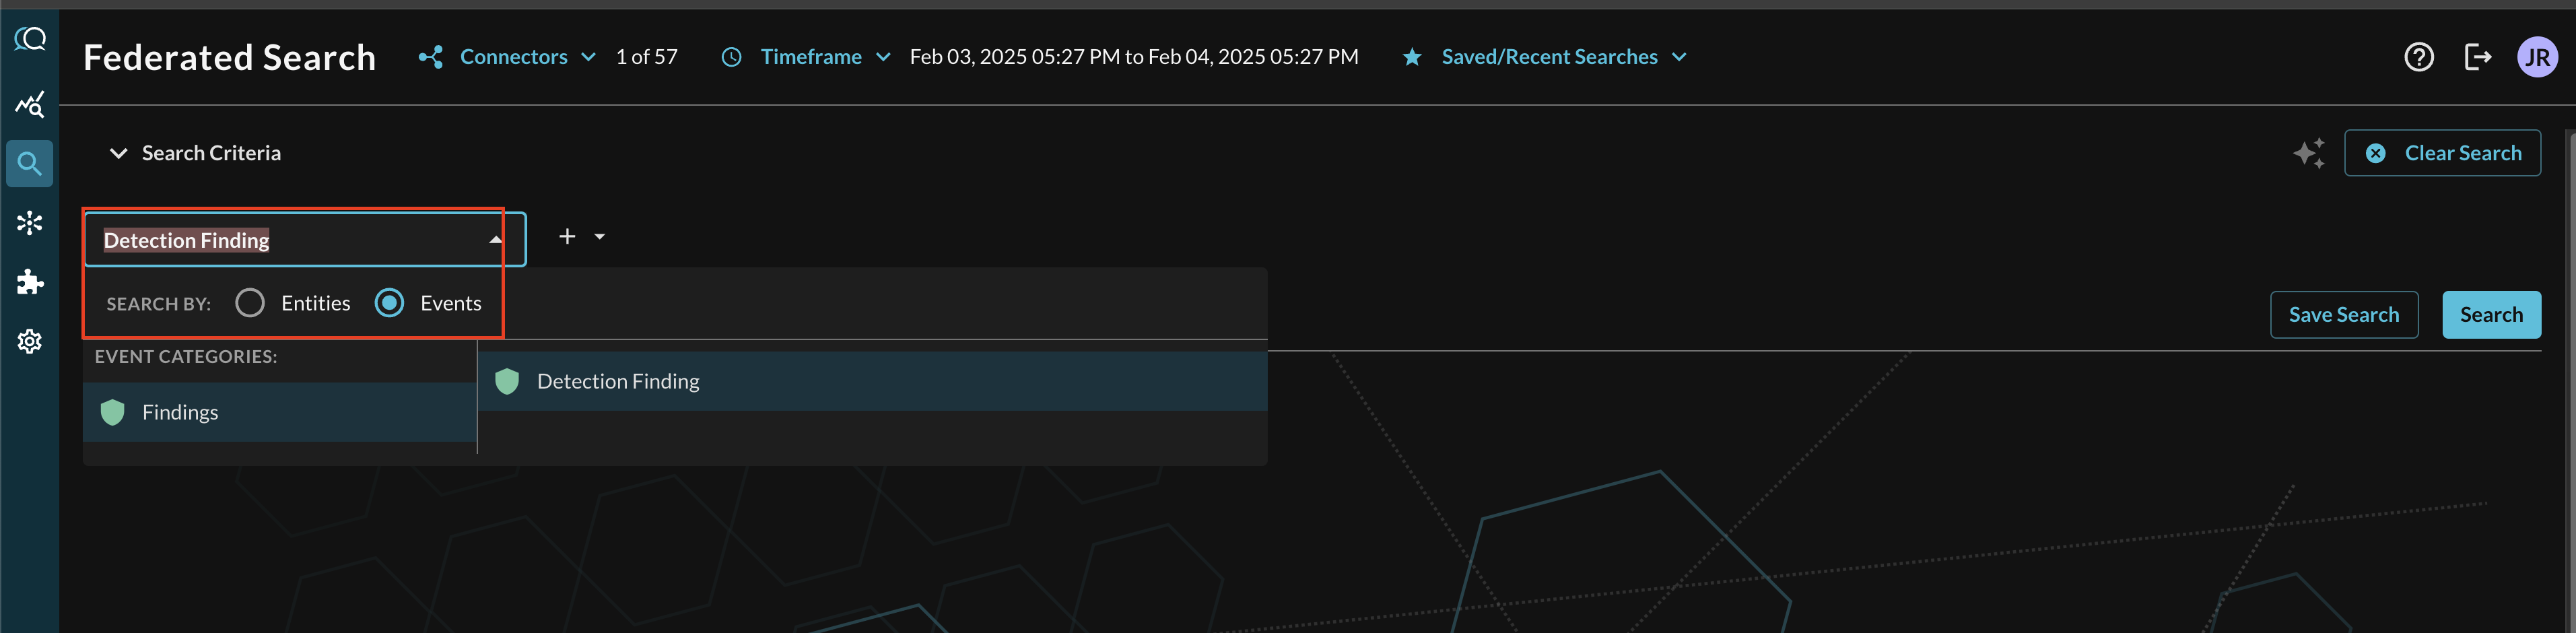
FIG. 15 - Selecting Detection Finding events to search against
Searching for the Event without any filters will retrieve all Alerts from the Microsoft Graph API - Security Connector (via the Alerts V2 API endpoint). This Connector has pagination and streaming enabled by default, if you have 10s of 1000s of alerts it may take up to 5 minutes for your results to render. For this purpose, it is recommended to use Entities or specific filtering.
For more specific filtering within an Event, you can choose one or more conditions to refine a search. Selecting the plus-sign (+) dropdown next to the Event menu allows you to choose from any specific OCSF/QDM attribute in the event. For example, when searching for Detection Finding events, you can search for a specific device (by it's MDE machineId or Entra ID id) by filtering for Device -> Unique UID as shown below (FIG. 16). You can also use multiple values and different operators here to account for the various IDs for resources and assets in the Defender 365 ecosystems.
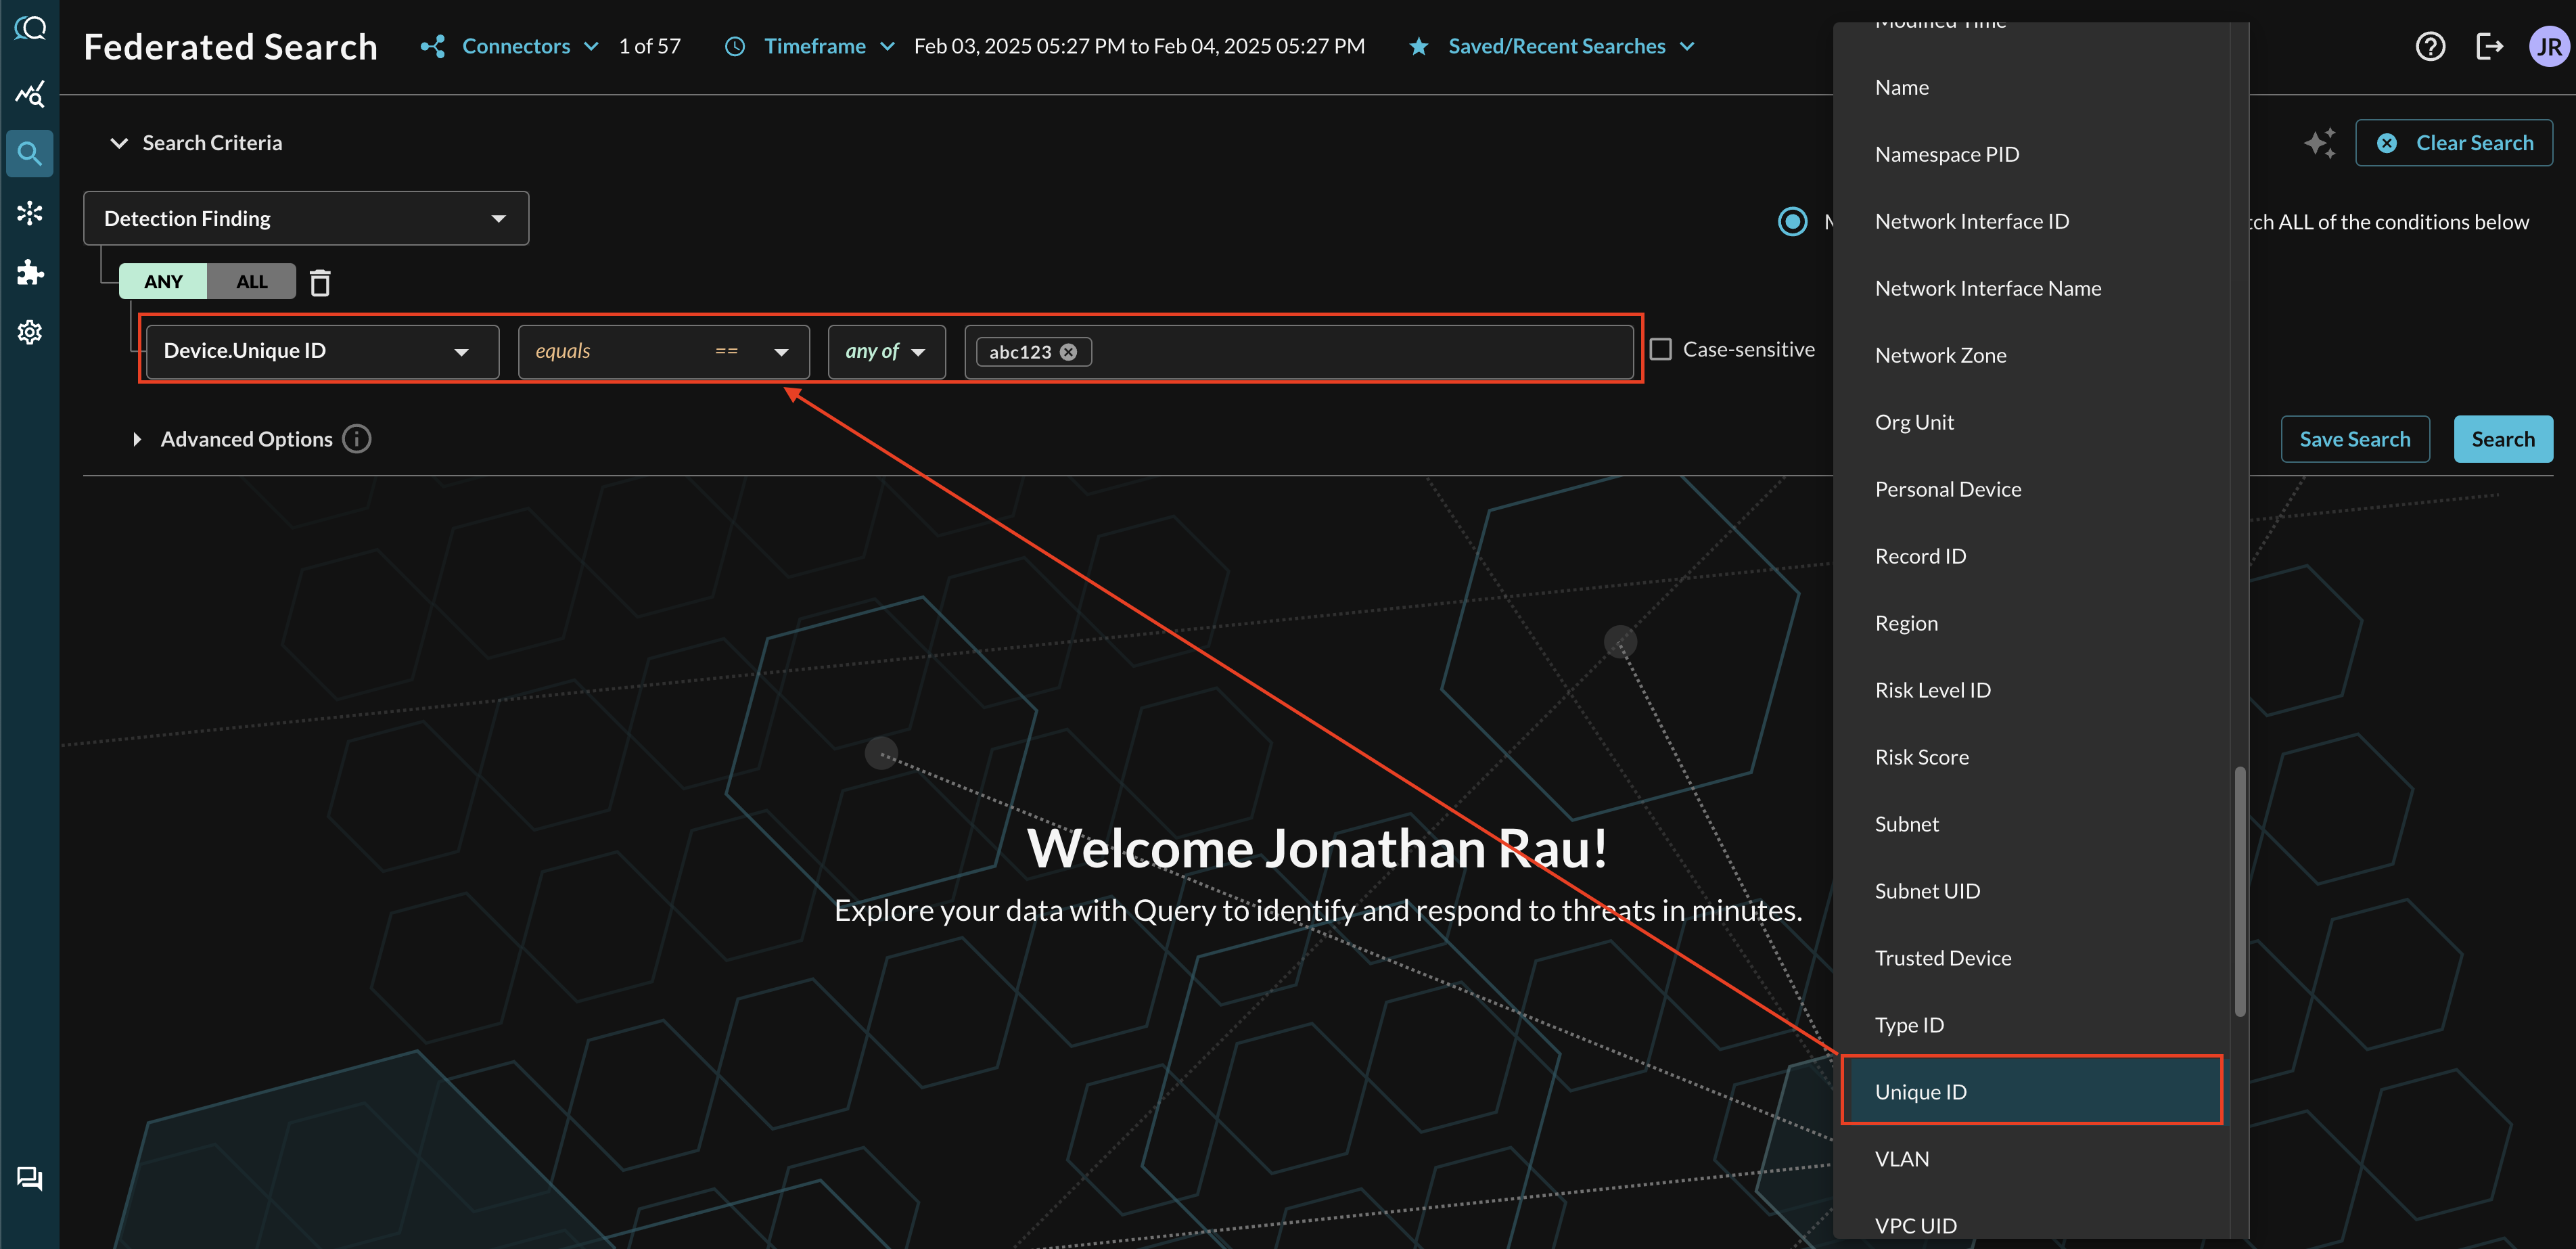
FIG. 16 - Searching for nested data in Detection Finding events using filters
When adding two or more Conditions, you can further change the behavior by specifying ANY or ALL quantifiers over the filters for greater levels of specificity or more narrow-but-generalized searches, respectively, as shown below (FIG. 17).
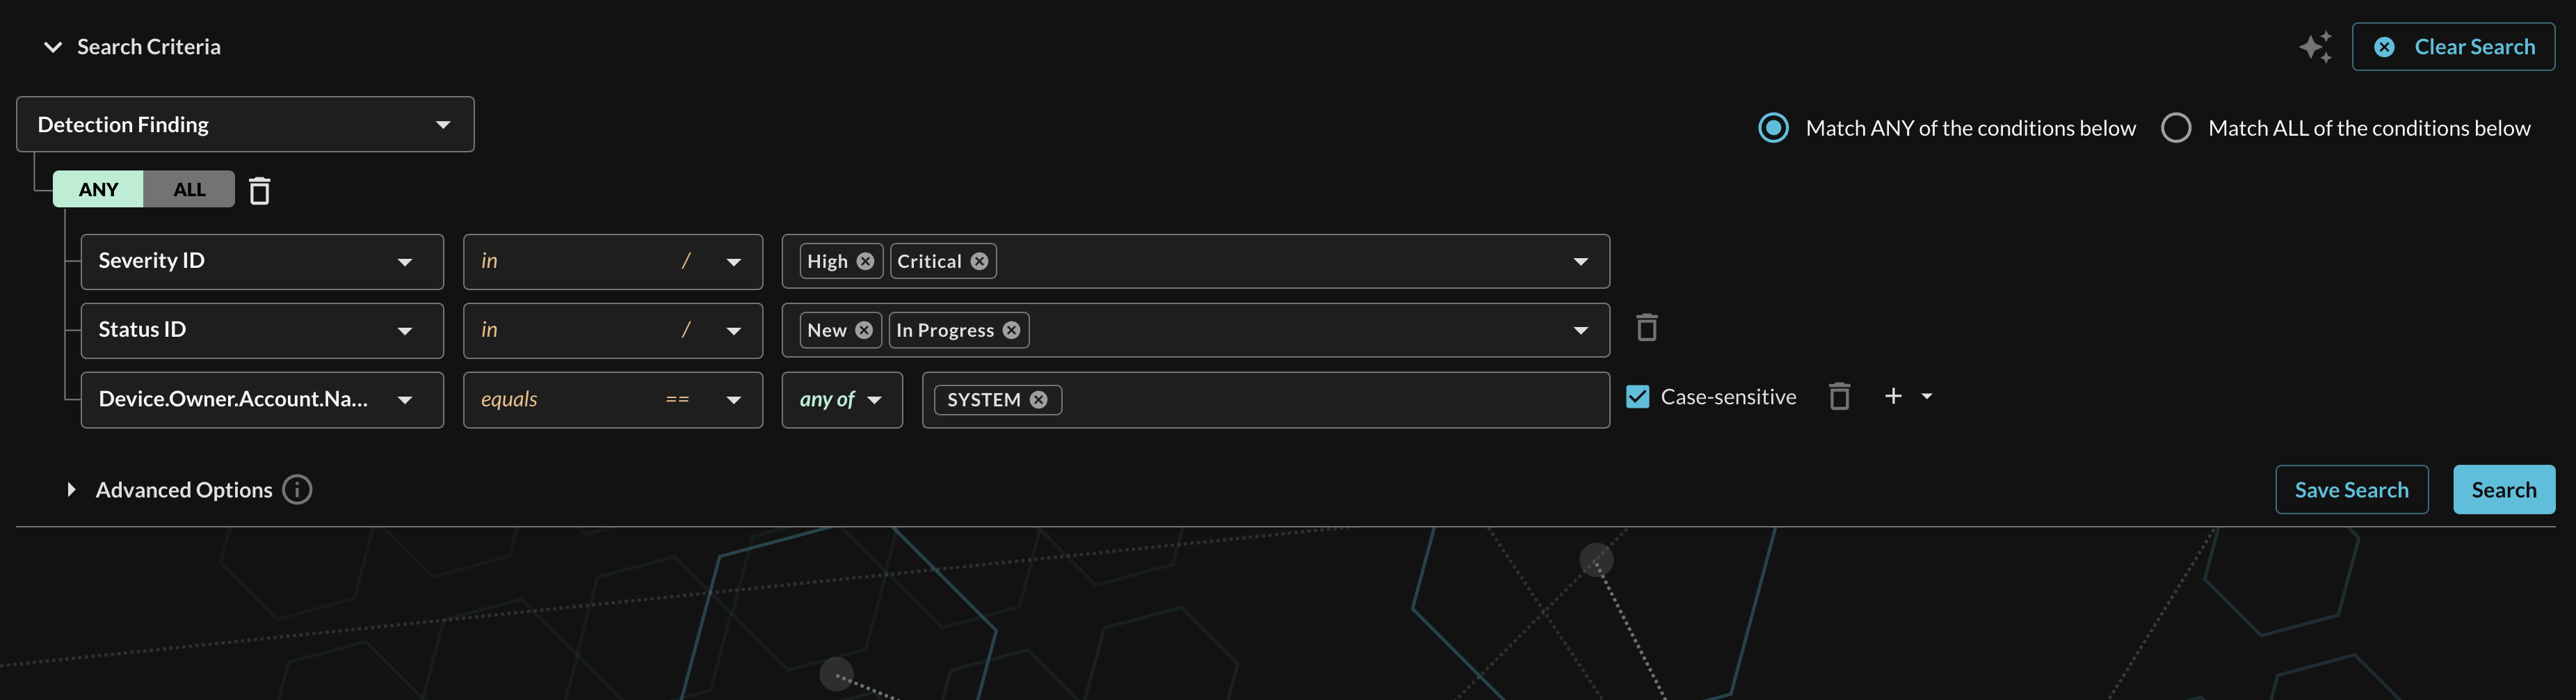
The above search demonstrates the following search:
- Severity ID: Select Alerts with a specific normalized Severity, such as High and Critical, this is fulfilled using the
$filteragainst theseverityfield in the Alerts. - Status ID: Select Alerts with a specific normalized Status which represents the Alert lifecycle, such as New and In Progress, this is fulfilled using the
$filteragainst thestatusfield in the Alerts. - Device.owner.account.name Further filter by the account name reported as device evidence.
Resources
Troubleshooting Steps
- Ensure that you have granted the correct Microsoft Graph permission with admin consent.
- Ensure that the Tenant ID, Client ID, and Client Secret Value match.
- Ensure that you copied the Client Secret Value and NOT the client secret ID.
- Ensure that your client credentials are not expired.
- If you are in a Government or Secret region, please contact Query Support.
If you have exhausted the above Troubleshooting list, please contact your designated Query Sales Engineer or Customer Success Manager. If you are using a free tenant, please contact Query Customer Success via the Support email in the Help section, or via Intercom within your tenant.
Updated 9 months ago