JAMF Pro
Integrate with JAMF Pro to retrieve data on Mobile Devices, Computers, and their patch states and logged in users.
TL;DR
To integrate with JAMF Pro and perform searches with Query:
- Create an API Role with the appropriate
READPermissions.- Create an API Client that will use the API Role, and generate credentials.
- Note your JAMF Pro Server name to setup the Connection
- Configure, test, and save a JAMF Pro Connector with your API Credentials and Server name.
- Use Query Federated Search to surface details on Computers and Mobile Devices including their patch information and logged-in users to support Incident Response, Investigations, Threat Hunting, Red Teaming, and/or Audit use cases.
Overview
JAMF Pro is a comprehensive mobile device management (MDM) solution designed to automate Apple device management across an organization. It enables IT administrators to deploy, manage, and secure Mac computers, iPads, iPhones, and Apple TVs from a centralized console. JAMF Pro provides detailed inventory information on both computers and mobile devices, including hardware specifications, installed software, security status, and compliance with organizational policies.
Administrators can use JAMF Pro to remotely configure settings, deploy applications, enforce security measures, and troubleshoot issues without disrupting end users, making it an essential tool for organizations that need efficient management of their Apple ecosystem.
All federated searches have their searches and results expressed in the terms of the Query Data Model (QDM), which is based on the Open Cybersecurity Schema Framework (OCSF). Each API source is normalized into a specific QDM/OCSF Event Class to standardize and normalize the data for increased situational awareness, ease of aggregation of filtering, and easy pivoting.
| API Name | Sections | QDM/OCSF Event Class | Entities/Observables |
|---|---|---|---|
| Computer Inventory Records | GENERALSTORAGEUSER_AND_LOCATIONOPERATING_SYSTEMDISK_ENCRYPTIONGROUP_MEMBERSHIPS | Device Inventory Info | Email Address Group Name Group UID MAC Address Resource Name Resource UID Serial Number Username |
| Computer Inventory Records | GENERALSOFTWARE_UPDATESPLUGINS | Operating System Patch State | Email Address Group Name Group UID MAC Address Resource Name Resource UID Serial Number |
| Computer Inventory Records | GENERALLOCAL_USER_ACCOUNTS | User Query | Email Address Group Name Group UID MAC Address Resource Name Resource UID Serial Number Username |
| Mobile Device Inventory Records | ALL | Device Inventory Info | Email Address Group Name Group UID MAC Address Resource Name Resource UID Serial Number Username |
Query Federated Search provides a normalized interface with all searches using the OCSF schema as the "decoder ring" to the various JAMF API methods and filters. When searching using Entities, you can retrieve important metadata about your devices in JAMF to use alongside data from Detection Findings (e.g., CrowdStrike Falcon, MDE) or Compliance Findings (e.g., AWS Security Hub) or otherwise. You can also use the integration to retrieve specific compliance or audit data for the devices onboarded and managed in JAMF.
Prerequisites
To connect a JAMF Pro Connector with Query Federated Search you'll need to:
-
Create an API Role. Navigate to Settings -> System -> API roles and clients as shown below (FIG. 1).
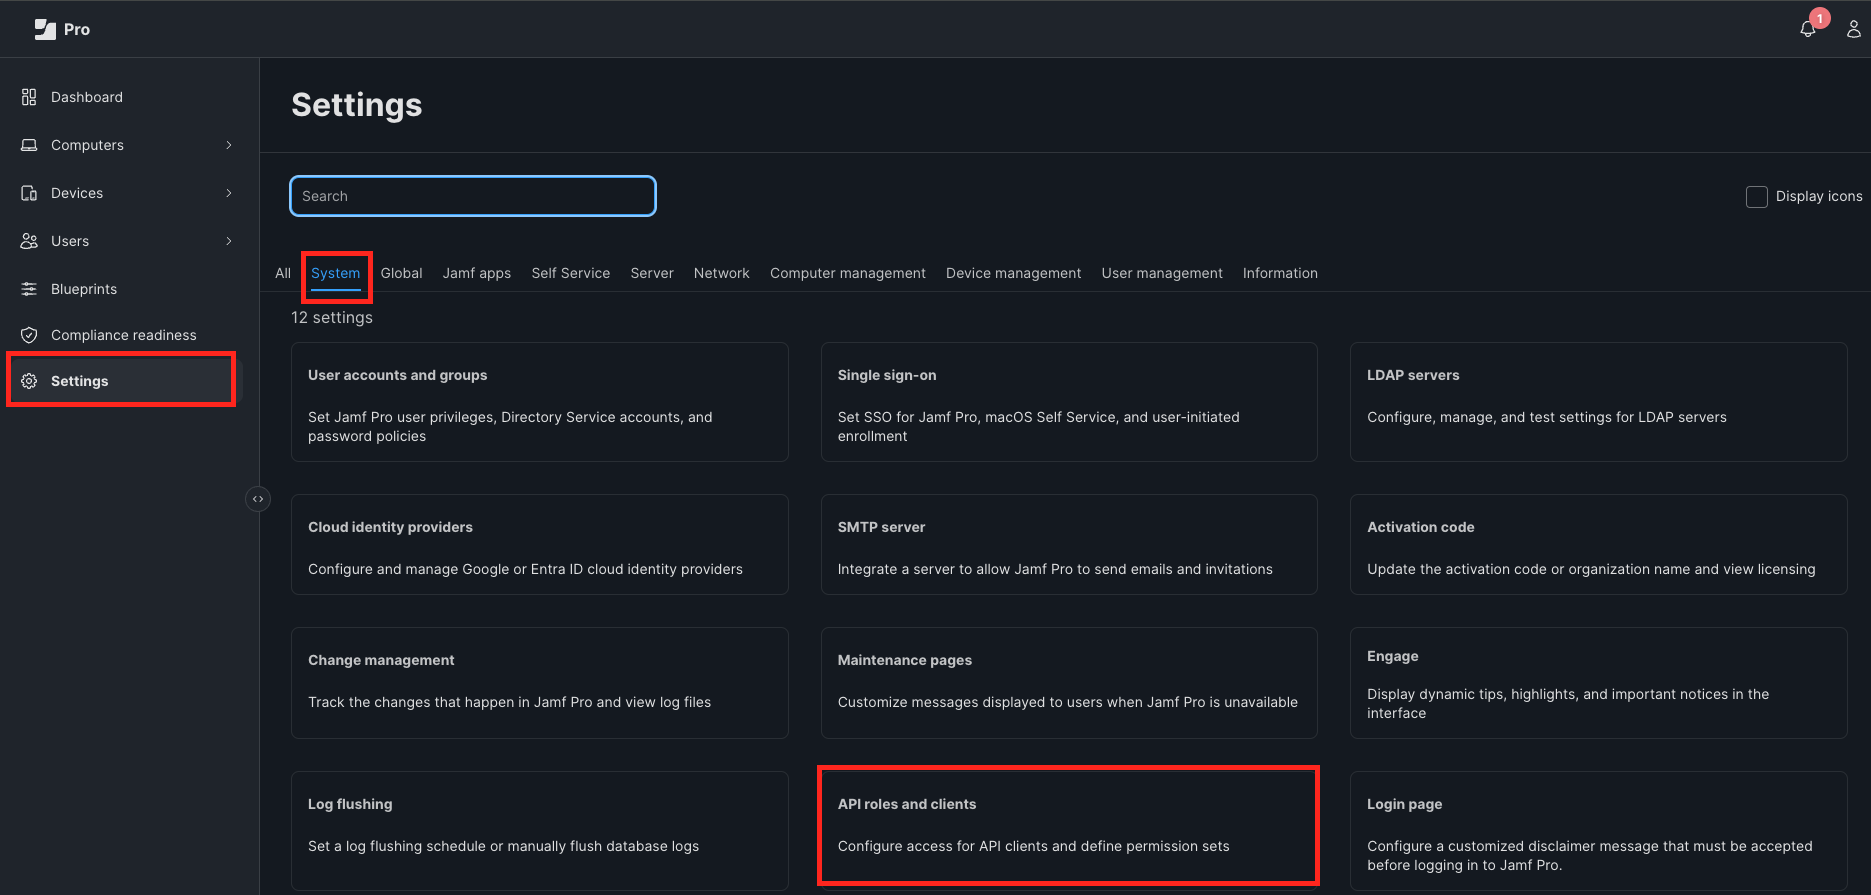
FIG. 1 - Navigate to the API roles & clients menu
-
On the top-right, select + New. Provide a Role Name (e.g.,
QueryFederatedSearchRole) and add the following Assigned Privileges, and select Save at the bottom-right of the screen as shown below (FIG. 2).-
Read Computers
-
Read Mobile Devices
-
Read User
-
Read User Extension Attributes
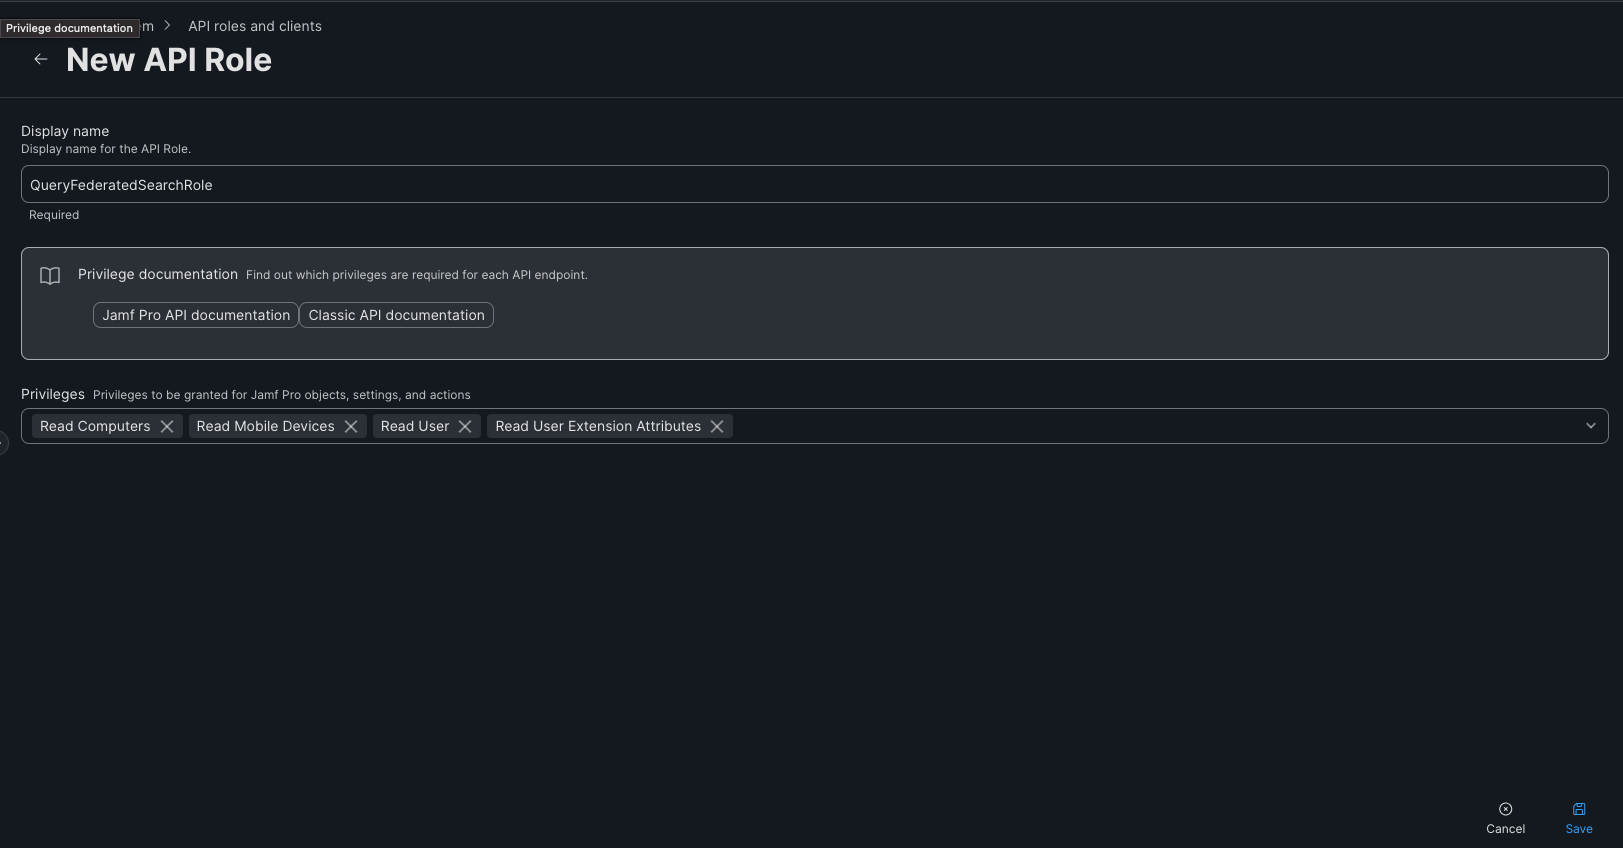
FIG. 2 - Assigning privileges to the API role
-
-
While still in the API roles and clients settings menu, select the API Clients tab and choose + New in the top-right corner to create a new API Client.
-
Provide a Display name (e.g.,
QueryFederatedSearchConnectorClient), select the API role(s) you created in Step 2 (e.g.,QueryFederatedSearchRole) and set the Access token lifetime to AT LEAST 30 minutes or above. Finally, select Enable API Client and select Save at the bottom right as shown below (FIG. 3).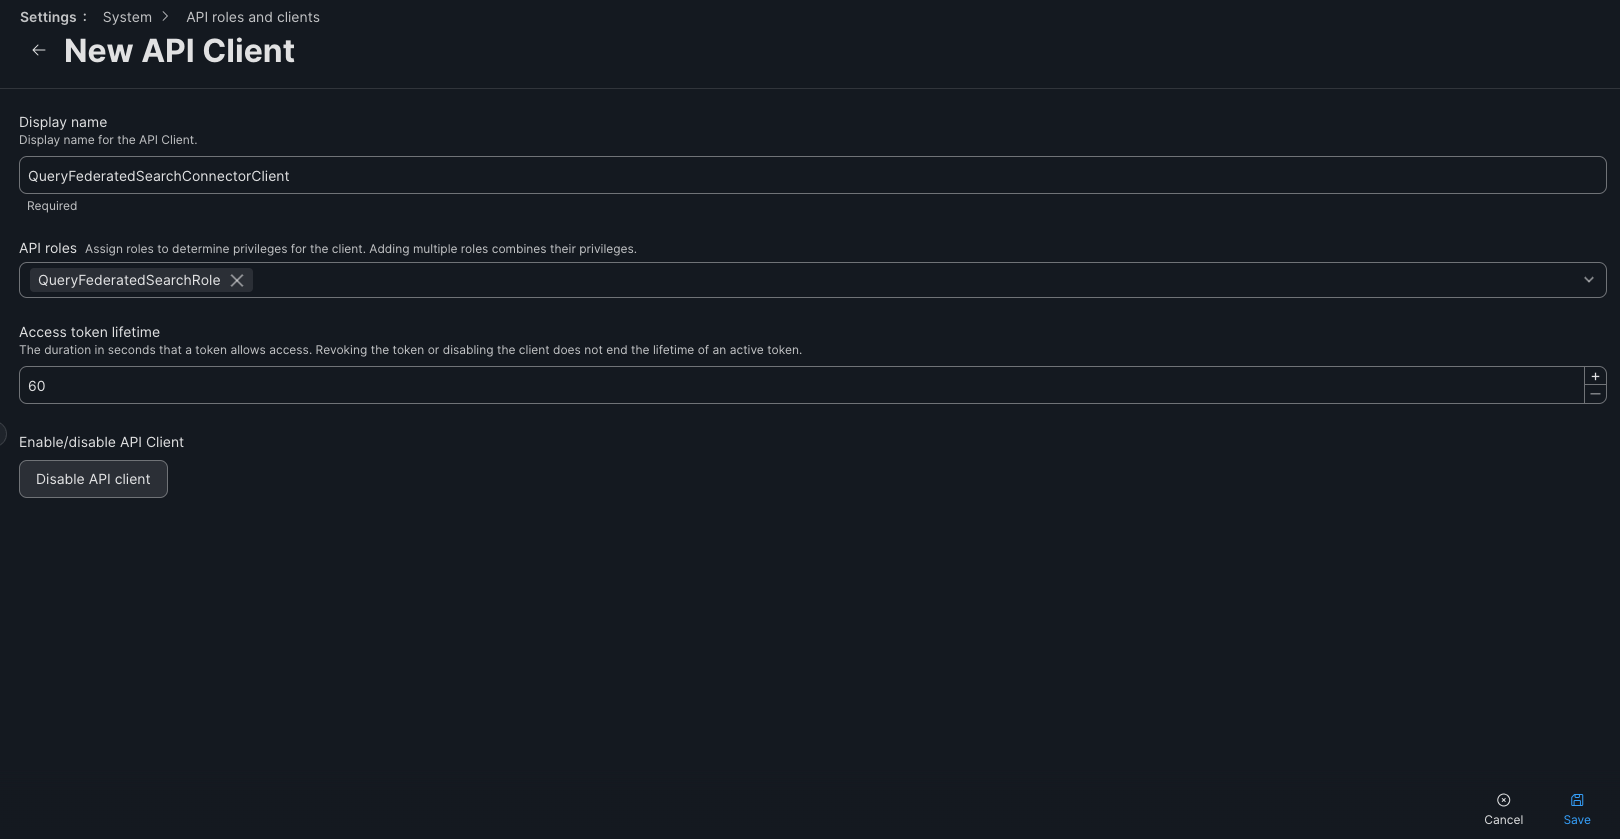
FIG. 3 - Creating a JAMF Pro API Client for Query Federated Search
-
You will be immediately redirected to a page for your API Client, copy the value for Client ID and select Generate client secret and copy the value for the Client Secret and store them in a PIM/PAM/Vault solution as shown below (FIG. 4).
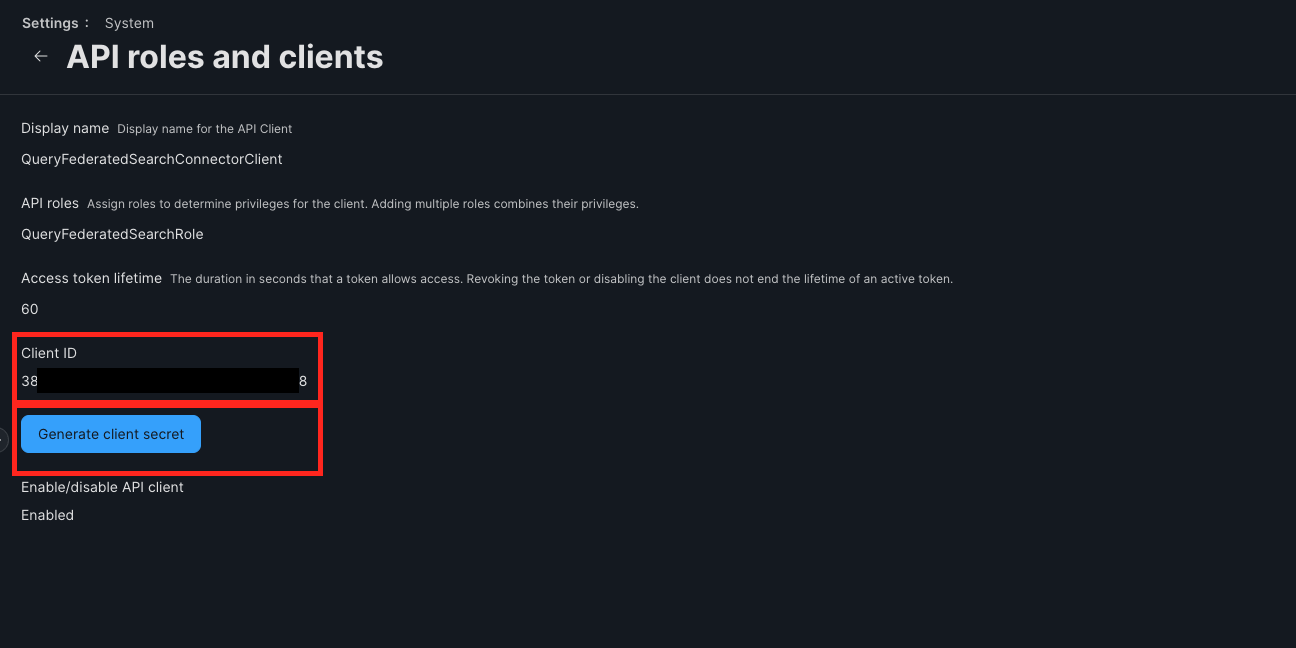
FIG. 4 - Generating and retrieving the Client ID and Client Secret
-
Take note of your Server name from the URL of your browser, for instance if your URL is
https://contosocorp.jamfcloud.com/view/settings?tab=allyour Server name is contosocorp.
To learn how to configure a JAMF Pro Connector Connector, proceed to the next section.
On NHI security
NHI - or, Non-Human Identities - such as your JAMF Pro API Client Secret is extremely sensitive. Query securely stores the Client Secret in a dedicated AWS Secrets Manager Secret per Connector per Tenant.
Your credentials are stored securely with minimum necessary permissions that only allows the specific piece of serverless infrastructure on the Query side to retrieve the secret, it is never cached or persisted outside of the Secret.
Setting up the JAMF Pro Connector Connector
Use the following steps to create a new Query Federated Search Connector for JAMF Pro Connector.
-
Navigate to the Connectors page, select Add Connector, and selectJAMF Pro Connector from the
Mobile Device Managementcategory as shown below (FIG. 5). You can also search for JAMF Pro Connector using the search bar in the Add Connector page.
FIG. 5 - Locating the JAMF Pro Connector in the Query Federated Search platform
-
In the Configure Connector tab, add the following detail as shown below (FIG. 6):
-
Connector Alias Name: The human-readable name you want to give to this connector, you can provide the name of your JAMF Server or another easy-to-remember name for your analysts.
-
Default Login: Leave the default value:
Default Login. -
JAMF Server Name: The name of your JAMF Server, DO NOT place the full URL here. Copied in Step 6 of the Prerequisites section.
-
JAMF Client ID: The Client ID for your API Client, copied in Step 5 of the Prerequisites section.
-
JAMF Client Secret: The Client ID for your API Client, copied in Step 5 of the Prerequisites section.
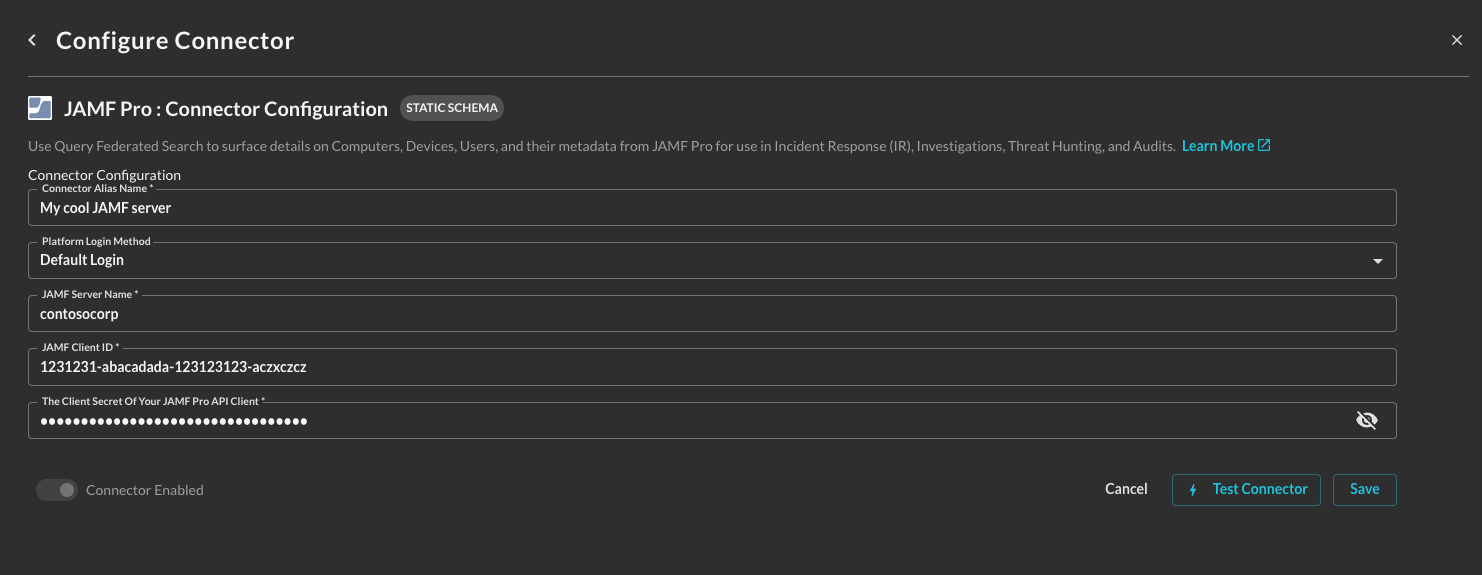
FIG. 6 - Configuring the Parameters for the JAMF Pro Connector
-
-
Select Save to save and activate the Connector.
-
Select Test Connection from the bottom-right of the connection pane to ensure that your API Client is enabled, that it has access to the right roles, and that you provided the right Server name to build an API URL from.
You will now see JAMF Pro Connector added as an available Connector within the Query Search and Query Summary Insights UI.
Resources
Troubleshooting Steps
- Check that you provided all
READprivileges for your API Role. - Check that you attached the correct API Role to your API Client.
- Check that you have Enabled your API Client.
- Check that you have provided the correct API Client ID and Client Secrets, that they were placed into the right parameter, and that they have not been regenerated. If they have, simply override the values in the Connector and save it again.
- Ensure that you have provided the correct Server name without any whitespaces or illegal characters, and ensure that you did not provide the full URL.
If you have exhausted the above Troubleshooting list, please contact your designated Query Sales Engineer or Customer Success Manager. If you are using a free tenant, please contact Query Customer Success via the Support email in the Help section, or via Intercom within your tenant.
Updated 9 days ago