Microsoft Defender for Endpoint
TL;DR
To integrate Microsoft Defender for Endpoint with Query:
- Setup the required connection parameters in Microsoft Graph Security API mentioned in the 'Prerequisites' section of this document.
- Add a Microsoft Defender for Endpoint connection source in Query with the connection parameters
- Test the integration with Test connection link.
- Perform searches for alerts based on device information or file hash. Search for devices and their details
Overview
Microsoft Defender for Endpoint is an enterprise endpoint security platform designed to help enterprise networks prevent, detect, investigate, and respond to advanced threats. By integrating with Query, you can:
- Search alerts for users' names, email addresses, devices, and file hashes.
- Get context on users and devices.
Prerequisites
Configuring Microsoft Graph API to access Defender for Endpoint data.
You must do the following steps to use the APIs and create the connection credentials. You can access Defender API with Application Context or User Context. Query will use the Application Context (Link) to access the Defender API.
- Create an Azure AD application Link
- Get an access token for using this application.
Microsoft Graph Security API permissions
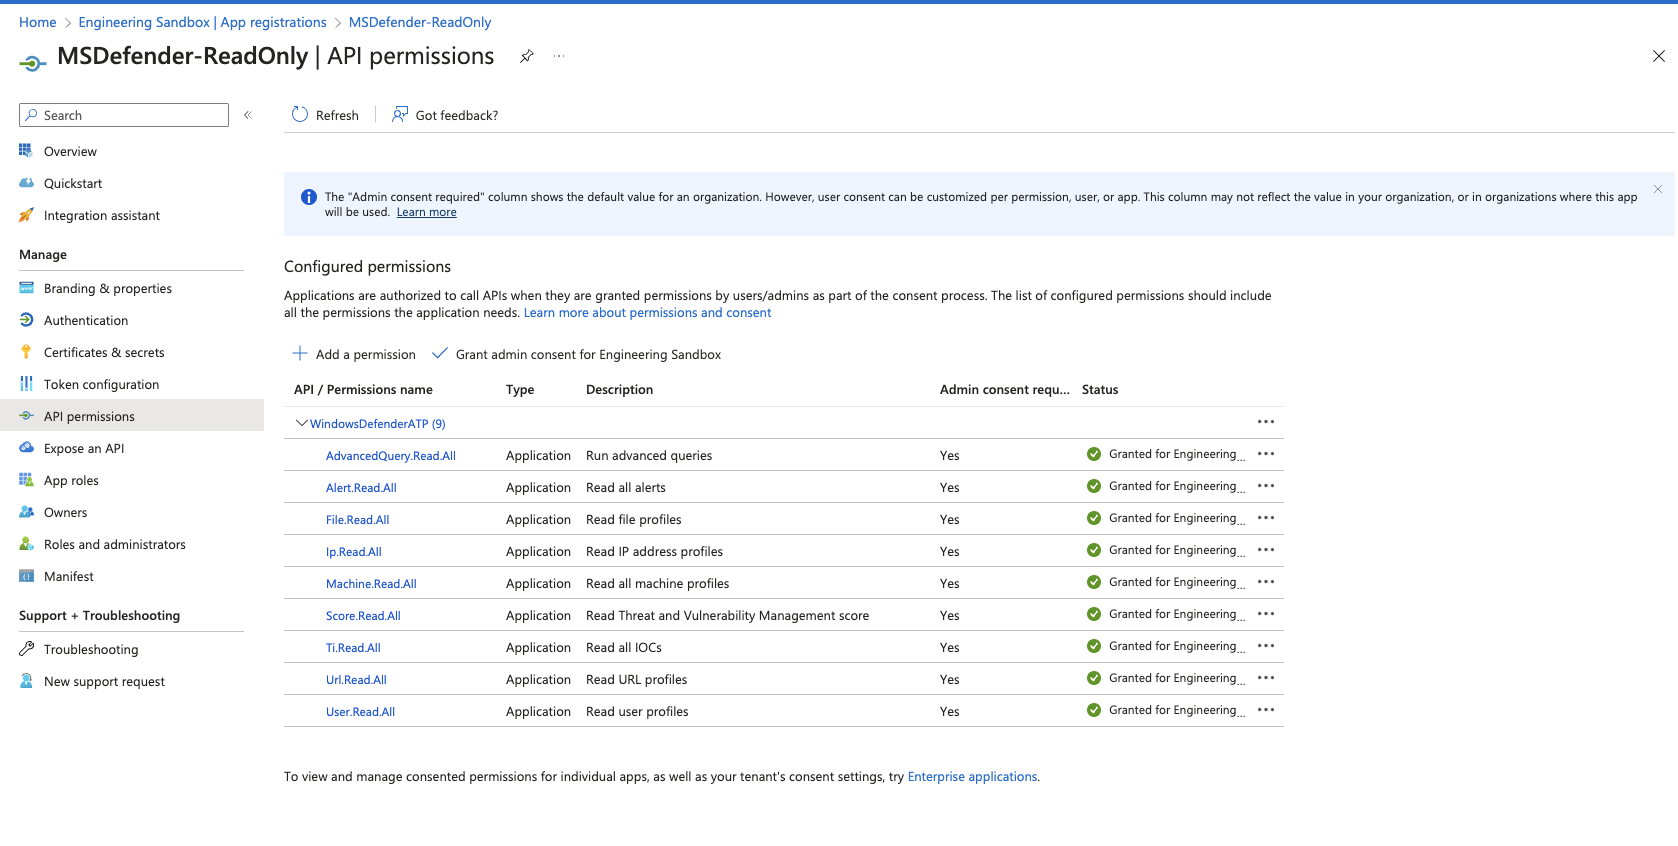
The following API permissions at a minimum are necessary for Query to search Microsoft Defender for Endpoint for alerts, device information, and others.
1. Select Organization's APIs:
- Navigate to the Request API permissions screen.
- Choose APIs my organization uses.
2. Locate 'WindowsDefenderATP':
- Use the search bar to type in
WindowsDefenderATP. - Click on
WindowsDefenderATPfrom the search results.
3. Set Application Permissions:
-
Click on Application Permissions. This allows Query to operate as a background service or daemon, independent of a signed-in user.
-
Grant the following API permissions:
AdvancedQuery.Read.AllAlert.Read.AllFile.Read.AllIp.Read.AllMachine.Read.AllScore.Read.AllTi.Read.AllUrl.Read.AllUser.Read.All
By following these steps, you'll ensure Query has the necessary permissions to function optimally.

Azure AD Application Connection Parameters
Make sure you obtain the following connection parameters from AAD Application to add it as a connection source in Query.
- Server URL - The API access URL
- Tenant ID - Azure Tenant ID
- Client ID - Azure Client/Application ID
- Client Secret - Azure Client Secret
Adding a connection source in Query
- Go to the Connections page, click Add Connections, and select Microsoft Defender for Endpoint source from the Endpoint category.
- In the General tab, add the following details
- Server URL - The API access URL
- Tenant ID - Azure Tenant ID
- Client ID - Azure Client/Application ID
- Client Secret - Azure Client Secret
- Click the Save button on the top right corner of the screen to save the connection source.
- To test the connection credentials, click on 'Test Connection.' You will see a successful connection message if the credentials are valid. If the test connection fails, then check if the connection parameters are correct. If necessary, change appropriately and retest.
Resources
- Configure Microsoft Defender for Endpoint APIs -
Updated 5 months ago